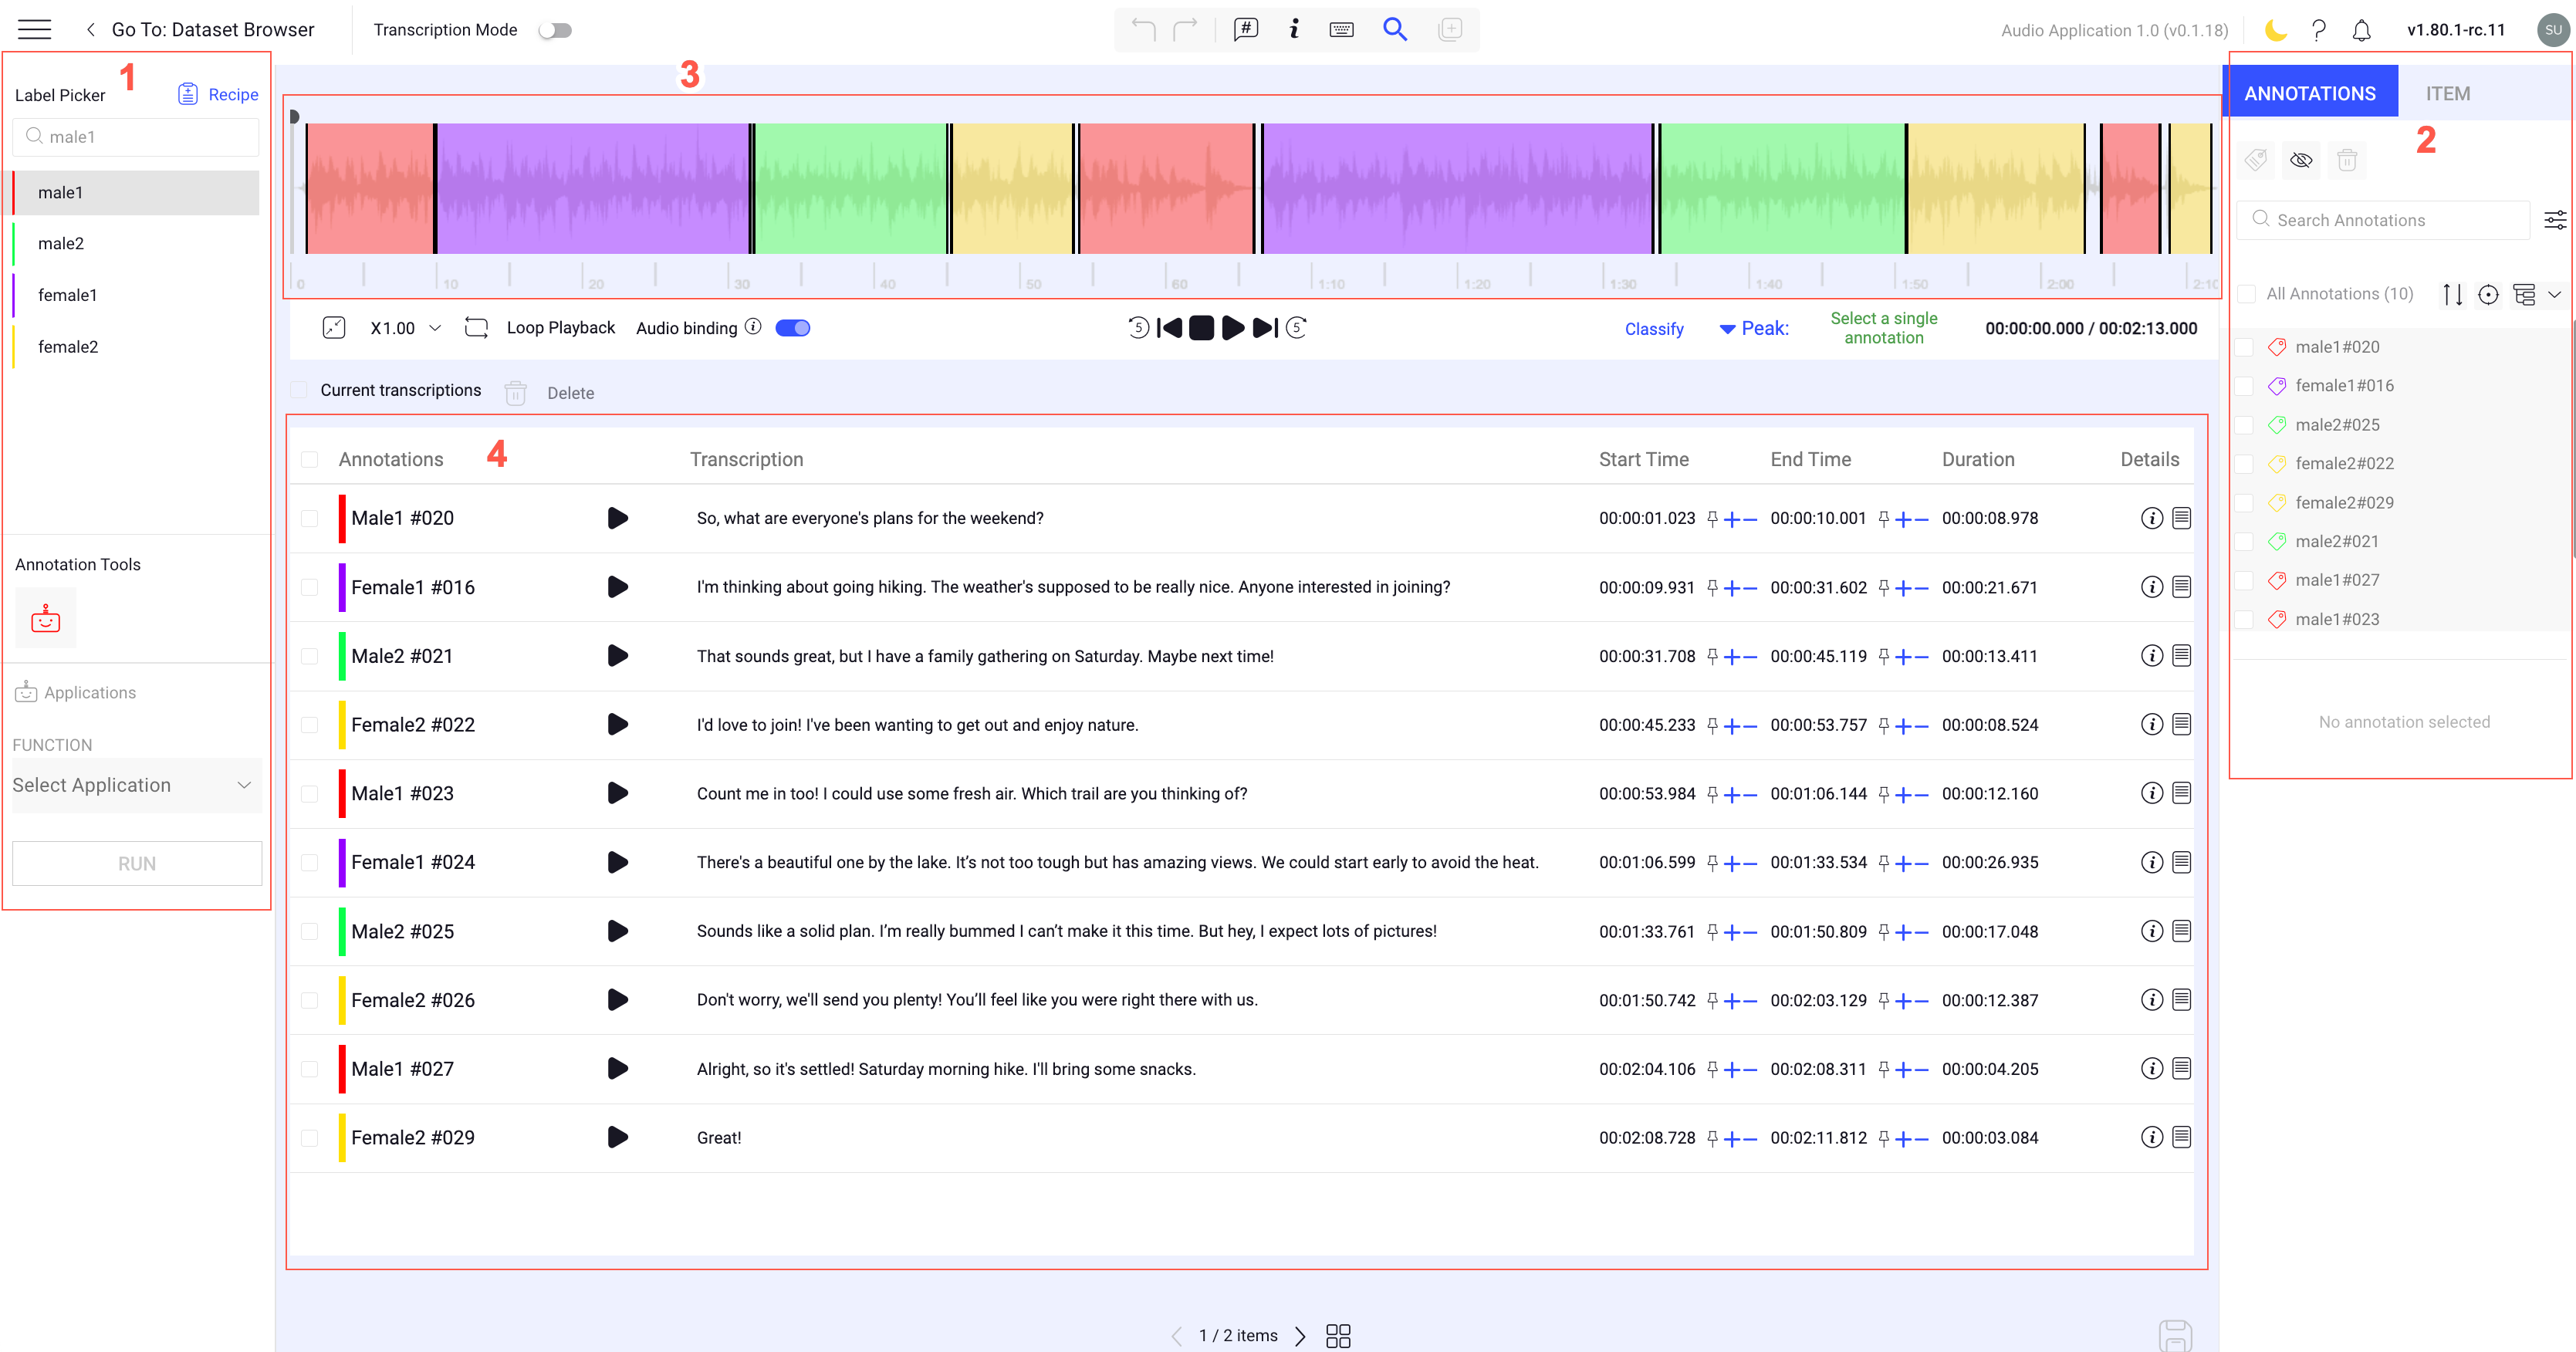
Overview
DDOE offers an audio studio that allows audio annotations per timeframe with transcription capability. It enables annotators to quickly annotate audio files for various purposes. Machine learning tasks such as speech-to-text model training, noise detection model training, translation, and more can be performed using DDOE Audio Studio.
Recipe Type - Legacy Recipe / Classic ML Recipe
Basic Operations
The basic operations related to audio files include the following:

Play: Click the Play icon to run the audio file.
Pause: Click the Pause icon to pause the audio file.
Stop: Click the Stop icon to stop the audio file.
Rewind 5 seconds: Click the left round arrow to go back 5 seconds of the audio file.
Skip 5 seconds: Click the right round arrow to go forward 5 seconds of the audio file.
Playback speed: You can adjust the speed of the audio file without affecting its pitch. Click on the current speed and select the relevant one from the list 0.5, 0.75, 1, 1.25, 1.5, and 2. By default, X1.00.
Classify: The Classify feature lets users make annotations on an audio file by using the position of their mouse pointer on the waveform (the visual representation of the sound). This means they can easily tag specific parts of the audio by pointing and clicking on the waveform.
Peak Amplitude (dB) (by default): Indicates the highest sound level within the selected segment (annotation). Select a single annotation to display the dB value. Click on the dropdown to display the Sound Meter option.
Sound Meter (dB): It provides measurement (in dB) of sound levels at the cursor's current point in the audio track.
Audio Binding: You can toggle this option from the control bar by using the slider (on/off modes).
ON mode (by default): while playing, selecting an annotation from either the audio signal or the annotation list will set the playback position at the beginning of this annotation.
OFF mode: Causes this binding to be removed, and moving between annotations either from the audio wave or from the annotation list will not change the audio play position.
Loop playback: This button enables the looping of a section of an audio item within the boundaries of the current selection range.
Loop back mode:
If an annotation is selected, it is played in a loop until either paused or it reaches the existing “loop playback” mode.
If no annotation is selected, the audio will loop back when it reaches the end.
Duration (01:30:04.768 / 02:30:04.768): The DDOE Audio Annotation Studio supports millisecond annotations for precise annotations. For example, the duration "01:30:04.768" represents "hh:mm:ss.milliseconds".
Audio Formats
The following audio file formats are supported in the Audio Studio, read more.
WAV
MP3
OGG
FLAC
M4A
AAC
Label Picker
A Label Picker is a feature within the annotation studio that allows you to pick or select labels to assign to specific objects or elements in the data being annotated. You can perform the following activities on the Label Picker section. The available labels are determined in the Recipe.
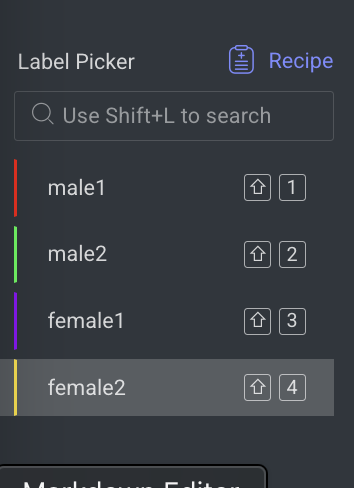
Scroll and click a label to activate it.
Use the search bar to easily find labels.
Resize the label list to better fit your number of labels by clicking and dragging the separator line.
Use the Shortcut keys to navigate between labels.
Annotation Type - Subtitle Type
Audio studio annotations are of Subtitle Type, enables adding transcription into the classification annotation. Refer to the Audio Item section to classify an audio file using the SDK.
Audio Classification Tool
Audio classification is the only annotation tool supported in the audio studio, and it allows you to classify the audio segments with the annotation labels available in the recipe.
Classify
The Classify feature lets you create annotations based on the position of your cursor on the audio waveform. Here's how you can use it:
Create Annotations and Transcriptions: Position your cursor on the desired point of the audio file to create annotations.
For example:
If you select the audio position at 15 seconds in a 30-second audio file and click Classify, an annotation will be created from the beginning to the 15-second mark.
If there is an existing annotation from 5 seconds to 10 seconds, the new annotation will be created from 10 seconds to 15 seconds.
Create Audio Annotations
Prerequisites: Ensure the recipe is properly configured for audio files, including Labels, Attributes, General Settings, Annotation Controls, Audio Settings, and other relevant options.
Open the Dataset Browser and select the desired audio file.
Double-click to open the file in the Audio Studio.
Play the audio file in order to hear the audio recording.
Select the desired label.
Identify the desired time frame (start and end points) to be annotated.
Drag the mouse on top of the waveform from the start point to the end point. The selected timeframe changes color to match the color of the label.
Note: A new annotation is created, and the new annotation is listed both on the annotation list and the transcription list.
Transcription Details
In the audio annotation studio, transcription is the process of converting spoken language in an audio file into written text. Audio Studio supports transcription tasks done by human labelers, or pre-annotations uploaded with transcription.
The Transcription table provides a list of annotations along with their transcriptions. Each transcription is linked to a specific annotation and its corresponding time frame. The table includes the following details:
Annotation's Label Name and ID: Identifiers for each annotation.
Audio Control: Play or Pause option for the audio segment.
Segment Start and End Times: Indicates the start and end times of a segment within the audio file. For example, "01:30:04.768" indicates that the segment begins at 1 hour, 30 minutes, and 4.768 seconds into the audio file.
Total Duration: The length of the segment within the audio file.
Annotation Info and Note Icons: Icons providing additional information and notes about the annotation.
Transcription Mode
Clicking on the toggle button for Transcription mode allows you to hide the left and right panels to have a clearer and larger view of the Audio Studio.
![]()
Transliteration Settings
Enable this option to type transcripts phonetically in your native language. As you enter text in English, it will be automatically converted into the selected script (e.g., Hindi, Tamil, Assamese). This is especially helpful for writing in regional languages without changing your keyboard layout.
Once a language is selected, it will remain active while navigating between items. This setting applies to both Assignments and the Dataset Browser.
Optional Feature
This is an optional feature. If you would like to enable it within your organization, kindly reach out to Dataloop.
![]()
Enable Transliteration
Open the Audio Annotation Studio.
Click on the
Transliteration Settingsicon from the top-bar to open the Transliteration Settings popup.Enable the Toggle button.
Select a specific language from the list.
Start typing in the transcription field to enter the texts in a specific language.
![]()
Add Transcriptions
Open the Audio Annotation Studio.
Create an annotation.
Click on the Transcription field.
Type the audio transcription in the Transcription field of the annotation.
Press the Enter or Return keys to save it. A new annotation is displayed in the annotations list located in the transcription column. The transcription saves the characters exactly as typed, allowing high accuracy in translation and speech-to-text tasks.
Note: To edit, click on the transcription at any time.
Using Classify
Select the required to be annotated interval in the time frame.
Click Classify. The Transcription text box is enabled.
Enter the transcription and press the Enter key to save the changes.
Using Classify While Playing the Audio
Start playing the audio file.
Once you reach the selected point to annotate in the time frame, click Classify. The Transcription text box is enabled.
Enter the transcription and press the Enter key to save the changes.
Find and Replace Transcriptions
Use the Transcription Finder function to find and replace transcription texts. Follow these steps to use the Transcription Finder function:
Open the Audio Annotation Studio.
Press the F key or click on the 🔍 icon from the top-bar to open the Transcription Finder popup.
Input the desired text in the Find What field to find it within the transcriptions.
To replace the text with another, input the new text in the Replace With field.
(Optional) Choose additional options as necessary:
Match case
Find whole word only
Click Find Text to highlight matching texts in the transcription.
If replacement is needed, click either Replace or Replace All. A confirmation message will be displayed.
Merge Transcriptions
Using this transcription feature, you can merge annotations.
Place your mouse cursor at the beginning of the transcription and press the Backspace or Delete key. The annotation will be merged with the previous annotation.
Split a Transcription
Using this transcription feature, you can split annotations.
Place the mouse cursor between the transcription words and press the Enter or Return key. A new annotation is created.
Remove Transcriptions
Identify the annotation from the list and click on the transcription. The Transcription text box is enabled.
Delete the text in the transcription box and press the Enter to save the changes.
Speaker Name
The speaker name identifies the person speaking in the audio as accurately as possible. It is linked to the label at the item level and does not carry over to other items.
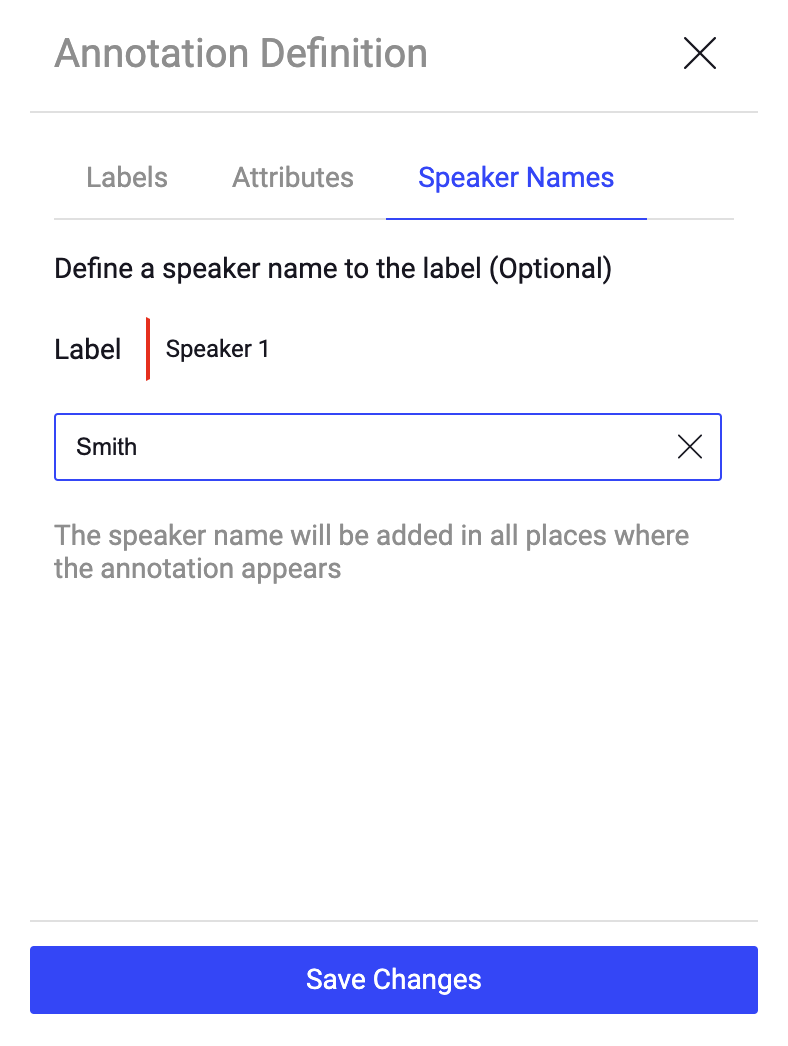
For example, if the task is transcribing a podcast and the labels are interviewer or guest, the annotator can add the name of the speaker once, and it will be relevant at that item level.
Note: The speaker name is optional to use, and it is up to the instructions of the task.
Set the Speaker's Name
Select the annotation from the annotations list.
Click on the Pencil icon. A pop-up window is displayed.
Select the Speaker Name tab.
Enter the name of the speaker.
Click Save Changes.
Create Overlapping Annotations
Identify the timeframe on the existing annotation where you need to create a new annotation.
Click the Shift key and drag the mouse to create an annotation on top of another annotation.
Edit Annotations' Start/End Time
Suggested below are multiple methods for editing the annotation start time and end time.
Use the + or - icons to adjust the end or start time.
Drag the annotation onto the waveform.
Use the pin icon to set a new start time or end time for the related annotation.
Zoom Annotations Interval
There are two options to zoom an annotation interval.
Zoom in via the mouse
Click the relevant annotated interval on the time frame.
Use the mouse's scroll wheel to zoom in on the interval.
Zoom in at once via a double click
Click the relevant annotated interval on the time frame.
Double-click the mouse to zoom in on the interval.
Zoom Out
Click the relevant annotated interval on the time frame.
Use the mouse's scroll wheel to zoom out the interval, or
Use the Fit to screen icon to return to its original size.
Modify Annotations' ID
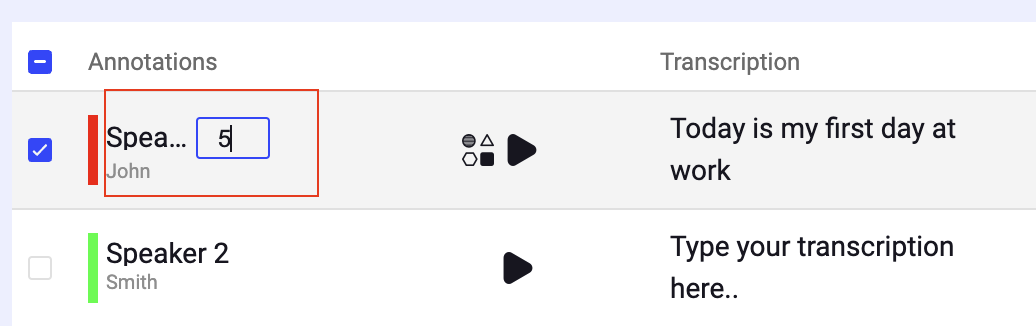
Click on the annotation label. It enables the ID field to be modified.
Modify the value and press the Enter key.
Audio Annotation - JSON Output
You can export the audio annotations in the JSON format.
More Details
Annotations tab
The Annotations tab on the right-panel allows you to control and manage annotations involves utilizing the annotations list and attribute controls, particularly when attributes are configured in the Recipe.

Learn more about the annotations and actions available.
Item tab
The Item tab displays information according to the type of the selected item.
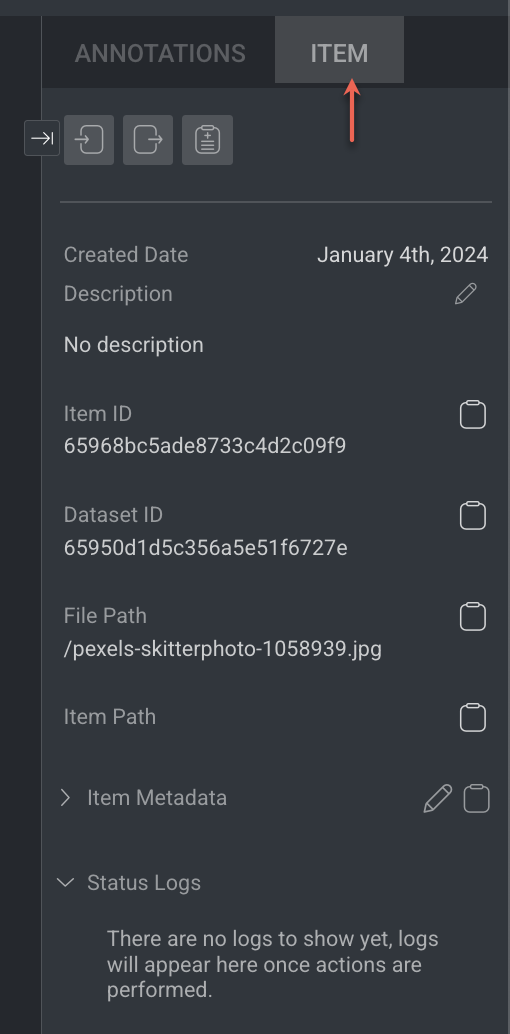
Learn more about the item and actions available.
Item Info & Controls (Top-Panel)
Item Info & Controls are available depends on the type of annotation studio. For the detailed information, refer to the following articles.

Item's View Controls (Bottom-Panel)
The controls on the bottom-side panel display based on the annotation contexts and work controls.
![]()
Workflow Context
Assignment controls, including moving between items, displaying the item gallery, and the status buttons (Complete / Discard). It displays only while working on an annotation or QA task.
Browse between the assignment items using the Left and Right arrows.
Open the Thumbnails' gallery viewer, and click a thumbnail to open that item.
Save button: Clicking the button when it is enabled triggers saving changes to the DDOE platform, before the auto-saving feature takes care of that.
Status buttons: Complete and Discard.
View Controls
From left to right, work controls at the bottom panel.
Keyboard Shortcuts
General Shortcuts
| Action | Keyboard Shortcuts |
|---|---|
| Save | S |
| Delete | Delete |
| Undo | Ctrl + Z |
| Redo | Ctrl + Y |
| Zoom In/Out | Scroll |
| Change Brightness | Vertical Arrow + M |
| Change Contrast | Vertical Arrow + R |
| Pan | Ctrl + Drag |
| Search Labels | Shift + L |
| Search a label | Shift + 1-9 (for the sub-labels, use the Tab key) |
| Navigate in label picker | Up and Down arrows |
| Select label in label picker | Enter |
| Tool Selection | 0-9 |
| Move selected annotations | Shift + Arrow Keys |
| Previous Item | Left Arrow |
| Next Item | Right Arrow |
| Add Item Description | T |
| Mark Item as Done | Shift + F |
| Mark Item as Discarded | Shift + G |
| Enable Cross Grid Tool Helper | Alt + G |
| Hold G to show Cross Grid Measurements | G |
| Go to annotation list | Shift + ; |
| Navigate in annotation list | Up and Down arrows |
| Select/deselect an annotation | Space |
| Hide/Show Selected Annotation | H |
| Hide/Show All Annotation | J |
| Show Unmasked Pixels | Ctrl + M |
| Hide/Show Annotation Controllers | C |
| Set Object ID menu | O |
| Toggle pixel measurement | P |
| Use tool creation mode | Hold Shift |
| Copy annotations from previous item | Shift + V |
Audio
Action | Keyboard Shortcuts |
|---|---|
Toggle Play/Pause | Space |
Previous Annotation | < |
Next Annotation | > |
Decrease Play Speed | [ |
Increase Play Speed | ] |
Stop | Backspace |
Activate zoom button | - |
Fit to screen | = |
Toggle Audio Binding | / |
Jump 20 seconds backward | Z |
Jump 10 seconds backward | X |
Jump 5 seconds backward | C |
Jump 5 seconds forward | V |
Jump 10 seconds forward | B |
Jump 20 seconds forward | N |
Set current transcription start time | \ |
Set current transcription end time | " |
Edit selected annotation transcription | Ctrl + A |
Save transcription | Ctrl + S |
Open Search Modal (Transcription Finder) | F |