Quality Task Types
- 25 Feb 2025
- Print
- DarkLight
- PDF
Quality Task Types
- Updated On 25 Feb 2025
- Print
- DarkLight
- PDF
Article summary
Did you find this summary helpful?
Thank you for your feedback
Overview
Quality tasks in Dataloop are designed to ensure the accuracy and reliability of annotations. Each task type offers unique functionality for managing and assessing data quality. The types of quality tasks are as follows:
Applicable only in the Distribution Assignee Allocation method
The Quality task types are only available when Distribution is selected as the Assignee Allocation method.
- Purpose: To ensure quality control by comparing annotations from multiple contributors.
- Functionality:
- Facilitates the comparison of annotations made by different contributors on the same item.
- Ensures consistency and reliability by calculating consensus metrics.
- Allows for more items to be annotated within a single task.
- Use Case: Ideal for tasks requiring alignment among multiple annotators working on the same data. The task calculator helps estimate the scope and scale of the task, providing clarity on workload distribution.
- Purpose: Qualification tasks create an assignment over entire selected data for each of the assignees. By having ground-truth annotations, a score is calculated and provided for each of the assignees.
- Functionality:
- Assigns the entire dataset or a subset to multiple contributors.
- Uses ground-truth annotations to calculate scores for each contributor.
- Helps in evaluating and qualifying contributors based on their annotation performance.
- Use Case: Useful for verifying contributors' skills before assigning critical tasks.
- Purpose: Dataset creation from multiple annotators.
- Functionality:
- Integrates annotations from multiple contributors.
- Identifies discrepancies and generates high-quality, consensus-driven annotations.
- Use Case: Suitable for creating datasets that require inputs from multiple annotators to ensure quality.
Task scoring process
A new Function called Score function will handle annotation scoring for items in tasks. The default function can be replaced with custom functions by users.
Scoring functionality is tied to specific task types: Consensus, Qualification, and Honeypot tasks.
- Task Setup:
- Scoring is enabled by default for these task types.
- A scoring pipeline is created with the same name as the task.
- The pipeline runs automatically, and users can manage it (stop, edit, or replace the scoring function).
- Function Deployment:
- Scoring functions use project resources and affect billing.
- Scoring resets if the item's status changes.
- Analytics:
- A new scores tab provides insights:
- Metrics for contributors, items, annotations, and labels.
- Average IOU (Intersection Over Union) and labels consensus scores.
- Histograms and bar charts for annotation and item scores.
- Drill-down capabilities for detailed exploration.
- Confusion Matrices:
- Contributors-Agreement matrix.
- Labels confusion matrix with clickable cells to explore respective items.
- A new scores tab provides insights:
- Behavioral Notes:
- Scoring resets when an item's status is updated.
- Tasks created via SDK enable scoring by default.
Consensus
The Consensus is an important quality control feature, allowing you to compare annotations by different users on a specific item and generating majority-vote based, high-quality data.
How consensus works
When consensus is enabled for a labeling task, it is configured with the percentage of items to cover and the number of assignees. Dataloop automatically creates copies of the items and assigns them randomly to contributors.
Key Points:
- Task Browsing: Only the original items are visible when browsing the task.
- Assignment Browsing: Users can view the specific copies assigned to them within their assignments.
- Annotation Merging: Once all copies of an item are assigned a status (e.g., "Completed"), the system merges the annotations back onto the original item. Until then, the original item will not display the annotations from its copies.
- Data Download: When downloading consensus data, the JSON file includes all annotations made by different users, along with their usernames. This allows users to calculate their own scores and determine which annotations are of the highest quality.
Set up a consensus task
To set up a task with consensus, follow the instructions:
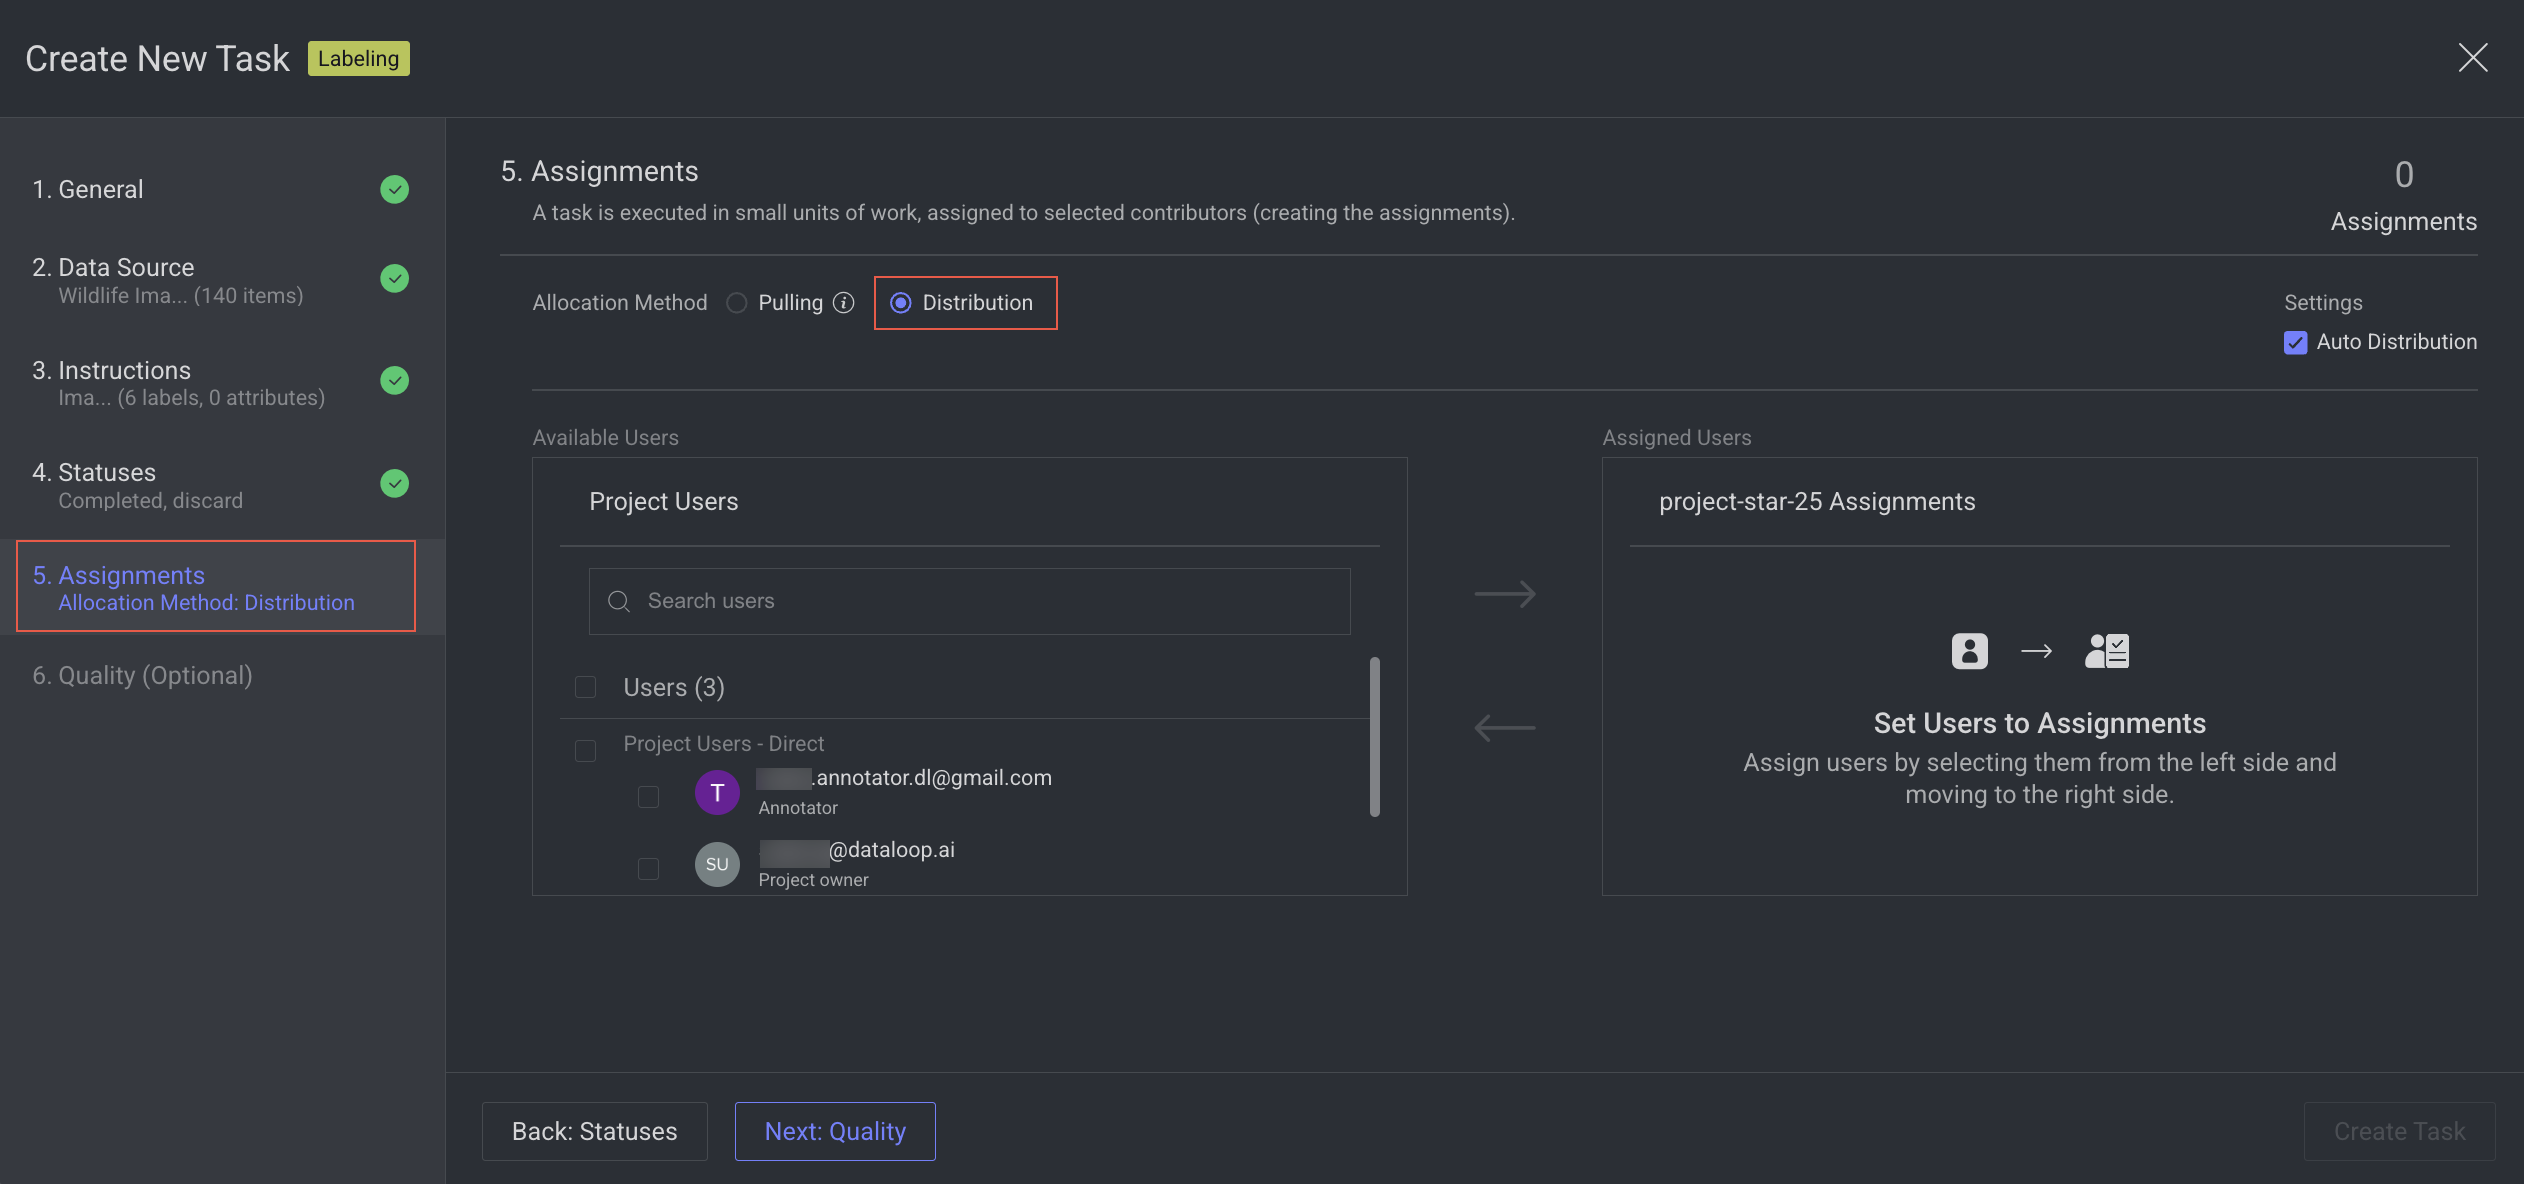
- Start a new labeling task and provide all the required information for Data and other steps.
- At the Assignments step of the Label task creation: Ensure you select Distribution as the Assignee allocation method.
- The Quality task types are only available when Distribution is selected as the Assignee Allocation method.
- Syncing Datasets with Consensus Task: Cloned external datasets (AWS, GCP, Azure) cannot be synced with a consensus task.
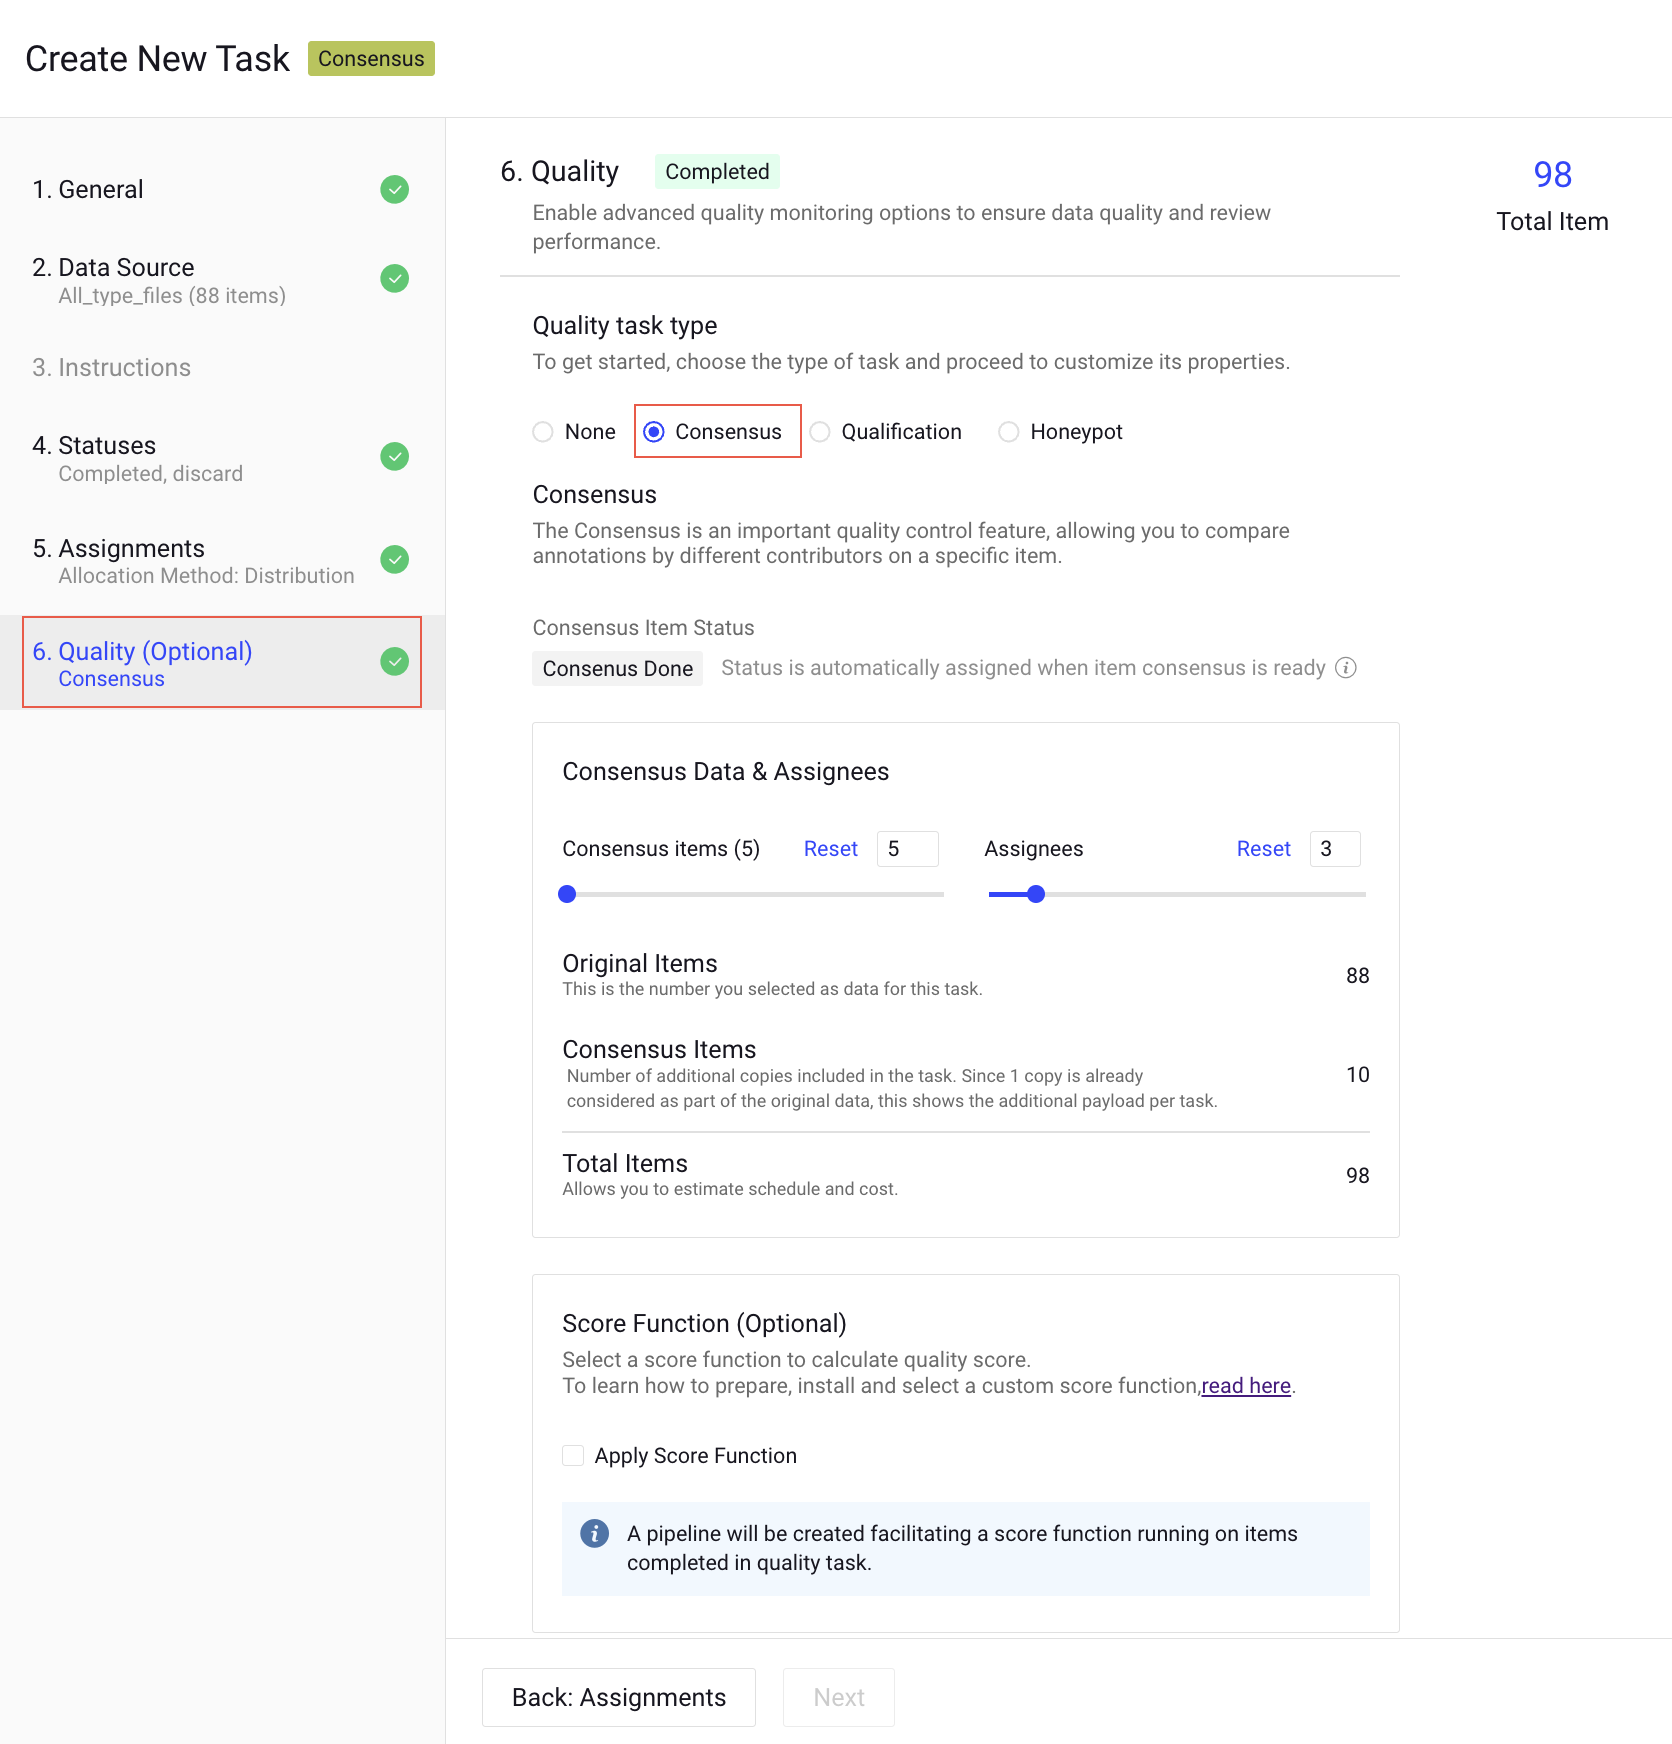
- Switch to the Quality step and enable the consensus feature.
- Consensus Data & Assignees:
- Consensus items: Define the Consensus items for consensus, up to 100% of the items in the task. As you change the percentage of items, the exact number of consensus items is calculated and shown.
- Assignees: Define the Users for consensus as the number of copies per item (minimum 2).
- Original Items: This is the number of items you selected as Data for this task.
- Consensus Items: The number of additional copies included in the task. Since one copy is already considered part of the original data, this shows the additional payload per task.
- Total Items: It allows you to estimate the schedule and cost.
- Score Function (Optional): Select a score function to calculate quality score. Clicking on the Apply Score Function, a pipeline will be created facilitating a score function running on items completed in the quality task.
Consensus in the QA workflow
Consensus is integrated into the QA workflow to enhance annotation quality. Reviewers can evaluate items containing annotations from multiple contributors, flag issues, and create note-annotations to trigger corrections.
Workflow Steps:
- Flagging Issues: Reviewers identify errors in annotations and provide feedback through notes or flags.
- Annotator Corrections:
- Annotators correct their work and set the item's status to Complete.
- The original annotations are removed from the master item, and the corrected annotations are copied over to ensure higher-quality work.
- Final Review: Reviewers re-evaluate the corrected annotations and set the item's status to Approve once it meets quality standards.
Consensus score
Quality task scoring is now available for items, annotations, and users. When creating a task with Consensus enabled, a scoring function is activated to evaluate all users, items, and annotations. Detailed scoring insights can be accessed through the new Scores tab on the Analytics page.
Benefits of Consensus Scoring with Application Integration:
- Customizable Scoring: Calculate consensus scores using your preferred methods and thresholds (e.g., IOU).
- Dataset Management: Move or clone items and annotations to a majority-vote dataset for use in training or testing.
- Pipeline Integration: Trigger further processing for annotations with high scores in the pipeline workflow.
To learn more about the Dataloop Scoring Function, see the Scoring and metrics app README file.
Redistribute or reassign consensus tasks
Dataloop consensus tasks currently have the following limitations:
- Redistribution Restriction: To ensure consistency in quality evaluation, consensus tasks cannot be redistributed once created.
- Reassignment Rules: Consensus assignments can only be reassigned to users who have never had an assignment in the task. This prevents scenarios where a single annotator works on multiple consensus copies of the same item.
To reassign:
1. Open the Labeling > Tasks page.
2. Double-click on the consensus task. The Assignments tab is displayed.
3. Select the assignment to be reassigned.
4. Click on the Assignment Actions and select the Reassign from the list. The Reassign Assignment window of the Edit Task will be displayed.
6. Select a new user from the list and click Apply Reassignment.
Qualification
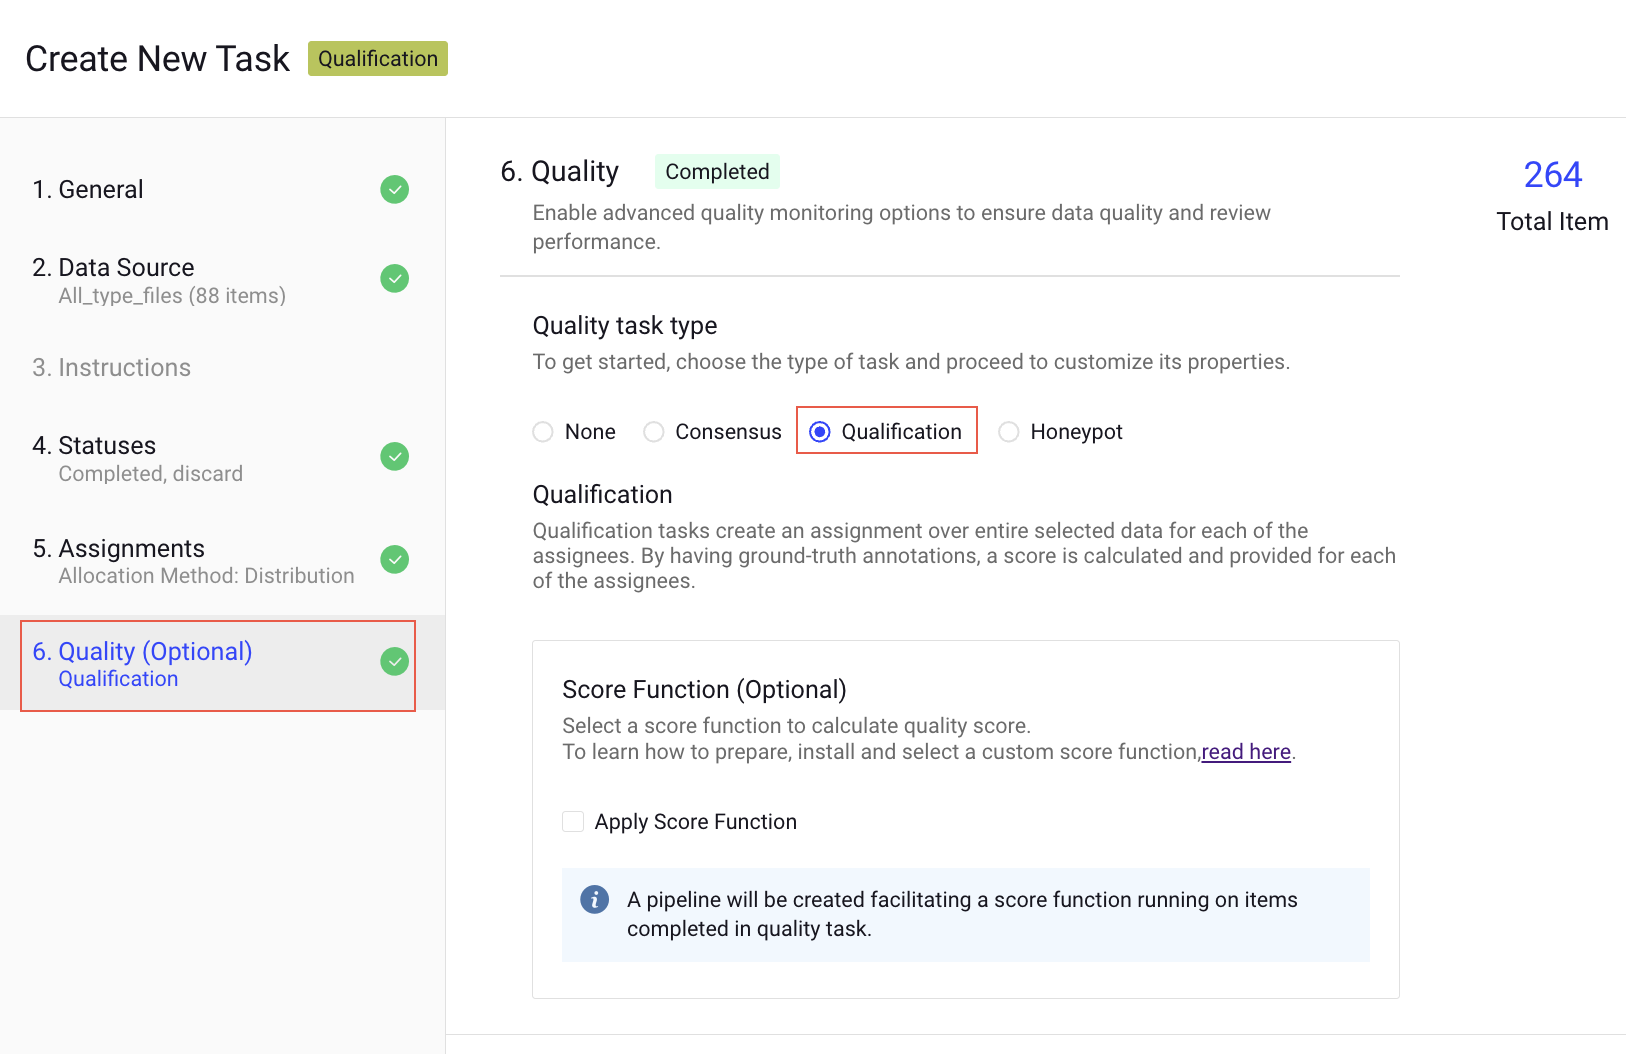
Qualification tasks create an assignment over entire selected data for each of the assignees. By having ground-truth annotations, a score is calculated and provided for each of the assignees.
How qualification works
Qualification tasks provide a tool to evaluate annotators' skills and performance by letting them work on a 'test' task that has ground-truth answers hidden from them. After completing their work (the assignment-completed event), scores can be calculated by comparing annotations in items in their assignment with ground-truth annotations from the original data.
Unlike consensus tasks, the annotator's work is not merged back into the original item, maintaining it as a clean qualification-test copy. By creating multiple qualification tests in the project context, managers can obtain insights into annotators' performances with various data (for example, image and video) and tools (box, polygon, etc.).
Setting up qualification tasks
To set up a qualification task, follow these instructions:
- Start a new labeling task and provide all the required information for Data and other steps.
- At the Assignments step of the Label task creation: Ensure you select Distribution as the Assignee allocation method.
The Quality task types are only available when Distribution is selected as the Assignee Allocation method.
- Switch to the Quality step and enable the Qualification feature.
- Select the Apply Score Function, if required. A pipeline will be created facilitating a score function running on items completed in the quality task.
Continuous qualification task
Qualification tasks by nature never ends. Any new user added to them as an assignee receives an assignment that includes all items. This allows for creating a qualification test once in a project and using it for testing new annotators along the project's lifecycle.
Qualification score
When selecting to enable qualification score, a Pipeline is created with 2 nodes:
- Task node - the qualification task itself
- Application (FaaS) node - running Dataloop default score function.
Dataloop default score function is in our GIT repository, and includes documentation of how score are calculated and saved for the different annotation types.
As such, you can fork our GIT repo and customize the score function to facilitate your custom logic, then add it as a new Application (FaaS) and place it in the Pipeline instead of the default Dataloop score function.
To learn more, contact the Dataloop team.
Honeypot
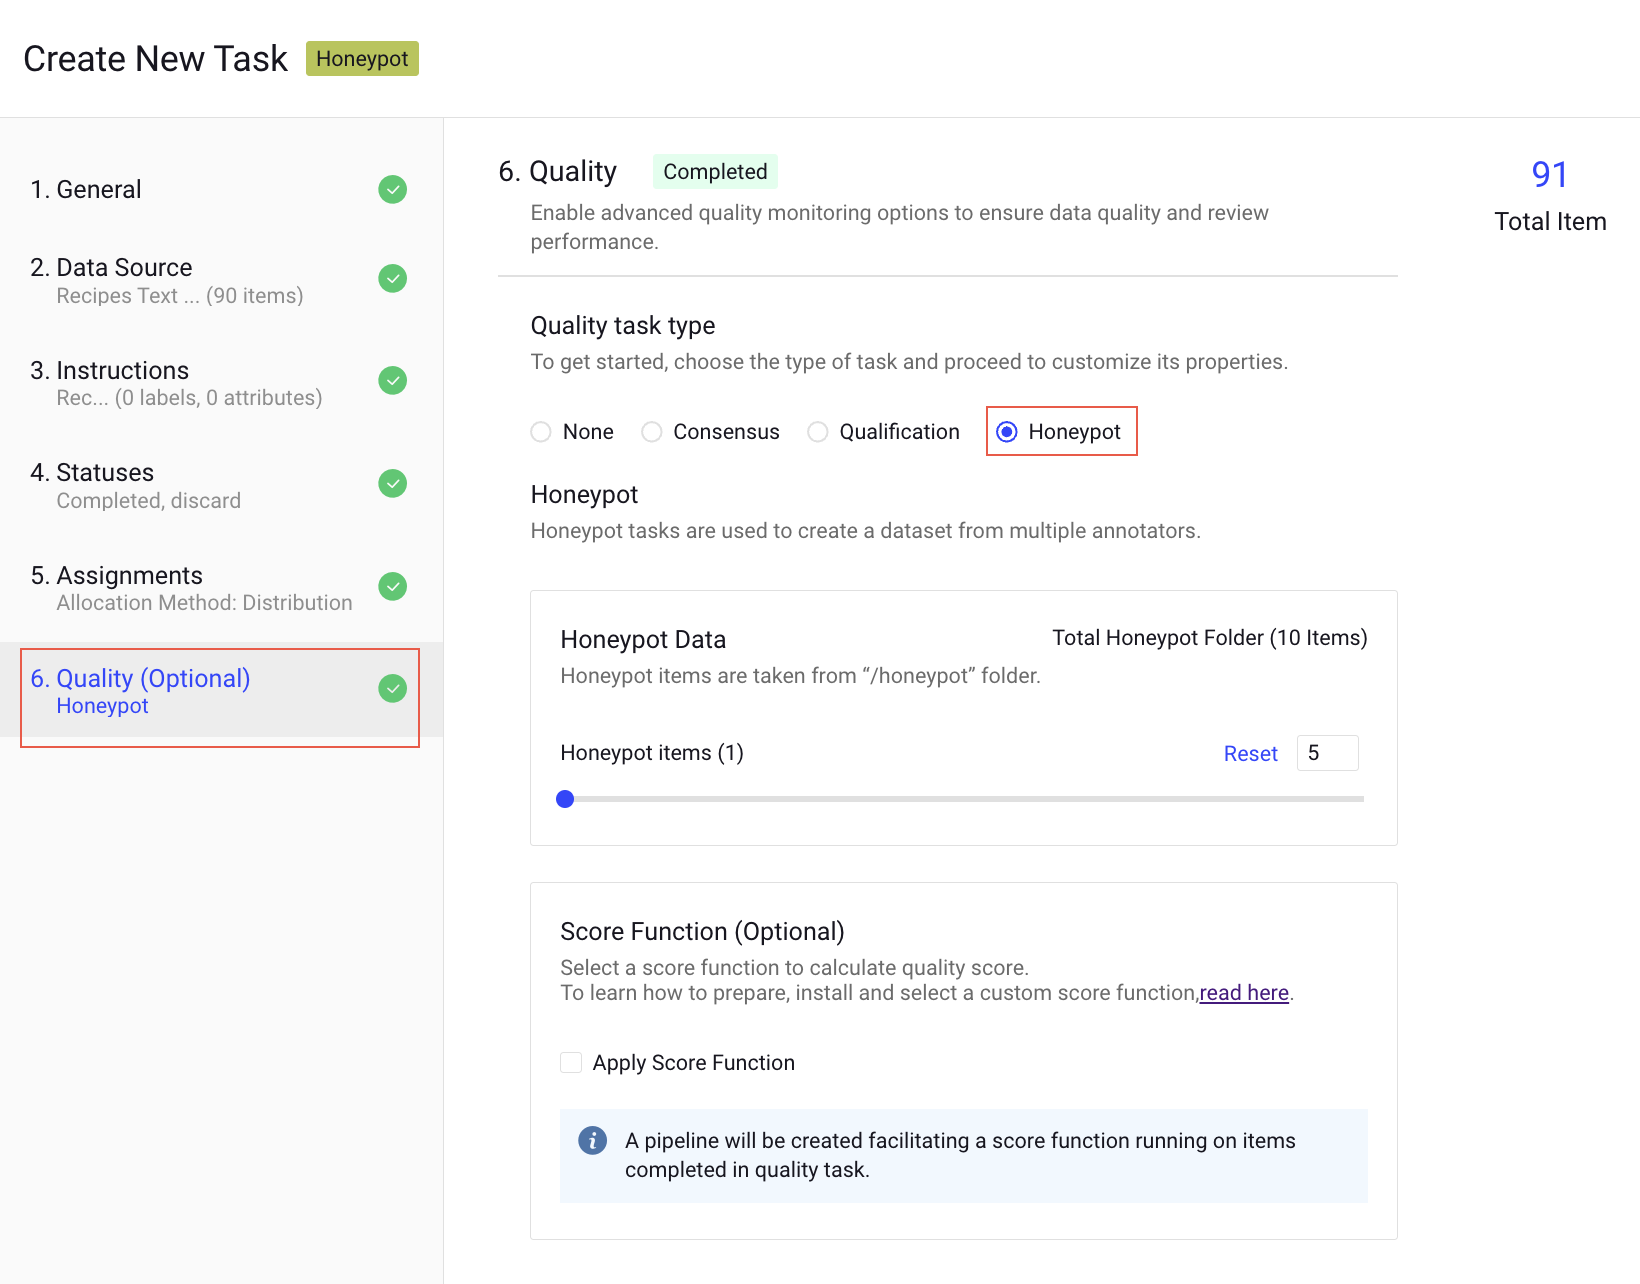
Honeypot tasks are used to create a dataset from multiple annotators.
How honeypot works
While Qualification tasks assess annotators' skills through initial testing, Honeypot tasks continuously monitor their performance, quality, and accuracy during real-world annotation. This is achieved by embedding items with known ground truth within tasks containing raw data. The annotators' scores are calculated based on their accuracy on these honeypot items, providing an ongoing estimate of the quality and reliability of their annotations on raw images.
Setting up honeypot tasks
To set up a honeypot task, follow these instructions:
- Prepare ground-truth data in the
/honeypotfolder of the same dataset where the raw data resides. - Start a new labeling task and provide all the required information for Data and other steps.
- At the Assignments step of the Label task creation: Ensure you select Distribution as the Assignee allocation method.
The Quality task types are only available when Distribution is selected as the Assignee Allocation method.
- Switch to the Quality step and enable the Honeypot feature.
- Set the percentage of honeypot items out of all items in the task. For example, setting it to 5% means that 5 out of every 100 items will be items with ground truth. If there are not enough honeypot items to cover the percentage requested, more raw items will be used.
- Select the Apply Score Function, if required. A pipeline will be created facilitating a score function running on items completed in the quality task.
Honeypot Score
Honeypot scores can be integrated as part of a FaaS (with an event trigger or in a pipeline) and provide the annotator's score. Dataloop provides a default score function, but any custom function that runs over the assignment items (taking only the relevant honeypot ones) can be used for that purpose.
To learn more about the Dataloop Scoring Function, see the Scoring and metrics app README file.