Labeling Tasks
A Labeling Task in Dataloop is a defined unit of work that assigns a specific set of data items—such as images, videos, audio, or documents—to one or more annotators for labeling.
Create a Labeling Task
To create a labeling task, follow the steps below:
Information
Once each step is completed, it will appear in green with a checkmark next to it on the step list. A red exclamation mark is displayed if it is incomplete.
Open the Labeling from the left-side menu.
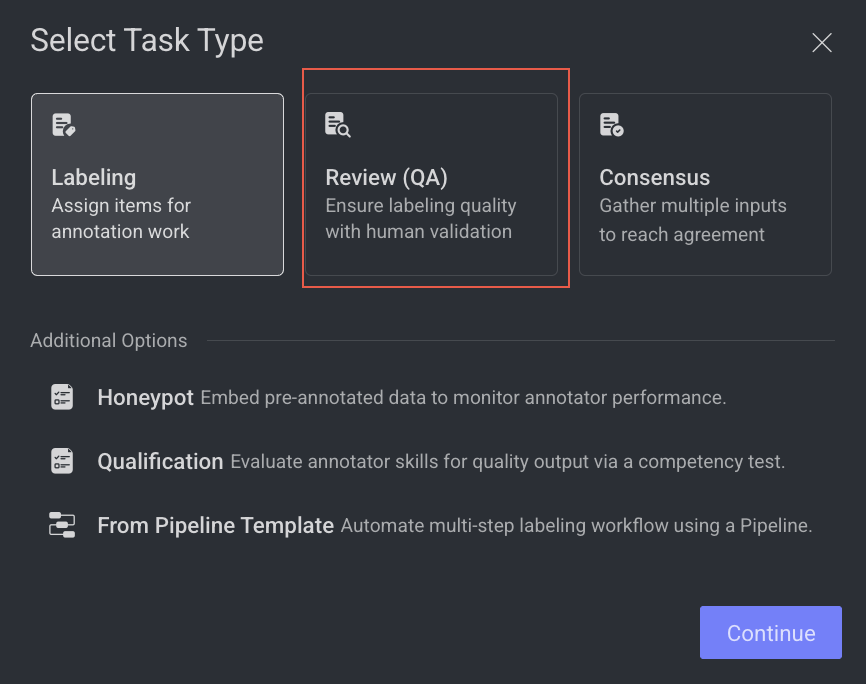
Click Create Task. The task type section popup is displayed.
Select the Labeling from the popup.
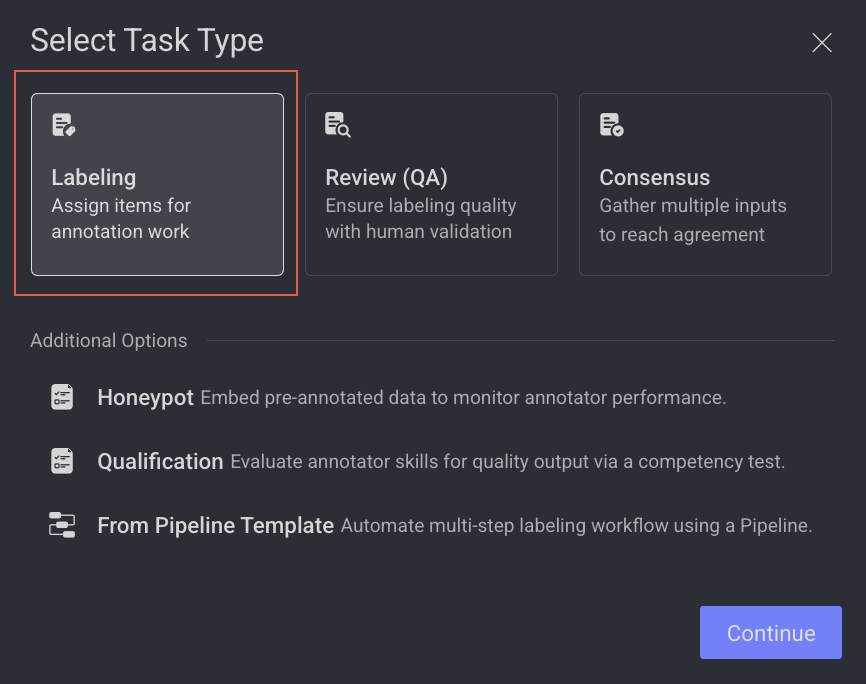
Click Continue. Complete the following sections to complete the task creation.
1. General
In the General section, enter or select the required details:
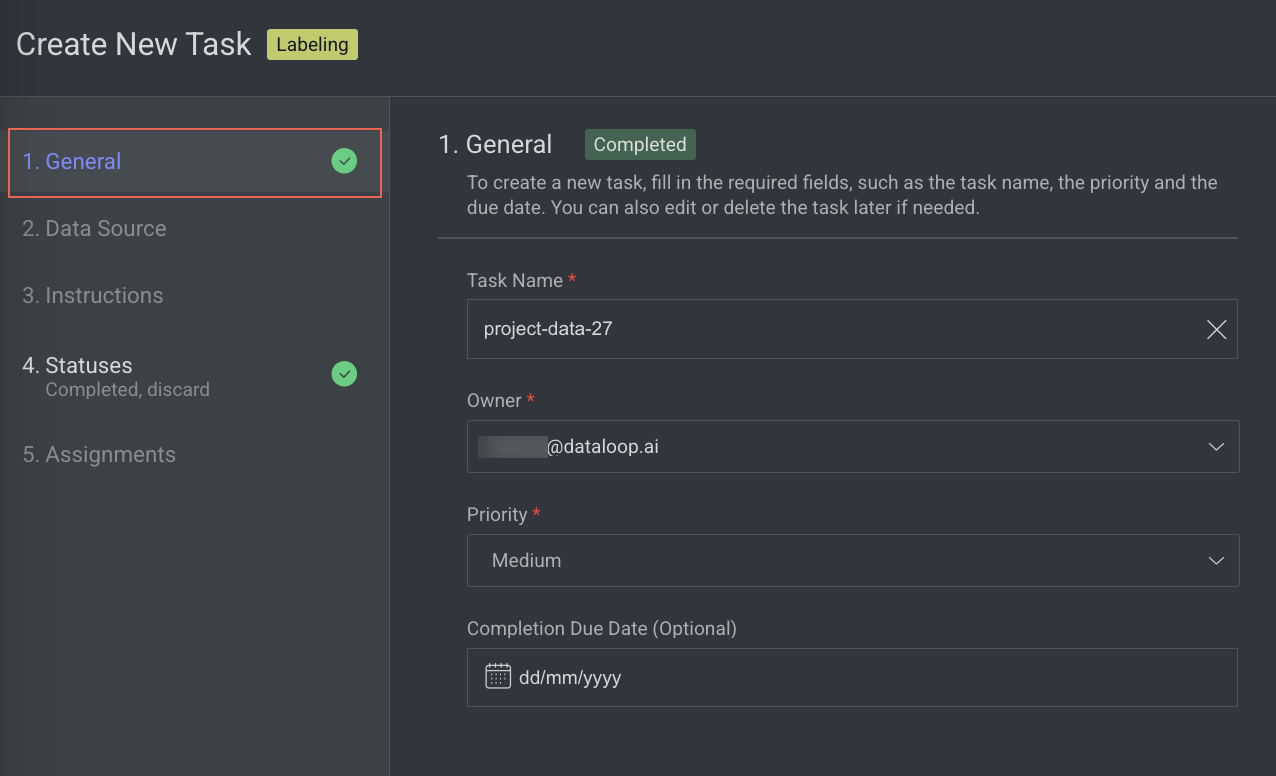
Task Name: Enter a name for your new task. By default, the project name + (total number of tasks + 1) is displayed.
For example, if the project name is abc and the total number of tasks you have already is 5, then the new task name is abc-6.Owner: By default, the current user's email ID is displayed. Click on it to select a different owner from the list.
Priority: Select a priority from the list. By default, Medium is selected.
Completion Due Date (Optional): Select a task due date from the calendar. If a date is chosen, you will have the option to lock the task once the due date has passed.
Lock Task After Due Date: When enabled, all assignments in this task will be locked for editing after the due date passes. Read here to unlock the task.
Click Next: Data Source.
2. Data source
In the Data Source section, enter or select the required details:
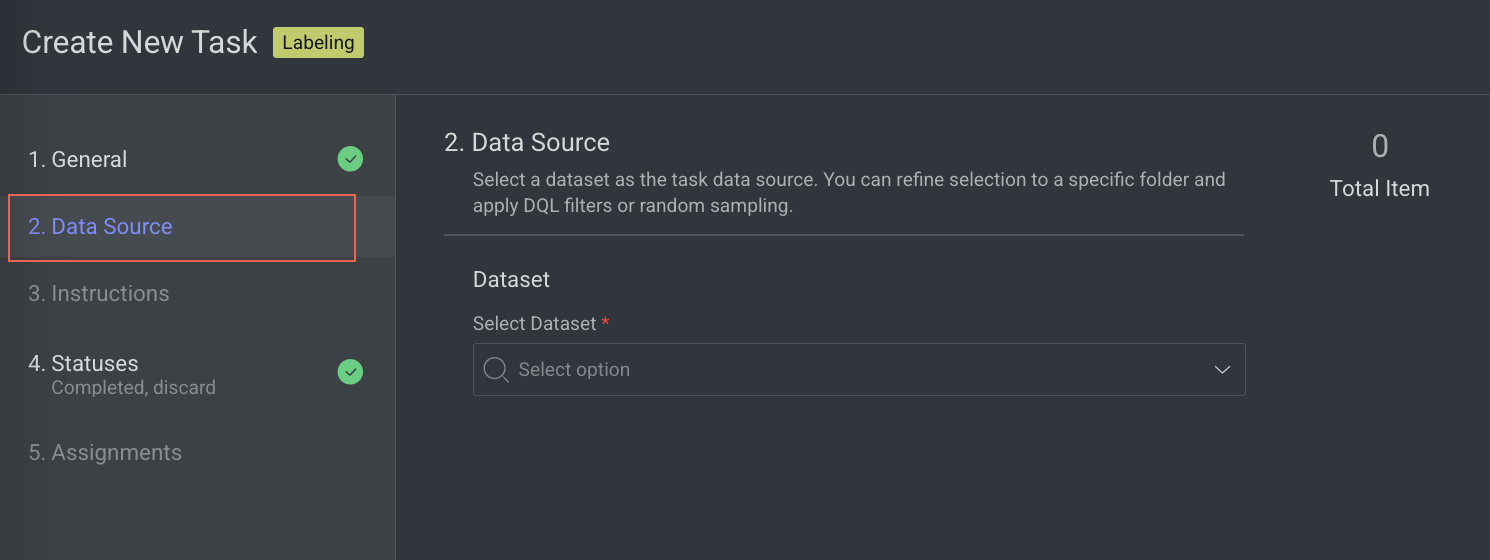
Select Dataset: By default, the selected dataset name is displayed, click on it to select a different dataset. The Dataset field is disabled, if you select any particular item(s) in the Dataset.
Note:
You cannot create a task with a dataset that contains items 80,000 or above. To use this dataset, sampling must be done or replaced with another dataset. You can view the number of total items on the top-right side of the page.
Filters (Optional) : Refine data selection by selecting specific folders, using DQL filters, or sub-sampling (randomly and equally distributed). The Folder or DQL field is Active only if you do not select any items in the Dataset.
Folders: Select a folder from the dataset, if available.
Selected Filters / Saved DQL Query: Select a filter or saved DQL query from the list, if available.
Data Sampling: Enter the Percentage or Number of Items for the task. Data sampling does not give an exact number of items.
Percentage: The option selects the items randomly. For example, if the percentage is 100% for four items, then 75% is for three items (It can be 1/4, 3/4, or 4/4) from the selected dataset. *
Number of Items: The allows you to select the items sequentially from the start of the dataset, not randomly.
Collections: Choose a collection from the list to filter and display items within the selected collection.
(Optional) WebM Conversion: By default, Enforce WEBM conversion of video items for frame-accurate annotations is selected.
Click Next: Instructions.
3. Instructions
In the Instructions section, enter or select the required details. The number of Labels and Attributes is displayed on the top-right side of the page:
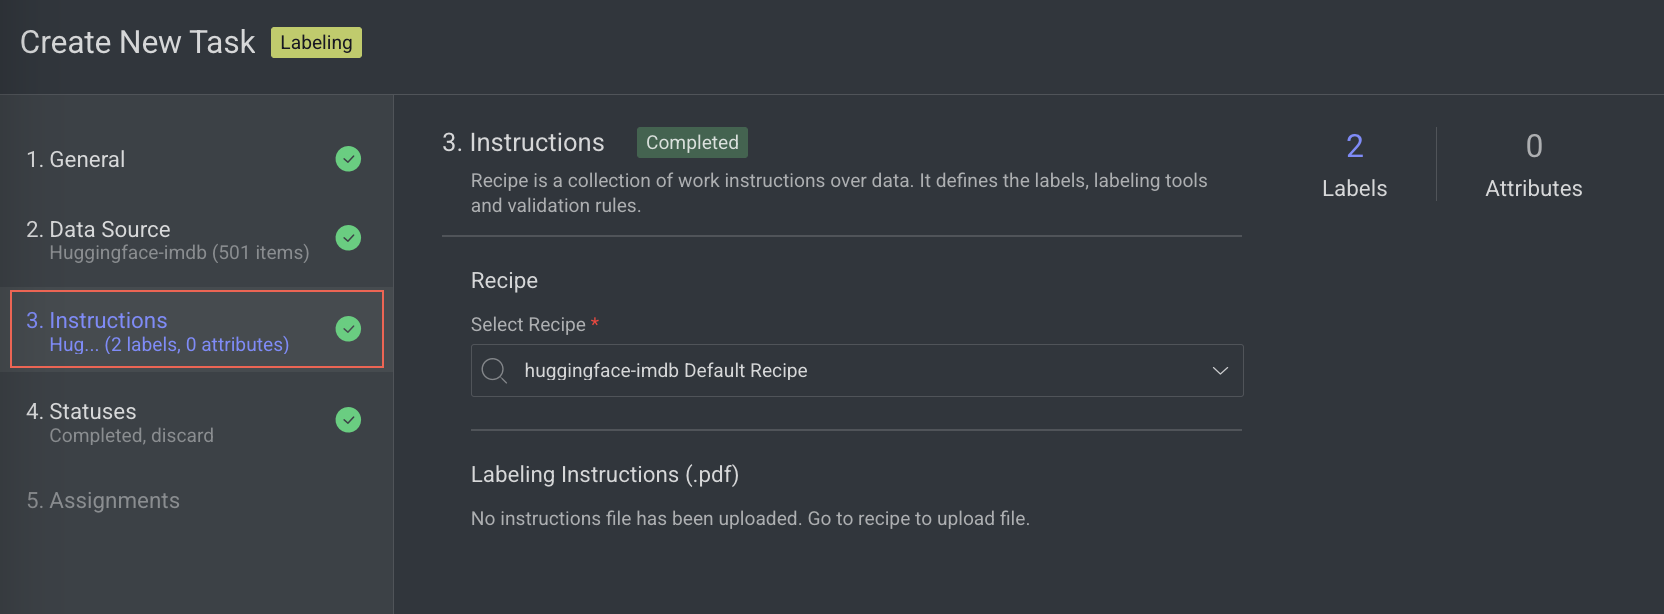
Recipe: By default, the default recipe is displayed. Select a recipe from the list, if needed.
Labeling Instructions (.pdf): The labeling instruction document is displayed, if available. Go to the Recipe section to upload a PDF instruction. You can select the page range accordingly.
Click Next: Statuses. The Statuses section is displayed.
4. Statuses
In the Statuses section, enter or select the required details
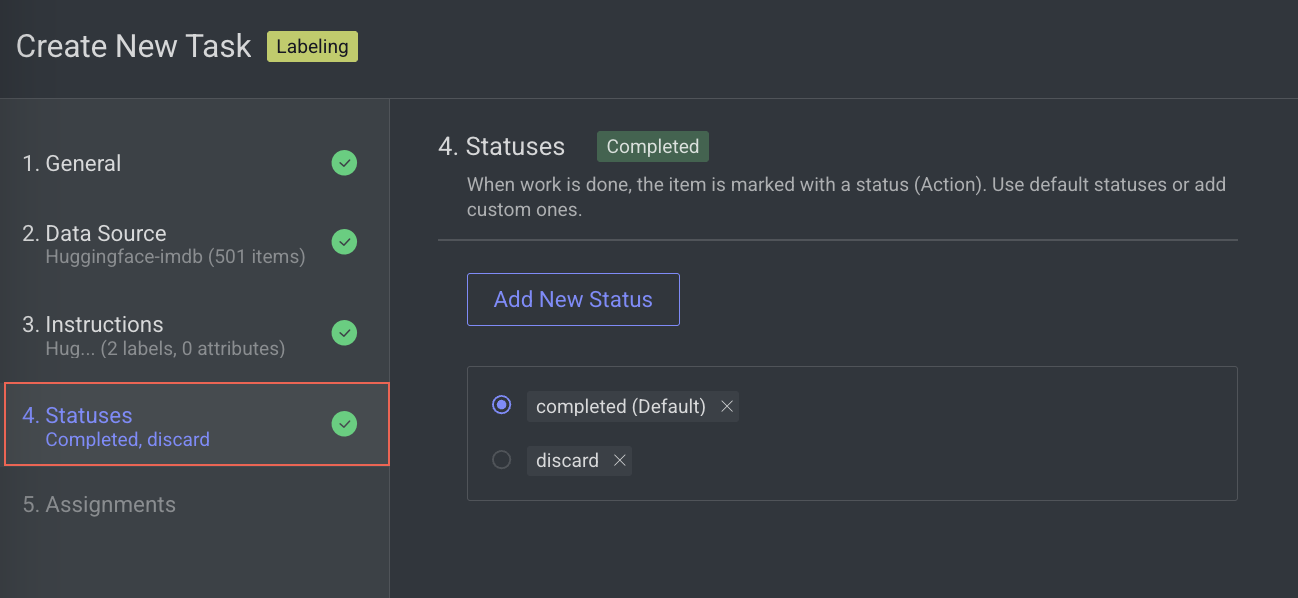
By default, the Completed status is selected. Click Add New Status to add a new status.
Click Next: Assignments.
5. Assignments
In the Assignments section, enter or select the required details:

Impact on Quality Tasks and Assignees
Switching the allocation method from Distribution to Pulling will disable all Quality tasks (such as consensus, honeypot, and qualification). Additionally, any existing task assignees will be cleared. You'll be prompted with confirmation dialogs to review and approve these changes before they take effect.
Allocation Method: Select one of the following allocation methods:
Pulling: The pulling distribution method means that annotators only pull a batch of items at a time and the maximum number of items in an assignment. You can make changes in the following fields if required: Pulling batch size (items) and Max items in an assignment.
Distribution: The distribution allocation method means that the items will be distributed in advance among users, equally or based on a custom percentage. The Auto Distribution option distributes the task equally among the users. By default, it is checked.
Available Users: Search for or select users from the list, and click on the Forward arrow icon to add to the
Assigned userslist.Assigned Users:
Search for or view the assigned users from the list. The allocation percentage is equally distributed if you select
Auto Distribution.Select and click the Backward arrow icon to remove them from the Assigned Distribution list.
Inactive users
Inactive users are grayed out and disabled for redistribution, and available for reassignment.
Click Create Task. The newly created labeling task will be available in the tasks list.
Use Pipelines to Automate a Labeling Task
Dataloop allows you to create a Labeling Task Workflow Using a Pipeline Template to streamline and manage the labeling process efficiently.
To create the workflow, follow the steps:
Open the Labeling from the left-side menu.
Click Create Task. The task type section popup is displayed.
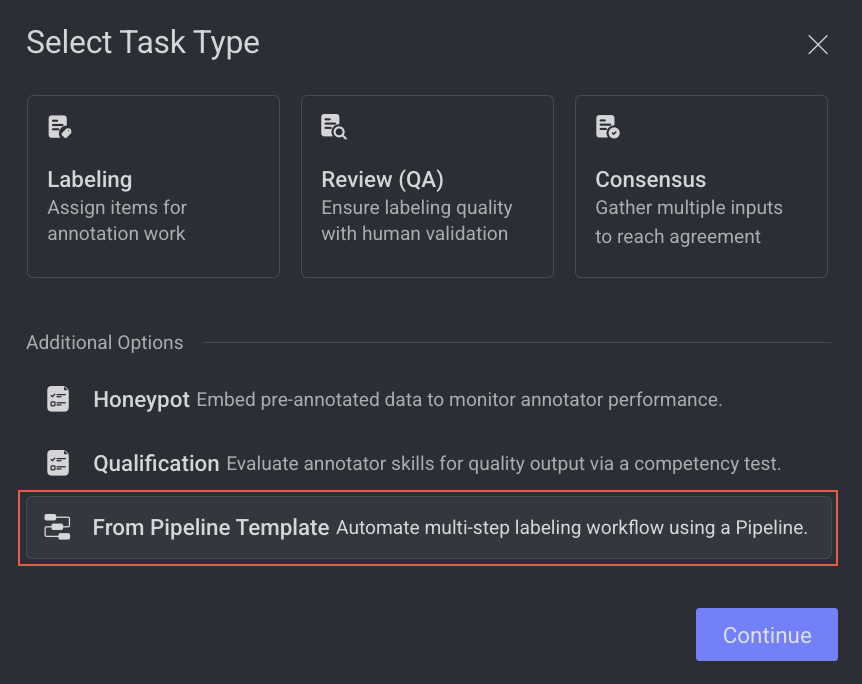
Select the From Pipeline Template from the list, and click Continue.
Select a Workflow widget and verify the details displayed on the right-side panel. A preview of the template with the available nodes is displayed.
Click Create Workflow. A new pipeline workflow page is displayed, and you start building your workflow by using various pipeline nodes.
Review (QA) Tasks
The quality assurance process ensures that annotations are compliant with certain quality standards or requirements, as well as identifying and addressing issues, as well as verifying that the desired level of quality has been achieved.
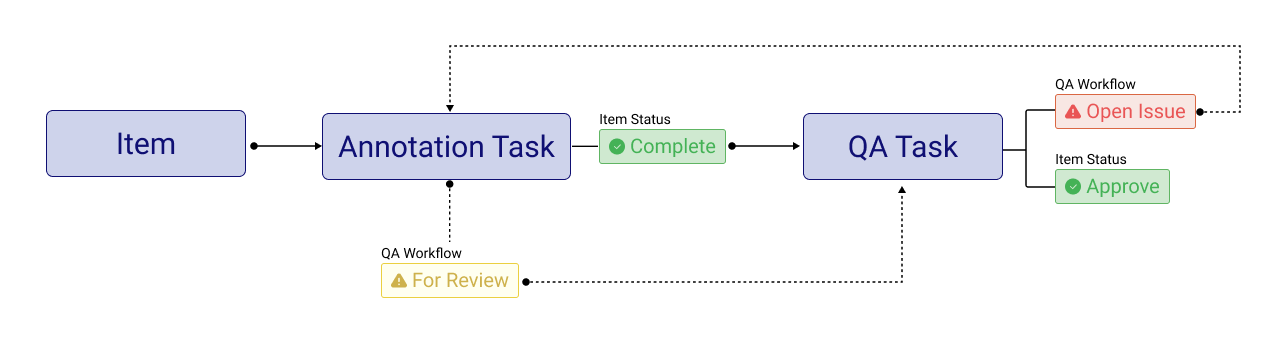
The QA process consists of the following steps:
Reviewers can use two tools to indicate quality issues during QA.
Create an Issue with an annotation. It is used when there is a quality problem with an annotation, such as a wrong position, label, attribute, etc.
Create a Note annotation. It is used to indicate that an annotation is missing. The note annotation is created with an issue on it.
Having an issue with an item in a QA task removes its status from the original task where the annotation was created.
For note annotations, since they are created in the QA task, the issue is assigned by default to the last person who sets a status on the item. However, the note reporter can manually change the note assignee. Learn more article.
Annotators will see open issues on assignments, and the task owner or manager can see them on the task level.
Annotators can start correcting the annotations.
After correcting an annotation, the annotator flags it For review and sets the status to Complete. This will make the item appear again in the QA task.
Info
If necessary, annotators can create an issue in the QA task.
The reviewer can view how many For review annotations are pending on their assignments and open them for review.
If corrections are accepted, the reviewer can flag them as Approved. If all corrections are approved, the reviewer can set the item's status to Approve.
To gain a clearer understanding of the QA process, see the QA Process Example.
Important
To ensure people learn from their mistakes and progress on the learning curve, Dataloop QA always favors the original annotation creator by default for any correction work.
Review (QA) Process
QA User Roles
Create QA Tasks: An Annotation Manager creates QA tasks, redistributes and reassigns these tasks to annotators, reviews their tasks, etc.
QA Tasks Assignees: QA tasks can be assigned to annotators, annotation managers, developers, and project owners.
Report Issues: Issues can be reported only by annotation manager role and above.
Info
If necessary, annotators can create an issue in the QA task.
QA Process Example
The following example gives you an idea of steps involved in the QA process.
Step 1: Create a QA Task
The annotation manager views the completed annotation task and creates a QA task (in this example, the annotation manager assigns the QA task to self and acts as a QA reviewer, but you can assign it to roles). Learn to Create a review QA task.
Step 2: Create Issues During the QA
During the QA task, the QA tester (in this case, the annotation manager):
Discovers issues with a couple of annotations and opens an issue with them.
In addition, the QA tester discovers a few objects that are not annotated, and since there is no annotation, adds an issue for them.
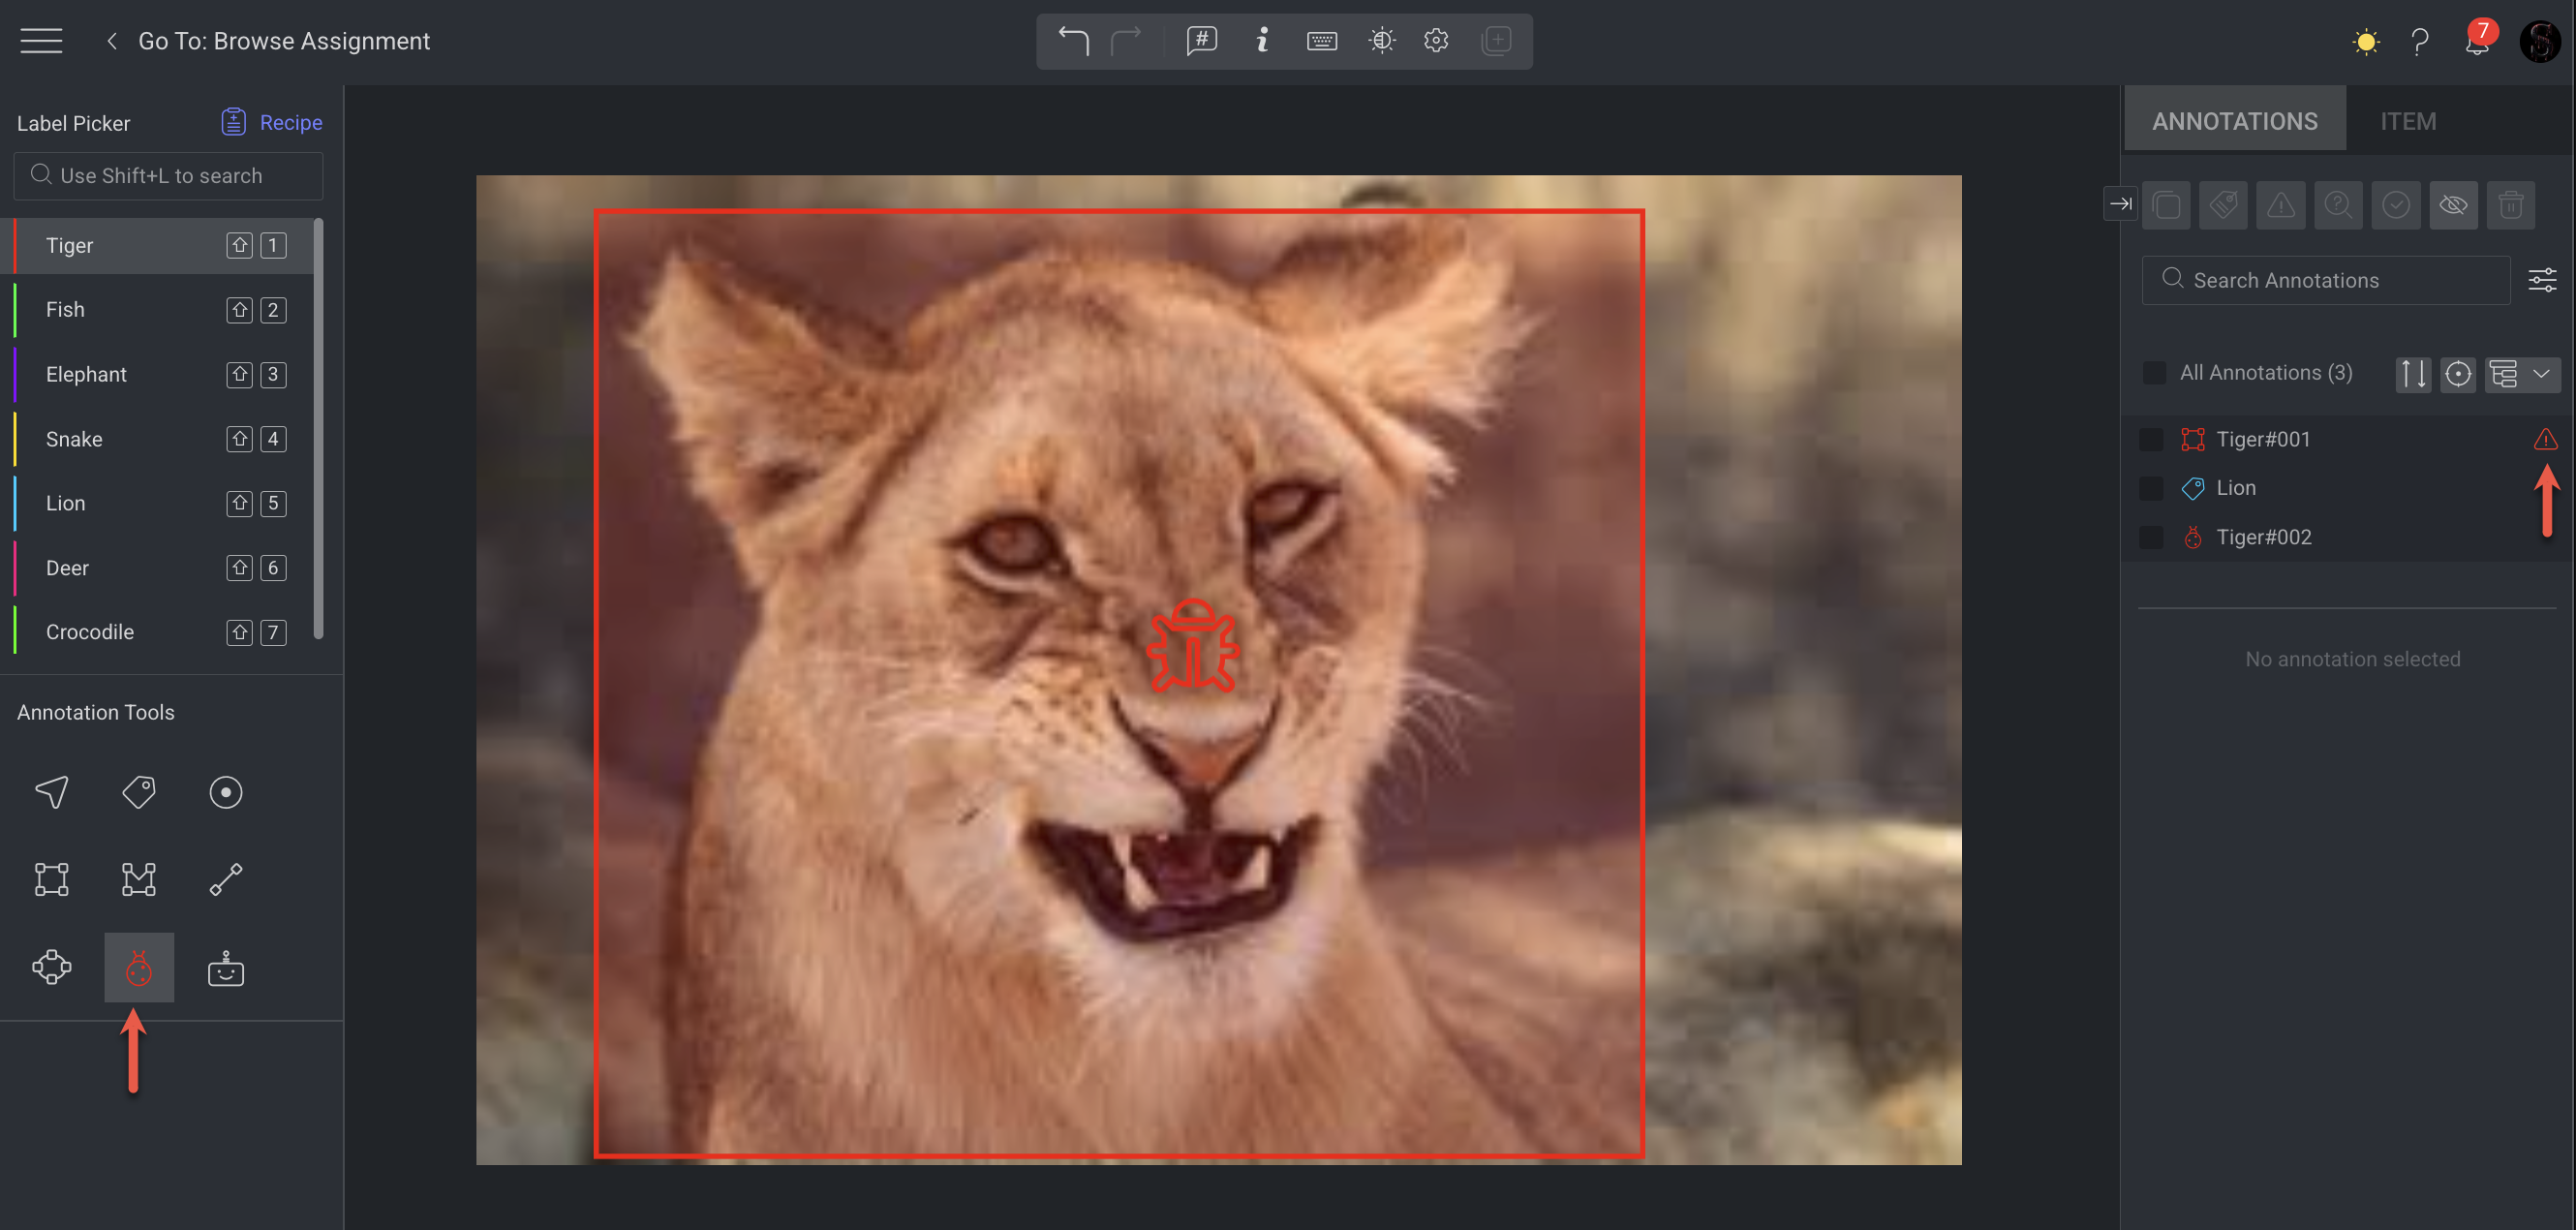
Creates a note (a ladybug icon) over the unannotated objects with instructions for the annotator. For more information about the Note, see the QA Note Annotation article.
When an issue or note is created:
The Completed status is removed from the item.
The assignment becomes active again.
An email notification will be received.
Resolve the Issues
The item cannot be completed or approved until the issues have been resolved and approved by the QA tester.
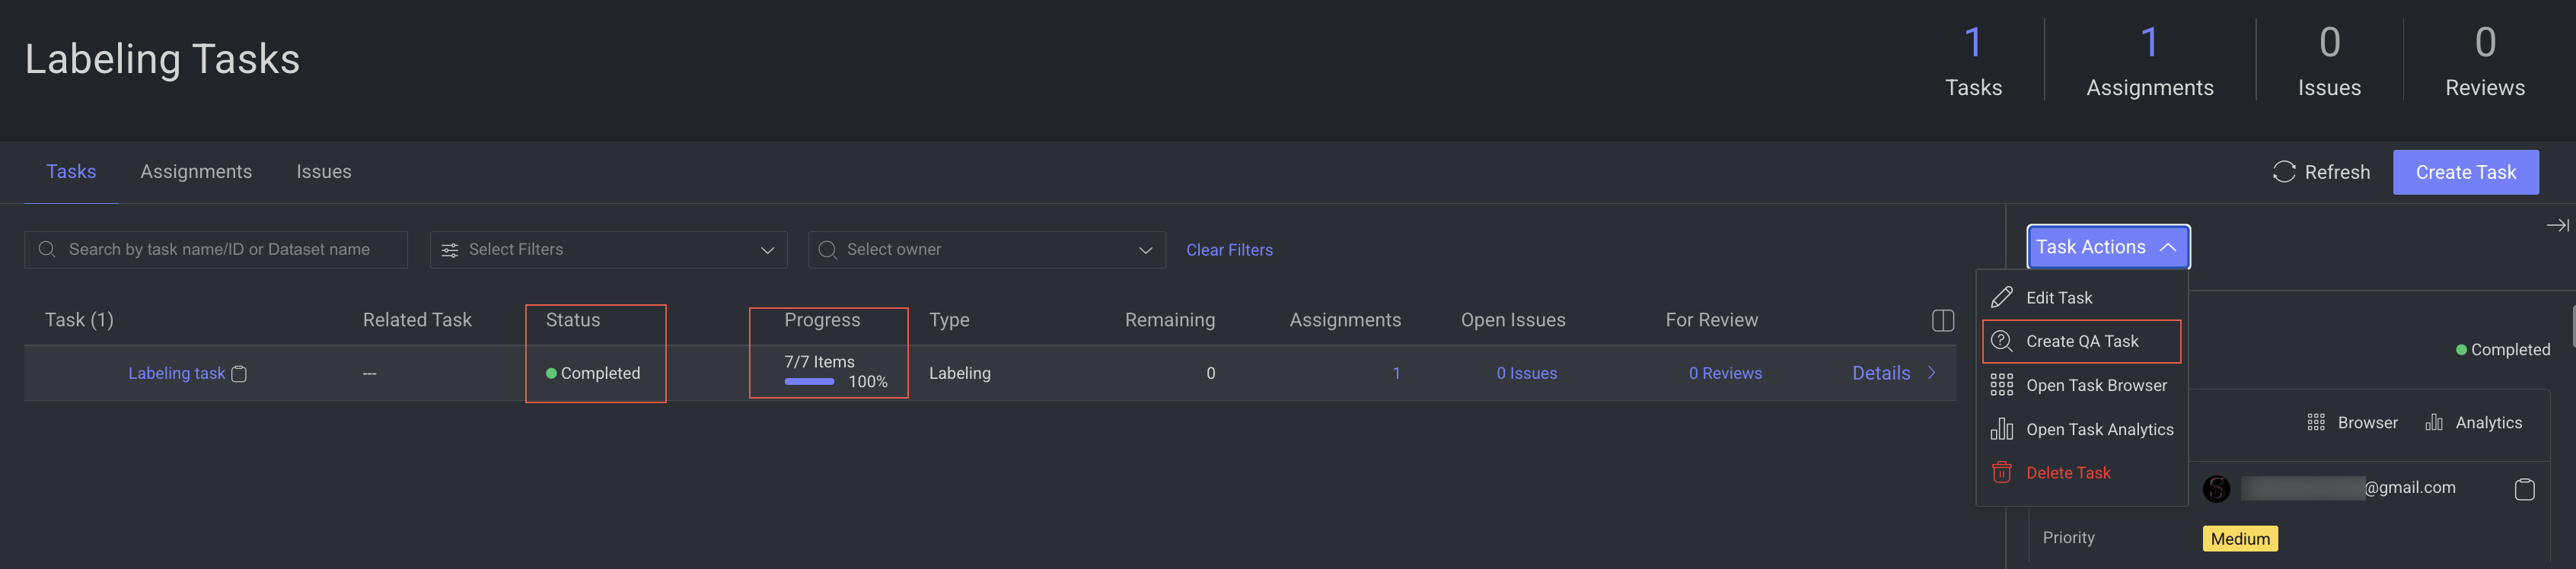
On the Tasks page, the progress bar shows that one item is not completed, and there are issues remaining to be resolved.

Step 3: View Issues Reported During the QA
The annotation manager can view tasks, open issues, and for review items. The annotator can see that there are open issues with the tasks in the Tasks page.
Hovering over the red exclamation displays the number of open issues.
Double-clicking on the exclamation opens the item with issues.
Step 4: Correct the Issues
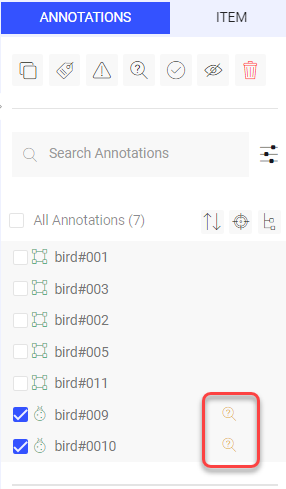
The annotator corrects the annotations and marks those annotations For Review in the Annotations tab by clicking on the hourglass icon.
Info
If necessary, annotators can create an issue in the QA task.
The annotator clicks Complete. On the Tasks page, the task is shown with items For review.
Similarly, the Tasks page on the QA tester’s platform shows that the annotator has submitted items for review.

Step 5: Review QA Corrections and Approve
The QA tester clicks the For Review to view the corrected annotations on the items.
If the issues have been corrected satisfactorily, the QA tester approves them by:
Selecting the annotations that are marked for review.
Clicking on the Approve checkmark icon.
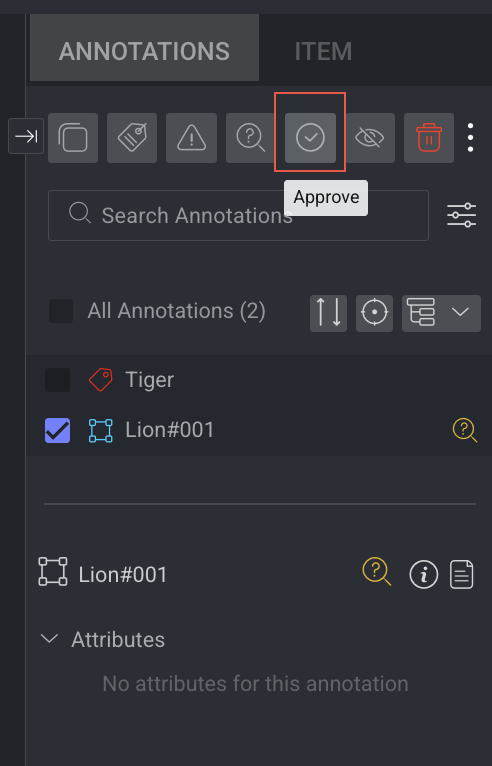
At this point, the For review icons disappear, and the QA tester can click Approve.
Both the annotation task and the QA task are now complete.

Create a Review (QA) Task
You can create Review (QA) tasks based on the following two scenarios:
A Review (QA) Task from a Labeling task: To validate annotations created by assignees.
A Standalone Review (QA) Task: To validate annotations that are uploaded to the platform, for example, Annotations created by your model.
On the tasks page, Review (QA) Tasks are linked to their respective annotation tasks. Click the "+" icon next to an annotation task to see all Review (QA) tasks related to it.
To create a Review (QA) task, follow the instructions for each section:
Open the Labeling from the left-side menu.
Click Create Task. The task type section popup is displayed.
Select the Review (QA) Single Task.
Click Continue.
1. General
Enter or select the required details in the General section:
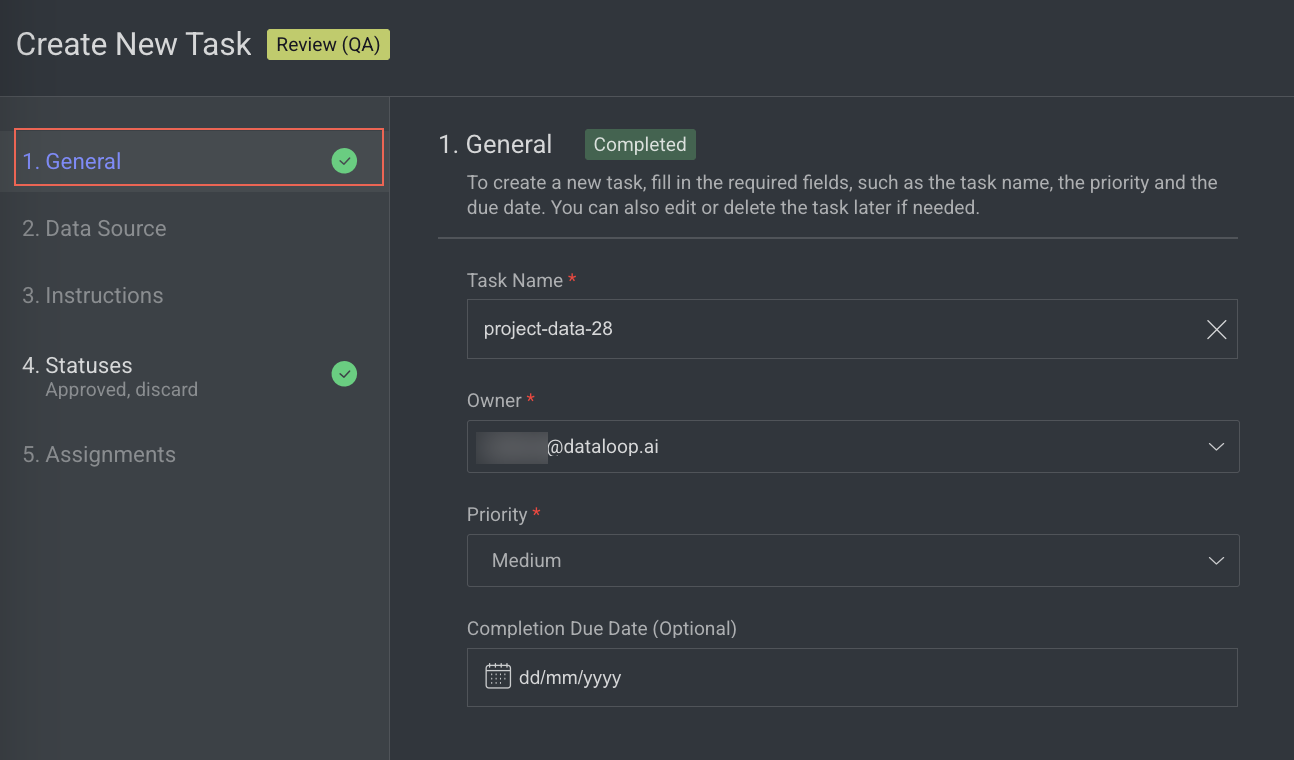
Task Name: By default, your task name - QA is displayed. Modify, if needed.
Owner: By default, the current user's email ID is displayed. Click on it to select a different owner from the list.
Priority: Select a priority from the list. By default, Medium is selected.
Completion Due Date (Optional): Select a task due date from the calendar. If a date is chosen, you will have the option to lock the QA task once the due date has passed.
Lock Task After Due Date: When enabled, all assignments in this task will be locked for editing after the due date passes. Read here to unlock the task.
Click Next: Data Source.
2. Data source
Enter or select the required details in the Data Source section.

Select Dataset: By default, the dataset used to create the task is displayed.
(Optional) Filters: Refine data selection by selecting specific folders, using DQL filters, or subsampling (randomly and equally distributed). The Folder or DQL field is Active only if you do not select any items in the Dataset.
Folders: Select a folder from the dataset.
Selected Filters / Saved DQL Query: Select a filter or saved DQL query from the list.
Data Sampling: Enter the Percentage or Number of Items for the task. Data sampling does not give an exact number of items.
Percentage: The option selects the items randomly. For example, if the percentage is 100% for four items, then 75% is for three items (It can be 1/4, 3/4, or 4/4) from the selected dataset.
Number of Items: The allows you to select the items sequentially from the start of the dataset, not randomly.
Collections: Choose a collection from the list to filter and display items within the selected collection.
Click Next: Instructions.
3. Instructions
Enter or select the required details in the Instructions section. The number of Labels and Attributes is displayed on the top-right side of the page.
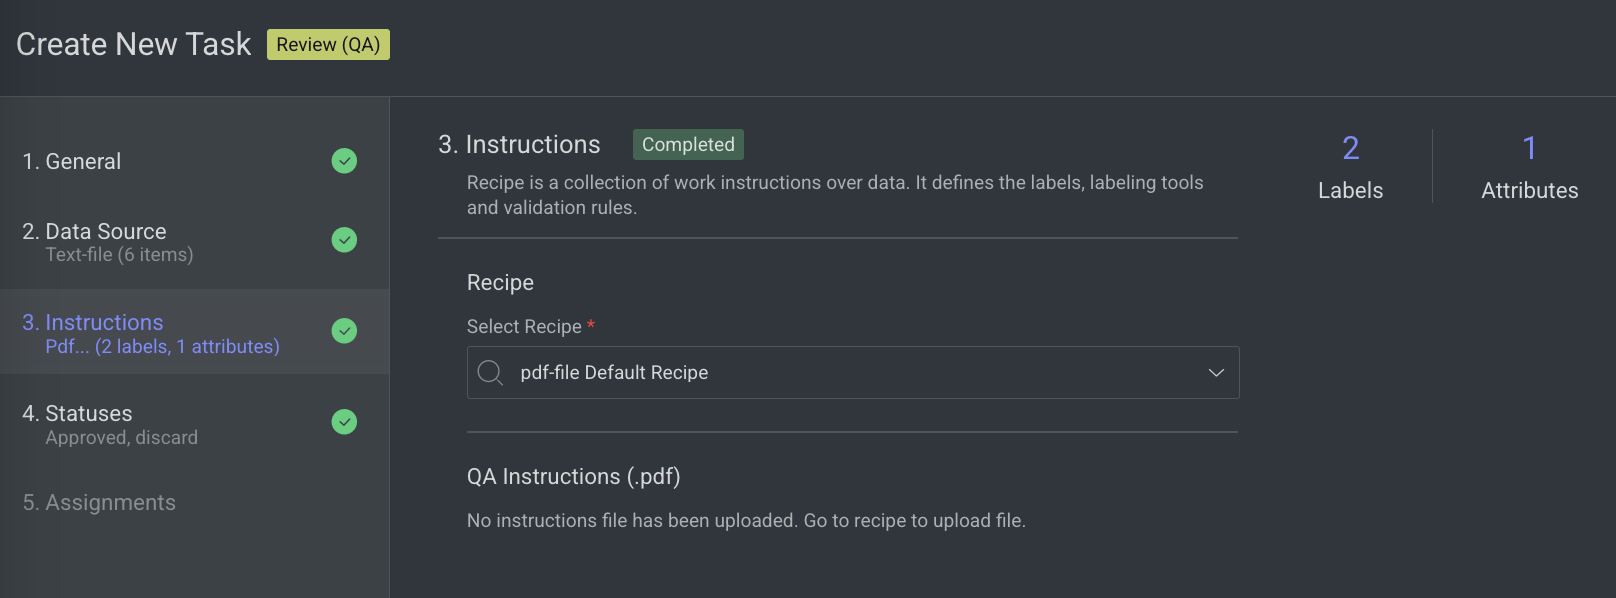
Recipe: By default, the default recipe is displayed. Select a recipe from the list, if needed.
QA Instructions (.pdf): The QA Instruction document is displayed, if available. Go to the Recipe section to upload a PDF instruction.
Click Next: Statuses. The Statuses section is displayed.
4. Statuses
Enter or select the required details in the Statuses section:
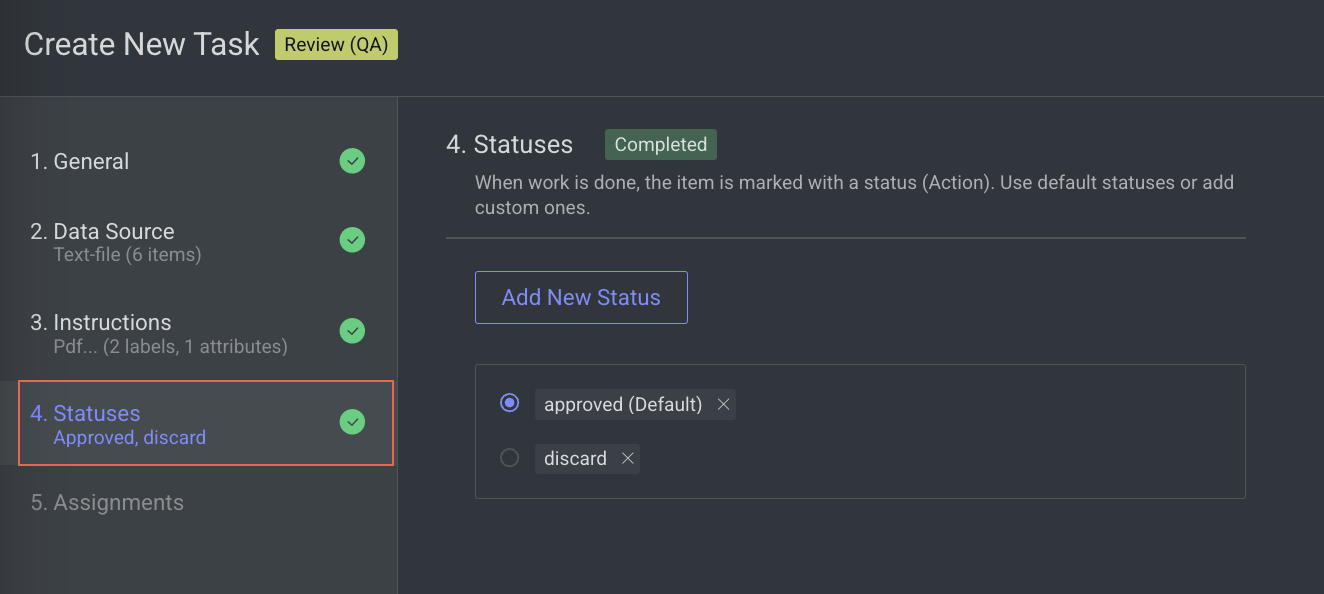
By default, the Approved status is selected. Click Add New Status to add a new status.
Click Next: Assignments.
5. Assignments
Enter or select the required details in the Assignments section.
Allocation Method: Select one of the following allocation methods:
Pulling: The pulling distribution method means that annotators only pull a batch of items at a time and the maximum number of items in an assignment. You can make changes in the following fields if required: Pulling batch size (items) and Max items in an assignment.
Distribution: The distribution allocation method means that the items will be distributed in advance among users, equally or based on a custom percentage.
The Auto Distribution option distributes the task equally among the users. By default, it is checked.
The Show only unassigned users to any labeling task option allows existing users to complete their task.
Available Users: Search for or select users from the list, and click the Forward arrow icon to add them to the Assigned Users list.
Assigned Users:
Search for or view the assigned users from the list. The allocation percentage is equally distributed if you select Auto Distribution.
Select and click the Backward arrow icon to remove them from the Assigned Distribution list.
Click Create Task.
Set a QA status
When working on a QA assignment, the assignee or QA tester is expected to review annotations and set the item's status to:
Approved, if it is annotated satisfactorily.
Discarded, if the item is unsuitable for the task.
or raise issues if there are problems with the annotation of the item that the QA tester wants the annotator to fix.
Setting the status on an item will trigger the studio to move on to the next item.
View QA status
You can view the QA status of a task on the following pages, depending on the user role and the type of information requested.
Task's page: When you double-click on a task within the task page, it displays assignments, especially if there are items with open issues or those pending review. Additionally, on this page, you have the options to Browse Tasks and Browse Issues.
Assignments' page: Double-click on a task to see all its assignments. Each assignment line shows an indication of whether there are open issues or items pending review.
Issues' page: On the Labeling > Issues page, you can see the full list of the issues in a project. For more information about the issue page, see the Issues article.
Consensus Tasks
The Consensus is an important quality control feature, allowing you to compare annotations by different users on a specific item and generating majority-vote based, high-quality data.
Purpose: To ensure quality control by comparing annotations from multiple contributors.
Functionality:
Facilitates the comparison of annotations made by different contributors on the same item.
Ensures consistency and reliability by calculating consensus metrics.
Allows for more items to be annotated within a single task.
Use Case: Ideal for tasks requiring alignment among multiple annotators working on the same data. The task calculator helps estimate the scope and scale of the task, providing clarity on workload distribution.
How Consensus Works
When consensus is enabled for a labeling task, it is configured with the percentage of items to cover and the number of annotators. Dataloop automatically creates copies of the items and assigns them randomly to annotators.
Key Points:
Task Browsing: Only the original items are visible when browsing the task.
Assignment Browsing: Users can view the specific copies assigned to them within their assignments.
Annotation Merging: Once all copies of an item are assigned a status (e.g., "Completed"), the system merges the annotations back onto the original item. Until then, the original item will not display the annotations from its copies.
Data Download: When downloading consensus data, the JSON file includes all annotations made by different users, along with their usernames. This allows users to calculate their own scores and determine which annotations are of the highest quality.
Syncing Datasets with Consensus Task: Cloned external datasets (AWS, GCP, Azure) cannot be synced with a consensus task.
Consensus Score
Quality task scoring is now available for items, annotations, and users. When creating a task with Consensus enabled, a scoring function is activated to evaluate all users, items, and annotations. Detailed scoring insights can be accessed through the new Scores tab on the Analytics page.
Benefits of Consensus Scoring with Application Integration:
Customizable Scoring: Calculate consensus scores using your preferred methods and thresholds (e.g., IOU).
Dataset Management: Move or clone items and annotations to a majority-vote dataset for use in training or testing.
Pipeline Integration: Trigger further processing for annotations with high scores in the pipeline workflow.
To learn more about the Dataloop Scoring Function, see the Scoring and metrics app README file.
Create Consensus Tasks
A labeling task assigned to multiple annotators for the same items, used to compare their results and measure agreement to ensure label quality and reduce subjectivity.
Open the Labeling from the left-side menu.
Click Create Task. The task type section popup is displayed.
Select the Consensus from the popup.
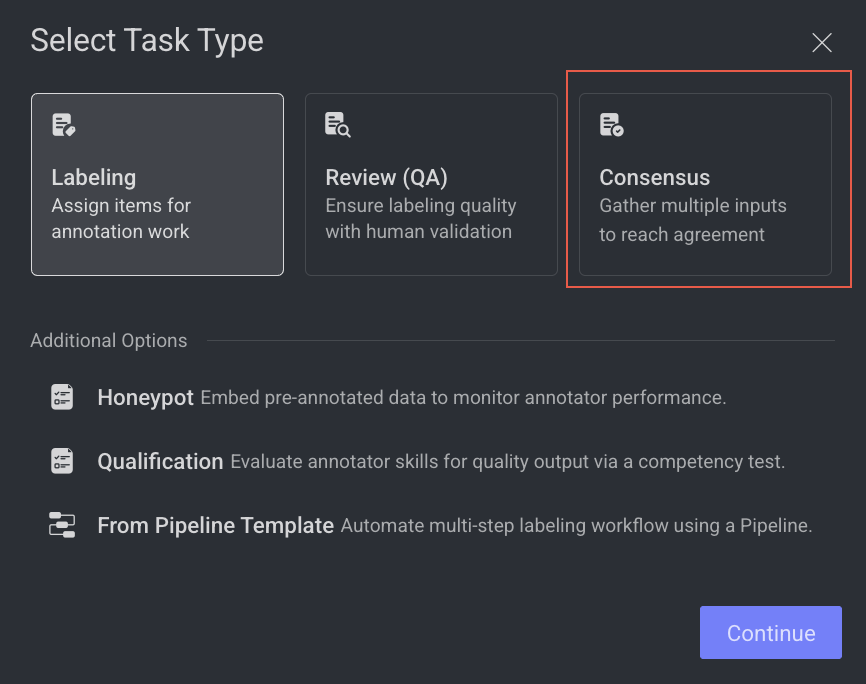
Click Continue.
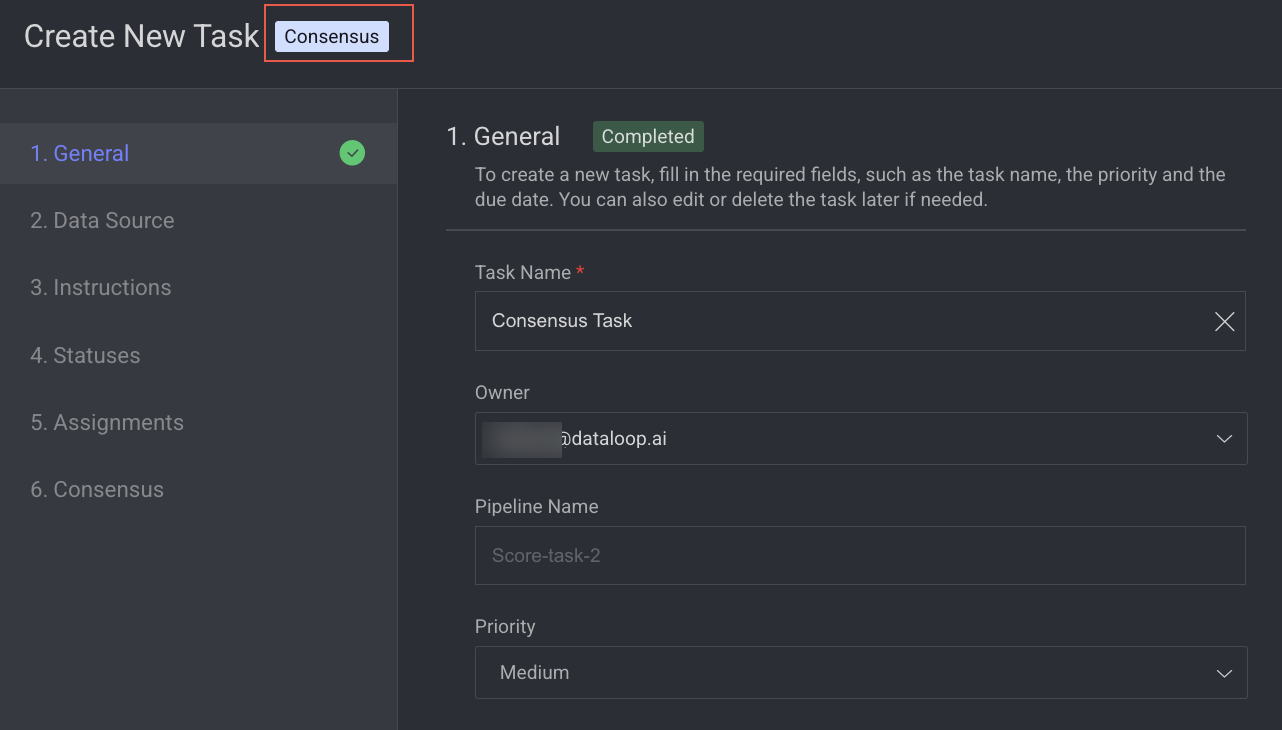
1. General
Enter or select the required details in the General section:
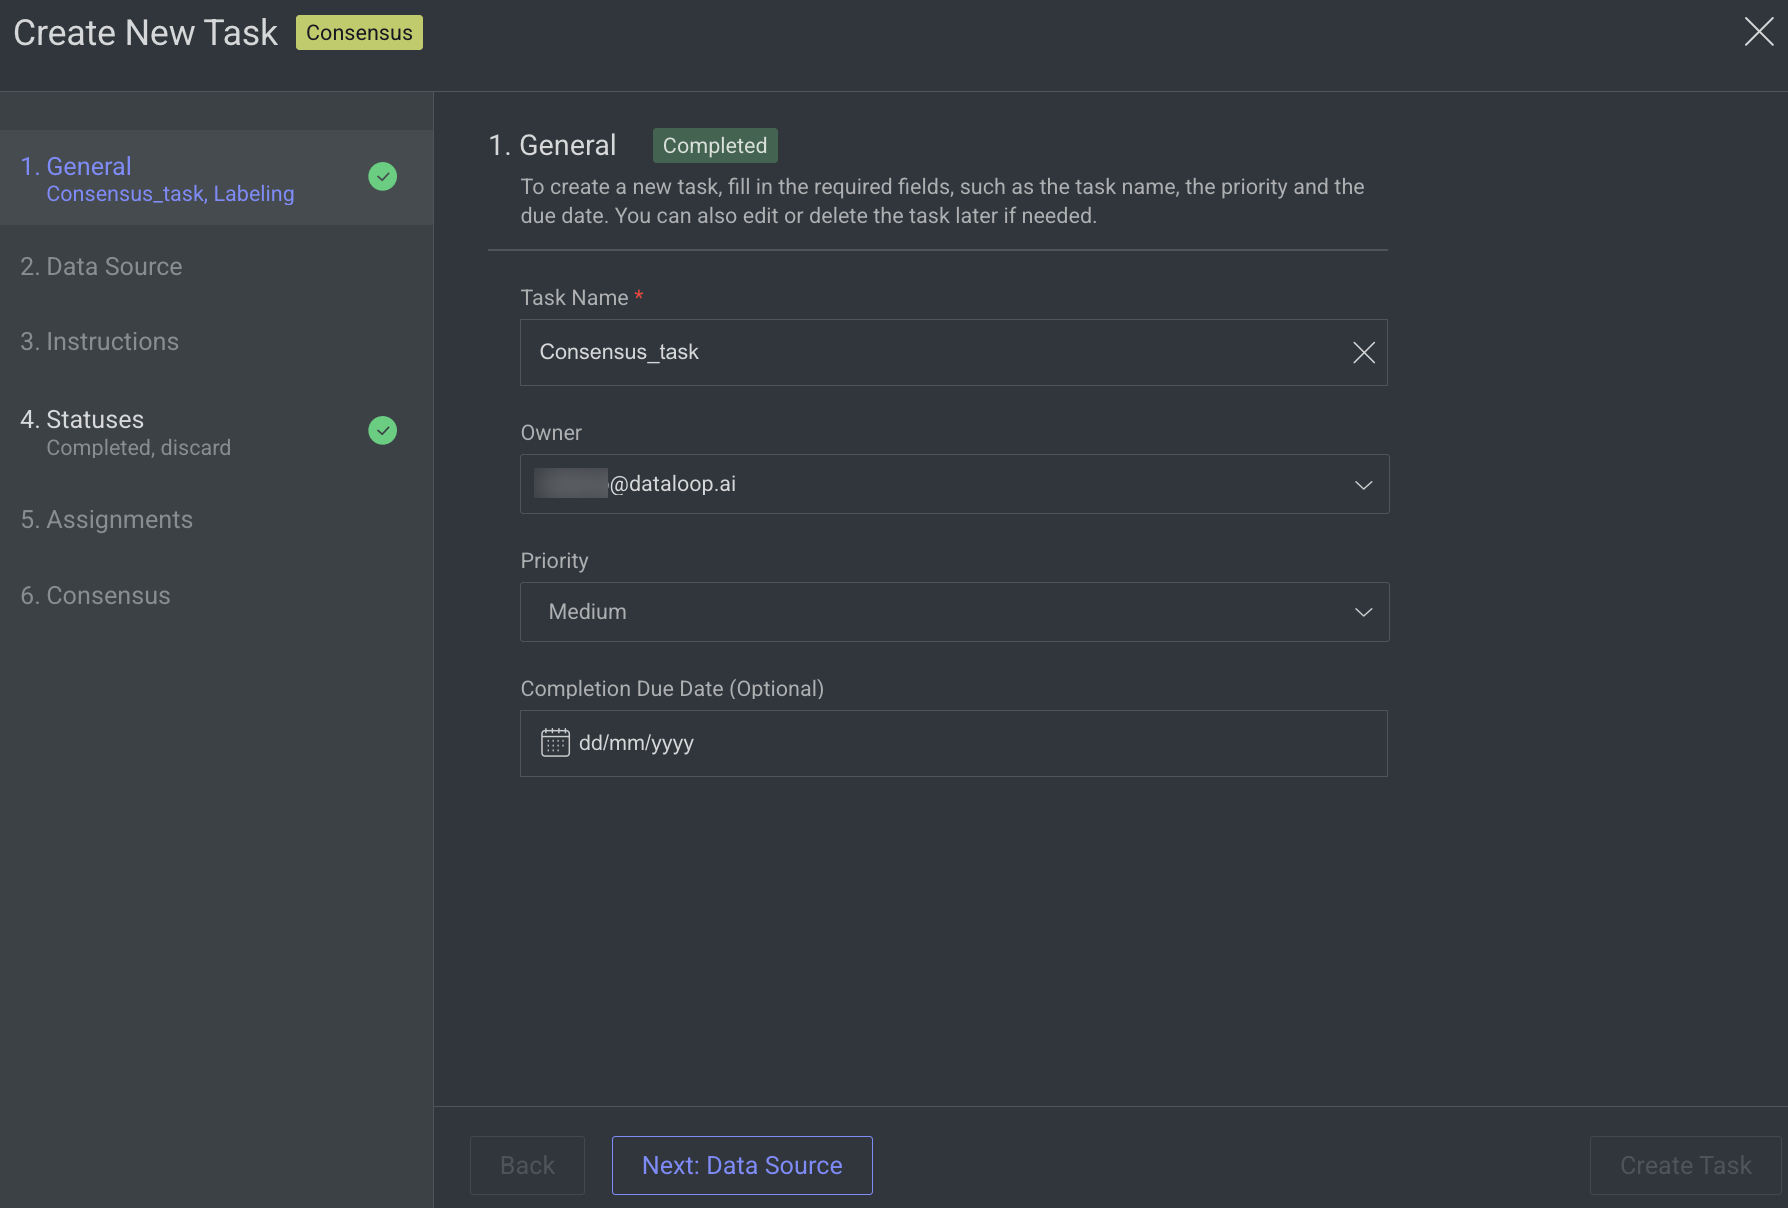
Task Name: Enter a name for the new task. By default, the project name + (total number of tasks + 1) is displayed.
For example, if the project name is abc and the total number of tasks you have already is 5, then the new task name is abc-6.Owner: By default, the current user's email ID is displayed. Click on it to select a different owner from the list.
Priority: Select a priority from the list. By default, Medium is selected.
Completion Due Date (Optional): Select a task due date from the calendar. If a date is chosen, you will have the option to lock the task once the due date has passed.
Lock Task After Due Date: When enabled, all assignments in this task will be locked for editing after the due date passes. Read here to unlock the task.
Click Next: Data Source.
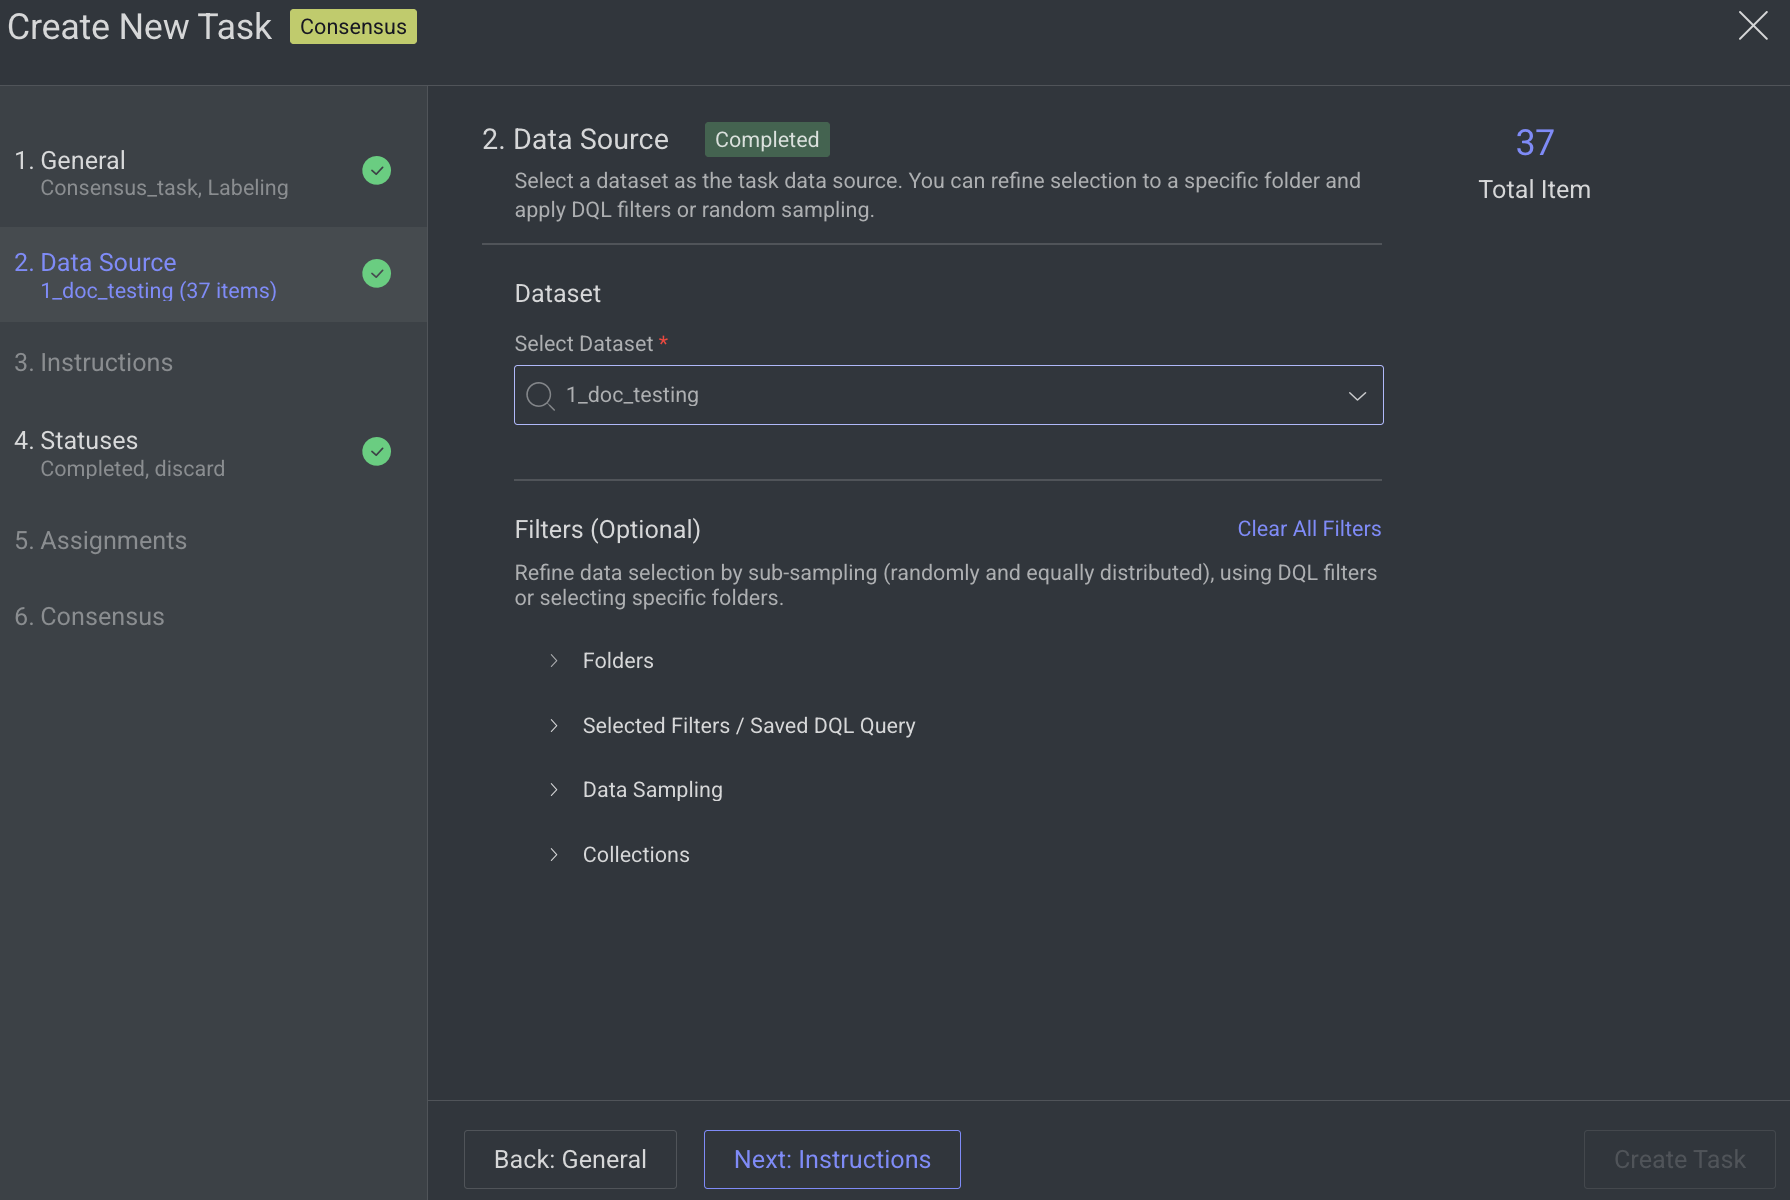
2. Data Source
Search or select a Dataset from the list.
Click Next: Instructions.
3. Instructions
Enter or select the required details in the Instructions section. The number of Labels and Attributes is displayed on the top-right side of the page.
Recipe: By default, the default recipe is displayed. Select a recipe from the list, if needed.
Labeling Instructions (.pdf): The labeling instruction document is displayed, if available. Go to the Recipe section to upload a PDF instruction. You can select the page range accordingly.
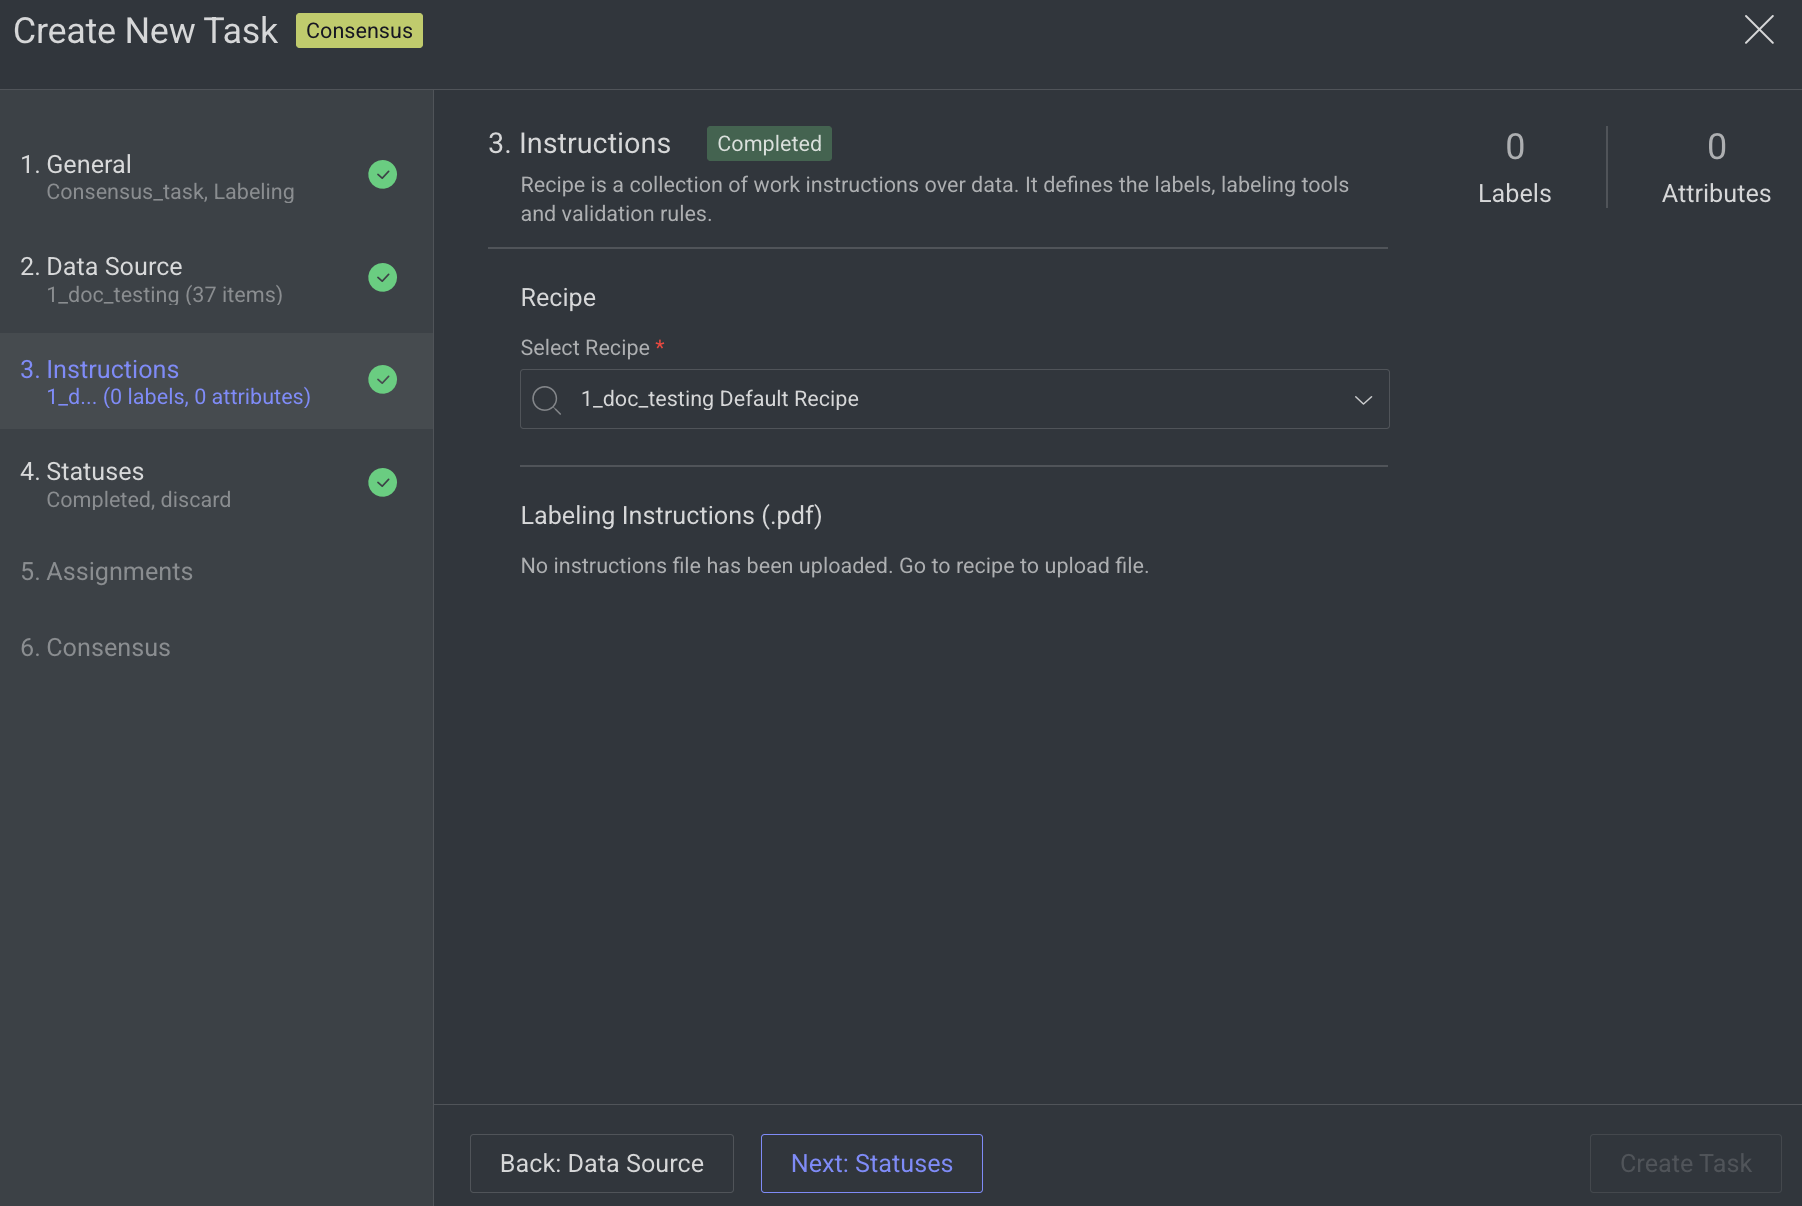
Click Next: Statuses. The Statuses section is displayed.
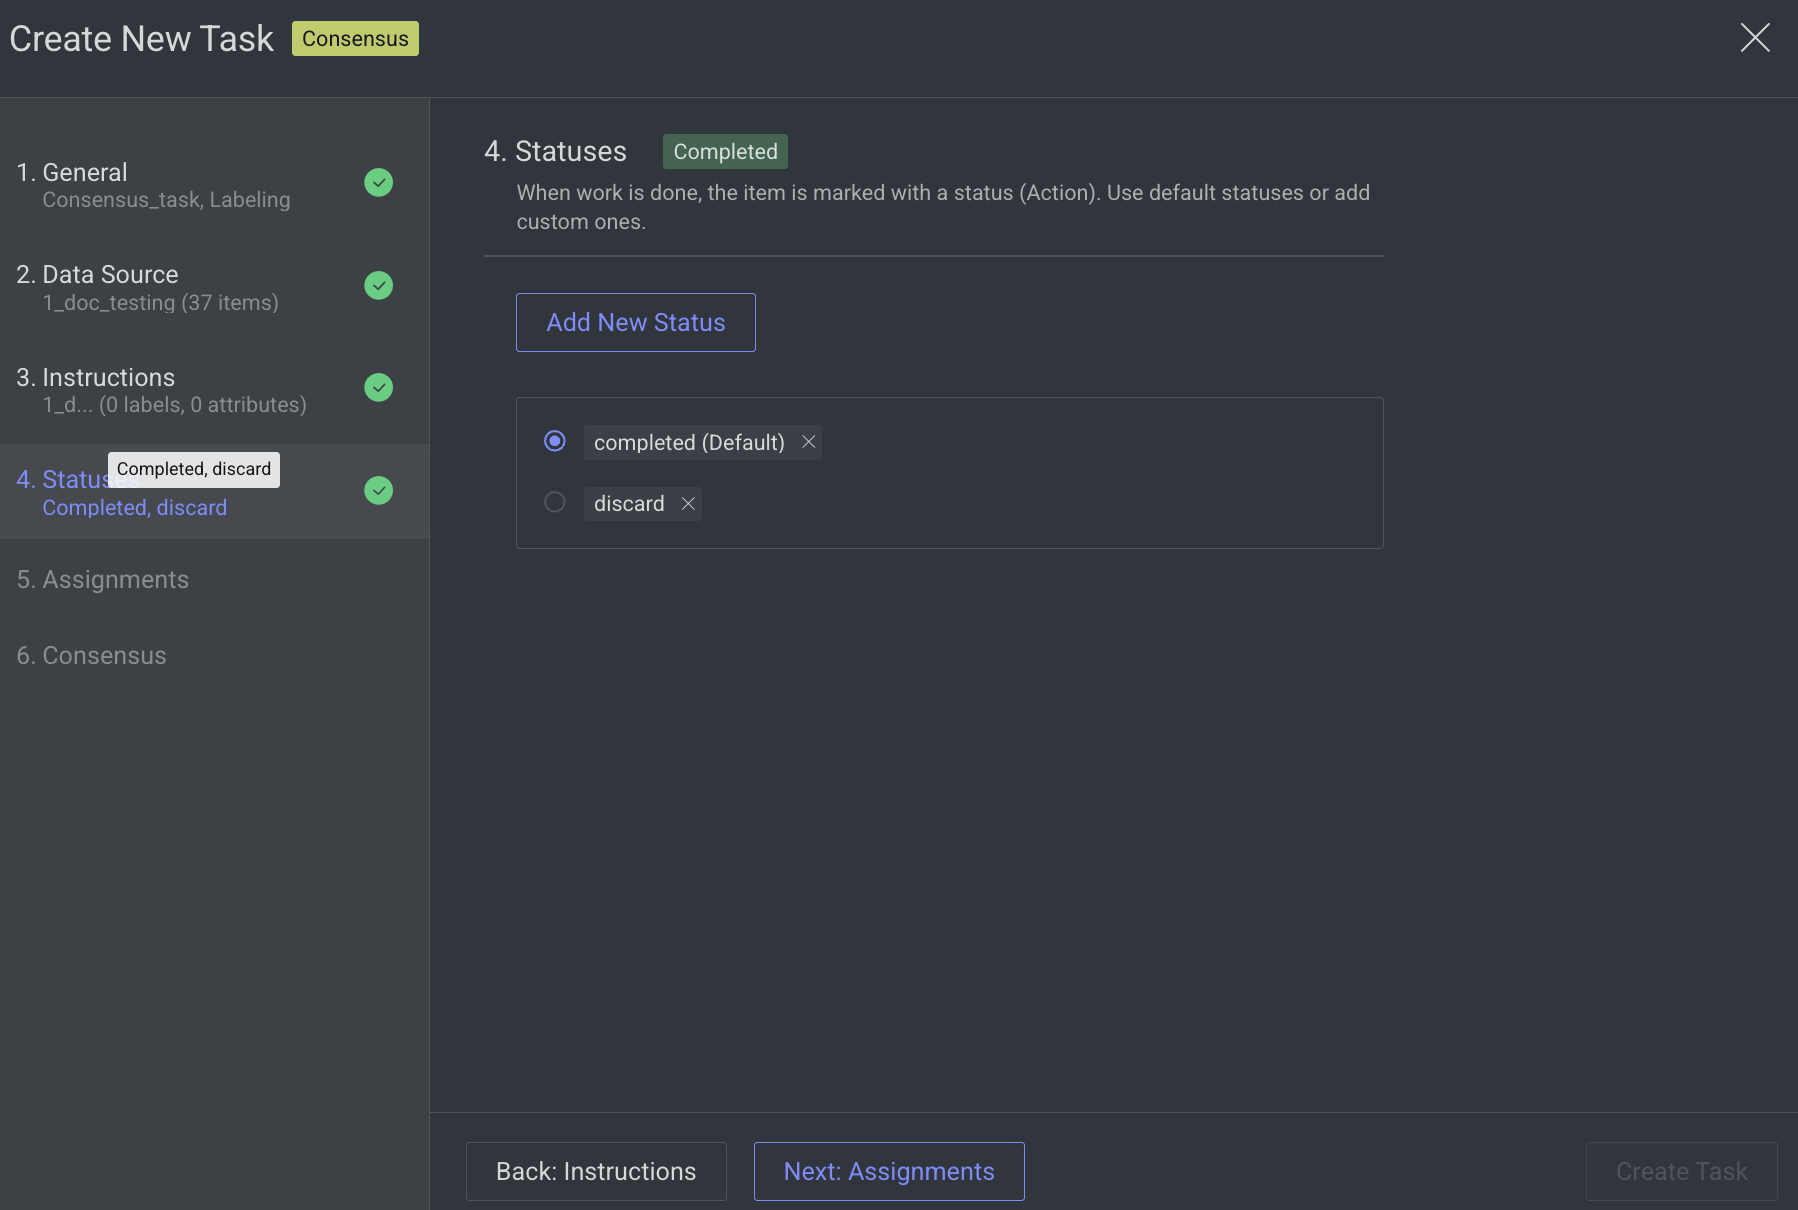
4. Statuses
By default, the Completed status is selected. Click Add New Status to add a new status.
Click Next: Assignments.
5. Assignments
Allocation Method: Distribution is selected by default, and the Pulling method is not supported for Consensus tasks. The distribution allocation method means that the items will be distributed in advance among users, equally or based on a custom percentage.
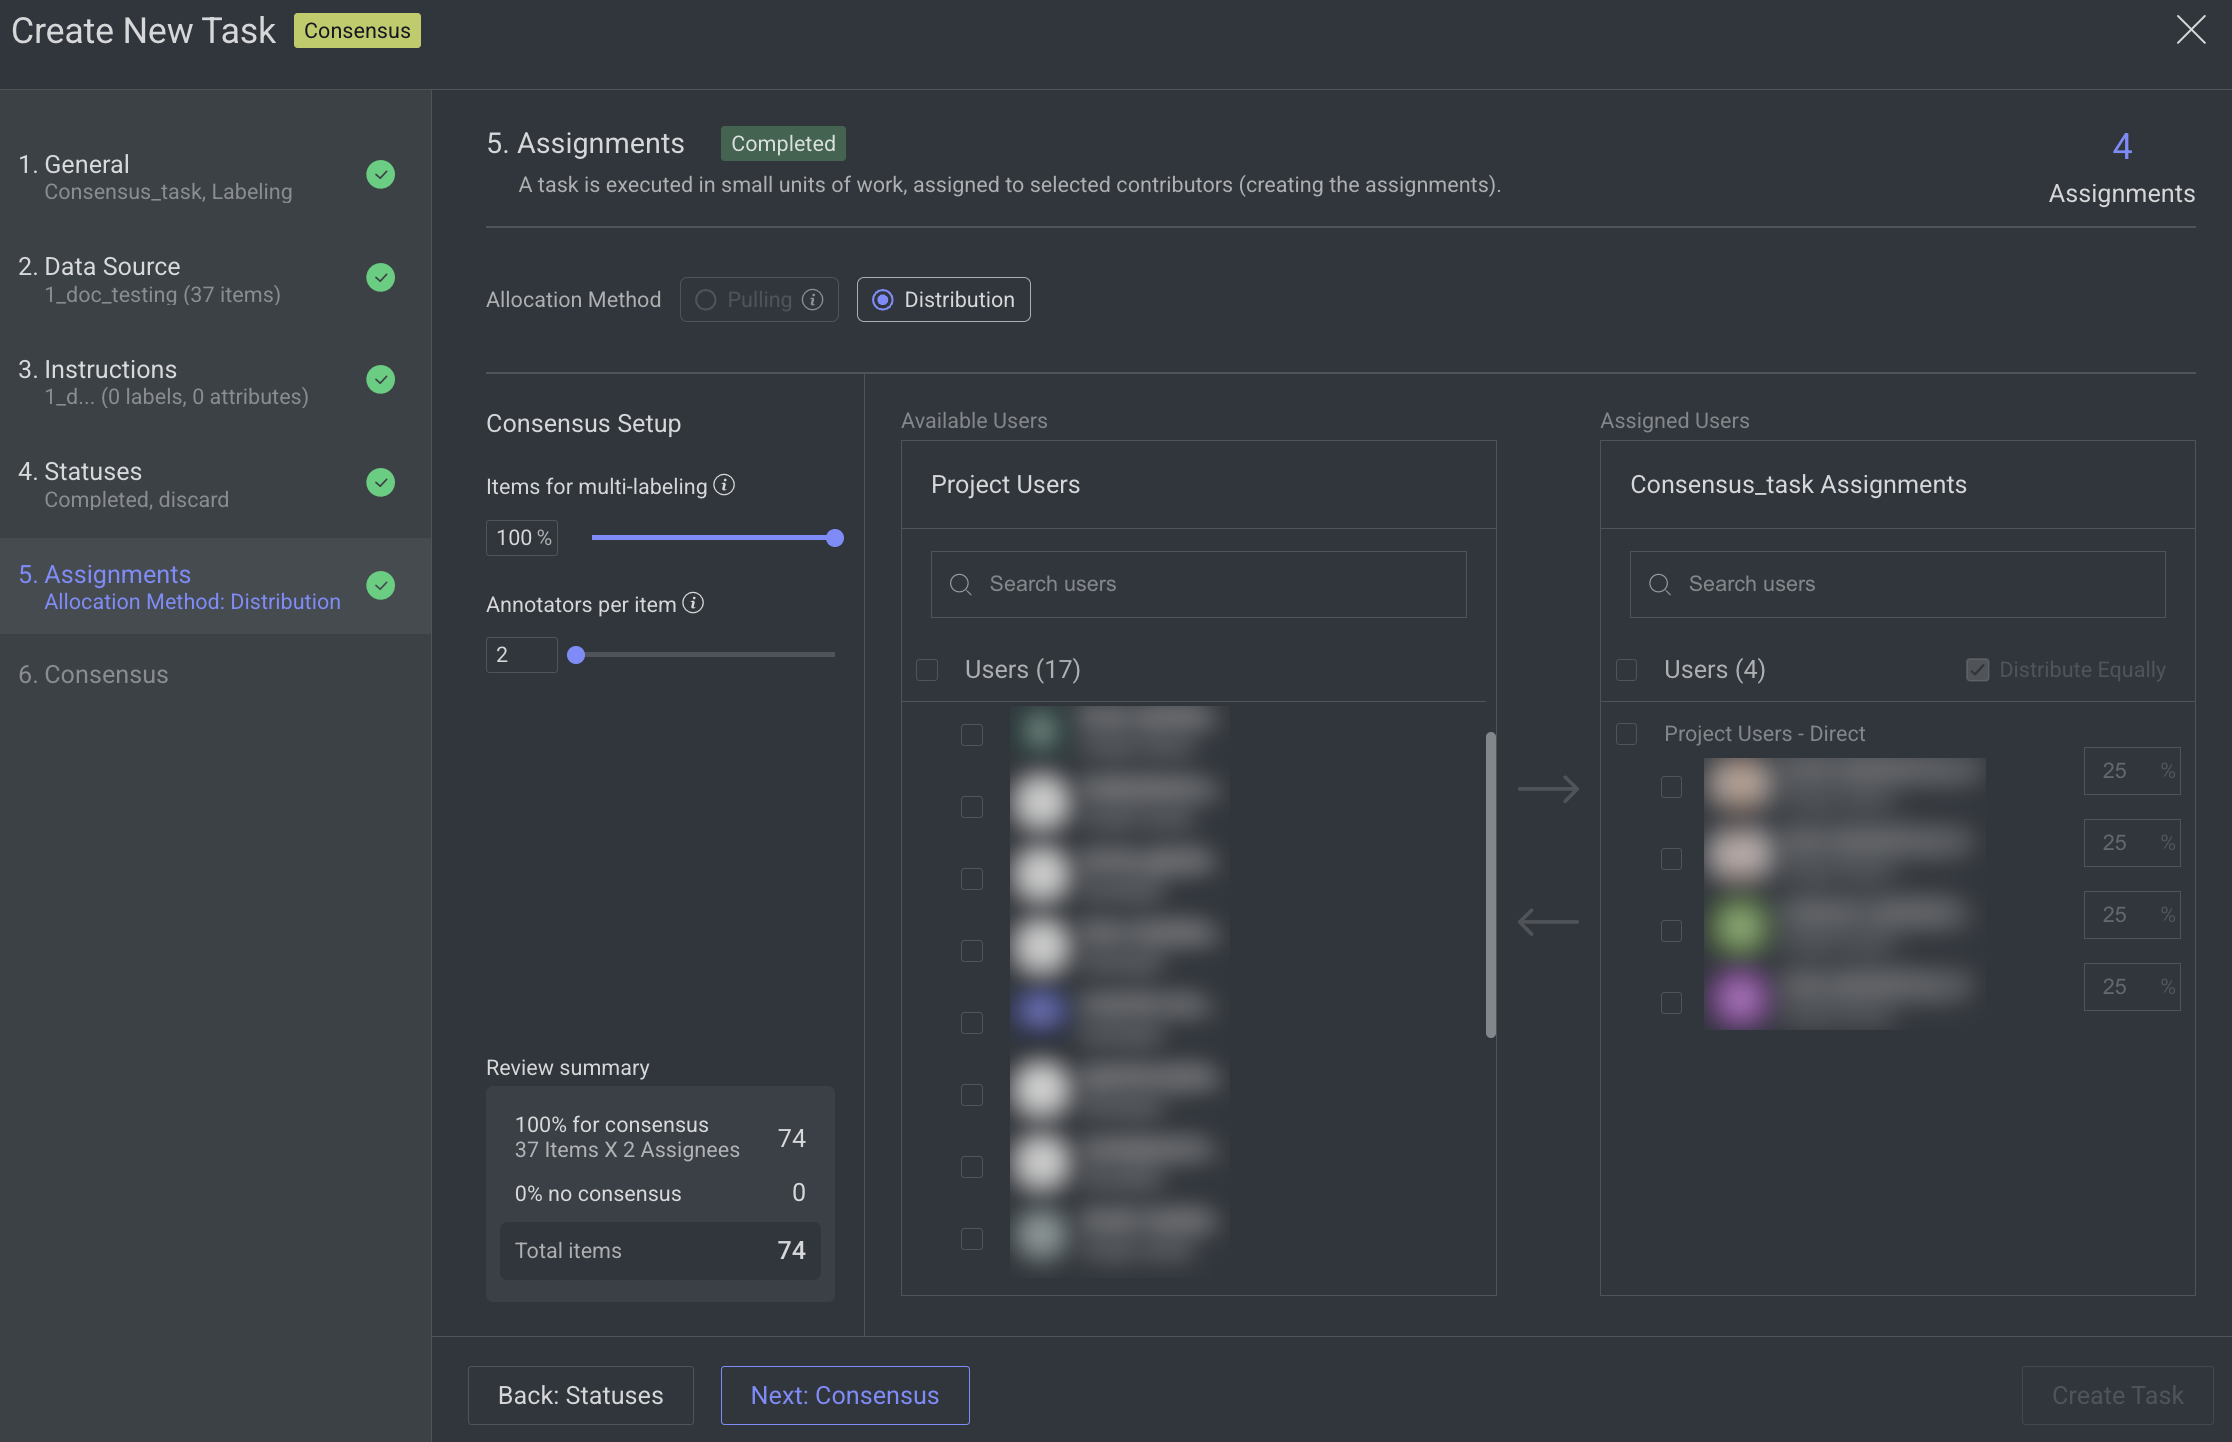
Consensus Setup:
Items for Multi-Labeling (by default, 100%): Use the slider to set the percentage of items to be labeled by multiple annotators.
These items are randomly selected from the task, and the rest will be labeled by a single annotator. As you change the percentage of items, the exact number of consensus items is calculated and shown in the below Summary.
When 100% is selected, the Distribute Equally will be disabled.
Annotators Per Item (min 2): Use this slider to define how many annotators will label each consensus item. Annotators are randomly chosen from the task's assignee pool, and the items are distributed evenly among them.
Summary: This section provides a breakdown of the labeling allocation:
% for Consensus: Indicates the number of items selected for consensus labeling, multiplied by the number of assigned annotators.
% No Consensus: Indicates the number of items assigned to a single annotator (i.e., not included in consensus labeling).
Total Items: Displays the total number of items in the task, including both consensus and non-consensus allocations.
Available Users in the Project: It displays the users available in the project. Search for or select users from the list, and click the Forward arrow → icon to add them to the Assigned users list.
Assigned Users for Task: It displays the user assigned for task from the project users list. Search for or view the assigned users from the list. The allocation percentage is equally distributed if you select Distribute Equally.
Distribute Equally (Default: Enabled): When enabled, the task is evenly divided among all assigned users. Consensus data is always distributed equally. If you're working with only a subset of the data for consensus labeling, the remaining items can be distributed unequally by disabling this option.
Removing Users: To remove a user from the assigned users list, select the user and click the Backward Arrow ← icon.
Click Next: Consensus.
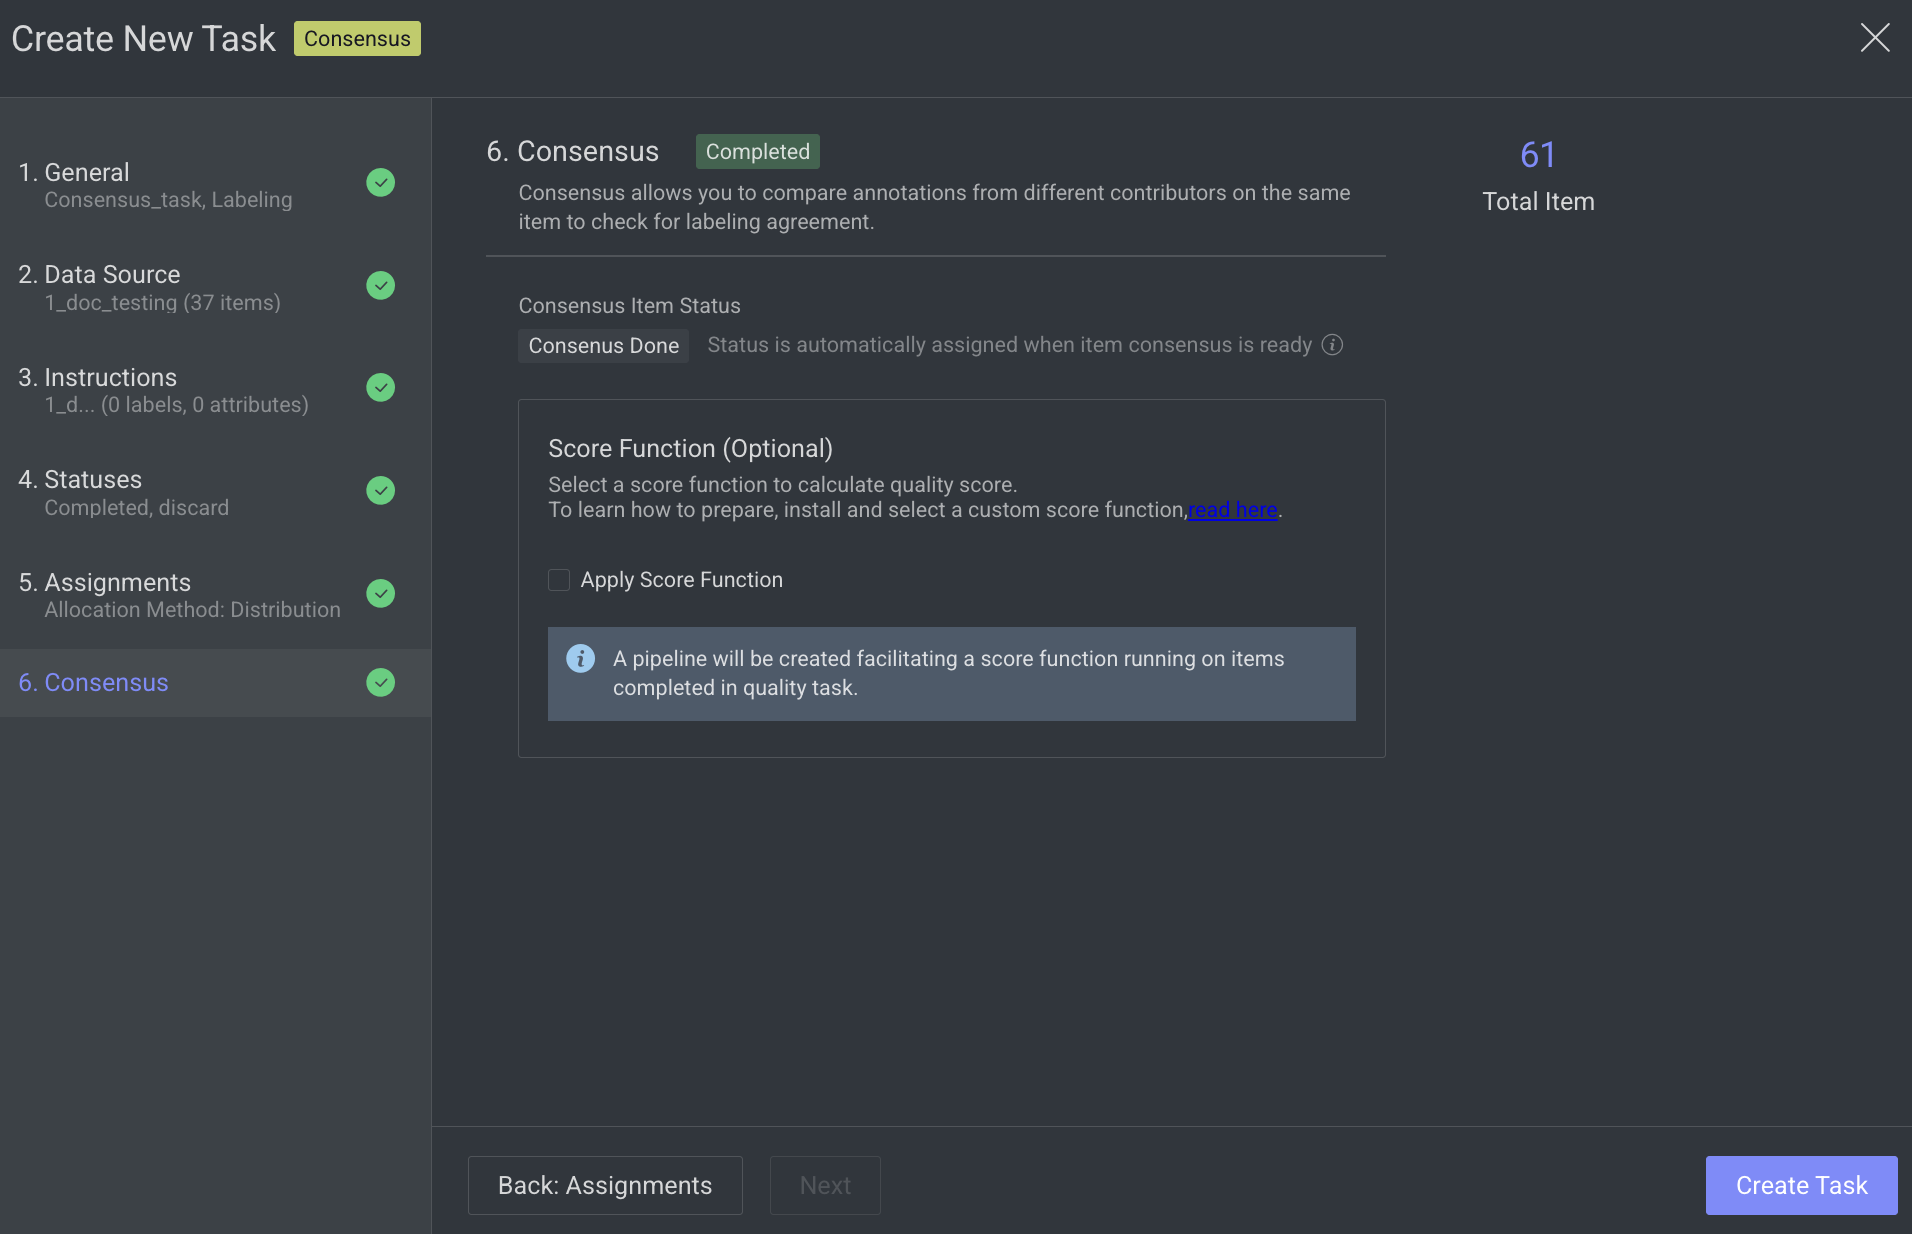
6. Consensus
Enable advanced quality monitoring options to ensure data quality and review performance.
Score Function (Optional): Select a score function to calculate quality score. Clicking on the Apply Score Function, a pipeline will be created facilitating a score function running on items completed in the quality task.
Click Create Task. The consensus task will be created and is displayed in the tasks list.
Create Pipeline Consensus Tasks
A method of automating consensus tasks within a pipeline, enabling data to flow through multiple annotation stages with built-in agreement validation between annotators. To create a consensus task, you can use one of the following options to create an annotation task.
Open the Pipelines from the left side panel.
Select and drag the Consensus task node from the node library to the pipeline canvas.
Select the Consensus task node and click Create Consensus task from the right-side panel.

The Create New Task page is displayed and perform the following steps:
1. General
Enter or select the required details in the General section:
Task Name: Enter a name for the new task. By default, the project name + (total number of tasks + 1) is displayed.
For example, if the project name is abc and the total number of tasks you have already is 5, then the new task name is abc-6.Owner: By default, the current user's email ID is displayed. Click on it to select a different owner from the list.
Pipeline Name: The name of the pipeline is displayed.
Priority: Select a priority from the list. By default, Medium is selected.
Click Next: Data Source.
For the following steps, refer to the below links:
The consensus task will be created and is displayed on the pipeline node.
Redistribute \ Reassign Consensus Tasks
Dataloop consensus tasks currently have the following limitations:
Redistribution Restriction: To ensure consistency in quality evaluation, consensus tasks cannot be redistributed once created.
Reassignment Rules: Consensus assignments can only be reassigned to users who have never had an assignment in the task. This prevents scenarios where a single annotator works on multiple consensus copies of the same item.
To reassign:
Open the Labeling > Tasks page.
Click on the consensus task. The Assignments tab is displayed.
Select the assignment to be reassigned, and click on the Assignment Actions.
Select the Reassign from the list. The Reassign Assignment window of the Edit Task will be displayed.
Select a new user from the list and click Apply Reassignment.
Refer to the Edit a task section to edit tasks.
Qualification Tasks
Qualification tasks create an assignment over entire selected data for each of the assignees. By having ground-truth annotations, a score is calculated and provided for each of the assignees.
How Qualification Works
Qualification tasks provide a tool to evaluate annotators' skills and performance by letting them work on a 'test' task that has ground-truth answers hidden from them. After completing their work (the assignment-completed event), scores can be calculated by comparing annotations in items in their assignment with ground-truth annotations from the original data.
Unlike consensus tasks, the annotator's work is not merged back into the original item, maintaining it as a clean qualification-test copy. By creating multiple qualification tests in the project context, managers can obtain insights into annotators' performances with various data (for example, image and video) and tools (box, polygon, etc.).
Continuous Qualification Task
Qualification tasks by nature never ends. Any new user added to them as an assignee receives an assignment that includes all items. This allows for creating a qualification test once in a project and using it for testing new annotators along the project's lifecycle.
Qualification Score
When selecting to enable qualification score, a Pipeline is created with 2 nodes:
Task node - the qualification task itself
Application node - running Dataloop default score function.
Dataloop default score function is in our GIT repository, and includes documentation of how score are calculated and saved for the different annotation types. As such, you can fork our GIT repo and customize the score function to facilitate your custom logic, then add it as a new Application and place it in the Pipeline instead of the default Dataloop score function.
To learn more, contact the Dataloop team.
Create a Qualification Task
Open the Labeling from the left-side menu.
Click Create Task. The task type section popup is displayed.
Select the qualification from the popup.
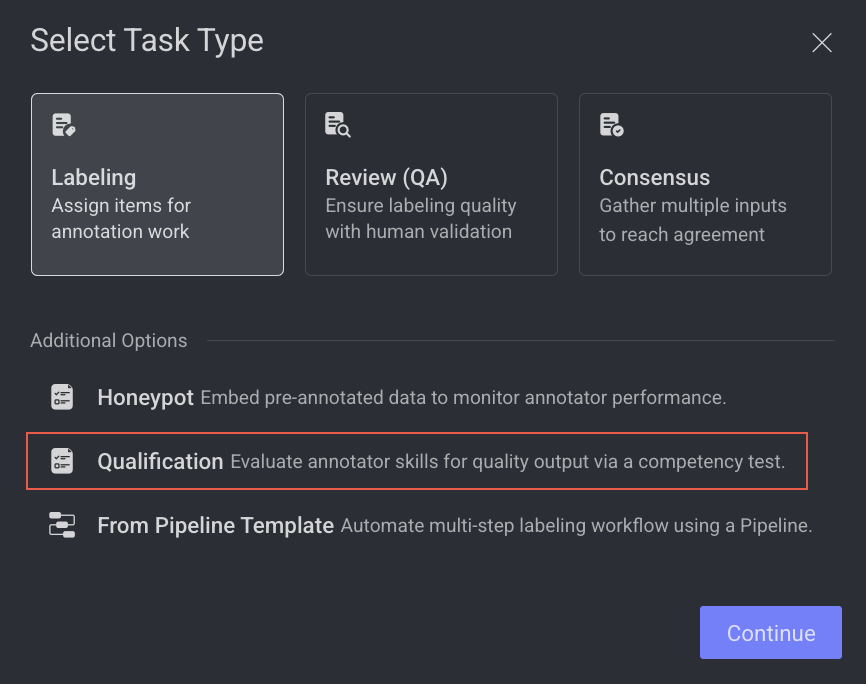
Click Continue.
1. General
Enter or select the required details in the General section:
Task Name: Enter a name for the new task. By default, the project name + (total number of tasks + 1) is displayed.
For example, if the project name is abc and the total number of tasks you have already is 5, then the new task name is abc-6.Owner: By default, the current user's email ID is displayed. Click on it to select a different owner from the list.
Priority: Select a priority from the list. By default, Medium is selected.
Completion Due Date (Optional): Select a task due date from the calendar. If a date is chosen, you will have the option to lock the task once the due date has passed.
Lock Task After Due Date: When enabled, all assignments in this task will be locked for editing after the due date passes. Read here to unlock the task.
Click Next: Data Source.
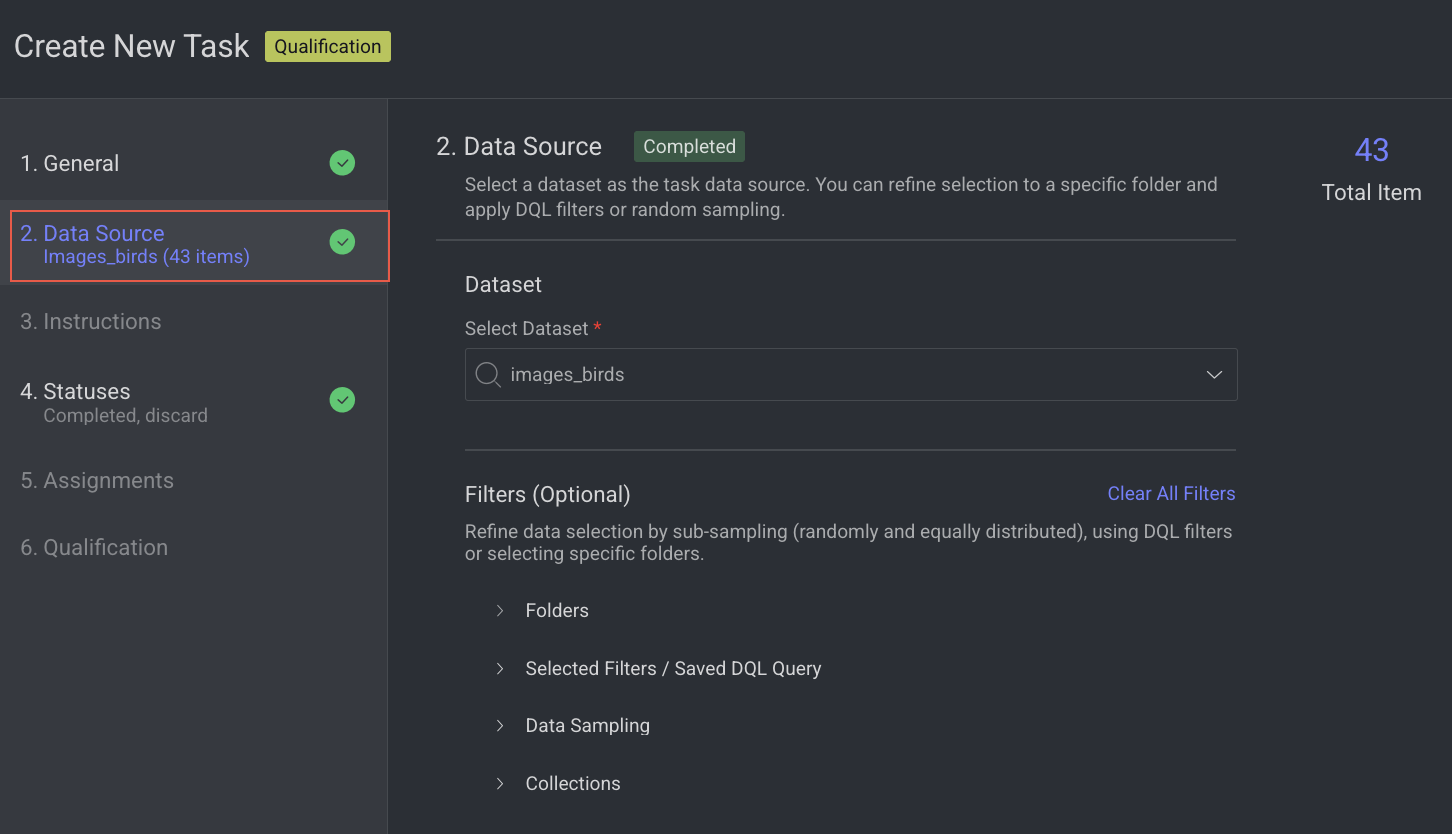
2. Data source
Enter or select a Dataset from the list.
Click Next: Instructions.
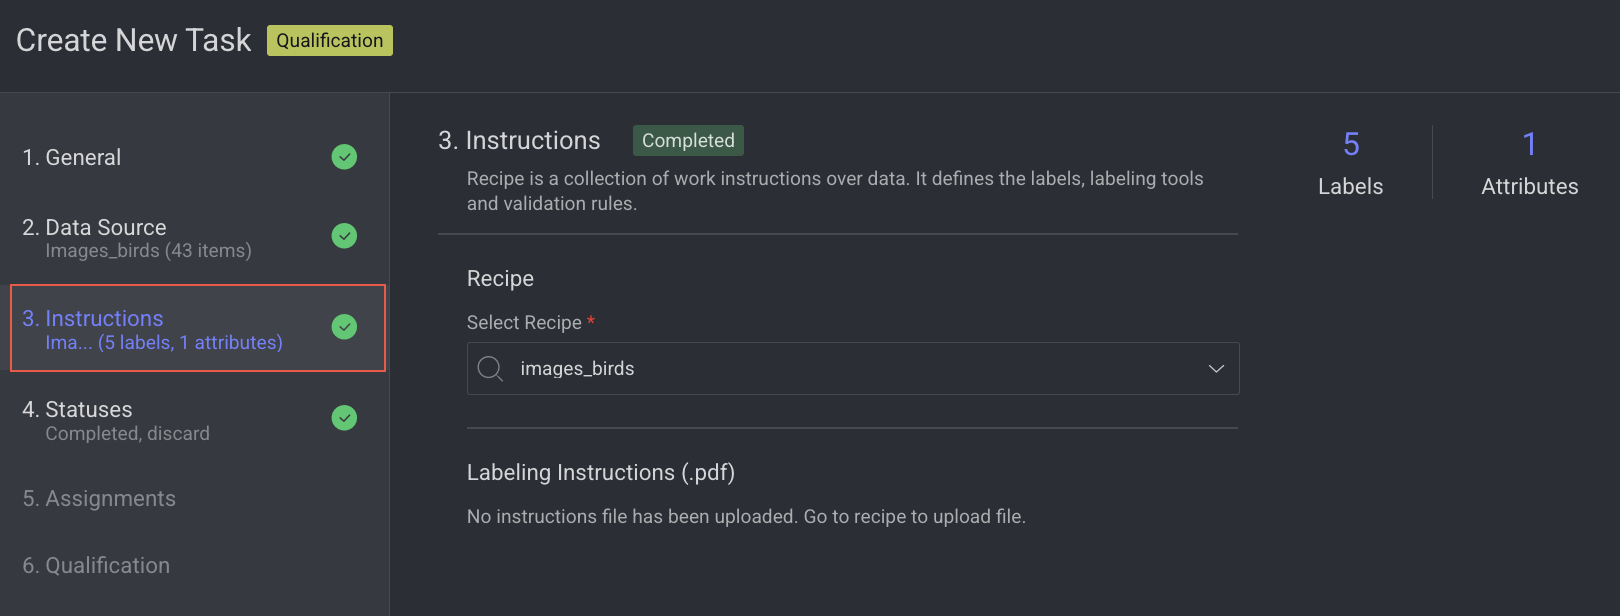
3. Instructions
Enter or select the required details in the Instructions section. The number of Labels and Attributes is displayed on the top-right side of the page.
Recipe: By default, the default recipe is displayed. Select a recipe from the list, if needed.
Labeling Instructions (.pdf): The labeling instruction document is displayed, if available. Go to the Recipe section to upload a PDF instruction. You can select the page range accordingly.
Click Next: Statuses. The Statuses section is displayed.
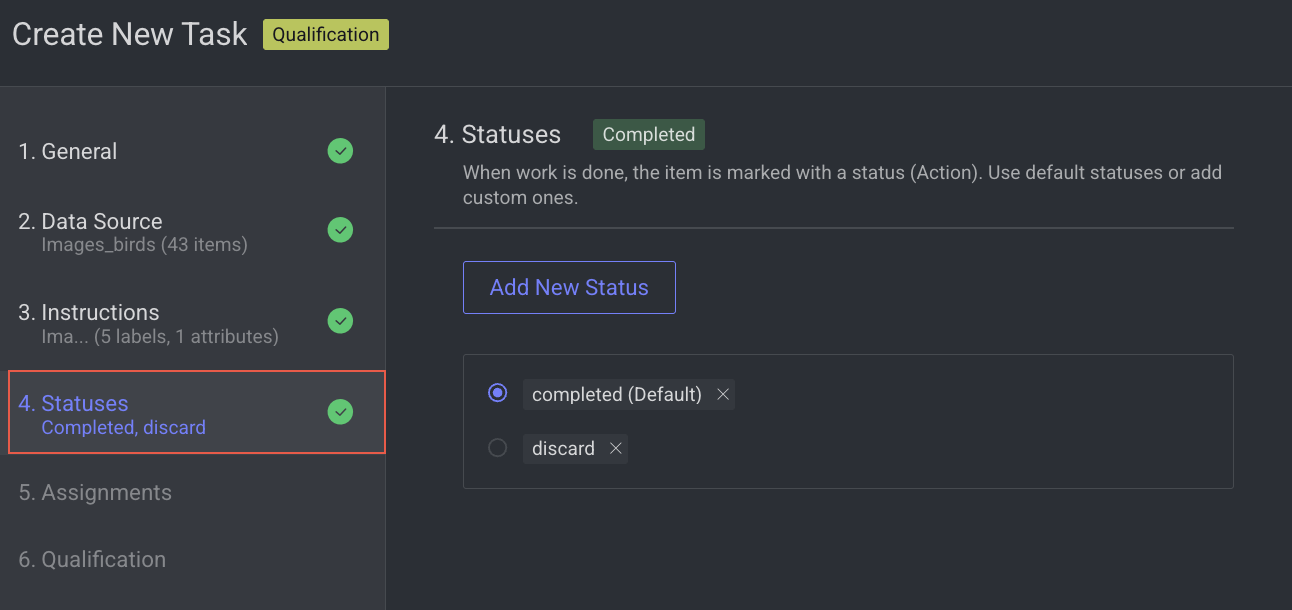
4. Statuses
By default, the Completed status is selected. Click Add New Status to add a new status.
Click Next: Assignments.
5. Assignments
Configure the Distribution method in the Assignments section. Allocation Method: Distribution is selected by default. The distribution allocation method means that the items will be distributed in advance among users, equally or based on a custom percentage. The Auto Distribution option distributes the task equally among the users. By default, it is checked.
Available Users: Search for or select users from the list, and click the Forward arrow icon to add them to the Assigned users list.
Assigned Users:
Search for or view the assigned users from the list. The allocation percentage is equally distributed if you select Auto Distribution.
Select and click the Backward arrow icon to remove them from the Assigned Distribution list.
Inactive users
Inactive users are grayed out and disabled for redistribution, and available for reassignment.
Click Next: Qualification.
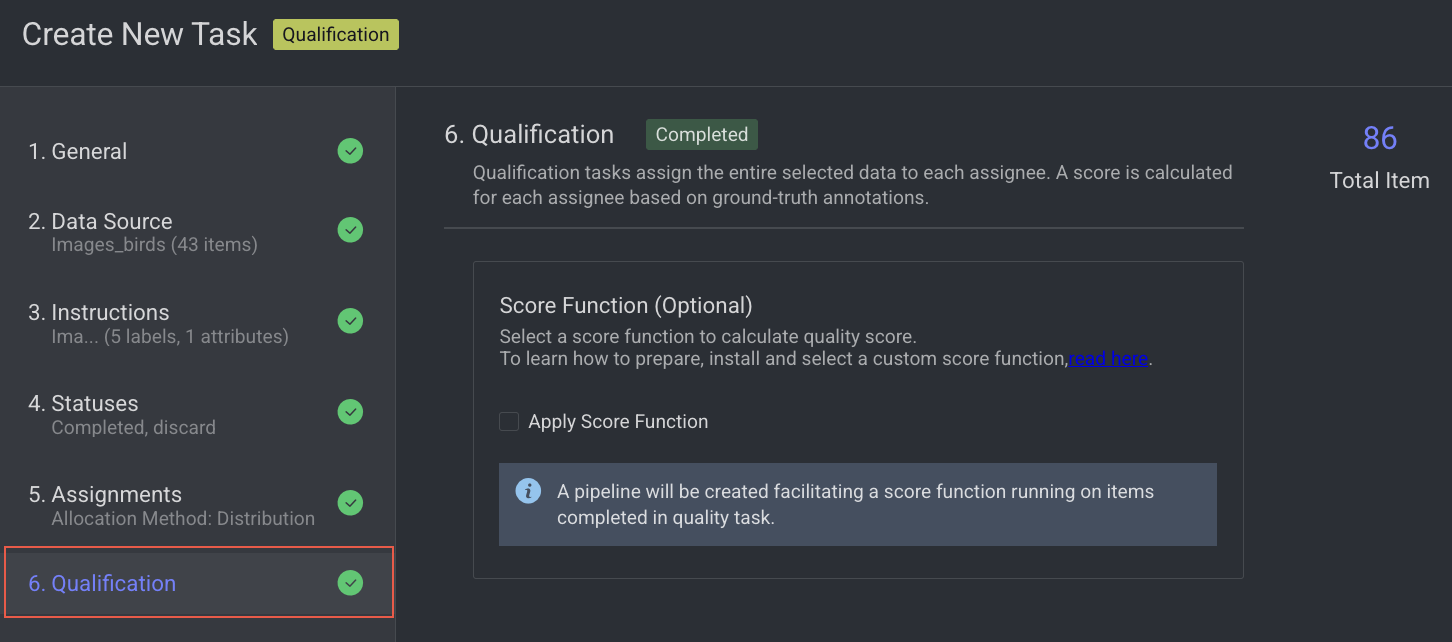
6. Qualification
Enable advanced quality monitoring options to ensure data quality and review performance.
Apply score function, if required.
Click Create Task. The qualification task will be created and is displayed in the tasks list.
To edit a qualification task, see the Edit a task section.
Honeypot Tasks
A Honeypot task is a quality control mechanism used during data annotation to evaluate annotator accuracy and reliability. It works by embedding pre-annotated (ground-truth) items also called "honeypots"—within the regular labeling workflow. These items must be placed in a folder named /honeypot inside the dataset. Dataloop uses this folder as the source of trusted items for quality testing.
How Honeypot Works
While Qualification tasks assess annotators' skills through initial testing, Honeypot tasks continuously monitor their performance, quality, and accuracy during real-world annotation. This is achieved by embedding items with known ground truth within tasks containing raw data. The annotators' scores are calculated based on their accuracy on these honeypot items, providing an ongoing estimate of the quality and reliability of their annotations on raw images.
Honeypot Score
Honeypot scores can be integrated as part of an application (with an event trigger or in a pipeline) and provide the annotator's score. Dataloop provides a default score function, but any custom function that runs over the assignment items (taking only the relevant honeypot ones) can be used for that purpose.
To learn more about the Dataloop Scoring Function, see the Scoring and metrics app README file.
Create a Honeypot Task
A quality control task where pre-labeled data is hidden among regular tasks to test annotators’ accuracy and reliability without their knowledge.
Open the Labeling from the left-side menu.
Click Create Task. The task type section popup is displayed.
Select the Honeypot from the popup.
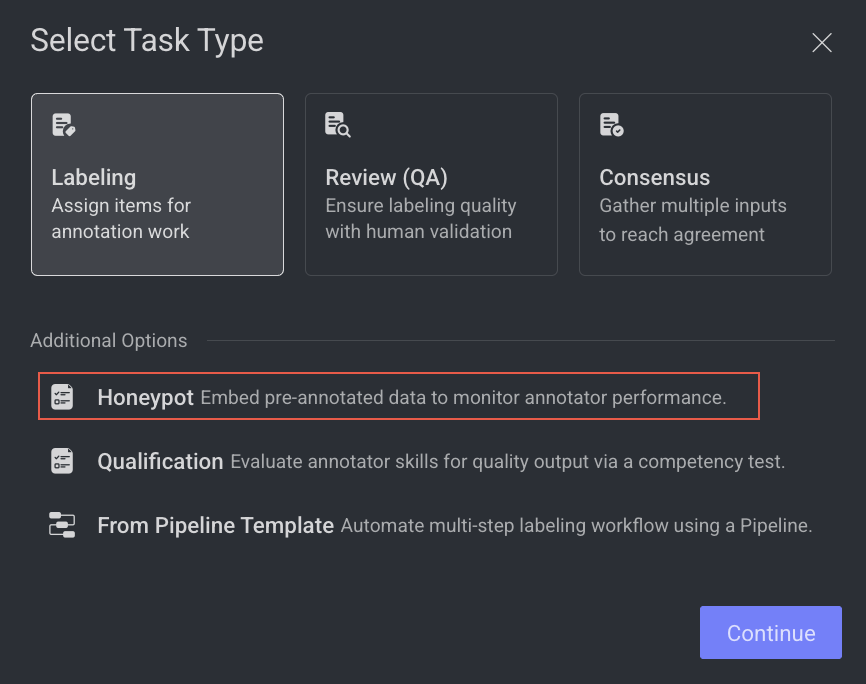
Click Continue.
1. General
Enter or select the required details in the General section:
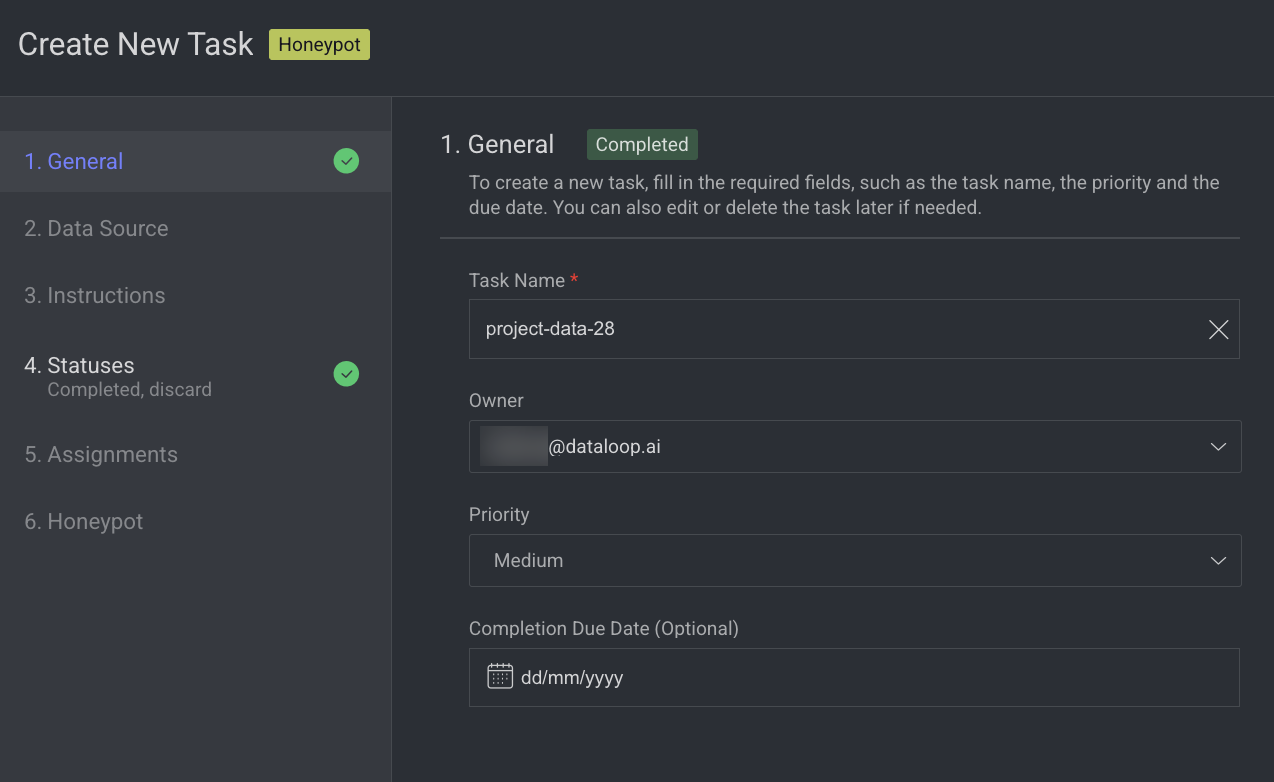
Task Name: Enter a name for the new task. By default, the project name + (total number of tasks + 1) is displayed.
For example, if the project name is abc and the total number of tasks you have already is 5, then the new task name is abc-6.Owner: By default, the current user's email ID is displayed. Click on it to select a different owner from the list.
Priority: Select a priority from the list. By default, Medium is selected.
Completion Due Date (Optional): Select a task due date from the calendar. If a date is chosen, you will have the option to lock the task once the due date has passed.
Lock Task After Due Date: When enabled, all assignments in this task will be locked for editing after the due date passes. Read here to unlock the task.
Click Next: Data Source.
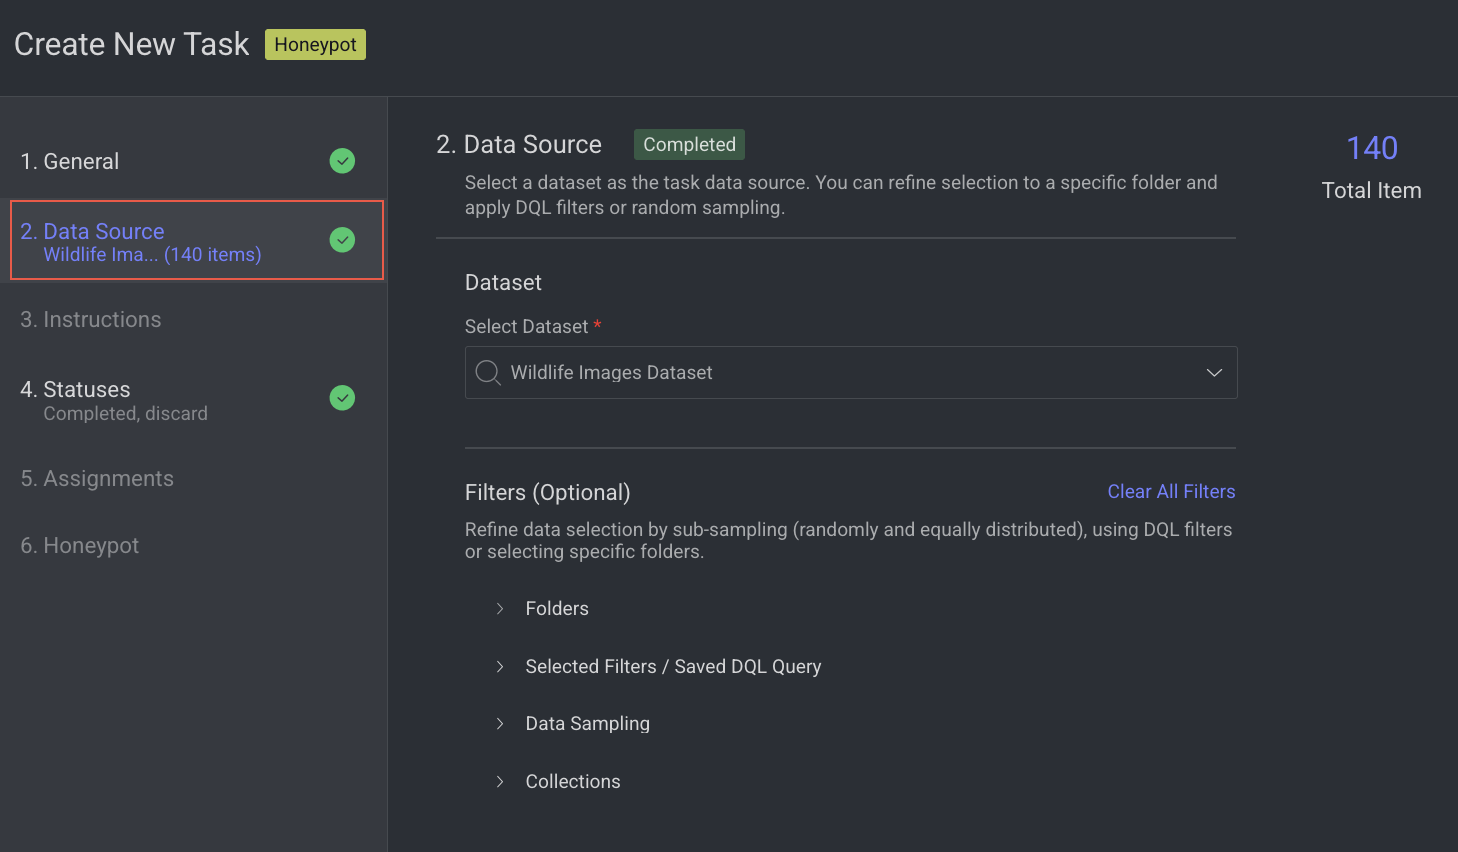
2. Data source
Enter or select a Dataset from the list.
Click Next: Instructions.
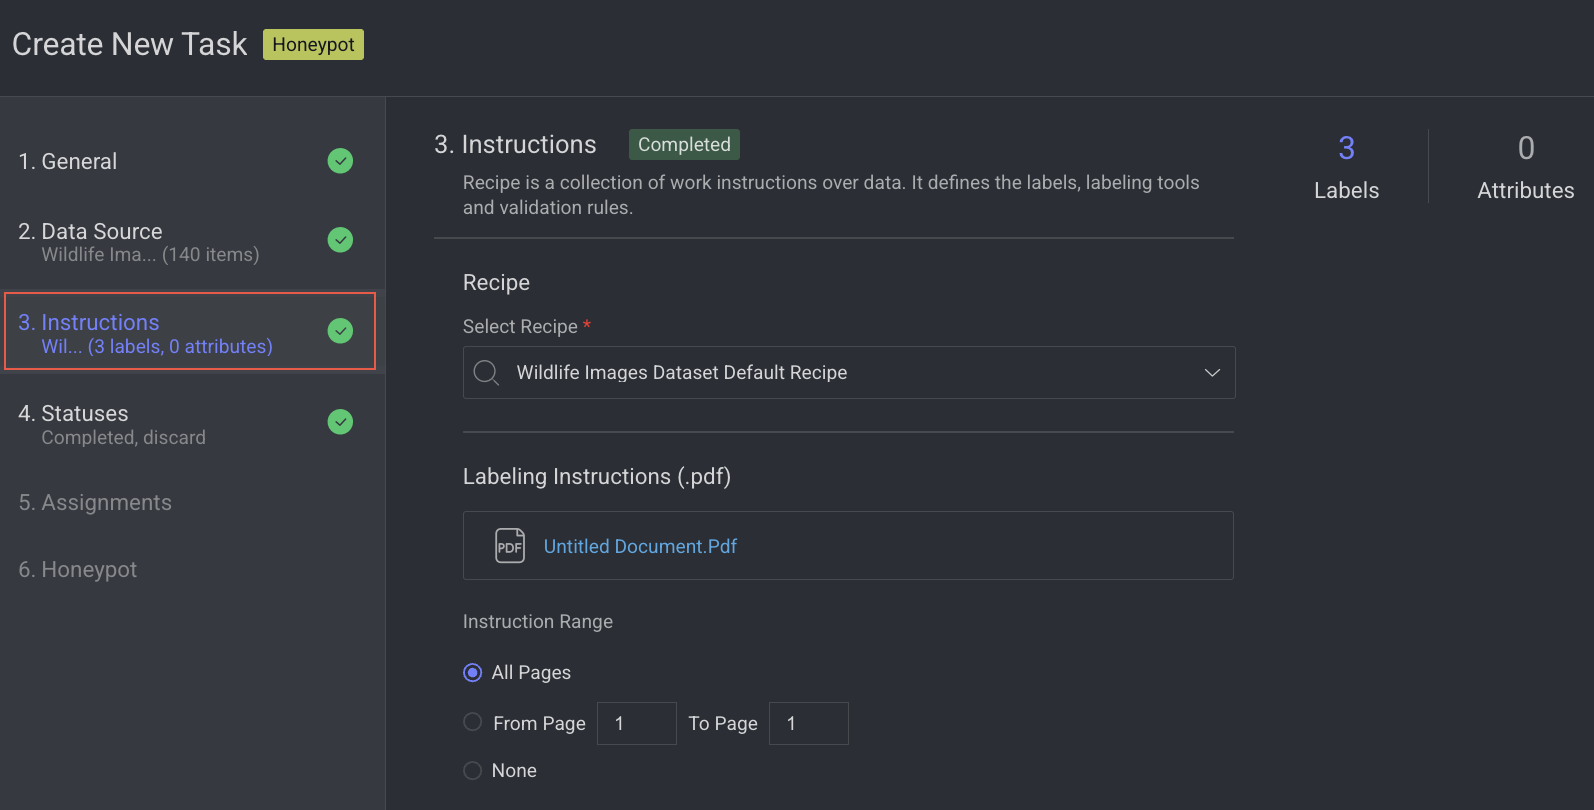
3. Instructions
Enter or select the required details in the Instructions section. The number of Labels and Attributes is displayed on the top-right side of the page.
Recipe: By default, the default recipe is displayed. Select a recipe from the list, if needed.
Labeling Instructions (.pdf): The labeling instruction document is displayed, if available. Go to the Recipe section to upload a PDF instruction. You can select the page range accordingly.
Click Next: Statuses. The Statuses section is displayed.
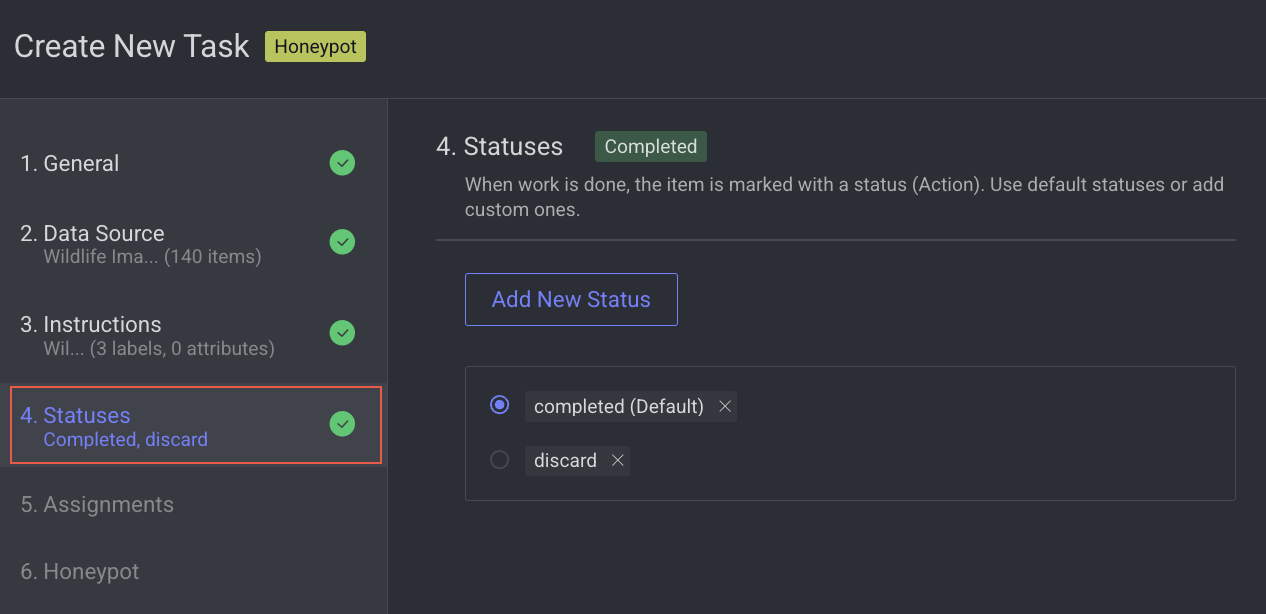
4. Statuses
By default, the Completed status is selected. Click Add New Status to add a new status.
Click Next: Assignments.
5. Assignments
Configure the Distribution method in the Assignments section. Allocation Method: Distribution is selected by default. The distribution allocation method means that the items will be distributed in advance among users, equally or based on a custom percentage. The Auto Distribution option distributes the task equally among the users. By default, it is checked.
Available Users: Search for or select users from the list, and click the Forward arrow icon to add them to the Assigned users list.
Assigned Users:
Search for or view the assigned users from the list. The allocation percentage is equally distributed if you select Auto Distribution.
Select and click the Backward arrow icon to remove them from the Assigned Distribution list.
Inactive users
Inactive users are grayed out and disabled for redistribution, and available for reassignment.
Click Next: Honeypot.
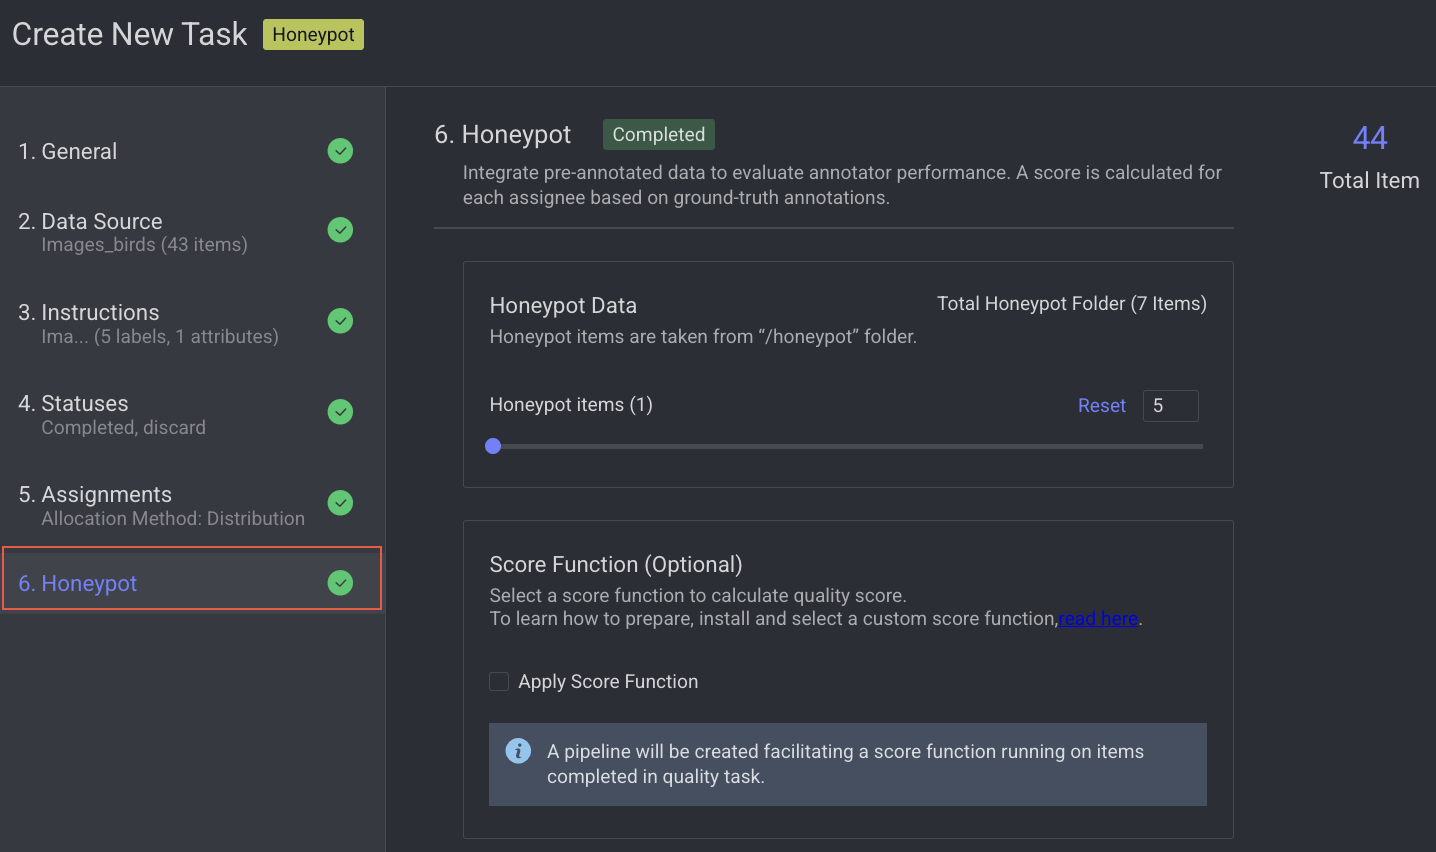
6. Honeypot
Enable advanced quality monitoring options to ensure data quality and review performance.
Modify the Honeypot items values as required.
Apply score function, if required.
Click Create Task. The Honeypot task will be created and is displayed in the tasks list.
To edit a qualification task, see the Edit a task section.