Overview
A Task represents a unit of work assigned to a user or a group of users in DDOE.
Tasks control how data is processed, annotated, reviewed, or evaluated by applying a Recipe to a set of data and assigning the work to specific contributors.

The Labeling page is now called Human Tasks.
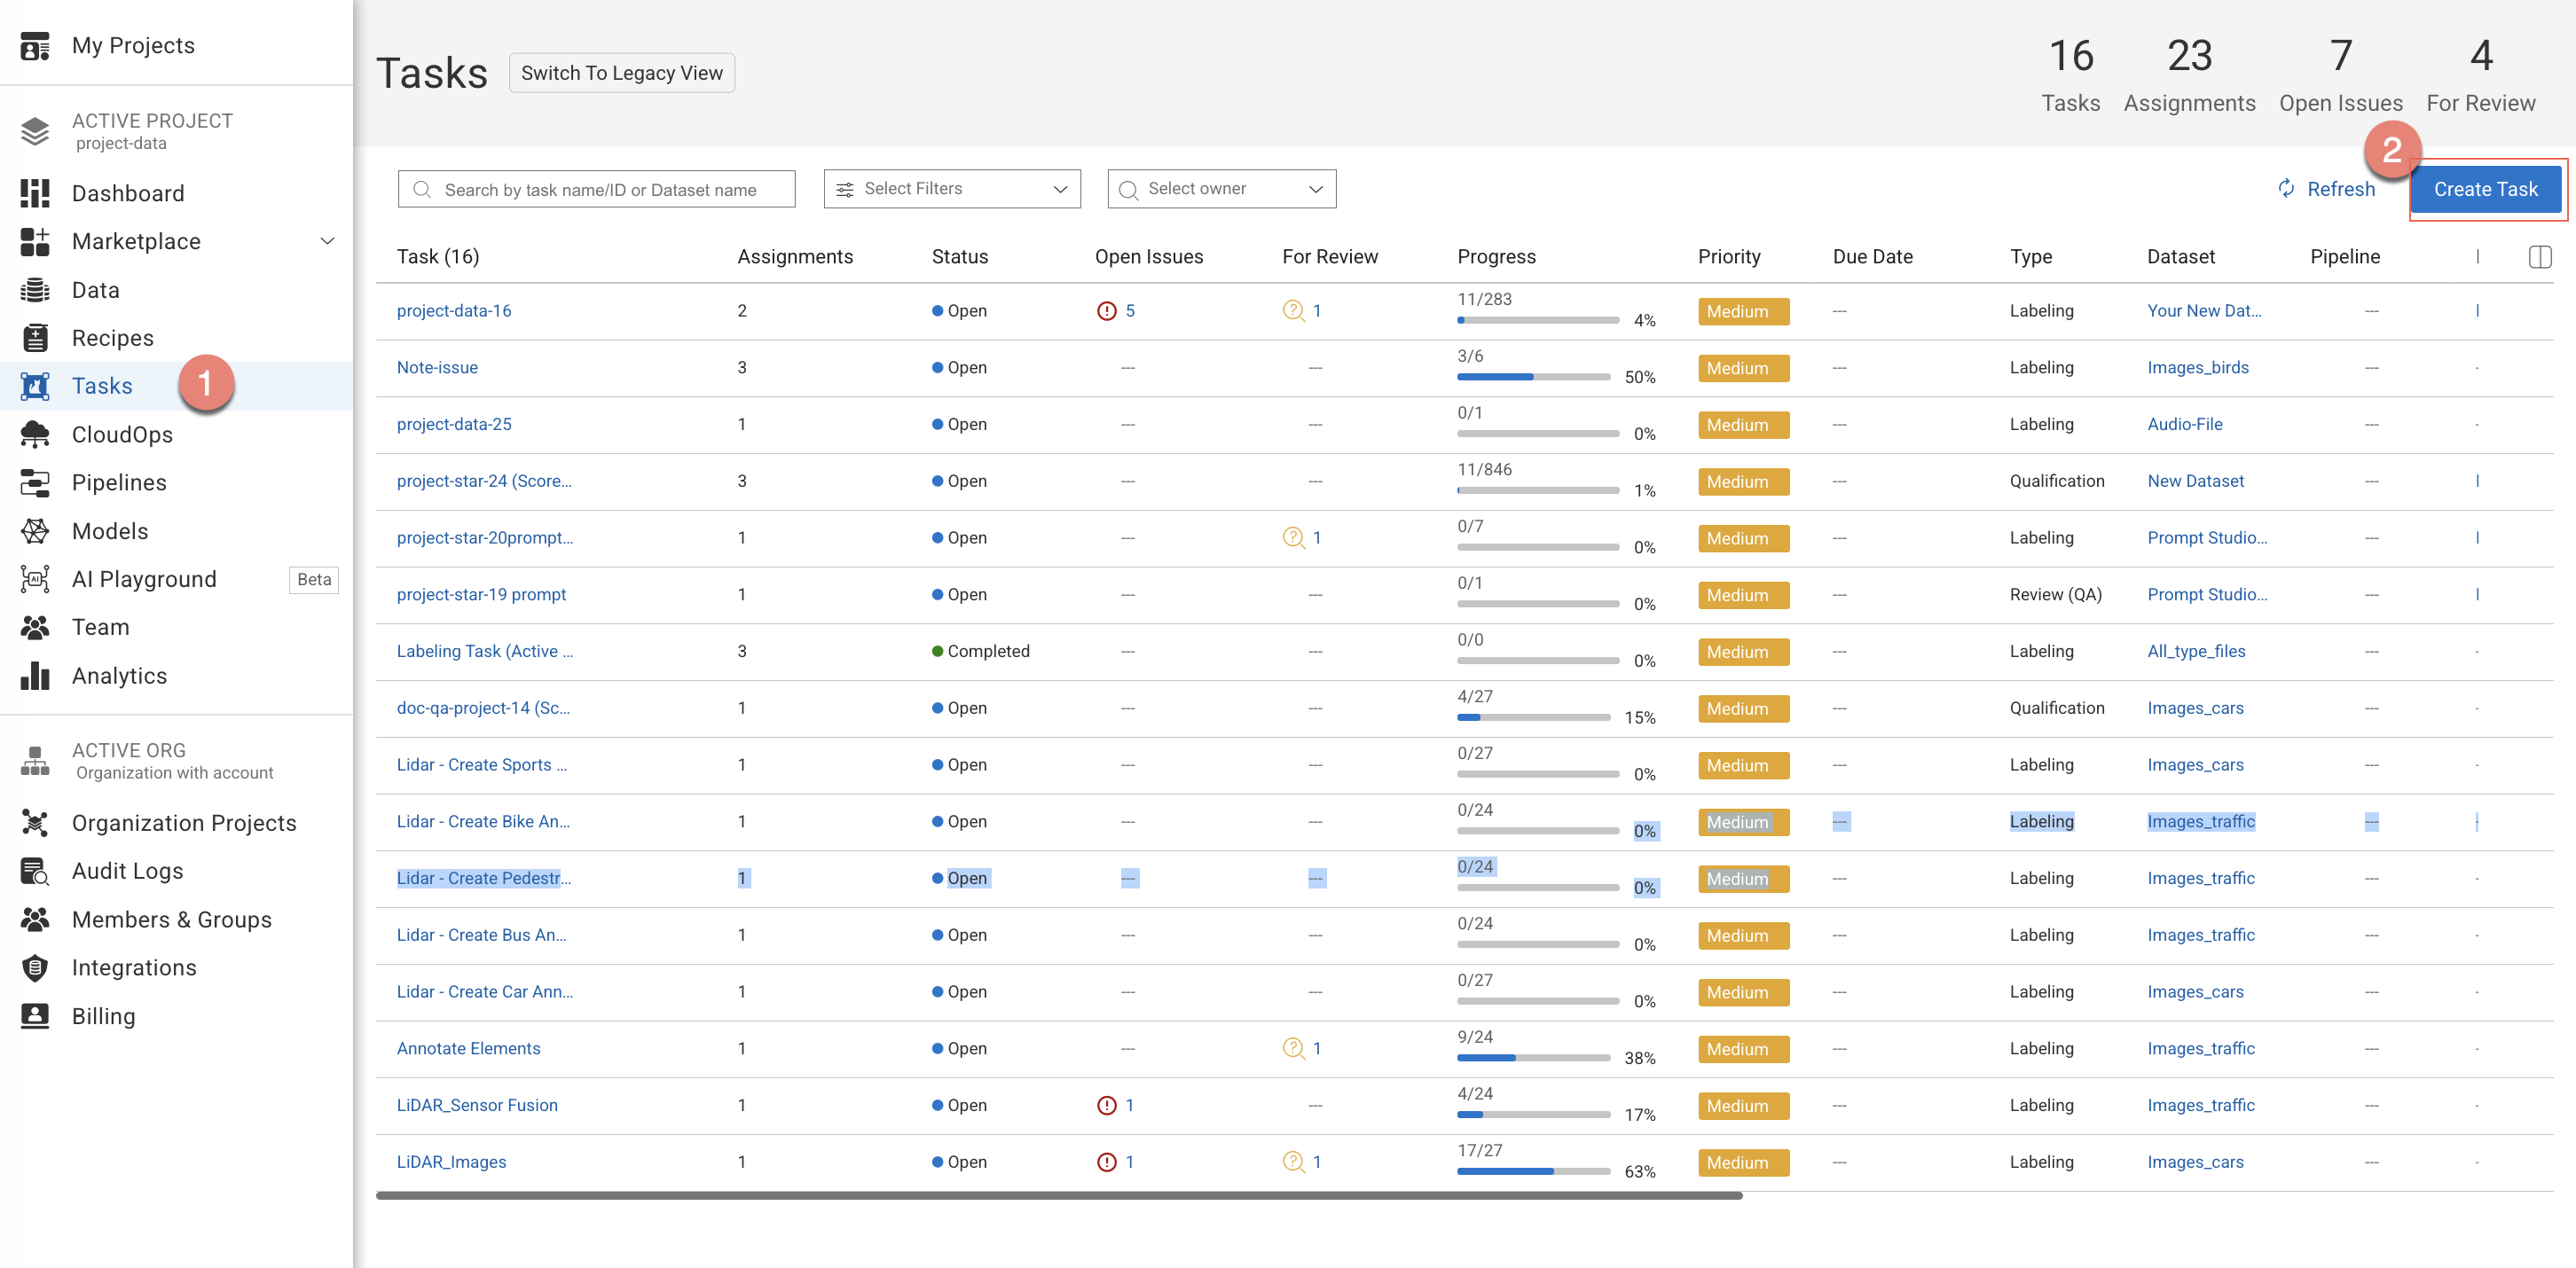
The Tasks page displays the current page and includes an option to Switch to Legacy View, allowing access to the previous “Labeling Tasks” interface if needed.
Summary Counters (Top Right)
These counters provide a quick snapshot of task activity:
Tasks: Total number of tasks in the project
Assignments: Total number of active assignments
Issues: Total number of open issues
Reviews: Total number of tasks pending review
Search & Filter Tasks
Search for tasks by task name, task ID, or dataset name.
Apply filters to narrow tasks by criteria such as status, type, priority, or dataset.
Filter tasks by task owner.
Tasks Table
The Tasks page displays a table containing a list of tasks, with their respective details presented in individual columns. Clicking on the Task Name or double-clicking on the task row will navigate you to the assignments page for that specific task.
Open Issue, Assignment Issue and For Review Signs
The presence of Open Issue and Assignment Issue signs typically indicates the existence of open issues within tasks or assignments. Click on the link to view more details.
The presence of For Review signs typically indicates that issue corrections are ready for review. Click on the link to view more details.
Task: This displays the name of the task. You can click on it to view the task's Items (browser) page. Also, you click on the Copy icon to Copy the Task ID.
Assignments: This displays the number of assignments associated to the tasks.
Status: This displays the status of the tasks.
Blue dot – Task is open
Green dot – Task is completed
Warning / error icons – Open issues exist
Review icons – Items are waiting for review
Open Issues: This displays the number of items with annotations that have open issues.
For Review: This displays the number of items with annotations that have issues corrected for review.
Progress: This displays the item's completion status.
Priority: This displays the tasks with a High, Medium, or Low priority.
Due Date: This displays the due date for the task set by the task creator. It helps the annotation team to prioritize tasks and plan their schedule accordingly.
Type: This displays the task type; labeling or QA tasks.
Dataset: This displays the name of the dataset used to create the task. You can click on it to view the Dataset browser page.
Pipeline: The name and link of the pipeline to which the task belongs.
Recipe: The name of the recipe selected for this task.
Allocation Method: This displays the task allocation method - Distribution or Pulling type.
Groups: This displays the group name of the task owner.
Owner: This displays the email ID and avatar of the task owner.
Updated At: This displays the task update date, for example, Sep, 15 2023.
Created At: This displays the task creation date, for example, Sep, 15 2023.
You can customize the default columns and display additional fields by clicking Show/Hide Columns.
What is in a Task?
When you click a task, DDOE navigates you to the Task view page, where you can view the task’s details and perform task actions, and also see Assignments, Items, Analytics, and Issues tabs.
Assignments Tab: This tab lists all assignments associated with the selected task. Assignments are part of a task and connect datasets to annotators by splitting data into manageable, trackable units of work and assigning them to specific team members.
Items Tab: The tab lists all the data items associated with the selected task.
Analytics Tab: This tab displays analytical data related to the selected task, such as progress and performance metrics.
Issues Tab: This tab lists all issues created during QA (Review) tasks that are associated with the selected task.
For Annotator Roles:
An annotator will have access to the Labeling page where can view the details of assignments and issues in seperate tabs:
Assignments: This tab displays all tasks currently assigned to the annotator.
Issues: This tab displays issues related to the annotator’s assignments.
Task Components
Each task consists of the following core components:
Data (Items)
The data defines what items users work on in the task. This can include images, videos, audio files, documents, text, or other supported data types. The data is a sub-set of one dataset.
Recipe and Instructions
The Recipe defines how the task is performed, including the annotation settings, available ontology (labels and attributes), annotation tools, or evaluation layout in case of Multimodal/GenAI use-cases.
Instructions is a PDF file that appears during annotation work, that guide users on how to complete the task correctly and consistently.
Status
Work on items is declared done by setting a status on the item. Statuses are defined when creating a task. There are default statuses, but the task creator can define custom ones.
Custom Status
You can add a custom statuses when creating a new task.
Labeling tasks:
Complete: The default status to declare that annotation work is done.
Discard: Disqualified item.
Review (QA) tasks:
Approve: The default status to declare that QA review work is done.
Discard: Disqualified item.
An item will consequently have several statuses, one for every task it was added to. The status of an item in a task can be changed. The original annotator/reviewer, or other project users with privileges, such as the task owner, can open the item again and set a different status.
Task and Assignment Status
Tasks and assignments have a status set by the system that cannot be changed by the users:
Open/To-Do: A task/assignment that is not started yet.
In-Progress: An assignment is being worked on by assignees.
Completed/Done: All items in the task/assignment are done.
Completed with issues: All items had statuses, but one or more items have an issue on at least one of the annotations; therefore, the task or assignment is not completed.
Assignees
Assignees are the users or teams responsible for completing the task.
Assignments
Assignments define how data items are distributed among assignees.
Allocation Methods
You can configure tasks to use one of the following two allocation methods, which determine how items are distributed to assignments.
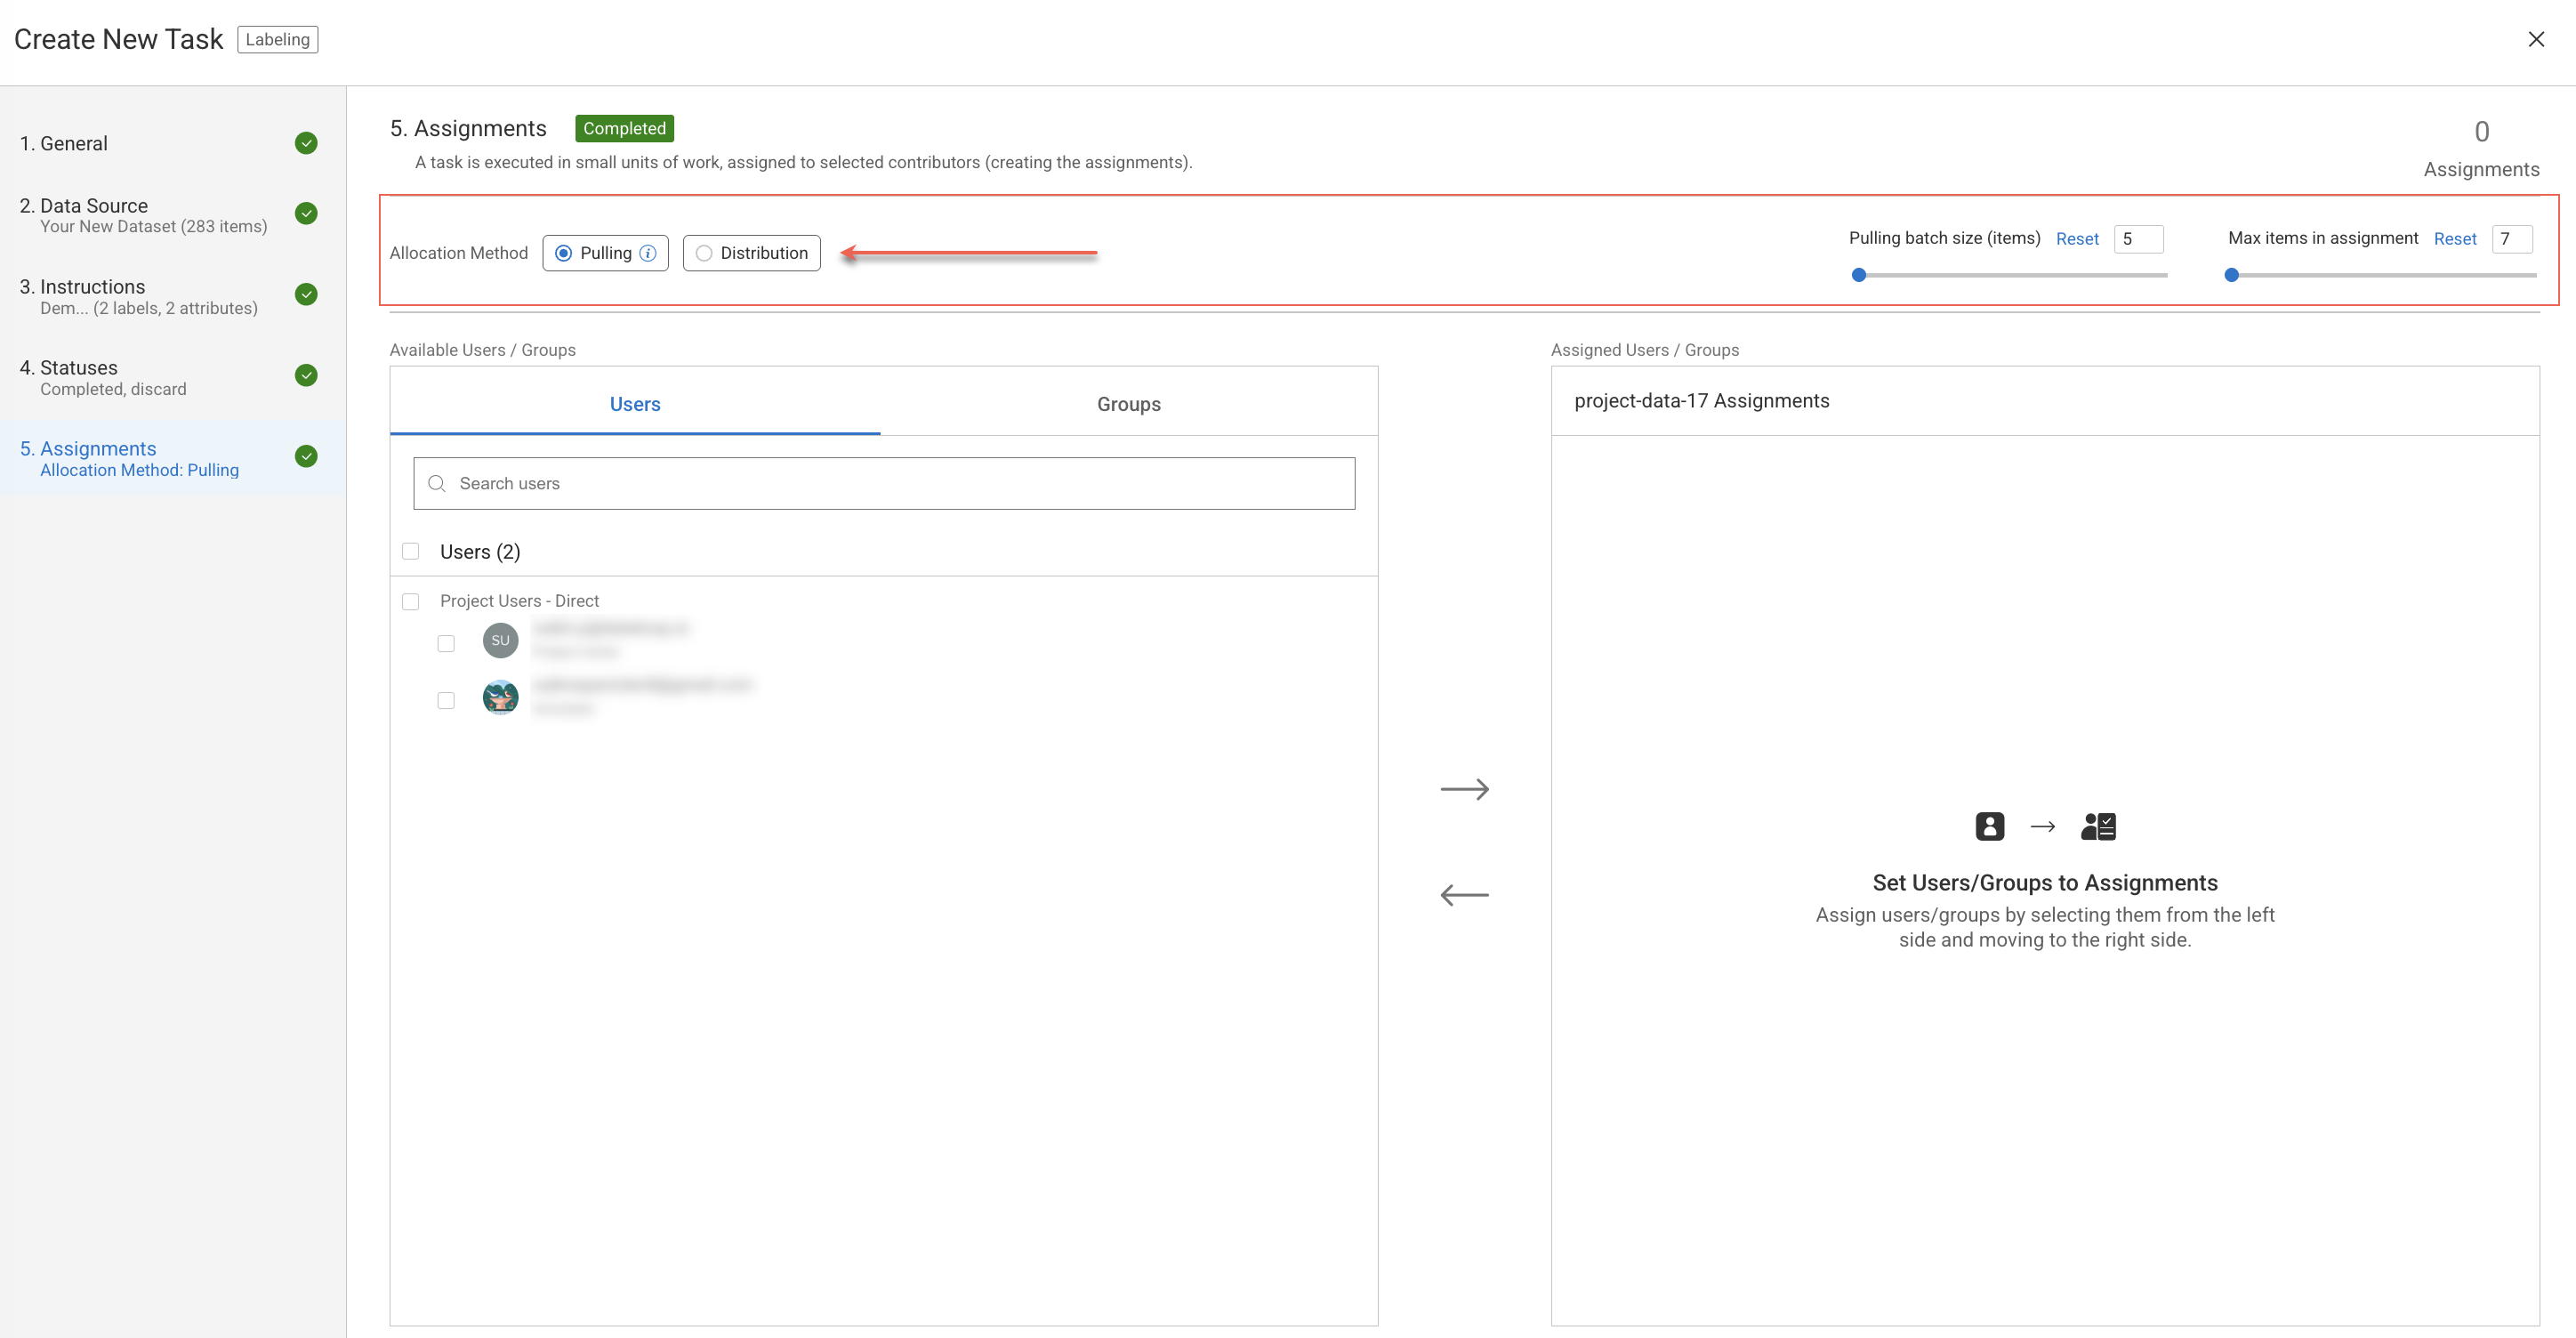
Distribution: In this method, when tasks are created, dataset items are initially allocated to assignments. Any modifications to assignments, such as the addition or removal of assignees or the rebalancing of items, necessitate a recalibration of the assignments.
Pulling: In this method, dataset items are initially queued in a concealed assignment and subsequently distributed to assignees in small batches based on their progress. This method makes it quite straightforward to make changes to the team since no assignee is burdened with many items in their assignment.
Task Types
DDOE supports several task types, each designed for a specific workflow:
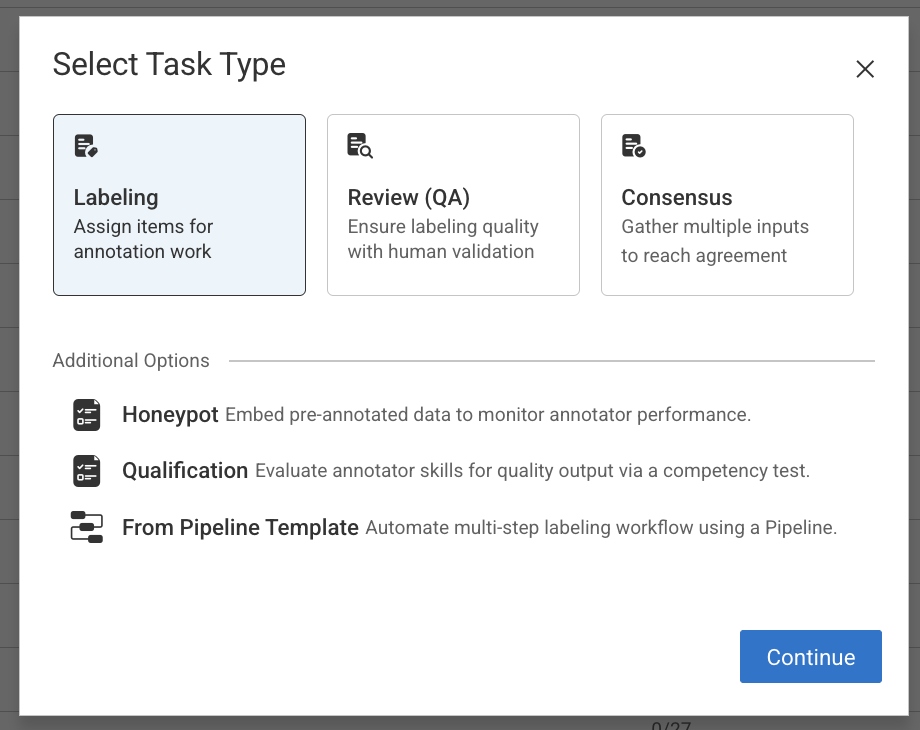
Labeling Tasks: Perform data annotation using the defined recipe.
QA (Review) Tasks: Review and validate completed tasks.
Consensus Tasks: Compare multiple annotations to reach agreement.
Quality Tasks: Measure annotation quality using predefined criteria.
Honeypot Tasks: Insert known samples to evaluate annotator performance.
Pipeline Tasks: Create Task with the help of a Pipeline to streamline and manage the labeling process efficiently.
Creating Tasks
Annotation managers are responsible for creating tasks by specifying the labeling requirements.
On the DDOE platform, you can create labeling tasks directly from:
Task Page
Open the Human Tasks page from the left-side menu.
Click Create Task. Learn more about the tasks
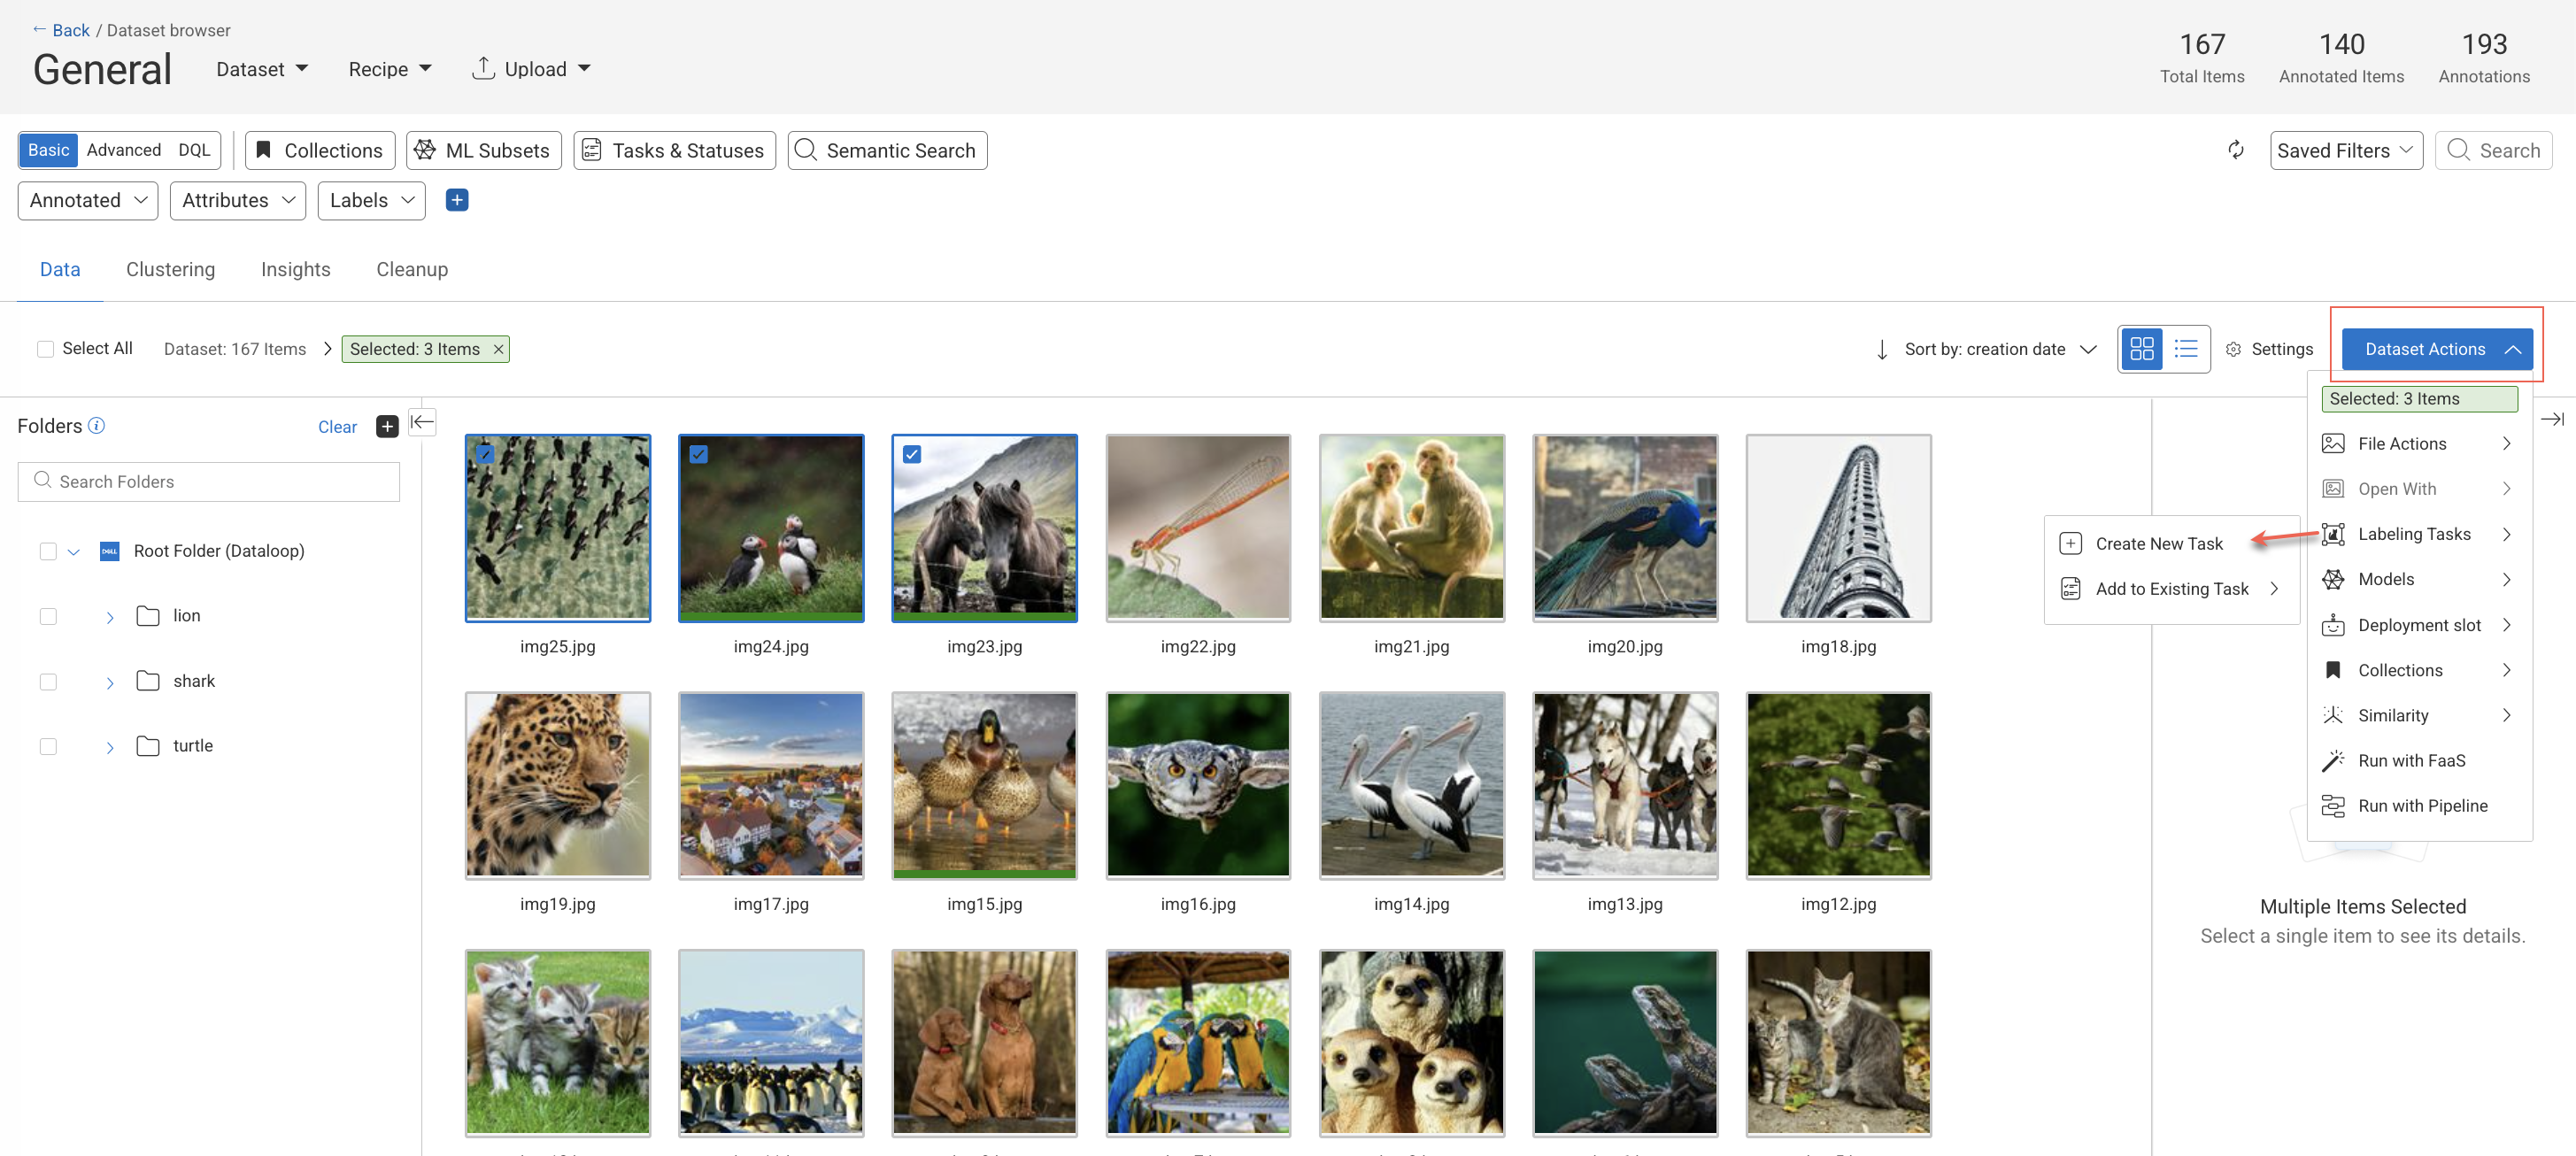
Dataset Browser
Open Data page from the left-side menu.
Click on the dataset from the list.
Click on the Dataset Actions from the right-side panel, or right-click on selected items.
Select the Labeling Tasks → Create New Task option from the list.
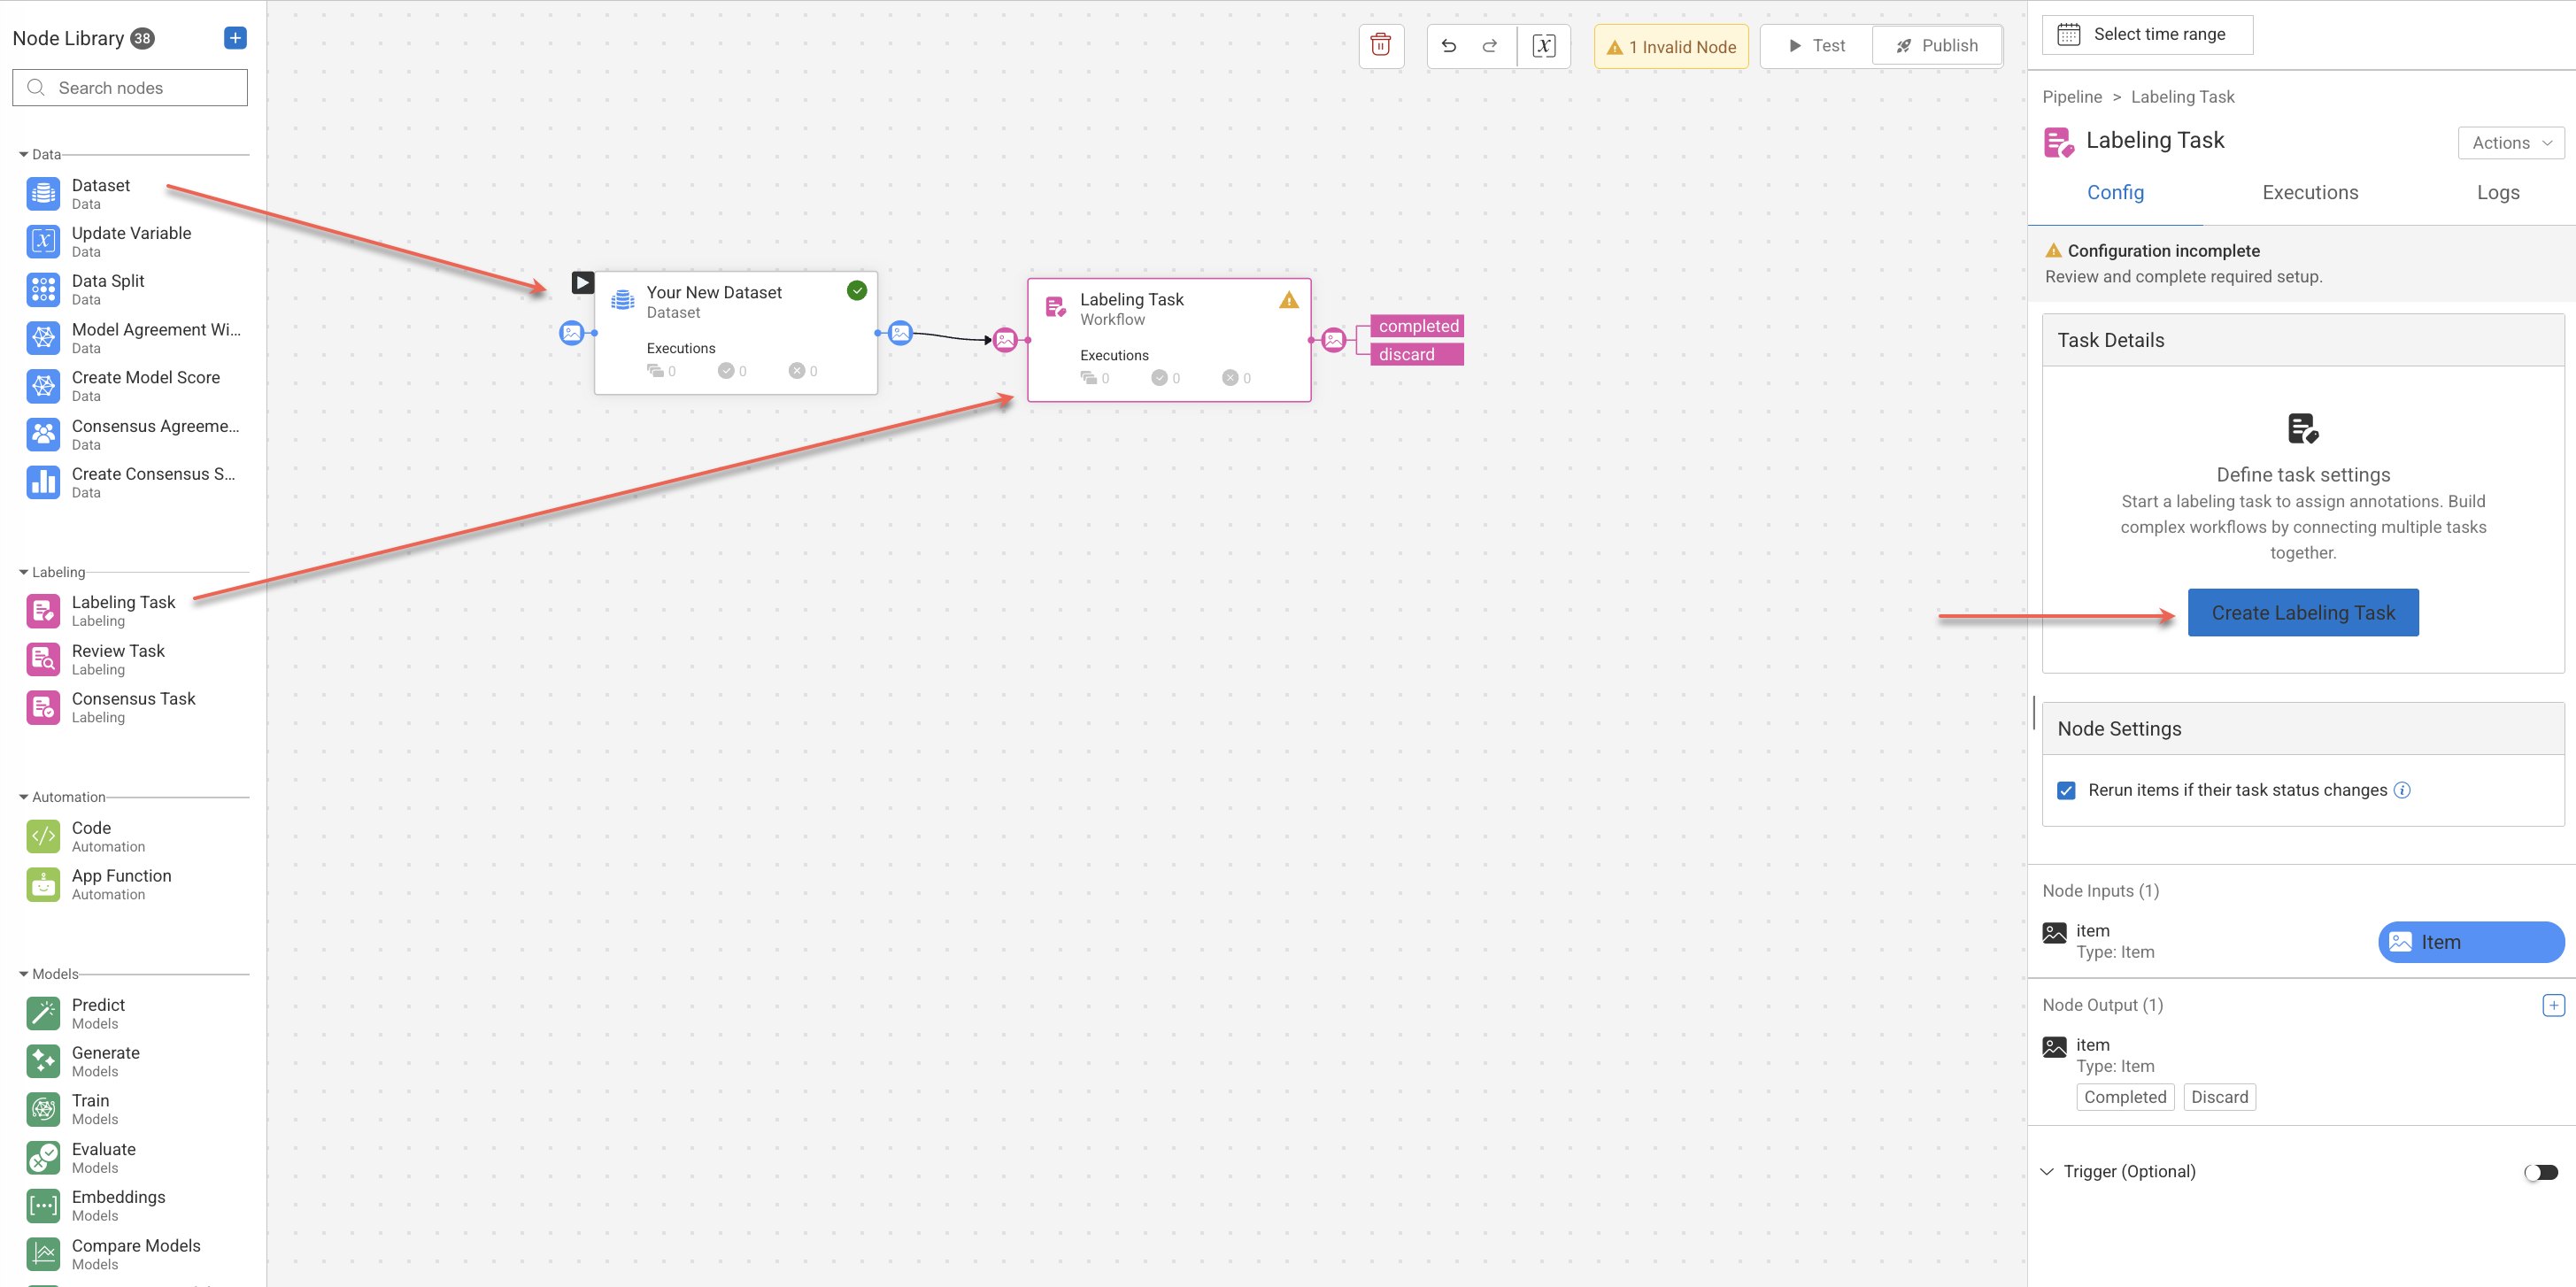
Pipeline
Open Pipelines page from the left-side menu.
Click Create Pipeline.
Add a Dataset node from the node library and configure as needed.
Add Labeling Task node from the library and start creating a task.
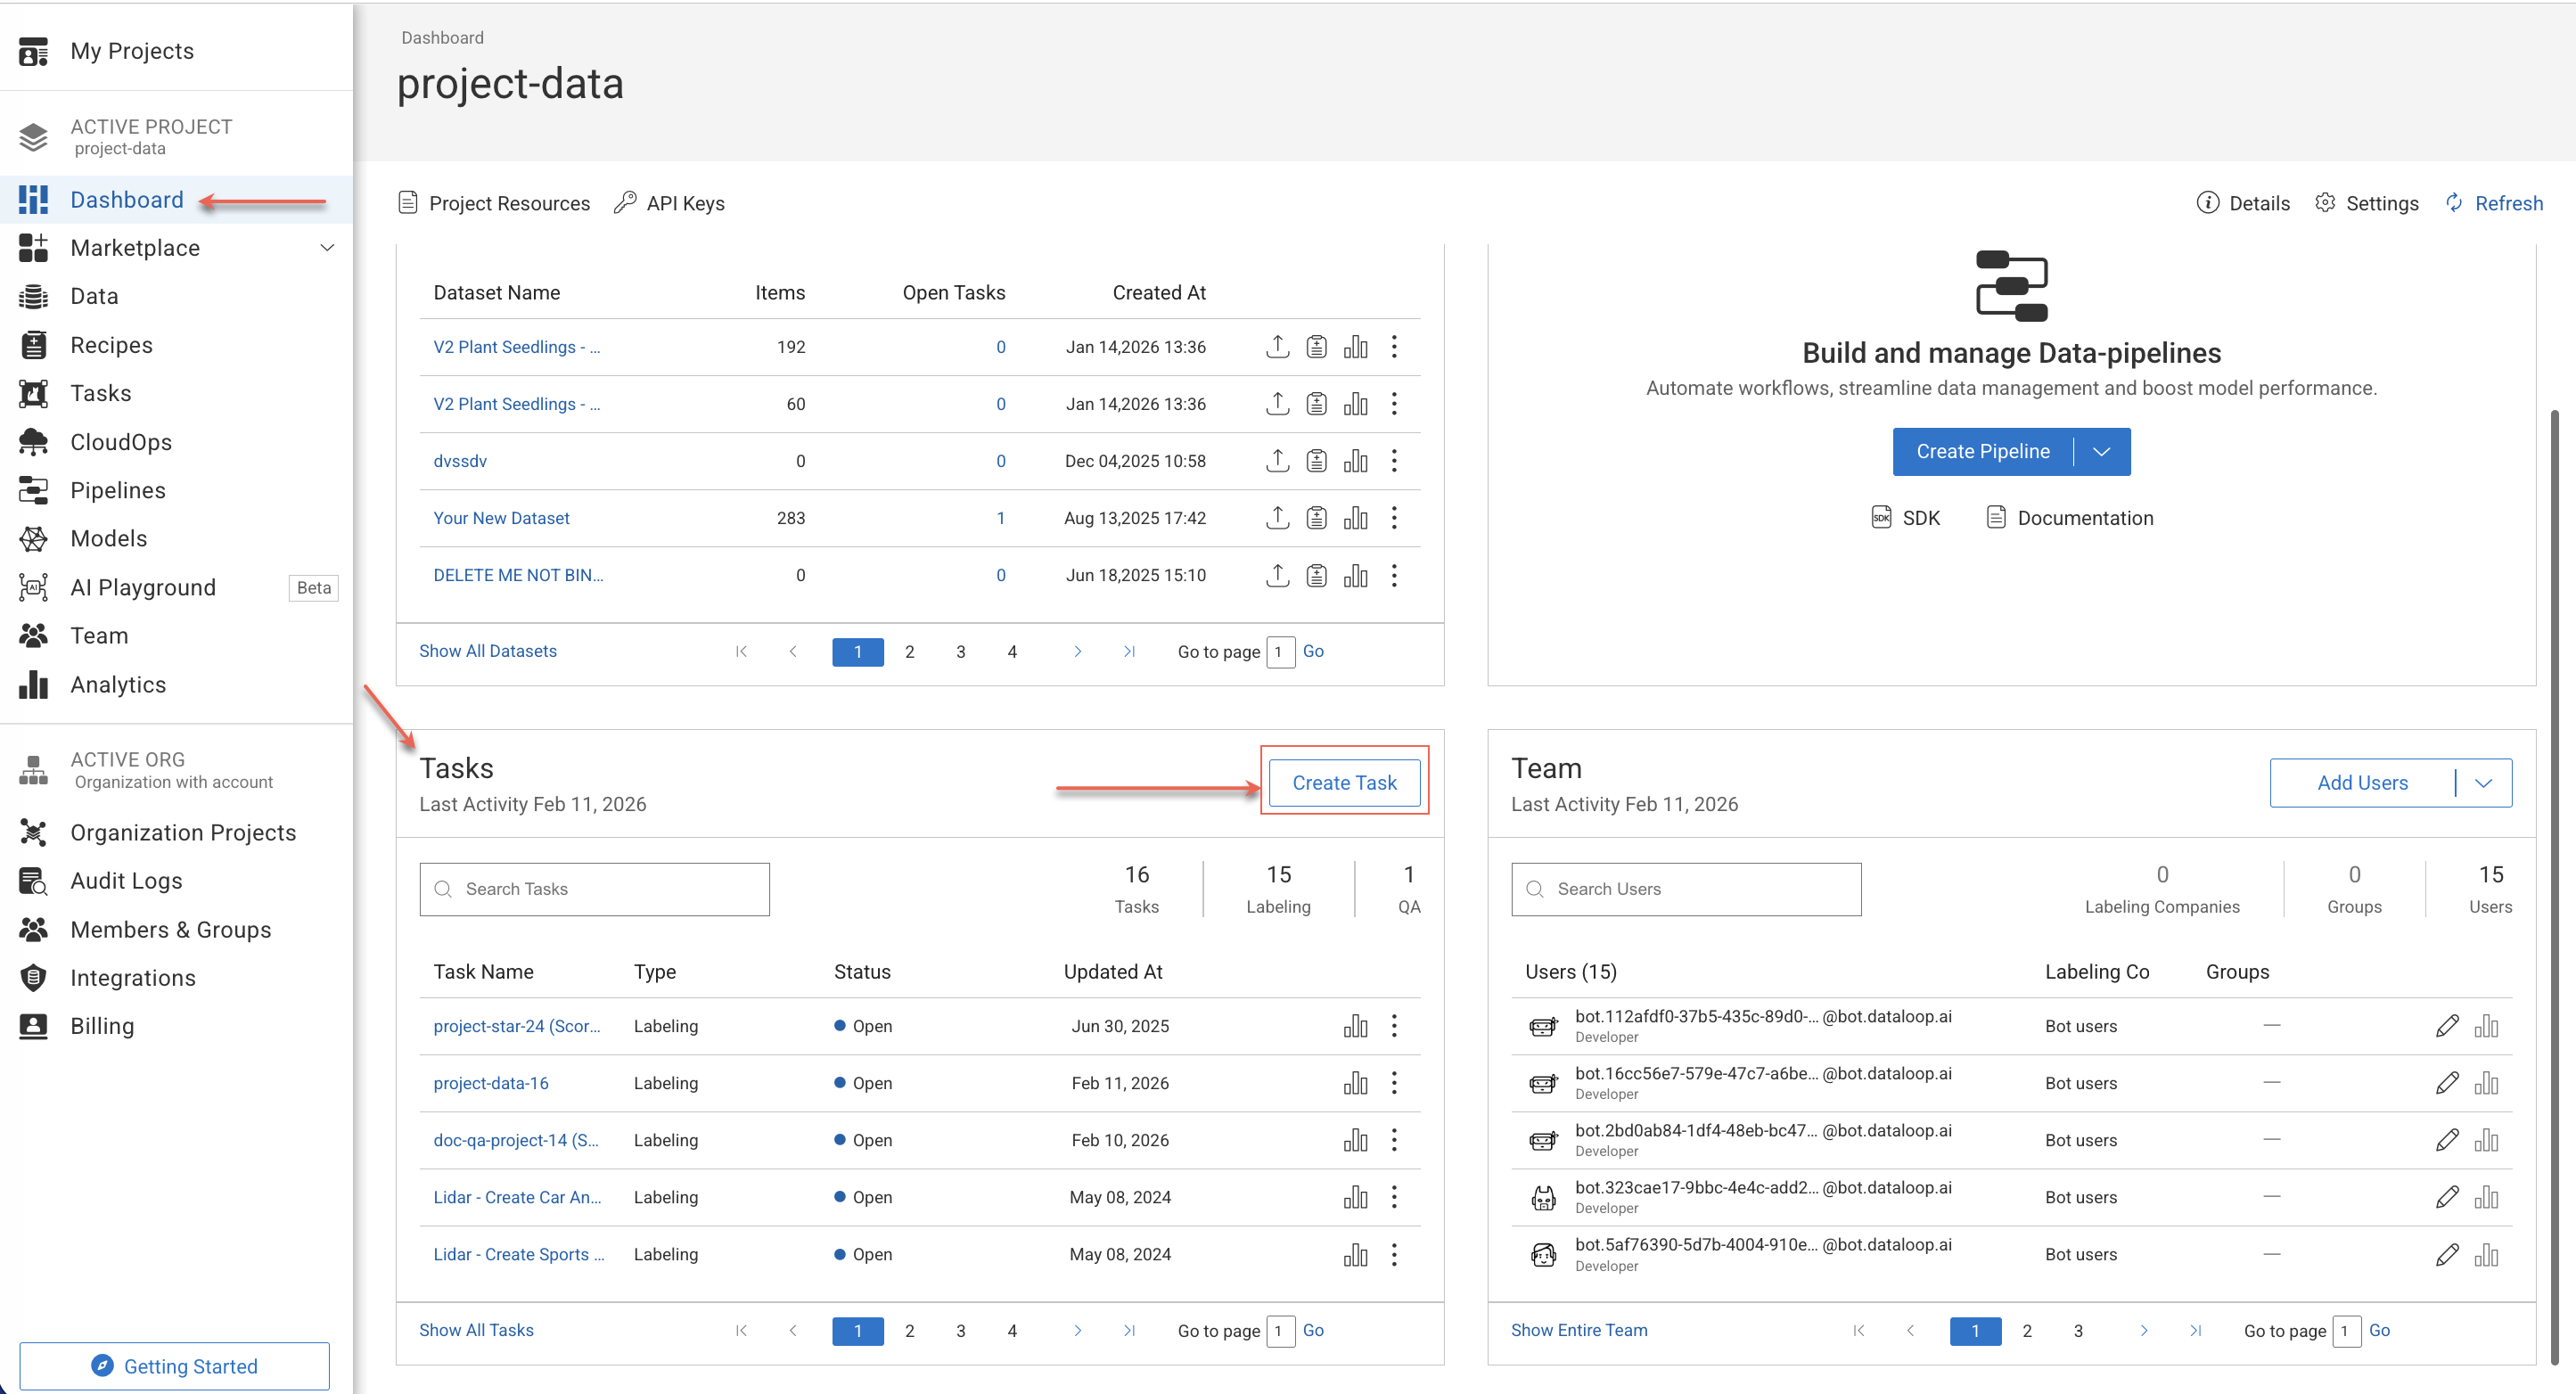
Dashboard
Open Dashboard page from the left-side menu.
Click Create Task from the Tasks widget.
Users and Roles
These are the main users that typically take part in a task, correlated with their role in a project:
Project Owner: A user with the role of a project owner responsible for arranging the data, preparing and delivering it to tasks, and creating them.
Annotation Manager: A user with the role of an annotation manager in the project responsible for task execution, workforce management, and accuracy assurance.
Annotator: A user with the role of an annotator in the project responsible for actual labeling or quality assurance but limited to labeling/review (QA) work.
Task Scoring Process
Task Scores are quality metrics used to evaluate the accuracy and consistency of annotations completed within a task. They help measure annotator performance and ensure that annotation results meet the required quality standards.
DDOE uses a Score Function to calculate these scores. By default, a built-in scoring function is applied, but organizations can replace it with a custom scoring function if needed. Supported Task Score Types
Task Setup
Scoring is enabled by default for these task types.
A scoring pipeline is created with the same name as the task.
The pipeline runs automatically, and users can manage it (stop, edit, or replace the scoring function).
Function Deployment
Scoring functions use project resources and affect billing.
Scoring resets if the item's status changes.
Analytics
A new scores tab provides insights:
Metrics for contributors, items, annotations, and labels.
Average IOU (Intersection Over Union) and labels consensus scores.
Histograms and bar charts for annotation and item scores.
Drill-down capabilities for detailed exploration.
Confusion Matrices:
Contributors-Agreement matrix.
Labels confusion matrix with clickable cells to explore respective items.
Behavioral Notes
Scoring resets when an item's status is updated.
Tasks created via SDK enable scoring by default.
Bulk Classifications
Bulk Classification in DDOE's Assignment Browser is designed to help annotators quickly apply classification labels to multiple items at once—directly from the Cards View.
Status Overlay on Completed Items
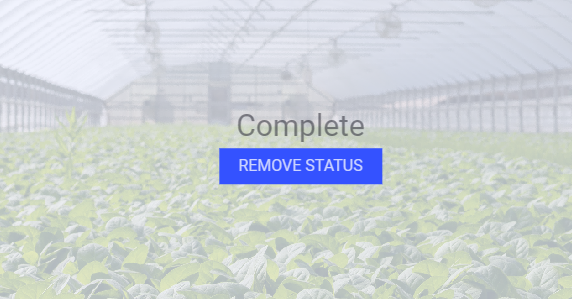
Setting a status as Completed on items in annotation or QA tasks flags the item as done and often triggers further automation steps in Pipelines and Applications. It is important to ensure that no changes to items/annotations are made after setting the status, otherwise, those changes won't be in effect for the automation steps. For example, setting a status may trigger a simple step for downloading the annotations JSON. If changes are made to the annotations afterward, there won't be a trigger for a new download process.
Now, the DDOE platform forces all users to view an overlay of the status and must remove the status from the item before making any changes, even as part of fixing issues opened during a QA task.
To enable or disable this feature:
Open the Dashboard from the left-side menu.
Click on the Settings.
In the General section, click on the Enable force all users to remove status before editing annotations.
Pipelines and Pre-labeling
Pipelines: You can include items in any number of labeling and review (QA) tasks. DDOE allows you to create a Labeling Task Workflow Using a Pipeline Template to streamline and manage the labeling process efficiently. Learn more
Pre-labeling: The Pre-Labeling feature in DDOE leverages AI models to automatically label data, significantly accelerating annotation workflows and minimizing manual effort. Learn more
Annotation Validation
Annotations validation enables project managers to enforce annotation rules by loading a JavaScript file in the annotation studio and running it when annotators click the Action button to assign the item with a status.
Task Actions
DDOE enables users to efficiently search, filter, manage, and take action on annotation and QA tasks using smart search, advanced filters, task-specific actions, and archive controls, while ensuring data integrity and performance insights through automated archiving and analytics integration.
Search Tasks
Use Smart Search to quickly find and auto-complete tasks. As you type, suggestions will appear based on your input. Smart Search will fetch suggestions from the first 100 tasks, dynamically updating as you refine your search.
Use the following search criteria to search tasks in the Search field:
To search for a task, utilize the following criteria:
Task Name: This displays tasks with the matching task name.
Task ID: It lists the tasks based on their unique task ID. You can either use the Copy Task ID icon next to the Task Name or use the URL to get the Task ID.
Dataset name: This displays tasks with the matching dataset name.
After entering the search criteria, you can begin the search by either pressing the Enter (or Return) key or by clicking outside the Search field.
Filter Tasks
The Labeling Tasks page enables you to use the following filter criteria to filter tasks when you click on the Select filters:
Filter Type | Criteria | Description |
|---|---|---|
Type | Labeling Task | This displays the tasks those are Labeling-type tasks. |
Type | Review (QA) | This displays the tasks that are QA-type annotation tasks. |
Status | Open | This displays the tasks that are in Open status. |
Status | Completed | This displays the tasks that are completed. |
Status | Completed with Issues | This displays the tasks that are completed with annotation issues. |
Priority | High | This displays the tasks with a high priority. |
Priority | Medium | This displays the tasks with a medium priority. |
Priority | Low | This displays the tasks with a low priority. |
Priority | N/A | This displays the tasks with no priority. |
Annotation Status | Open Issues | This displays the tasks with annotations that have open issues. |
Annotation Status | For Review | This displays the tasks with annotations that have issues corrected for review. |
Quality | Consensus Task | This displays the tasks with a Quality task type of Consensus. |
Quality | Qualification Task | This displays the tasks with a Quality task type of Qualification. |
Quality | Honeypot Task | This displays the tasks with a Quality task type of Honeypot. |
Channel | Pipeline | This displays the tasks, those created using the Pipeline channel. |
Filter Using the Task Owner or Username: Select the Project Owner's name from the Select owner dropdown list to filter the tasks.
After you select the filter criteria, the system initiates the search function.
Clear Filters: To clear the search or filter criteria, click on the Clear Filters button.
Edit Labeling Tasks
Edit the task allows you to change task details, such as the assignees, due date, and more.
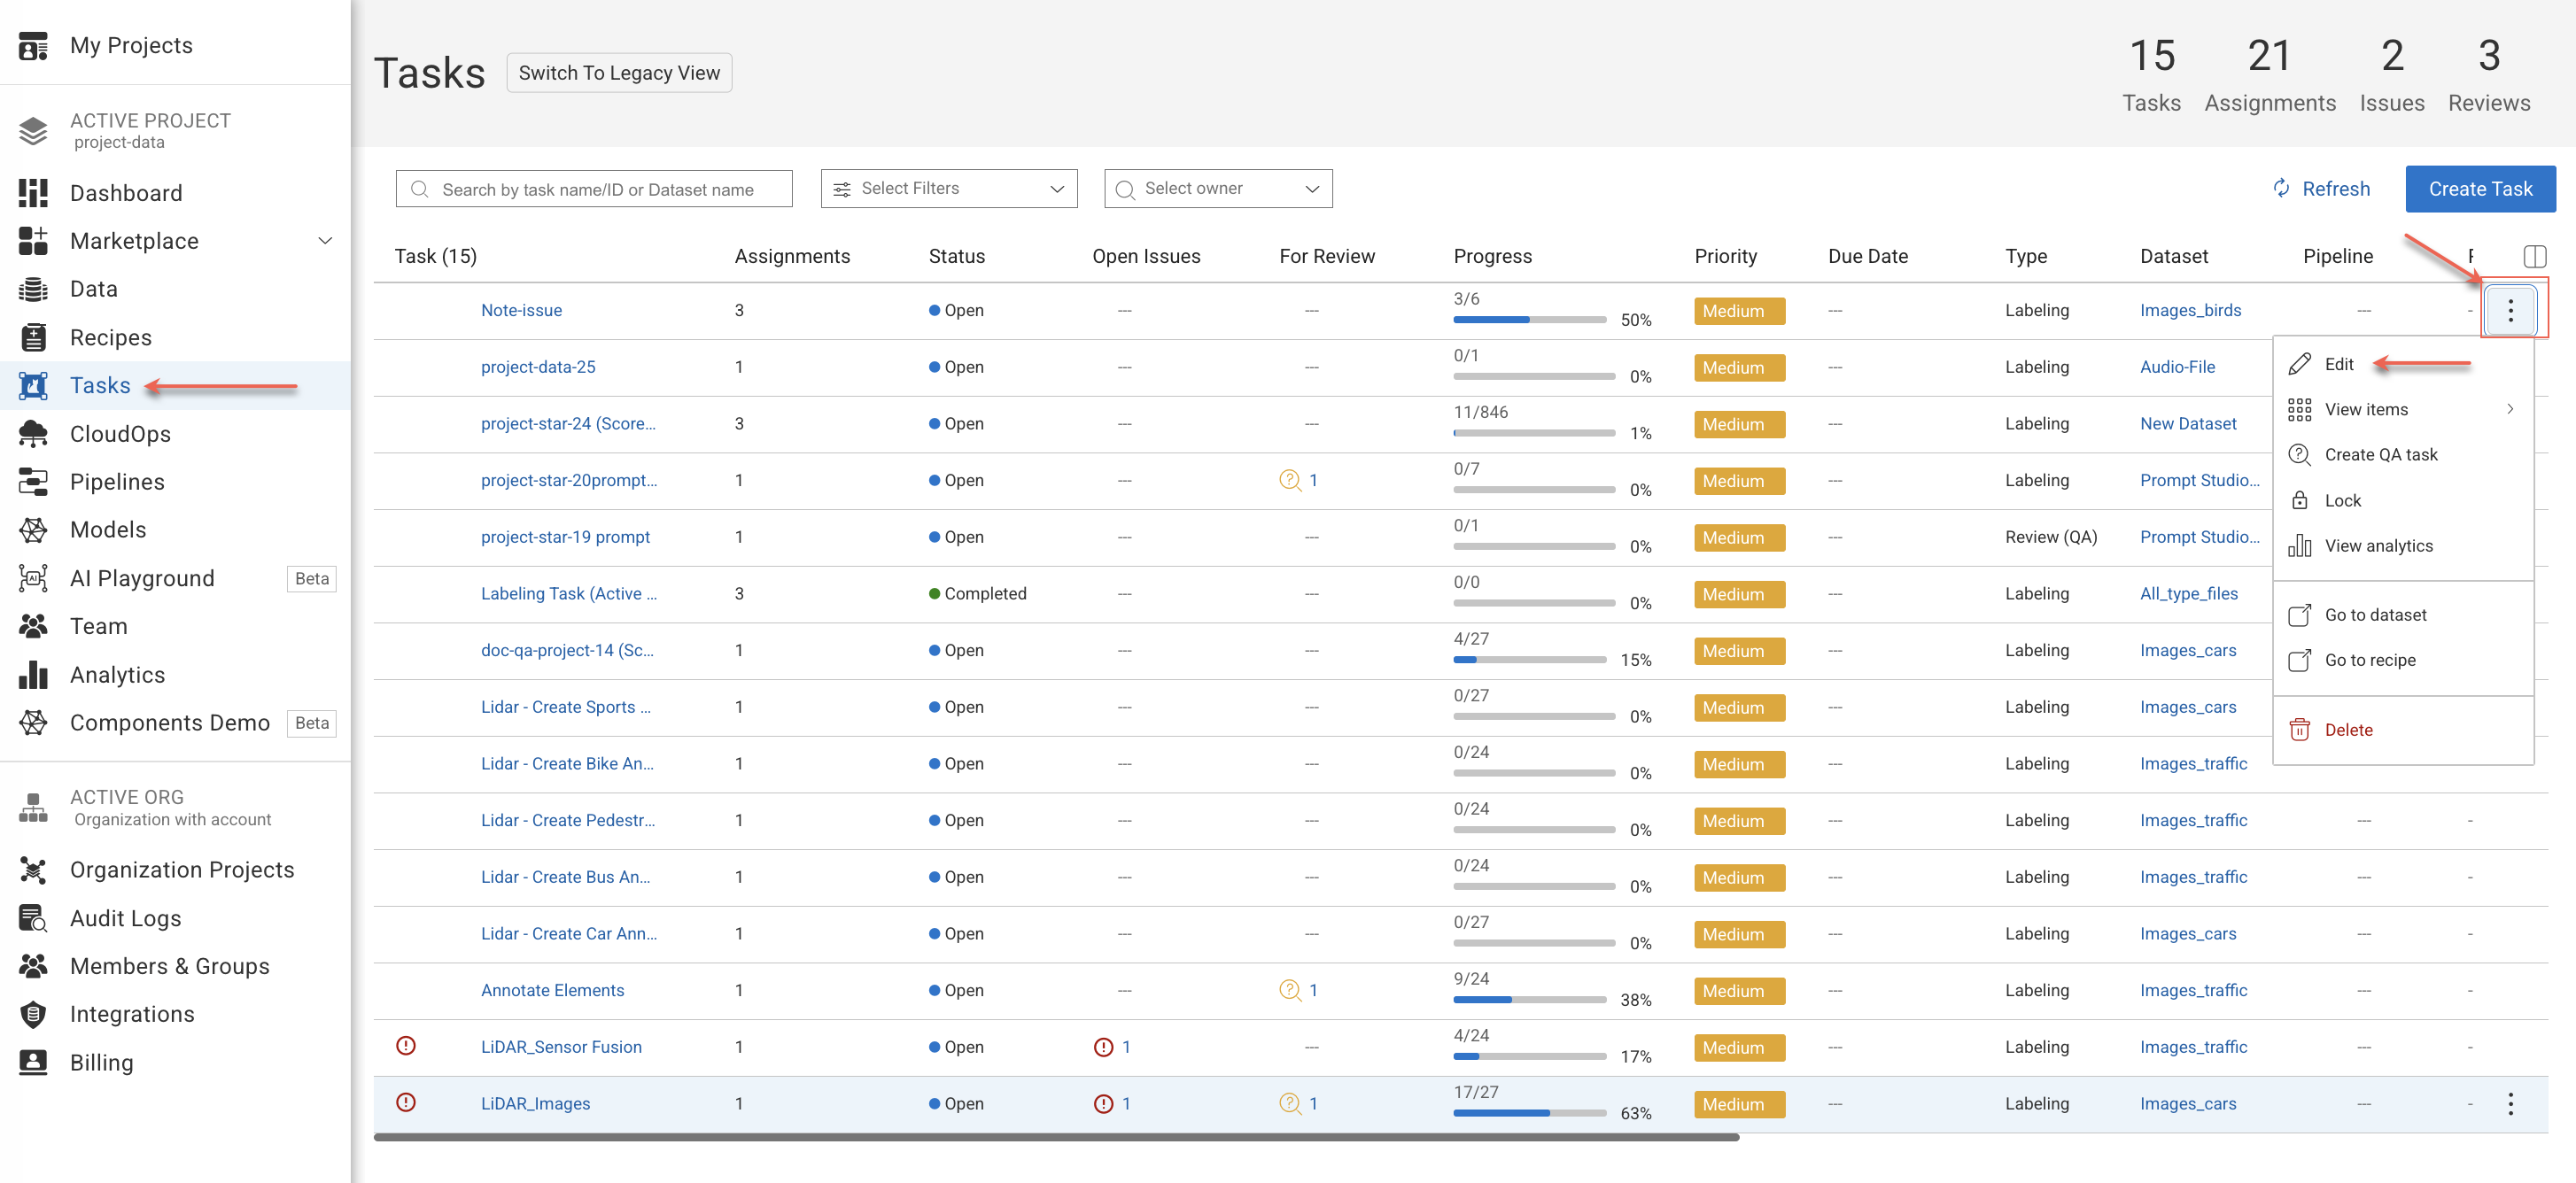
Open the Human Tasks page from the left-side menu.
Find and hover over a labeling task from the list, and click on the Three-Dots.
Select Edit Task from the list. The
Edit Taskpage will be displayed, indicating whether it originated from Pipeline or Labeling through the respective tag.
Workflow and Pipeline Tasks
You have the ability to modify tasks generated through Workflow (Labeling > Tasks) or Pipeline.
You can edit pipeline tasks even while the pipeline is running, and there is no need to pause the pipeline for editing.
Editing a pipeline task will result in the corresponding update within the pipeline.
Modify the available fields, for example:
General:
Task Name
Owner
Priority
Completion Due Date
Instructions: Recipe
Assignments:
Edit the Item Workload
Reassign
Click Save Changes.
Edit Review (QA) Tasks
Open the Human Tasks page from the left-side menu.
Find and hover over a labeling task from the list, and click on the Three-Dots.
Select Edit Task from the list. The
Edit Taskpage will be displayed, indicating whether it originated from Pipeline or Labeling through the respective tag.
Workflow and Pipeline Tasks
You have the ability to modify tasks generated through Workflow (Labeling > Tasks) or Pipeline.
You can edit pipeline tasks even while the pipeline is running, and there is no need to pause the pipeline for editing.
Editing a pipeline task will result in the corresponding update within the pipeline.
Select the required section and make the changes.
Click Save Changes.
View Task Items
This allows you to open and view items in the task browser page. You can view All Task Items, Remaining items to complete the labeling or QA, or Completed / Done items.
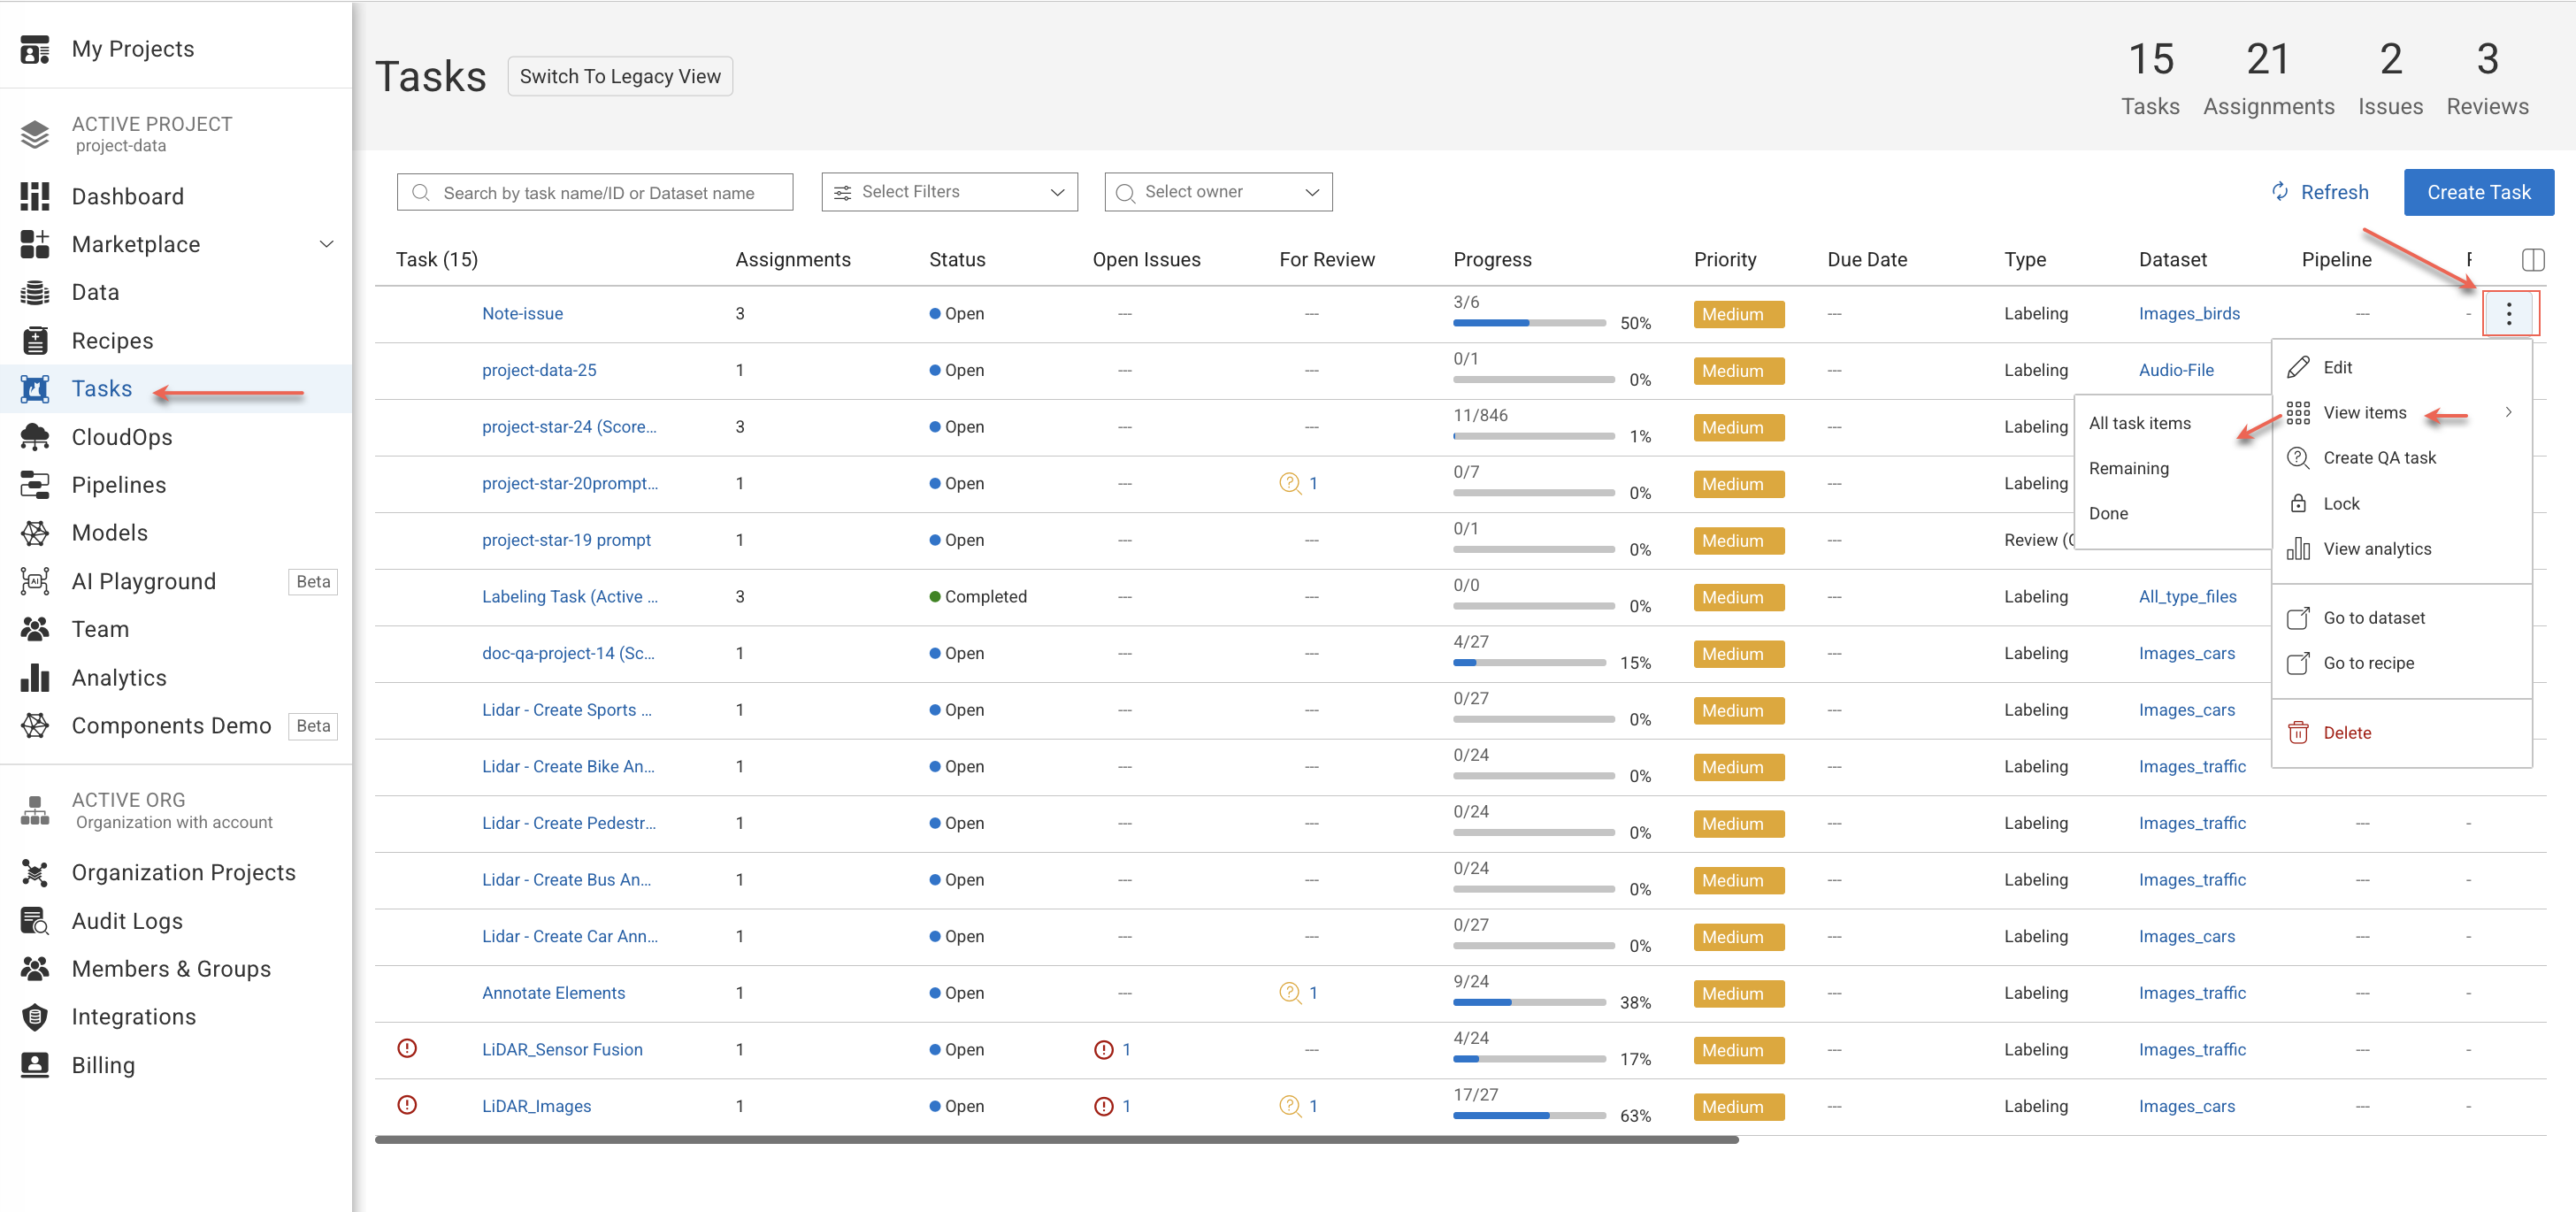
Open the Human Tasks page from the left-side menu.
Find and hover over a labeling task from the list, and click on the Three-Dots.
Select View Items from the list, and select the following view options from the list:
All Task Items
Remaining Items
Done (Completed items)
Lock / Unlock Tasks
It allows annotation managers or above can lock or unlock a task for further modifications.
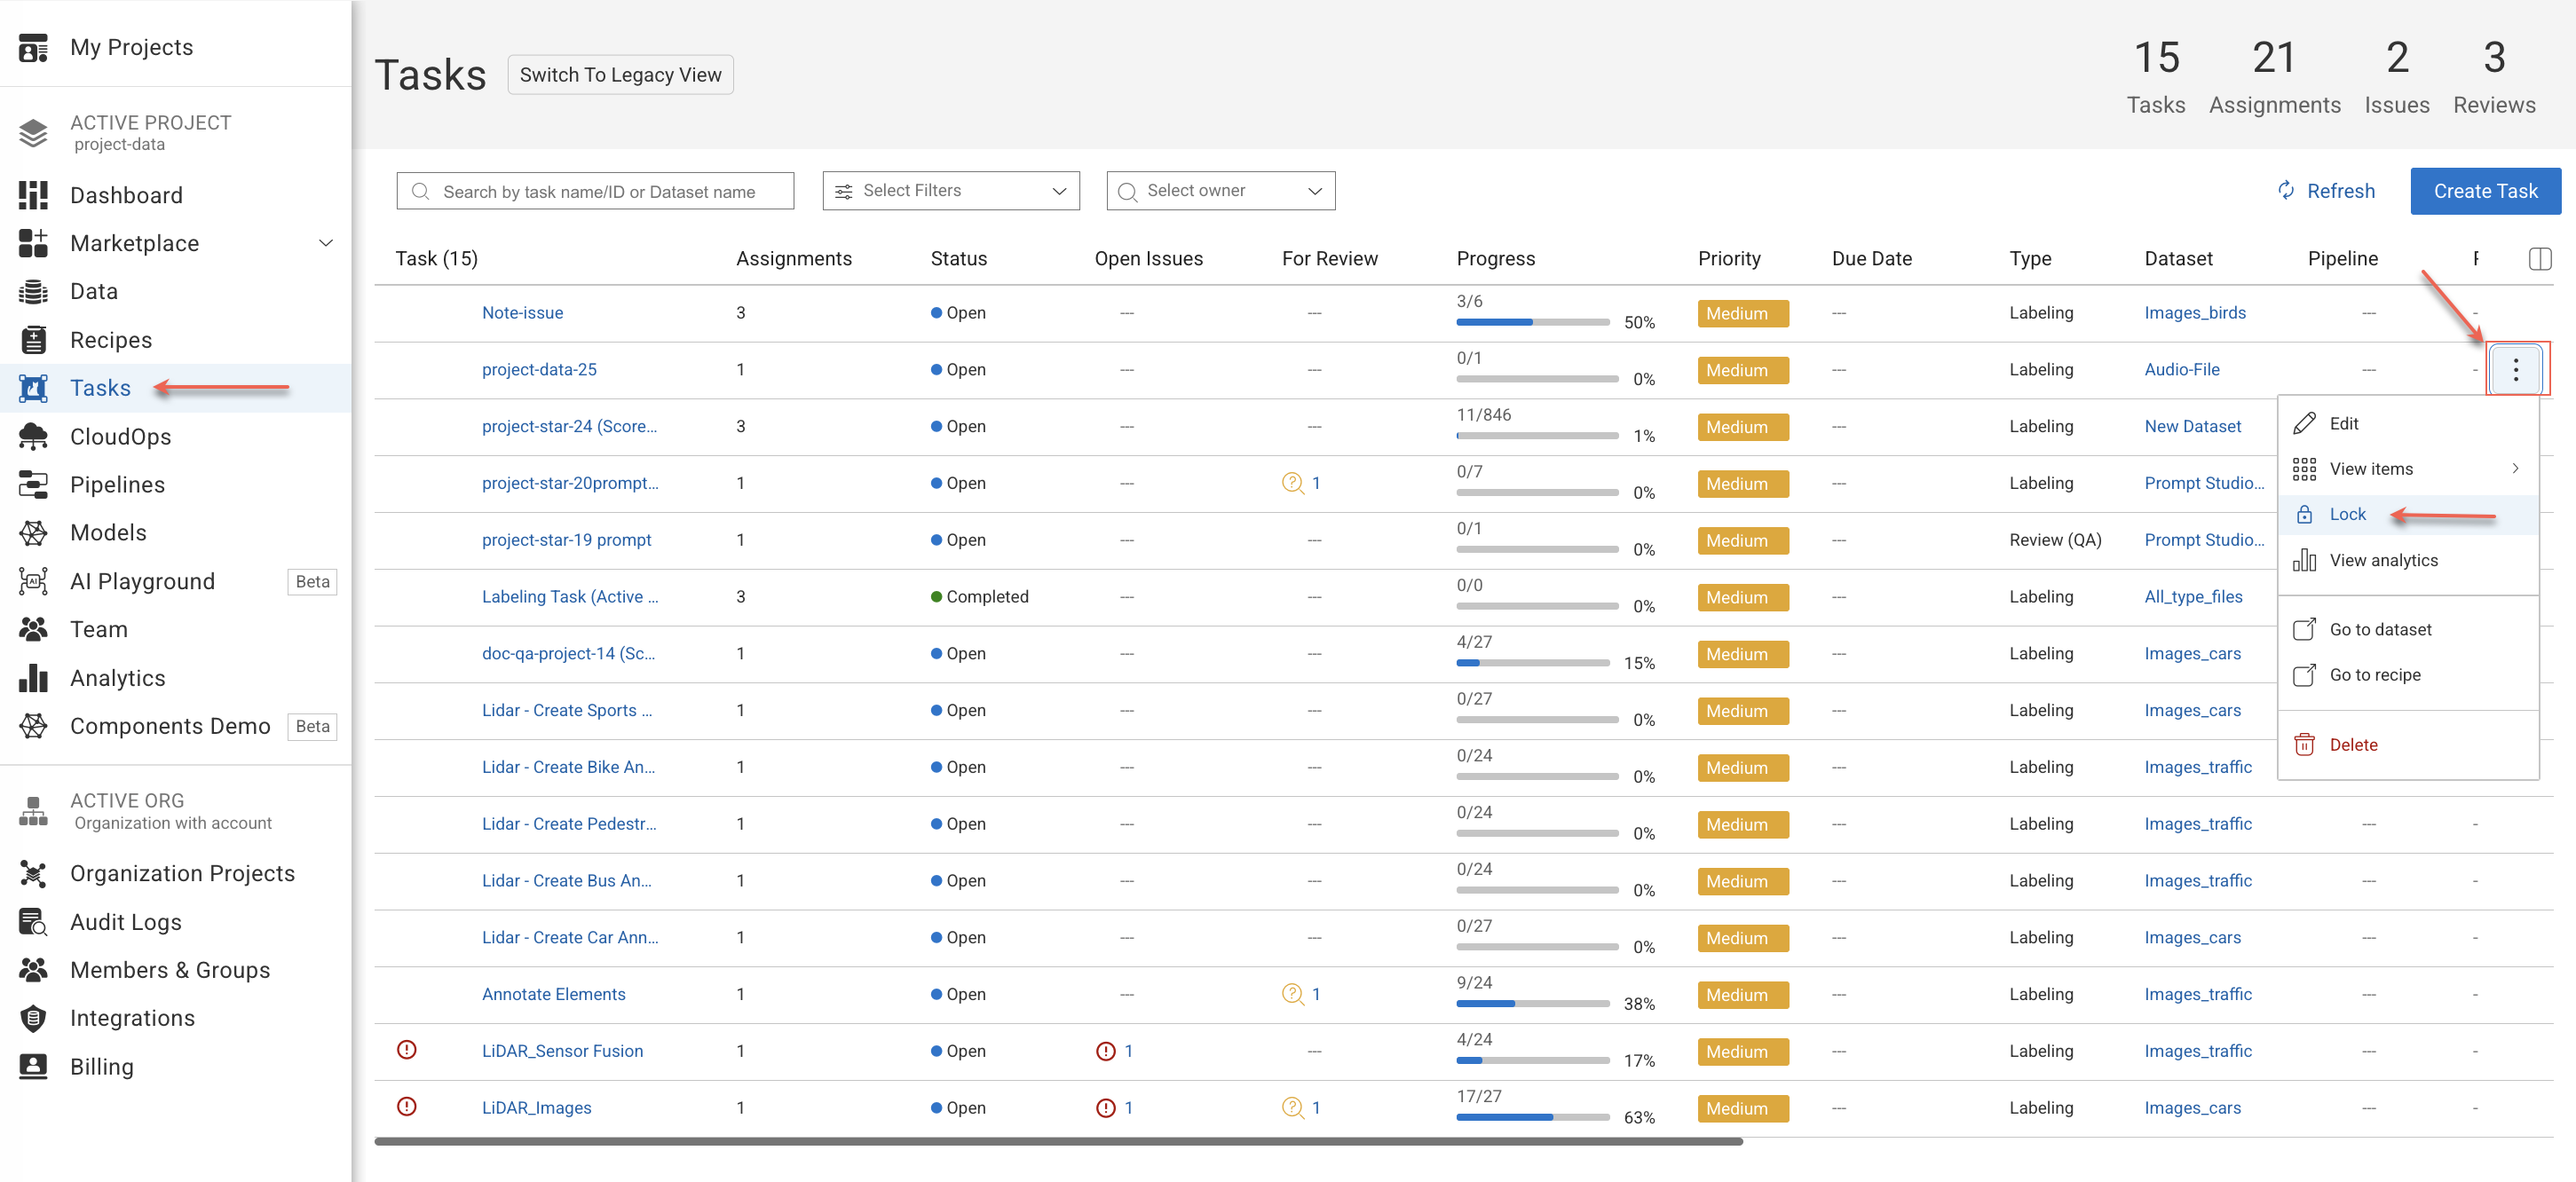
Open the Human Tasks page from the left-side menu.
Find and hover over a labeling task from the list, and click on the Three-Dots.
Select:
Lock Task to lock the task for further modifications. Locking this task will make all assignments read-only. No changes will be allowed, including status updates. A lock icon will be displayed.
Unlock Task to enable for modifications. Unlocking the task will remove read-only mode, allowing updates that may impact the current export/training.
Click Confirm.
Locking Tasks After the Due Date
You can enforce a Due Date on tasks to automatically lock them once the date has passed. Locked tasks and their assignments become read-only.
How It Works
In the Task Creation dialog, if a due date is set, you can enable “Lock task after due date”.
Once the due date passes:
The task and all assignments are locked (read-only mode).
No edits, annotations, or status changes are allowed.
In Studios, Task, or Assignment browsers, a Read-Only banner with refresh/hide options is displayed. These indicators are not shown in customer-based Studios.
To enforce a due date on tasks, refer to the creation steps of labeling tasks
Unlocking and Locking
Annotation Managers or above can manually lock or unlock tasks from the Task Actions menu.
Unlocking removes read-only mode and allows edits again.
Both actions show a confirmation dialog and take effect immediately.
View Task Analytics
This takes you to open and view the Analytics page of the task.
Create QA Tasks
This allows you to create QA (Review) tasks for completed tasks.
Open the Human Tasks page from the left-side menu.
Find and hover over a labeling task from the list, and click on the Three-Dots.
Select Create QA Tasks from the list. The QA task creation page is displayed, read here learn about the remaining steps.
Add Items to Tasks
Before adding items to an existing task, you may select the items you wish to add by clicking on them (CTRL+click to select multiple items). If you do not select any items, you can choose to filter the items with a DQL query or add all items that are not already included in the task.
Enter the Data page and open required Dataset.
Select the required items from the dataset.
Click Dataset Actions or right-click on of the items.
Choose Labeling Tasks -> Add to existing task -> Manual Task from the list.
A wizard will open, allowing you to select the pipeline task to want to add the items to.
In the Select Task section, select the task to which you need to add items.
Click Next: Data Source.
In the Data Source section, edit the Filters details, if required.
Click Next: Assignments.
In the Assignments section, add contributors from the Available Contributors list to the Assigned Contributors list.
Click Add Items.
Add Items to Pipeline Tasks
Before adding items to an existing pipeline task, you may select the items you wish to add by clicking on them (CTRL+click to select multiple items). If you do not select any items, you can choose to filter the items with a DQL query or add all items that are not already included in the task.
Add items to pipeline task
Adding items to an existing pipeline task using the option 'Add to Existing Task' will result in initiating the pipeline flow starting from the corresponding Task node, all preceding nodes will be skipped.
To trigger the pipeline with new items from its starting point, please read here.
Enter the Data page and open required Dataset.
Select the required items from the dataset.
Click Dataset Actions or right-click on of the items.
Select Labeling Tasks -> Add to Existing Task -> Pipeline Task from the list.
A wizard will open, allowing you to select the pipeline task to want to add the items to.
Select the task to which you need to add items.
Click Next: Data Source.
In the Data Source section, edit the Filters details, if required.
Click Send To Pipeline.
Click Confirm to add the items to the selected task.
Important
The selected items will be added to the pipeline, initiating the pipeline flow starting from the corresponding Task node. A confirmation message is displayed and you can easily click on the View Pipeline button to navigate to the pipeline.
Archive Tasks
Once you delete tasks or datasets:
Deleting Tasks: When you delete a task, if the task has been part of analytics activities, instead of deleting, DDOE platform will automatically archive it for you. This means all the usual steps of deletion will take place, except the task will be safely stored in our archive rather than being permanently removed. This also applies to any assignments within the task that have analytics data – they'll be preserved in the archive as well.
Dealing with Datasets: When it comes to datasets, if any tasks within the dataset have been active or have analytics data, rest assured they won't be deleted. This is to ensure that no significant information or insights are inadvertently lost.
Archive Flag: If a task or assignment is archived due to associated activity after the deletion, a status indicating it is archived (archive= true) will be added to its metadata.system. This status can be used to specifically search for archived tasks or assignments.
Analytics Performance Tab: For a comprehensive view, our Analytics Performance Tab will now include data from archived assignments. You'll be able to see details like the assignment name and the annotator involved, even for tasks that have been archived instead of deleted. Ensure you have Annotation Manager or above to view archived assignments.
Delete Tasks
Before You Delete
When you delete a task, it deletes all associated assignments. If analytics or historical data is involved, the task will be archived instead of deleted, preserving the analytics data.
Labeling tasks cannot be deleted if there are unresolved issues.
Review (QA) tasks must have all review issues resolved before they can be deleted.
Pipeline tasks generated from a pipeline cannot be deleted while actively in use. To proceed, first remove the corresponding task node from the pipeline.
Open the Human Tasks page from the left-side menu.
Find and hover over a labeling task from the list, and click on the Three-Dots.
Select Delete Task from the list. A confirmation message is displayed.
Click Yes. A confirmation message is displayed.