The Dataset Browser lets you take action at both the dataset and item levels. To get started, select the scope of items you want to work with either the entire dataset or specific items. Then, click Actions to access the available options. Some actions may be unavailable when multiple items are selected.
.png)
Right-Click: Right-clicking on an item opens the actions menu. While the menu appears on the item you clicked, the actions apply to all currently selected items. The same set of options is also available under Dataset Actions.
Multi-Select Items: To select multiple items, hold Ctrl (or Cmd on Mac) and click the items you want to include.
Item Details
The Item Details panel displays details of the selected item, including general details, tasks and annotations, automation, and metadata. Learn more
File Actions
You can perform the following action on an item within the Dataset. Please note that actions from the right-click menu cannot apply to multiple selected items simultaneously.
.png)
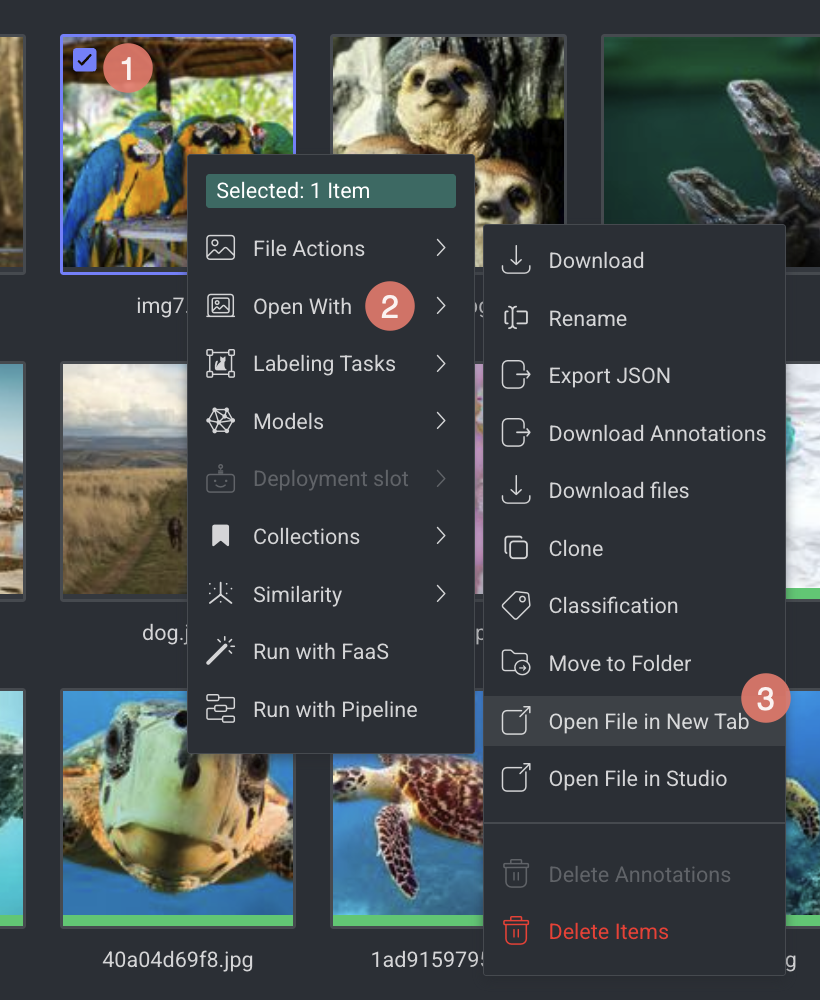
Open Items in a New Tab
It allows you to view images, play audio files, etc. in a new browser tab.
In the Dataset Browser, select the item.
Right-Click, or click Actions.
Select File Actions > Open File in New Tab. The selected file will be opened in a new browser tab.
Open Item in the Studio
It allows you to view images, play audio files, etc. in a new browser tab. In the Dataset Browser, identify the item and double-click. The item will be opened in the default annotation studio based on the type of the item, such as image, audio, video, etc. or, you can follow these steps:
In the Dataset Browser, select the item.
Right-Click, or click Actions.
Select File Actions > Open File in Studio. The selected file will be opened in the default annotation studio.
Export as JSON File
In the Dataset Browser, select the item you want to export.
Right-Click, or click Actions.
Select File Actions > Export JSON. The selected dataset or items will be exported as a JSON file in a ZIP file and will contain annotation, if available. For example, a JPG image will be downloaded as a JSON file.
Download Annotations
In the Dataset Browser, select the item to download annotation.
Right-Click, or click Actions.
Select File Actions > Download Annotations from the list. The annotations of the selected file will be downloaded as a JSON file.
Rename Items
In the Dataset Browser, select the item you want to rename.
Right-Click, or click Actions.
Select File Actions > Rename.
Edit the name, and click . A confirmation message is displayed.
Move Items to a Folder
In the Dataset Browser, select the item you want to move.
Right-Click, or click Actions.
Select File Actions > Move to Folder.
Select a folder from the list.
Click . A confirmation message is displayed.
File Moving: External Storage
Moving items within a dataset that resides on external (read-only) storage is not possible. This is a designed limitation, since Dataloop cannot physically move files in your storage without causing mismatches between the dataset and the actual storage structure.
Classify Items
In the Dataset Browser, select the item you want to classify.
Right-Click, or click Actions.
Select File Actions > Classification from the list. Learn more about the classification.
Clone Items
In the Dataset Browser, select the item you want to clone.
Right-Click, or click Actions.
Select File Actions > Clone. Learn more about the cloning process.
Download Files
Download up to 100 files
You can download up to 100 files per selection. To download more, use the SDK.
Only Developer or Owner can download files.
In the Dataset Browser, select the item(s) you want to export.
Right-Click, or click Actions.
Select File Actions > Download Files. The selected item will be downloaded. For example, JPG image will be downloaded as a JPG file.
Delete Annotations
In the Dataset Browser, select the item you want to delete annotations.
Right-Click, or click Actions.
Select File Actions > Delete Annotations. A confirmation message is displayed.
Delete Items
In the Dataset Browser, select the item you want to delete.
Right-Click, or click Actions.
Select File Actions > Delete Items.
Click . A confirmation message is displayed.
Open With
The Open With option allows you to open items in the respective labeling studios.
In the Dataset Browser, select the item.
Right-Click, or click -> Open With.
Select the Annotation Studio. The type of the annotation studio will display based on the type of the item, such as image, audio, video, etc.
Labeling Tasks
Create Tasks
In the Dataset Browser, Click
Select Labeling Tasks -> Create New Task from the list.
Items to Task or Model
When creating a task or model from the Dataset browser, it includes all items in the dataset.
Add Items to Tasks
Add items in the datasets to an existing task.

In the Dataset Browser, click
Select Labeling Tasks -> Add to an Existing Task → Manual Task from the list.
Items to Task or Model
When creating a task or model from the Dataset browser, it includes all items in the dataset.
Add Items to Pipeline Tasks
Add items in the datasets to an existing pipeline task.
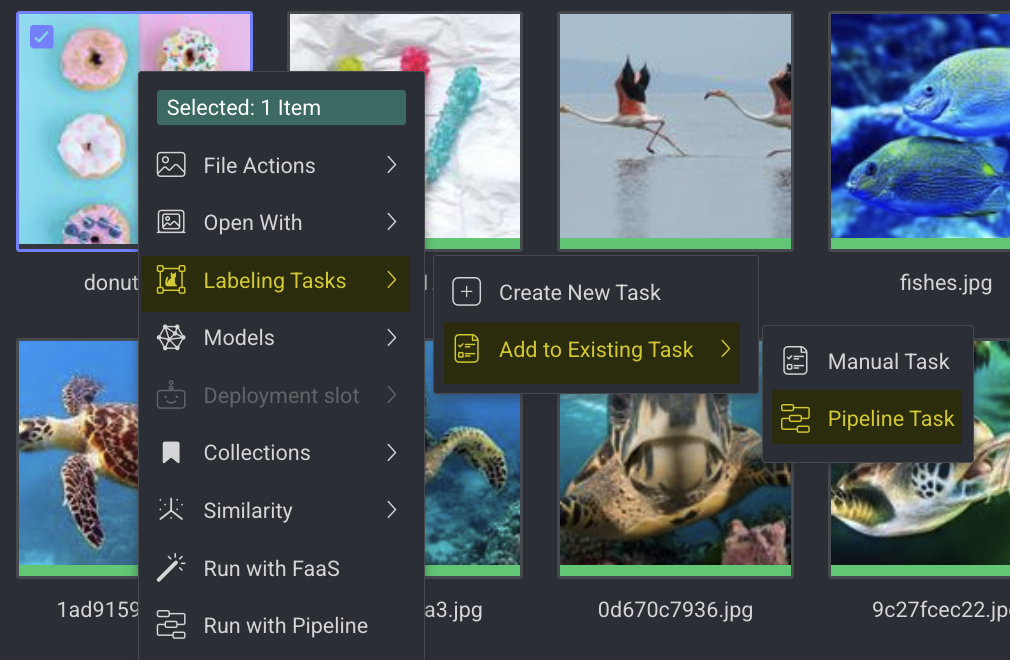
In the Dataset Browser, click
Select Labeling Tasks -> Add to an Existing Task → Pipeline Task from the list.
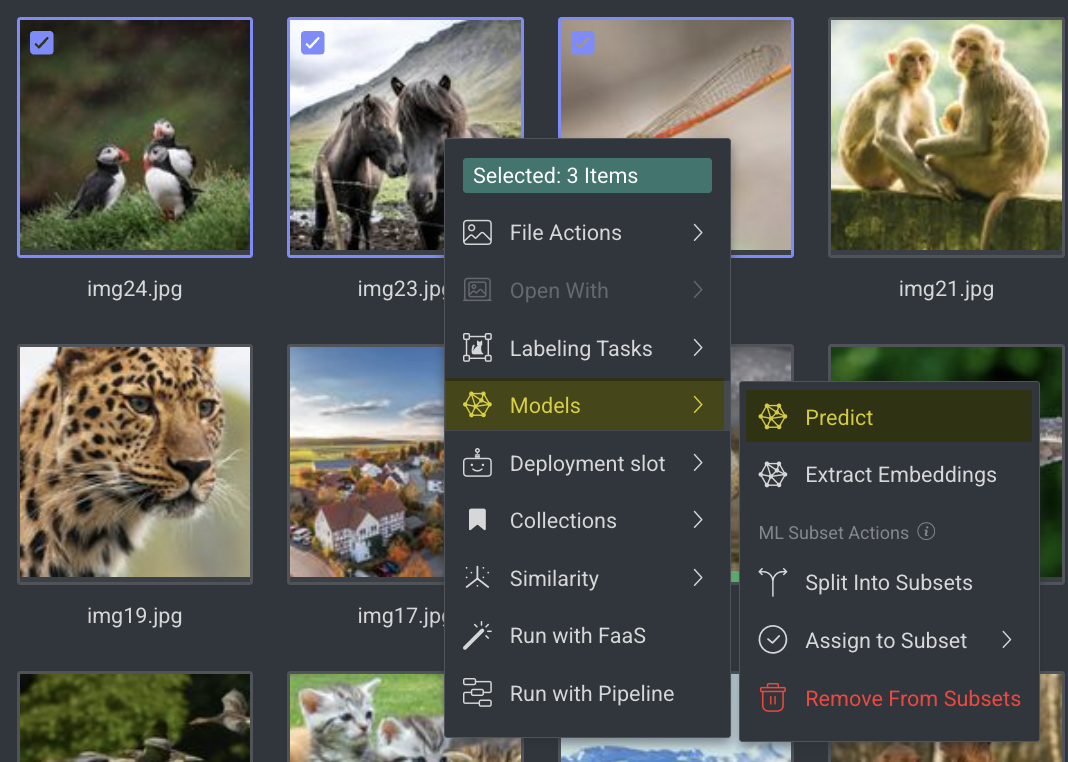
Models
Predict with a Model
You can use the dataset items to generate predictions by using a trained, pre-trained, and deployed model.
Open the Dataset Browser
From the Dataloop main interface, click the Data menu on the left-hand panel.
Choose and open the relevant dataset from the list.
Select Items for Prediction
In the Dataset Browser, select the items you want to pre-label (you can select one or multiple items).
Right-click on the selected items to open the context menu.
Access the Predict Function
From the context menu, go to Models → Predict.
The Predict With Model panel will appear on the right side of the screen.
Choose a Model and Run Prediction
Under the Deployed section, choose the model you want to use.
Click Predict (Items) to begin pre-labeling the selected items. A confirmation message is displayed as
Running model prediction - follow the activity bell. Open the Service Page. Once the prediction is complete, the labels will be applied to the items and available for review or post-processing.
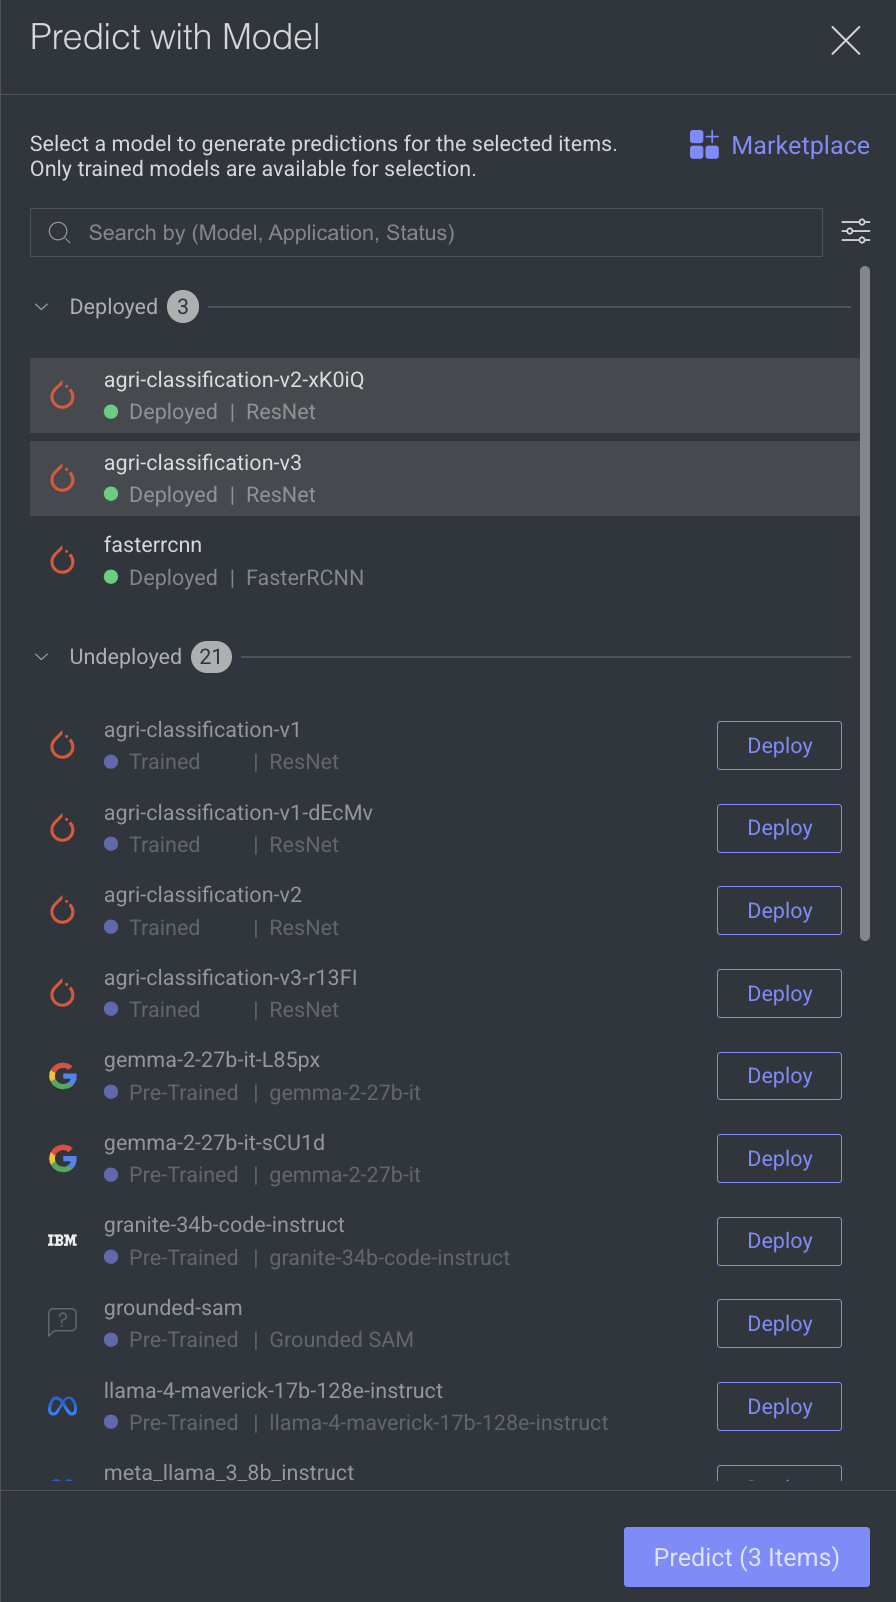
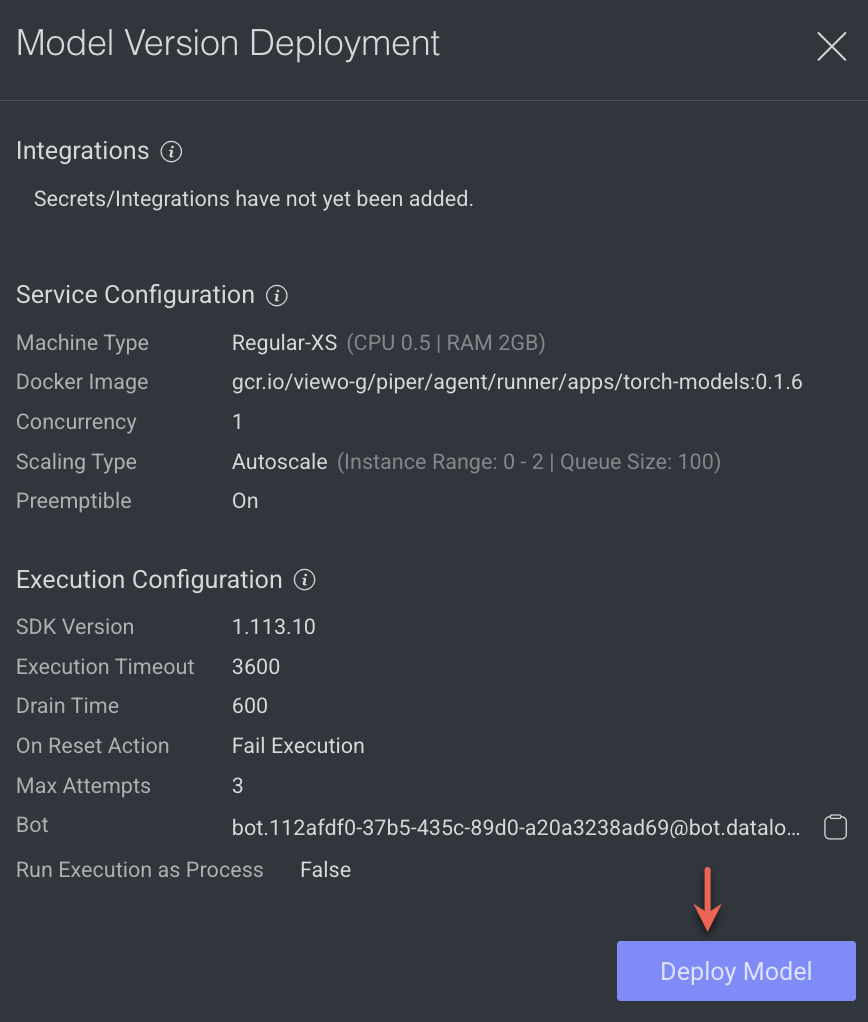
Deploy a Model for Prediction
Under the Undeployed section, select the model and click Deploy before using it for predictions. The Model Version Deployment panel is displayed.
Make the service and execution configurations as required, refer to the Edit Services article for more details.
Once complete, click Deploy Model. The deployed model will be added under the Deployed section.
Select the model and click Predict Items.
💡 Tips
Install a New Model: If the required model isn't available, click Marketplace to browse and install new models into your project.
Extract Embeddings
In the Dataset Browser, select the items you want to extract embeddings.
Click and select the Models -> Extract Embeddings option from the list. An Extract Embeddings pop-up is displayed.

Select a Model from the Deployed section, or click on the Marketplace to install a new model.
If there are no models available, click Install Model.
Click to initiate the embeddings' extraction. Use the Notifications bell icon to view status.
Split Items into ML Subsets
Refer to the Split Into Subsets article.

Assign Items to Test Subsets
You can assign the selected items to model's test datasets. When you assign, a tag (Test) will be added to the item details.
In the Dataset Browser, select the item.
Right-Click, or click Actions.
Select Models -> Assign to Subset.
Select the Test. The Test Dataset is used to evaluate the performance of a trained model on new, unseen data.
Assign Items to Train Subsets
You can assign the selected items to model's train datasets. When you assign, a tag (Train) will be added to the item details.
In the Dataset Browser, select the item.
Right-Click, or click Actions.
Select Models -> Assign to Subset.
Select the Train. The Train Dataset is used to train the machine learning model, helping it learn patterns and make predictions.
Assign Items to Validation Subsets
You can assign the selected items to model's Validation datasets. When you assign, a tag (Validation) will be added to the item details.
In the Dataset Browser, select the item.
Right-Click, or click Actions.
Select Models -> Assign to Subset.
Select the Validation. The Validation Dataset is used to fine-tune the model and optimize its hyperparameters, helping prevent overfitting.
Remove Items from Subsets
In the Dataset Browser, select the item.
Right-Click, or click Actions.
Select Models → Remove from Subsets.
.png)
Click Yes to confirm it.
Deployment Slot
The Dataset browser incorporates significant automation capabilities, enabling you to export dataset items in industry-standard formats through the following functions. Any function available within this application can be applied to selected items or an active query.
In addition to the Dataloop format, annotations can be exported in industry-standard formats. These are facilitated as functions deployed to the UI Slot of the Dataset-browser.
To learn more about the converters, their input, and output structures, visit their Git repo.
COCO Converter: This tool is used to convert data annotations from other formats into the COCO (Common Objects in Context) format or vice versa. COCO is a popular dataset format for object detection, segmentation, and image captioning tasks.
YOLO Converter: YOLO (You Only Look Once) is a popular object detection algorithm. A YOLO Converter is used to convert annotations between YOLO format and other annotation formats, making it easier to work with YOLO-based models and datasets.
VOC Converter: VOC (Visual Object Classes) is another dataset format commonly used in computer vision tasks. A VOC Converter allows you to convert annotations between VOC format and other formats, facilitating compatibility with different tools and models.
Info
Develop a custom converter and deploy it to a UI-Slot anywhere on the platform, or embed it as a Pipeline node. To learn more, contact Dataloop support.
Export Datasets in COCO/YOLO/VOC Formats
In the Dataset Browser, select the item(s) in the Dataset Browser.
Right-Click, or click Actions.
Select Deployment Slot and select one of the following format:
COCO Converter.
YOLO Converter.
VOC Converter.
A message is displayed as
the execution of function <global-converter> was created successfully, please check activity bell. A ZIP file will be created and downloaded.
Important
Images: The COCO/YOLO/VOC Format conversion supports only images.
Videos: You can download COCO, YOLO, or VOC formats for video files; however, only the annotations from the first frame are included.
Collections
The Collections feature in Dataloop's Data Browser helps streamline data management by allowing you to tag or group specific sets of items based on task needs (e.g., annotation, review, training).
Selecting this option allows you to add selected items to a collection folder.
Similarity
The Similarity feature in Dataloop enables you to identify items that are similar to a selected item. This helps with data exploration, cleaning, and optimizing ML subset splits. To use this feature, ensure that the selected item has an available feature vector. After selecting the Similarity -> Find similar items, you can view all associated feature set names and the model name that generated the item's vector.
Find Similar Items
In the Dataset Browser, select the item to download annotation.
Right-Click, or click Actions.
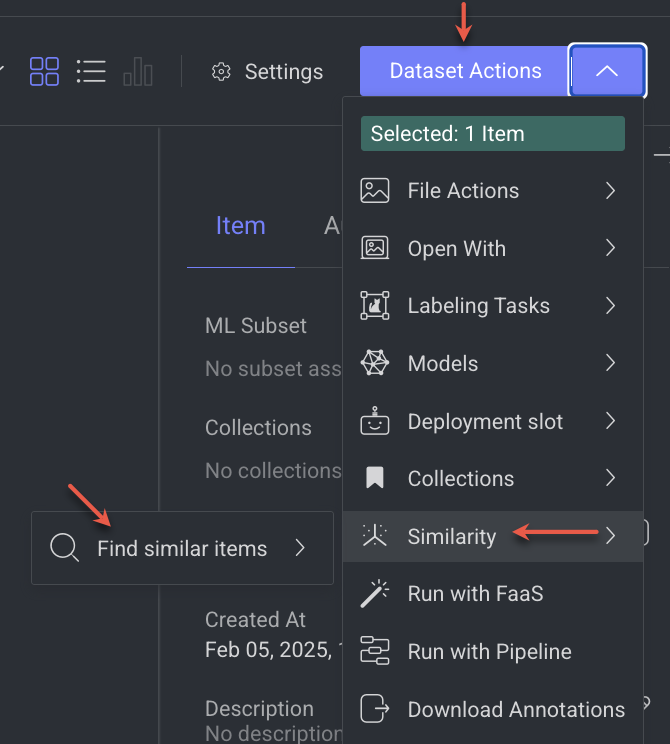
Select Similarity -> Find similar items
Click on the Feature Set name. The Clustering tab is displayed with similar items are selected.
Run Items with Applications
A list of active applications is displayed, and select one of the applications to run the chosen item(s).
In the Dataset Browser, select the item.
Right-Click, or click Actions.
Select the Run with FaaS to select a function to execute with the selected items.
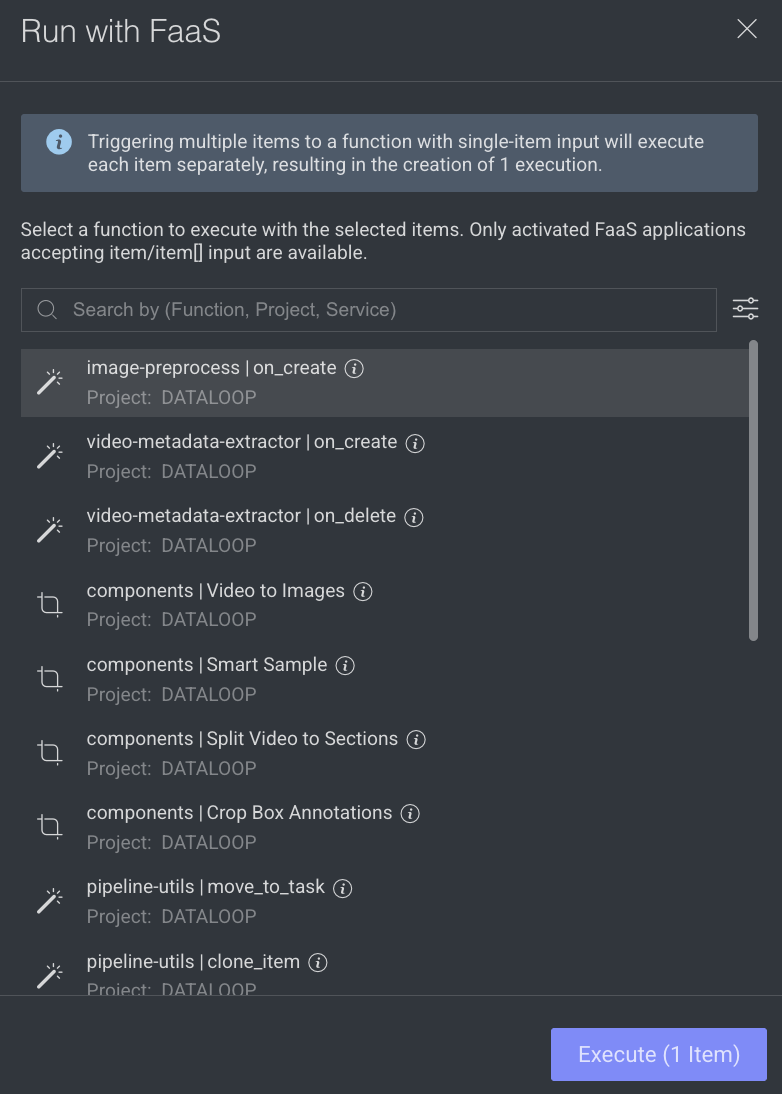
You can:
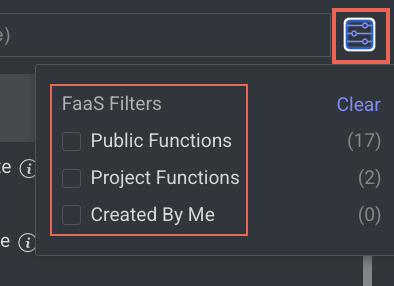
Search functions by function name, project name, and service name.
Filter functions by public functions, project functions and all functions in the user’s projects.
Select a function from the list.
Click . A confirmation message will be displayed.
Notice
The following messages are displayed when you run the item with an application:
Single-item input: Selecting multiple items will trigger separate executions for each item.
List (item[]) input: Selecting multiple items will trigger a single execution with all items.
Over 1000 items (item[] input): The function is disabled, and a warning is shown indicating that execution with more than 1000 items is not supported.
Run Items with Pipelines
A list of active pipelines containing input items is displayed. Select one of the pipelines to run the chosen item(s). Once selected and executed, the pipeline will be triggered starting from its start node.
Notice
The following messages are displayed when you run the item with a pipeline:
Single-item input: Selecting multiple items will trigger separate executions for each item.
List (item[]) input: Selecting multiple items will trigger a single execution with all items.
Over 1000 items (item[] input): The function is disabled, and a warning is shown indicating that execution with more than 1000 items is not supported.
Learn more about Pipelines.
In the Dataset Browser, select the item.
Right-Click, or click Actions.
Select the Run with Pipeline. It allows you to execute the selected items in the selected pipeline.
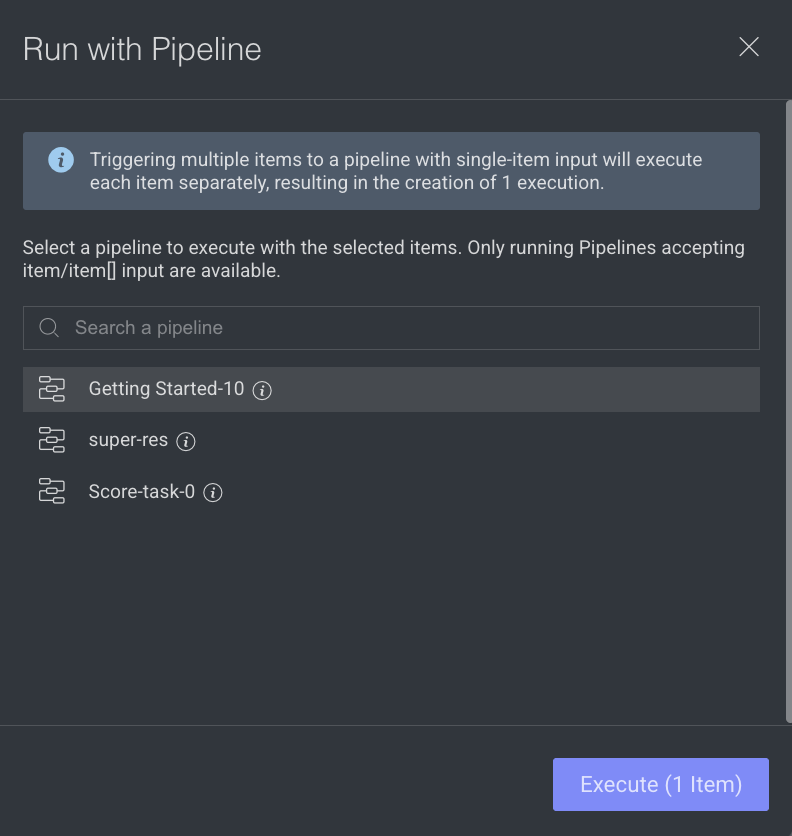
Search and select a pipeline from the list.
Click . A confirmation message will be displayed.
To view more actions available on the dataset actions, refer to the Manage Datasets article.