Application Creations - Guide
- 06 May 2025
- Print
- DarkLight
- PDF
Application Creations - Guide
- Updated On 06 May 2025
- Print
- DarkLight
- PDF
Article summary
Did you find this summary helpful?
Thank you for your feedback
Overview
This tutorial helps you to learn how to use the Dataloop platform to push, deploy, execute, and trigger functions.
Important references
1. Codebase
The package codebase is the code you import to the platform containing all the modules and functions. When you upload the code to the platform, either from your computer or from GitHub, it is saved on the platform as an item (in a .zip file). If you wish to download the codebase, use the following script:
# Get the service
service = dl.services.get(service_id='my_service _id')
# get the item object of the code base
code_base = dl.items.get(item_id=service.package.codebase_id)
# Download the code to a local path
code_base.download(local_path='where_to_download_the_codebase')
A Codebase is a packaged Python module or Git repository that:
- Includes one or more service runner classes (like ServiceRunner in your code).
- Is uploaded to Dataloop as either:
- A ZIP file containing the Python script(s), or
- A linked GitHub repository.
- Is then registered on Dataloop under the "Codebase" section of the platform.
- Once registered, it can be:
- Used to create Dataloop Services.
- Triggered automatically on items, events, or datasets.
- Integrated into automation pipelines for image preprocessing, inference, augmentation, etc.
Codebase Example
The following Python code consists of two image-manipulation functions:
- RGB to grayscale over an image: Turns a color image into an image composed of shades of gray.
- CLAHE (Contrast Limited Adaptive Histogram Equalization) Histogram Equalization over an image: Reduces noise amplification to improve the contrast of the image.
Each function receives a single item (image type), which later can be used as a trigger to invoke the function.
import dtlpy as dl
import cv2
import numpy as np


class ServiceRunner(dl.BaseServiceRunner):
   @staticmethod
   def rgb2gray(item: dl.Item):
       """
       This function converts an RGB image to gray.
       This will also add a modality to the original item.
       :param item: dl.Item to convert
       :return: None
       """
       buffer = item.download(save_locally=False)
       bgr = cv2.imdecode(np.frombuffer(buffer.read(), np.uint8), -1)
       gray = cv2.cvtColor(bgr, cv2.COLOR_BGR2GRAY)
       gray_item = item.dataset.items.upload(local_path=gray,
                                             remote_path='/gray' + item.dir,
                                             remote_name=item.filename)
       # add modality
       item.modalities.create(name='gray',
                              ref=gray_item.id)
       item.update(system_metadata=True)

   @staticmethod
   def clahe_equalization(item: dl.Item):
       """
       This function performs histogram equalization (CLAHE).
       This will add a modality to the original item.
       Based on opencv: https://docs.opencv.org/4.x/d5/daf/tutorial_py_histogram_equalization.html
       :param item: dl.Item to convert
       :return: None
       """
       buffer = item.download(save_locally=False)
       bgr = cv2.imdecode(np.frombuffer(buffer.read(), np.uint8), -1)
       # create a CLAHE object (Arguments are optional).
       lab = cv2.cvtColor(bgr, cv2.COLOR_BGR2LAB)
       lab_planes = cv2.split(lab)
       clahe = cv2.createCLAHE(clipLimit=2.0, tileGridSize=(8, 8))
       lab_planes[0] = clahe.apply(lab_planes[0])
       lab = cv2.merge(lab_planes)
       bgr_equalized = cv2.cvtColor(lab, cv2.COLOR_LAB2BGR)
       bgr_equalized_item = item.dataset.items.upload(local_path=bgr_equalized,
                                                      remote_path='/equ' + item.dir,
                                                      remote_name=item.filename)
       # add modality
       item.modalities.create(name='equ',
                              ref=bgr_equalized_item.id)
       item.update(system_metadata=True)
To continue with the tutorial, save the code as a Python file (you may call it main.py) and then compress it to a .zip file or upload it to your Git.
2. Environment
Since the code requires a Python library that is not a standard library (cv2 - OpenCV), it's essential to ensure its pre-installation before execution.
Two options are available:
- Use a custom Docker Image. For more details, read here.
- Upload a requirements file (.txt), separated from the codebase. For more details, read here.
Below you will find instructions on how to upload the codebase to Dataloop to create an application.
3. Push a Package of Multiple Functions
In this tutorial, you will learn how to create and push code as a package to the Dataloop application library.
The code package will serve as an app that you can install/uninstall in your project.
To create an application element, refer to Create an application article, and the following important information helps you to understand it better:
Provide an app name. This name will serve as the service name. You can name our tutorial app image-process-app.
Select your preferred way of uploading the example code:
- Codebase Item type – for uploading a compressed folder (for example, “.zip”).
- Codebase Git type – to link a git code.
Environment: In our example, the package codebase utilizes a non-standard Python library (cv2 - openCV). Thus, it's mandatory to ensure its pre-installation before executing the entry point.
Two options are available:Use a custom Docker Image. For more information, see here.
Upload a requirements file (Requirements.txt):
opencv-python==3.4.2.17
Requirements File UploadNotice that the 'Requirements.txt' file must be uploaded separately from the codebase. You'll find an exclusive button for the requirements file upload in the application creation dialog.
Missing Python LibrariesUninstalled Python libraries will trigger an initialization error, leading to a "Crash Loop - Requirements Error," preventing your application service from start running.
Multiple functions may be defined in a single package under a module entity. This way, you will be able to use a single codebase for various services (applications).
Define the module name (no limitations). Themain.pyfile you created should be defined as the module entry point.List the functions defined in the
main.pyfile:rgb2grayandclahe_equalizationand their inputs and outputs. In our example, no outputs were defined.
Add or Edit Descriptions Using the SDK
- You can create descriptions for Init Input, Input, and Output while creating an application using the SDK.
- You can edit descriptions for Init Input, Input, and Output using the SDK.
- Additionally in the application UI, you can view (cannot create or edit via UI) descriptions for Init Input, Input, and Output only if you include them during application creation using the SDK.
- For more information, see the SDK article to create an application using SDK.
4. Deploy a Service
You can now create a service from the package. To do that, you need to define which module the service will serve. Notice that a service can only contain a single module. The module’s functions will be added to the service automatically.
Multiple services can be deployed from a single package. Each service can get its own configuration:
a different module and settings (computing resources, triggers, UI slots, etc.).
In our example, there is only one module in the package. Let’s deploy the service:
Install
To install an Application, refer to the Install an Application article.
Set an Event-based Trigger to the Service
When creating a service, you can configure a trigger to automatically run the service functions. When you bind a trigger to a function, that function will execute when the trigger fires. The trigger is defined by a given time pattern or by an event in the Dataloop system.
An event-based trigger is related to a combination of resource and action. A resource can be several entities in our system (item, dataset, annotation, etc.) and the associated action will define a change in the resource that will prompt the trigger (update, create, delete).
The resource object that triggered the function will be passed as the function's parameter (input).
Separate triggers must be set for each function in your service.
Let’s set a trigger to invoke the rgb2gray function:
The trigger that set, invokes the function every time a new item is created.
We added a DQL filter, which monitors image items only, as well as a specific dataset (based on its dataset ID), rather than the entire project.
To find your dataset ID, go to the Dataset Browser → click on any item → the Dataset ID can be found in the right panel and copied by clicking the clipboard icon.
{
	"$and": [{
			"type": "file"
		},
		{
			"hidden": false
		},
		{
			"datasetId": "61e0349e9e3e2358d715ee06"
		},
		{
			"metadata.system.mimetype": {
				"$eq": "image/*"
			}
		}
	]
}
Filters are created using the Dataloop Query Language (DQL).
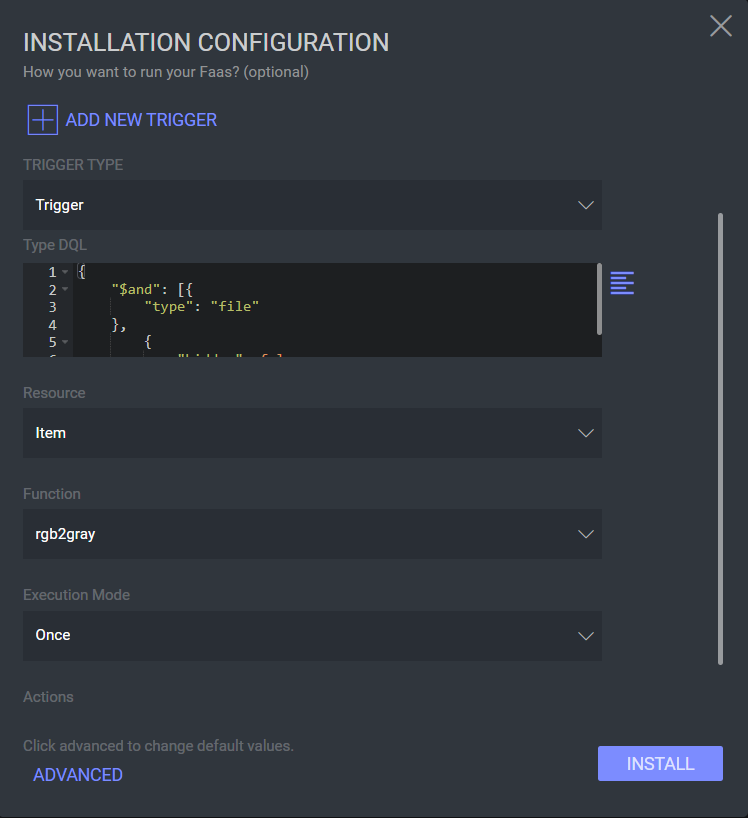
You can also add filters to specify the item type (image, video, JSON, directory, etc.) or a certain format (jpeg, jpg, WebM, etc.).
To trigger the function only once (only on the first item event), set Execution Mode to Once, otherwise use Always.
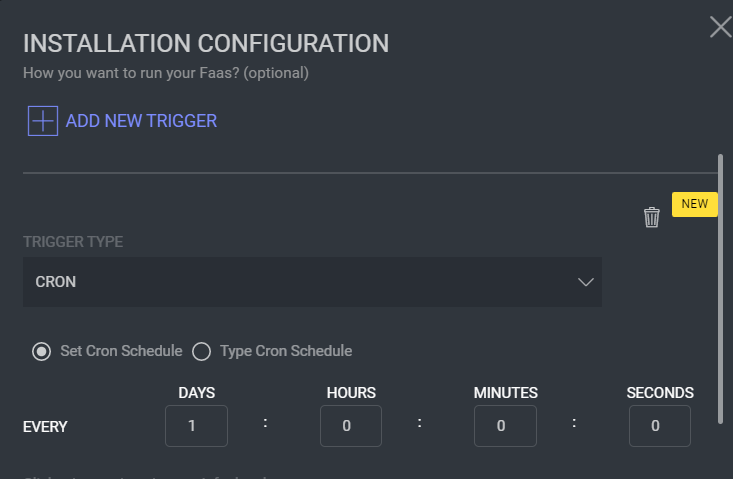
Optional: Cron Trigger at Predefined Intervals
Click Cron to set a predefined interval for triggering the function, for example, processing image files once a day. For more specific scheduling, use regular CRON expressions.
Advanced Options – Compute Settings
By default, packages are deployed on Regular-S GCS instances. Click the ADVANCED button to change settings such as machine type, replicas, and concurrences, and even apply a docker image.
Final Installation
Click Install to deploy the service.
Bot user - Please note that if this is the first time you deploy a service, your project probably does not have a bot user. In this case, a pop-up dialog will require your permission to create a bot user to deploy the package. Follow the dialog steps to create the bot.
Validation
Your service must now be listed on the Services tab. Click the service to see the sidebar, or click the 3-dot icon for more information and options.
5. Execute the Function
Once the service is ready, you may execute the available functions on an input.
An execution means running the function on a service with specific inputs (arguments). The execution input will be provided to the function that the execution runs.
Now that the service is up, it can be executed manually (on-demand) or automatically, based on a set trigger (time/event).
We will manually upload an item to the dataset we specified in the trigger’s DQL filter. You can use any image to upload. Once the image is uploaded, the item created trigger event invokes the rgb2gray function from our service. The transformed image will be saved in the same dataset.
Congratulations! You have successfully created, deployed, and executed a Dataloop function!
6. Application UI Slots – Optional
Activate UI Slots
To activate the UI button to enable you to invoke and execute the functions from different places in the platform:
- Go to the application service that for which you want to activate the UI Slot
- In the service actions under the 3-dot icon, click Activate UI Slots.
- Select the projects where you want to activate the UI slot buttons in, and the required slots you defined on the application package. Make sure to have all required permissions (see below). Click OK.
- Execute the function through the UI-Slot in the dataset browser, task browser, or annotation studio, according to the UI Slot definition on the package.
To learn how to add UI Slots, refer to the UI Slots.
Required Permissions
Certain permissions need to be set up to use UI slots of an application service in projects other than the project where the application service is located.
- application Service Bot User:
To enable users to see and use the UI slot button in projects other than the application service's project, the application service user bot must be added as a user (developer) to those projects. Read more about bot users here. - User Access:
In addition to adding the application service user bot to the relevant projects, the user who needs to access the UI slot button must also be added as a user to the project where the application service is located, with any role.
Once these permissions are set up, users will be able to see and use the UI slot button for the application service in projects other than the application service's project.
7. Service Overview
The table listing and the sidebar panel provide you with information about the service status (running, paused, etc.), and allow you to pause/run the service by clicking the action button.
In addition, the sidebar panel provides access to information and tools:
Triggers: To see the triggers of your service, click VIEW Triggers. On this page, you can also create new triggers.
You can also see project-level triggers on the triggers page, which lists all triggers in the system, their type, settings, etc.Logs: To see the logs of your service, click VIEW LOGS. In the logs tab, filter your executions or sort the log in ascending/descending order to view the most recent or oldest content.
Executions History:
- Click EXECUTIONS to view the executions log.
- Click on any execution to see that execution’s details.
- Click the Repeat icon to rerun a failed execution.
You can also see project-level executions on the executions page, which lists all executions in the system, their statuses, services, etc.