Overview
Dataloop’s LiDAR annotation tools offer advanced tracking capabilities through the use of KeyFrames and interpolation. KeyFrames mark specific frames where annotations are created, adjusted, or modified, ensuring precise control over the annotation process.
Interpolation then fills in the gaps between KeyFrames, allowing for smooth and efficient tracking of objects across frames without the need for manual adjustments on every single frame.
These tools significantly enhance the speed and accuracy of annotating LiDAR data, making them ideal for complex use cases such as autonomous vehicles, robotics, and 3D spatial analysis.
Interpolation
Dataloop platform offers the following two interpolation methods while annotating LiDAR files:
- Linear
- None
Linear Interpolation
An interpolated frame is a frame that lies between two KeyFrames and is automatically generated by the system. Instead of manually annotating each frame, interpolation allows the software to predict and smoothly transition object positions, shapes, or attributes between KeyFrames. This reduces the need for manual adjustments on every frame, saving time while maintaining annotation accuracy.
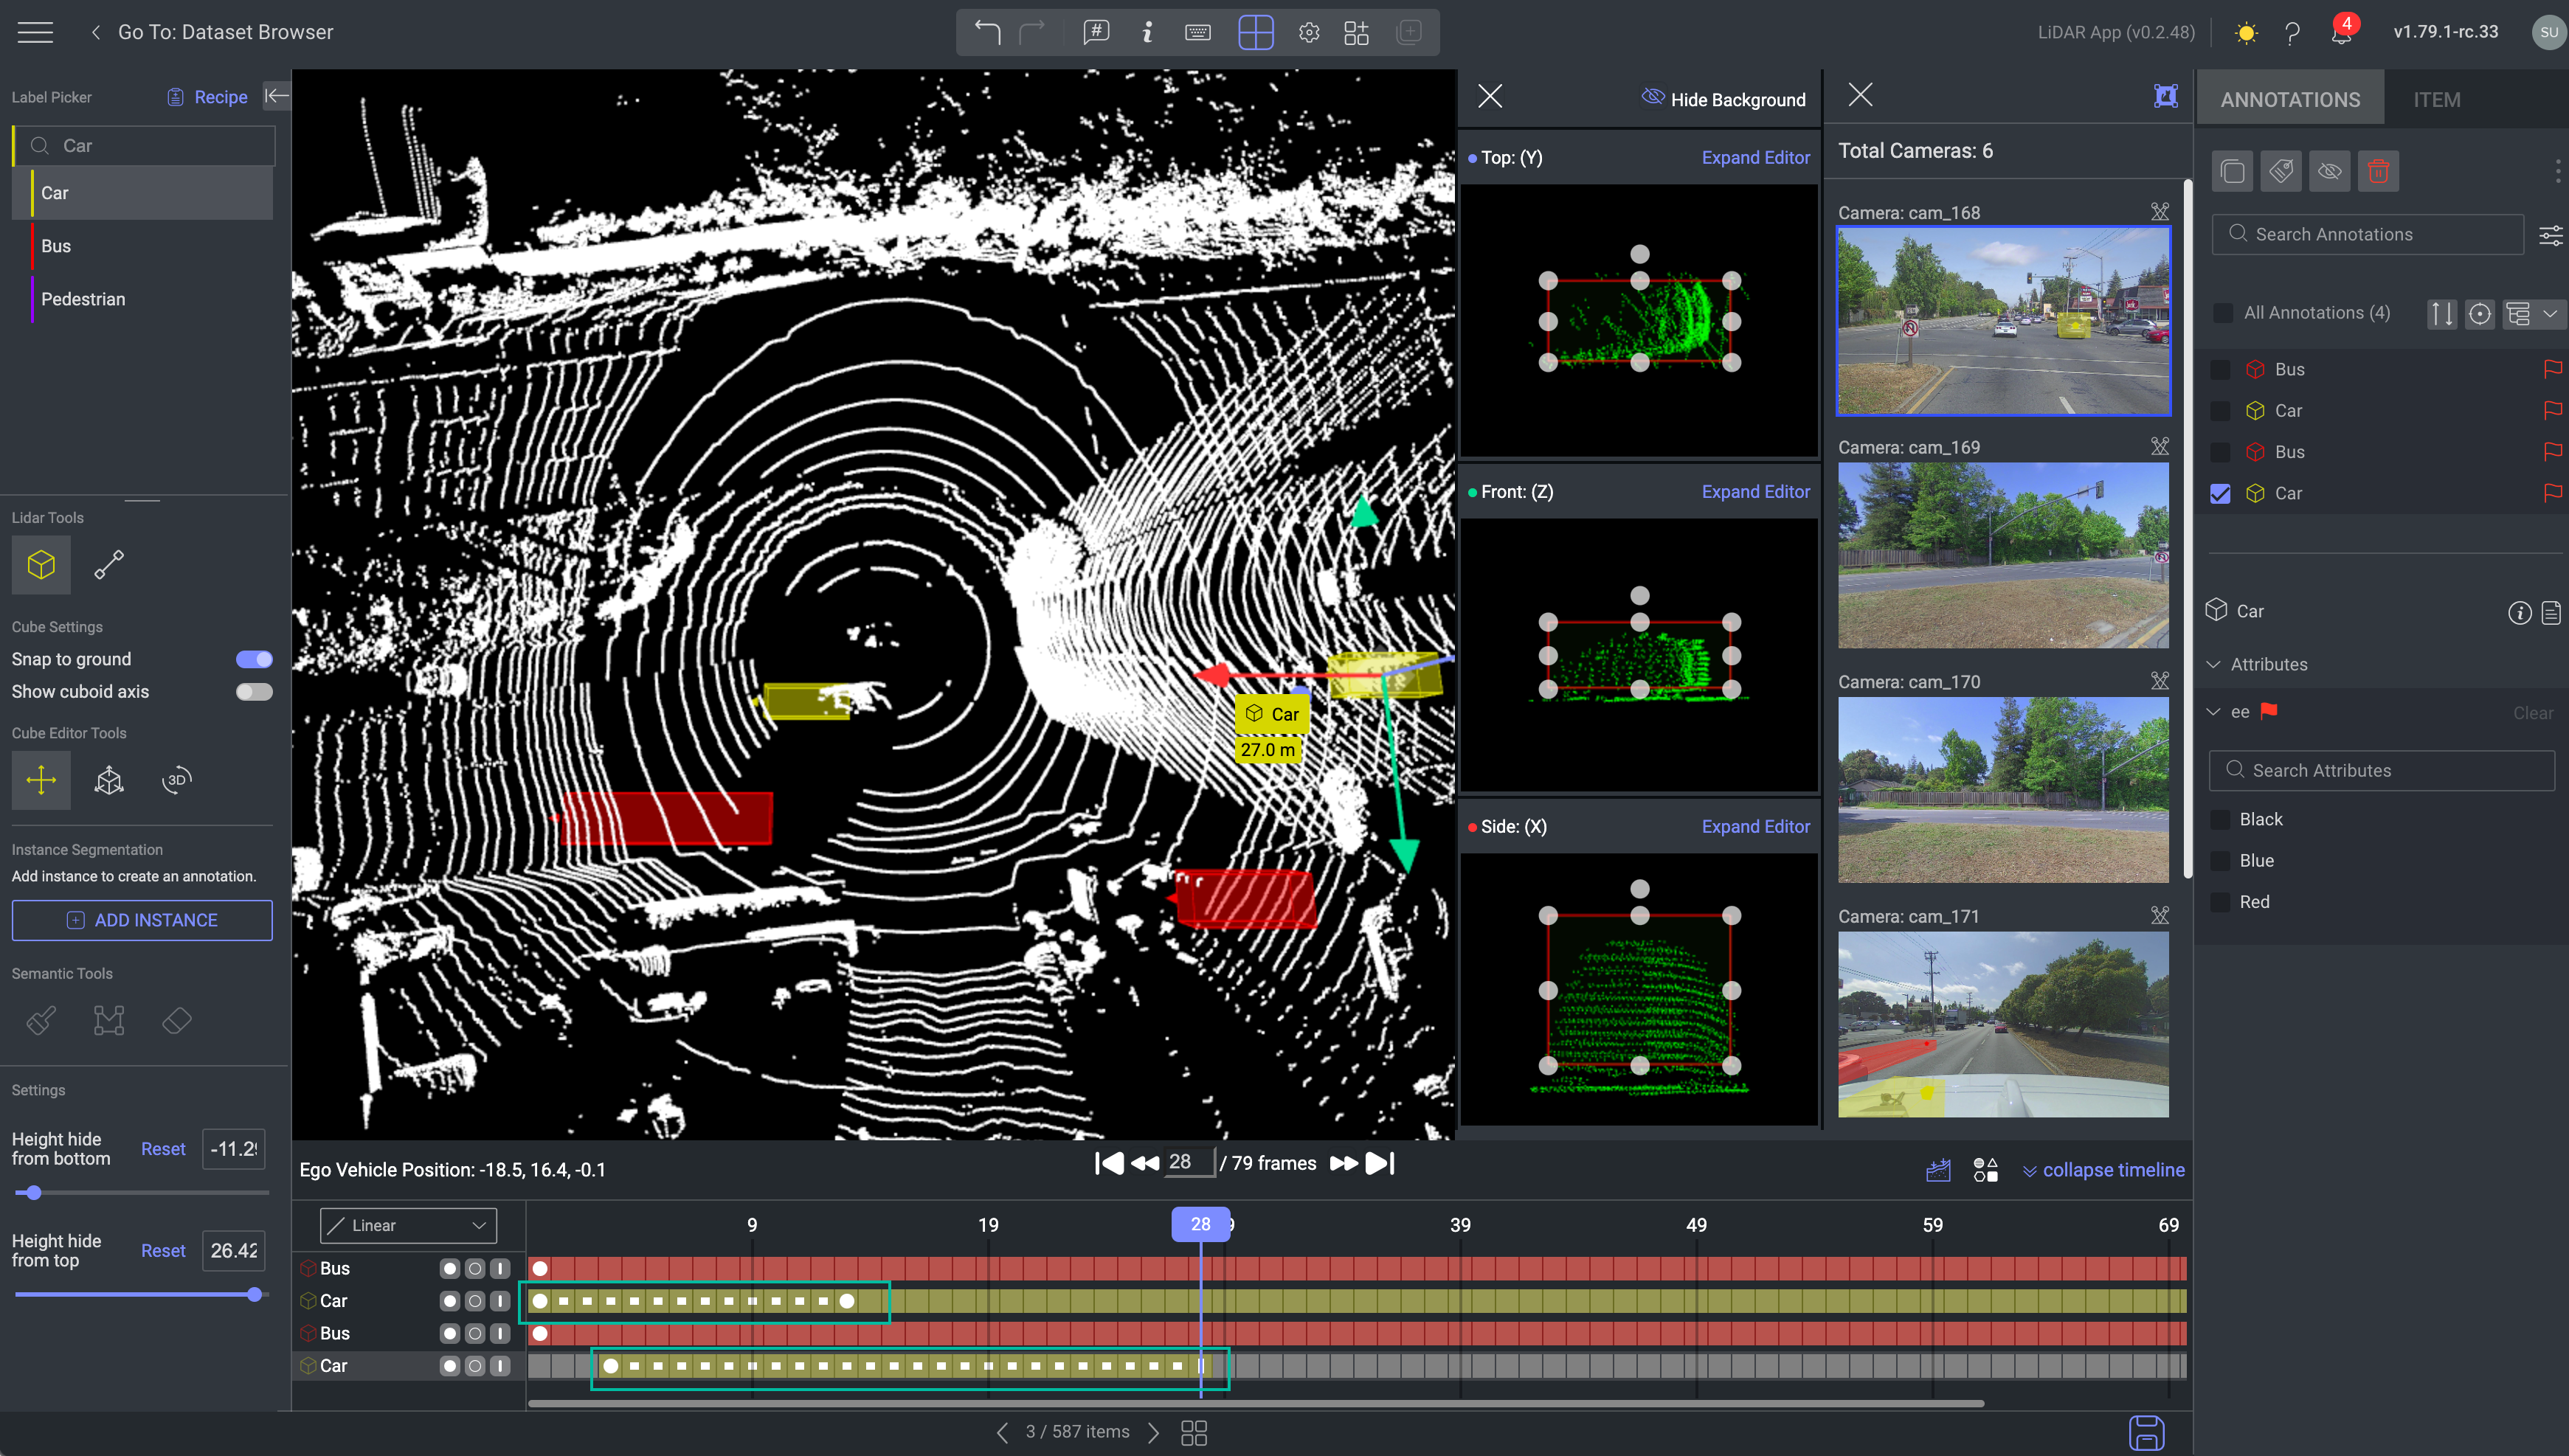
Linear Interpolation automatically calculates the linear transition in size and position between two keyframes, enabling users to work more efficiently by removing the need to manually adjust each frame. In the LiDAR studio, Linear Interpolation is enabled by default. You can see the interpolation on the timeline, indicated by the green box, in the following screenshot.

How It Looks on the Timeline
On the timeline, KeyFrames are usually marked distinctly, such as with solid dots. Interpolated frames appear between these KeyFrames and are often represented by a different visual indicator, such as solid square dots, showing the transition between the manually set KeyFrames. The interpolated frames visually connect the KeyFrames, displaying a smooth progression of the object's movement or changes over time.
Linear interpolation is supported for 3D Cube and Polyline.
-
Cuboid: Cuboid annotation tool supports interpolation. If the interpolation is enabled, the annotator can annotate and the interpolation will be done automatically. Between each 2 keyframes there will be interpolated frames.
-
Polyline: The polyline annotation tool supports interpolation. When activated, annotators can annotate, and automatic interpolation occurs between consecutive keyframes. The polyline points can be adjusted at each frame, with any modification treated as a keyframe (including attribute, label, and location changes).
-
Instance Semantic: Instance semantic annotation tool does not support interpolation. For annotating with Instance Semantic on various frames, the user should annotate manually at each frame. Each manual annotated frame will be counted as keyframe.
If you use the Instance Segmentation tool for the annotation, the Set Start Time, Set End Time, and Set Hidden/Visible Mode buttons will be disabled.
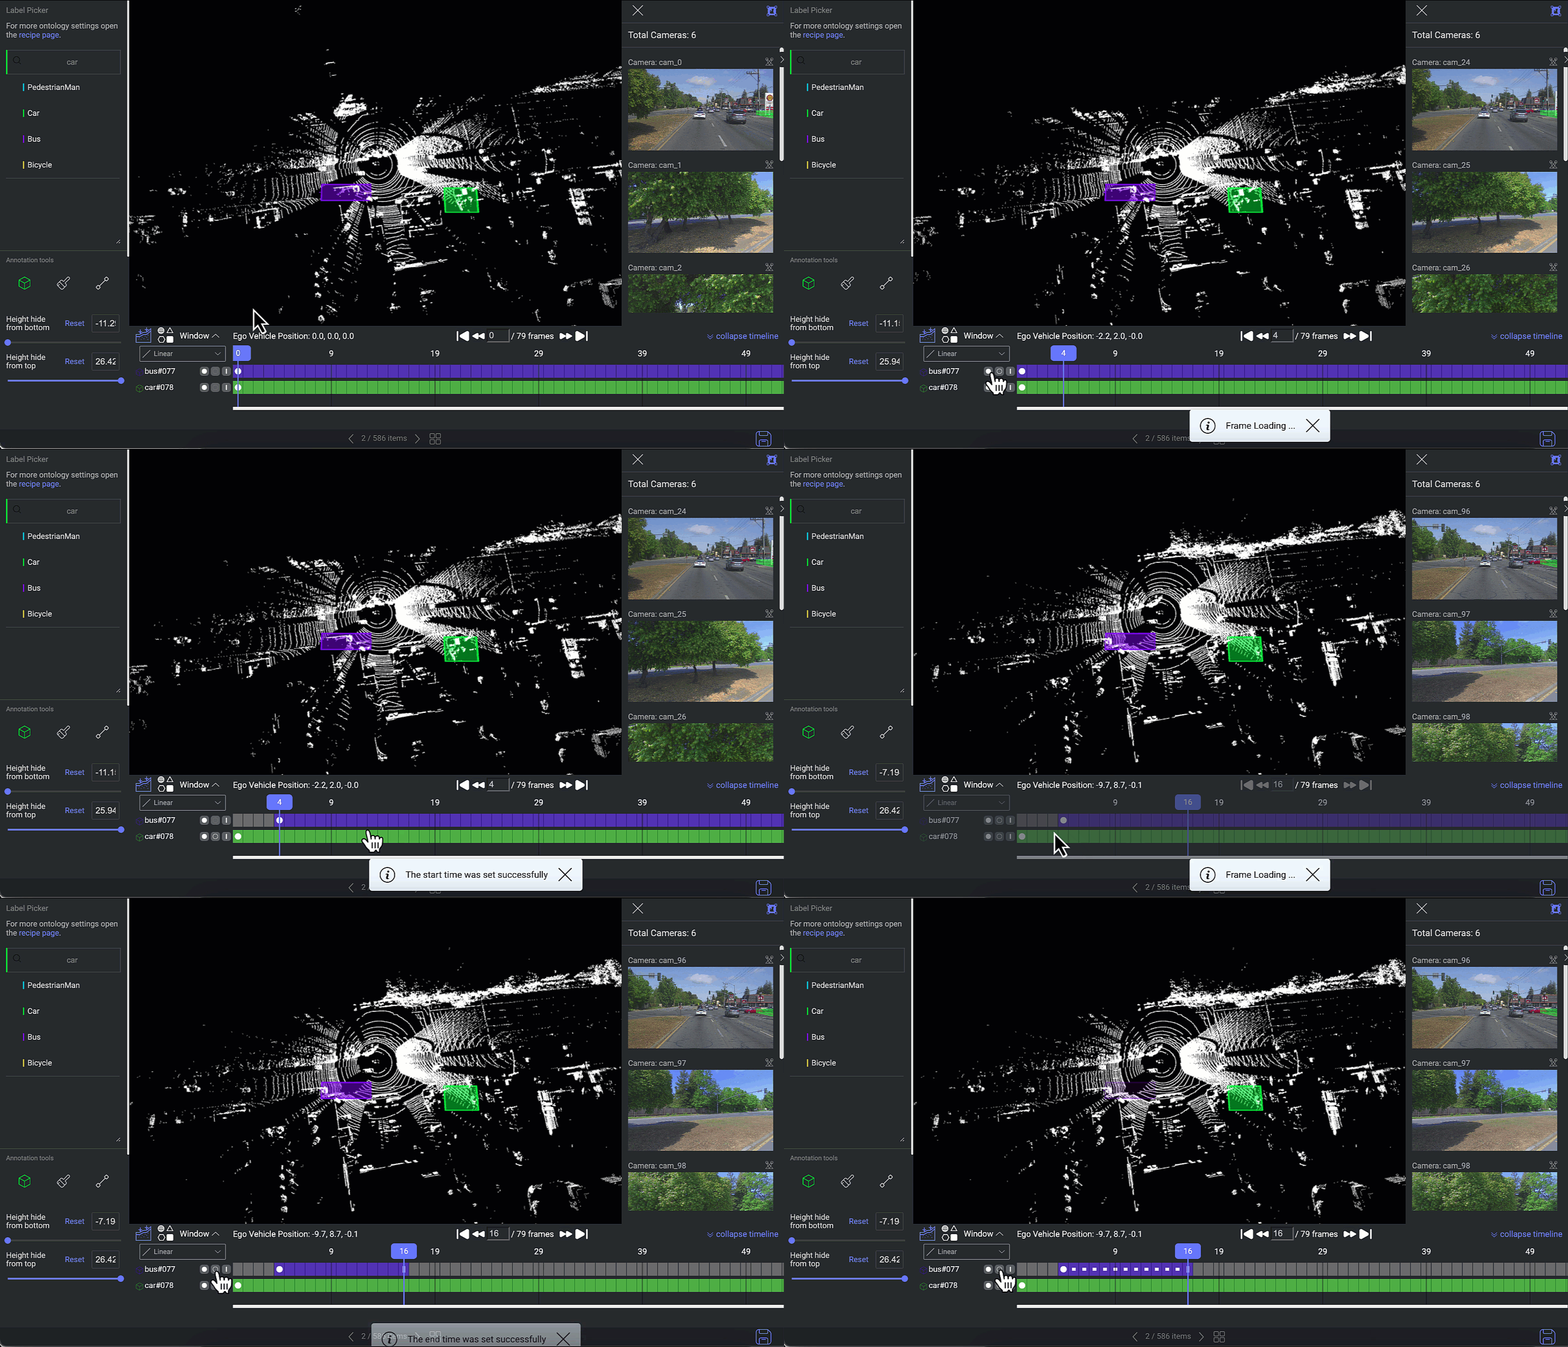
Use the controls on the left to set a keyframe at the current position.
- Set Start Time: It removes the previous Start Frame.
- Set End Time: The annotation will end on this frame.
- Set occlusion on/off: Set ON when the annotation is hidden and off when it's back. Changes are visualized over frames with different opacities.

How to Use the Linear Tracker?
- Select the Linear interpolation. By default, Linear interpolation is active in the LiDAR studio.
- Create an annotation while Linear is selected.
- Move forward to a later frame and adjust the annotation position. Between each 2 keyframes there will be interpolated frames.
- Look at each frame to see how the annotation changes automatically between frames.
None - No Tracker
If None is selected from the dropdown, the interpolation tool will be deactivated, and any annotations created will not be interpolated.
KeyFrames
KeyFrames in LiDAR annotations refer to specific frames where key actions occur during the annotation process. These include the initial frame where an annotation is created (start frame), the frame where it ends (end frame), or any frame that has been manually edited.
Edits may involve actions such as adjusting the size or position of the annotation, changing its label, updating attributes, or toggling occlusion (hidden/visible). KeyFrames mark significant changes in the annotation, ensuring precise tracking and consistency throughout the data.
KeyFrames in JSON File
KeyFrames are stored in the JSON file under annotations.metadata.system.snapshots_. They capture the annotation data, such as position, label, and attributes, that apply from that point onward. To view the KeyFrames, download the annotation JSON file and locate this section.
Setting a Start and End-Frame
By default, when creating a new annotation, it has its first frame. If not specifically setting an end-frame, which will be recorded as a fixed frame, the annotation will only have the first frame specified.
The start and end times of LiDAR annotations will be recorded in the output JSON file.
Automated Frames
Automated frames are generated automatically between two KeyFames when the Linear is used since they can automatically adjust annotation position/size.
Automated Frames in JSON File
Automated frames are represented as additional frames recorded as snapshots at Annotations.metadata.system.snapshots_. They can be seen as type Linear.
Reflected Frames
Reflected frames exist between two keyframes. Since reflected frames are not automated, it means that nothing changed in the annotation in these frames.
For example, setting an annotation as hidden in frame 10 and visible again in frame 20 means that we have keyframes in frames 10 and 20, and reflected frames between 11 and 19, having the same information as frame 10.
Reflected Frames in JSON File
Reflected frames have no representation in the annotations JSON file.
Scope of Changes – Label & Attributes
Any changes to an annotation’s label or attributes, such as updating the annotation's label, will automatically apply to all subsequent frames until the next KeyFrame. Any auto-generated frames between the point of change and the next KeyFrame will be adjusted automatically.
This simplifies the process of correcting or updating annotations, removing the need to modify each frame individually.
Scope of Changes – Size and Position
Changing the size and position of an annotation in an existing frame, where size and position have been previously determined, will only affect that specific frame. Changes are not calculated forward to the next frame or next keyFrame.
Hidden Annotations (Occlusion)
In LiDAR Annotation Studio, the "Set Hidden Mode" feature allows users to temporarily hide or disable the display of annotations within the workspace. This can be useful when focusing on the raw LiDAR point cloud data without the distraction of annotation overlays.

It enables users to:
- Review the LiDAR data without any visual interference from existing annotations.
- Inspect specific areas or details of the point cloud more clearly.
- Simplify the workspace when managing large and complex sets of annotations.
When the annotations are hidden, they are not deleted or altered—they are simply not visible until the "Set Hidden Mode" option is toggled off. This feature provides a flexible and clutter-free way to interact with the data.
How to Hide Annotation?
The first frame of an annotation cannot be a hidden one.
- Annotate the object you wish to annotate.
- Set the annotation as hidden using the Set Visible Mode/Set Hidden Mode icon, either from the annotation controller or the annotation timeline. While hidden, annotations are still visible on the canvas.
- When the object is visible again, set it accordingly using the Set Visible/Set Hidden icon, either from the annotation controller or the annotation timeline.