The Manage Datasets documentation provides a comprehensive guide on how to efficiently organize, structure, and manipulate datasets within the Dataloop platform. Datasets serve as the foundation for data annotation, machine learning model training, and AI-driven workflows. Dataloop provides the capability to perform a variety of dataset management actions, as described below.
Dataset Versioning
Dataloop enables you to manage your datasets and items, including functions like cloning, merging, moving, as well as refining and segmenting your files.
You can clone either datasets or items along with their annotations or metadata.
Important
You cannot clone the item status, such as approved, completed, discarded, etc.
Cloned datasets are generated using the same recipe as the original ones.
Do not make any changes to items during the cloning process. This includes actions such as adding, editing, or deleting annotations, or moving items, etc.
Clone Datasets
To clone an entire dataset, follow these instructions:
From the left-side menu, go to Data.
Find the desired dataset from the list, and click on the three-dots icon.
Choose Clone Dataset from the list.
In the Clone Dataset/Items window, decide whether you want to clone items from an existing dataset or create a new one:
Existing Dataset:
Select a dataset from the list.
Search for and select the folder within the dataset where you want to clone the dataset (root folder, subfolders, etc.).
New Dataset:
Enter a name for the new dataset.
Choose your cloning options:
Whether you want to clone with item annotations.
Whether you want to clone with item metadata.
Once you've configured your options, click Clone to initiate the cloning process. A confirmation message is displayed.
Clone Dataset's Items
Dataloop facilitates the cloning of items into target datasets. It's important to note that you can clone items:
From internal storage (e.g., Dataloop cloud storage) to internal storage.
From external storage (e.g., S3) to external storage, provided that the target storage also uses the same storage driver (e.g., using the same integration secret and storage driver pointing at the same location).
To clone an item, follow the steps:
From the left portal menu, select Data.
Click on the dataset in the list.
Select a single or multiple item(s), and right-click or select File Actions > Clone from the list.
In the Clone Dataset/Items window, decide whether you want to clone items from an existing dataset or create a new one:
Existing Dataset:
Select a dataset from the list.
Search for and select the folder within the dataset where you want to clone the dataset (root folder, subfolders, etc.).
New Dataset:
Enter a name for the new dataset.
Choose your cloning settings:
Whether you want to clone with item annotations.
Whether you want to clone with item metadata.
Once you've configured your options, click Clone to initiate the cloning process.
Parent ID or Dataset ID of the Cloned items
After cloning an item, the metadata (JSON) of the cloned item will display both the parent item ID (
srcItem) and parent dataset ID (srcDataset). However, in the Details tab, only the parent item ID is shown.
Merge Datasets
Dataloop provides the capability to merge datasets. The result of dataset merging depends on the degree of similarity or dissimilarity between the datasets.
Cloned Datasets: When datasets are cloned, their items, annotations, and metadata are merged. This means that you can have annotations from various datasets associated with the same item, allowing you to view and work with combined annotations on a single item.
Notice
Merging items from cloned datasets is feasible only if the items being merged originated from the same master item, meaning that the cloned items must both reference the same source.
Different datasets (not clones) with similar recipes: Items will be summed up, and similar items will be duplicated.
Datasets with different recipes: Datasets with different default recipes cannot be merged. To merge datasets, use the Switch Recipe option at the dataset level (accessible through the ellipsis icon) to align recipes between datasets.
To merge datasets, follow the instructions:
From the left portal menu, select Data.
Choose the datasets you want to merge from the list.
Click Merge Datasets.
In the Merge Datasets window, enter a name for the newly merged dataset in the Dataset Name field.
Indicate whether you wish to merge With Items Annotations? and/or With Items Metadata? (i.e., including information added by annotators).
Upon successful completion of the merge process, the newly created dataset will be listed with the Dataset type labeled as Merge.
Copy a Dataset ID
You can copy the Dataset ID by using one of the following options:
Clicking on Dataset Details from the Dataset Browser page and click on the Copy icon next to the Dataset ID field.
Select the Data page from the left-side panel and click on the Ellipsis (three-dots) icon of the dataset and select the Copy Dataset ID option from the list.
Download Items by Pipelines
A pipeline can include a phase for automatic data and metadata export to a connected location. This can be done as an application to export all data via a remote API or a connected Driver. For example, use a dataset node and an App Function node, and select an export function. For more information, refer to the Create Pipelines.
Export Entire Datasets
Use either the Dashboard > Data Management widget, or the Data > Datasets tab to export the data:
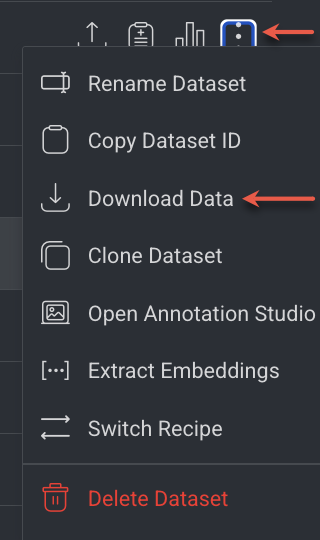
Select the dataset from the list.
Click on the Ellipsis (3-dots) icon and select Download data from the list.
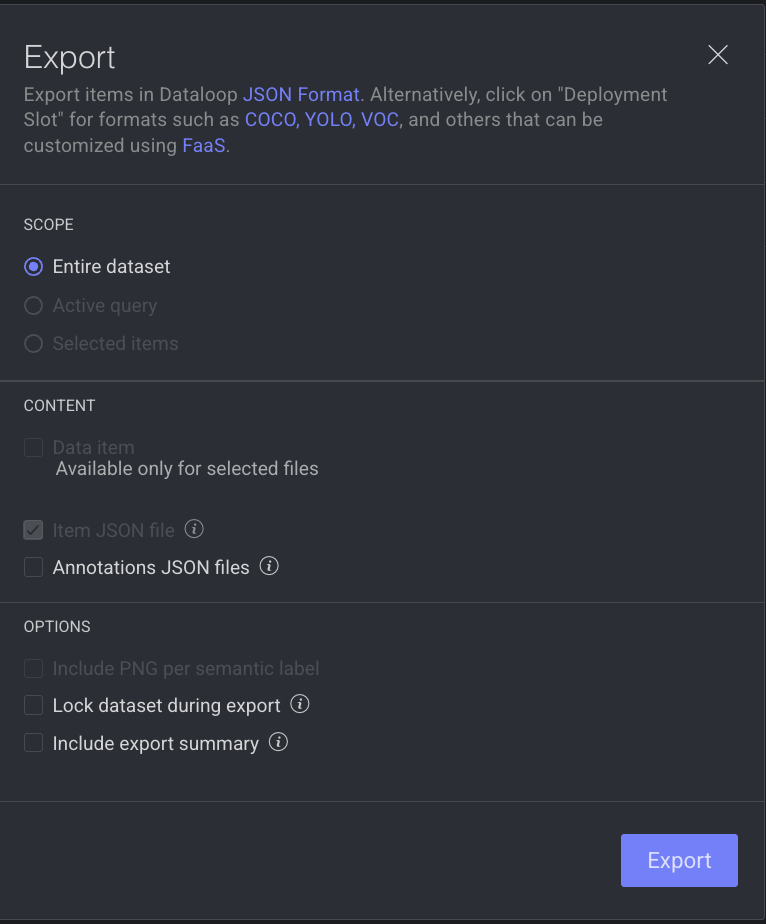
Select the export Scope:
Entire dataset: The ZIP file includes JSON files for all items in the dataset.
(Optional) include the Annotations JSON files. By default, the Item JSON file is selected. Selecting the Annotations JSON files option enables you to Include PNG per semantic label.
Include PNG per semantic label (optional): Select the ☑️ to include PNG per semantic label.
Lock dataset during export (optional): Select the ☑️ to lock the dataset during the export to ensure the dataset is exported exactly as it was when the export began. Read more
Include export summary (optional): Select the ☑️ to export the summary. A JSON file named “Export Summary” will be included. It provides a summary of the exported items, including item names, annotations, and more – allowing you to store it for quick reference later.
Click Export.
Learn how to export datasets using the SDK.
Lock Datasets During Export
Lock the dataset during the export to ensure the dataset is exported exactly as it was when the export began.
Perform the Export Entire Datasets instructions.
Select the ☑️ Lock dataset during export option.
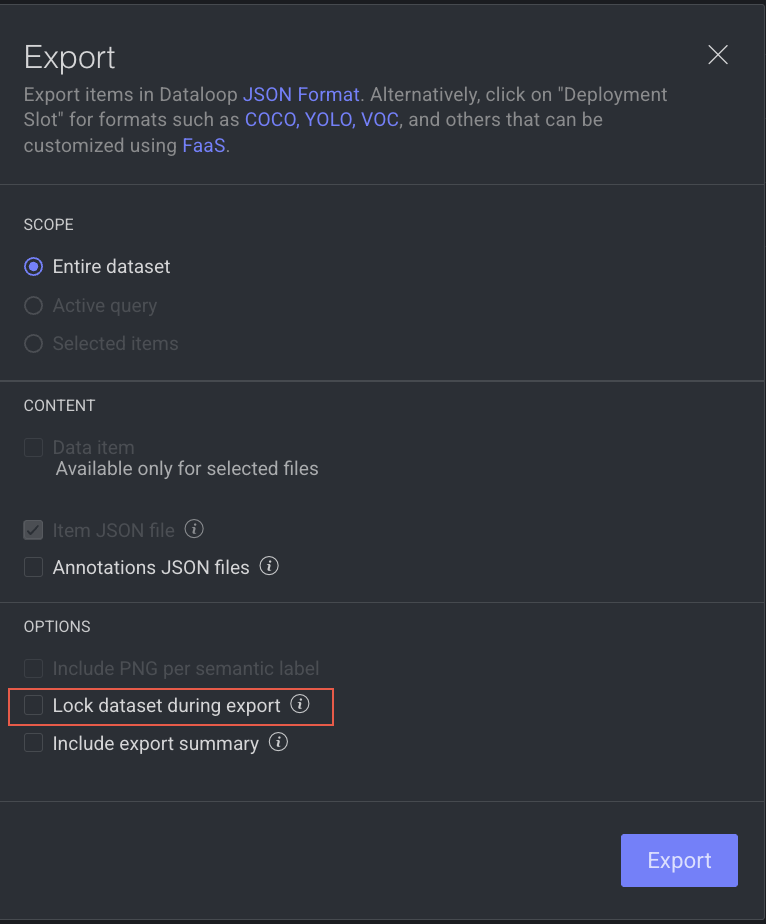
Click Export. A ZIP file will be downloaded.
Learn how to Lock Datasets During Export using the SDK.
Download an Export Summary File
It provides a summary of the exported items, including item names, annotations, and more – allowing you to store it for quick reference later.
Perform the Export Entire Datasets instructions.
Select the ☑️ Include export summary option.
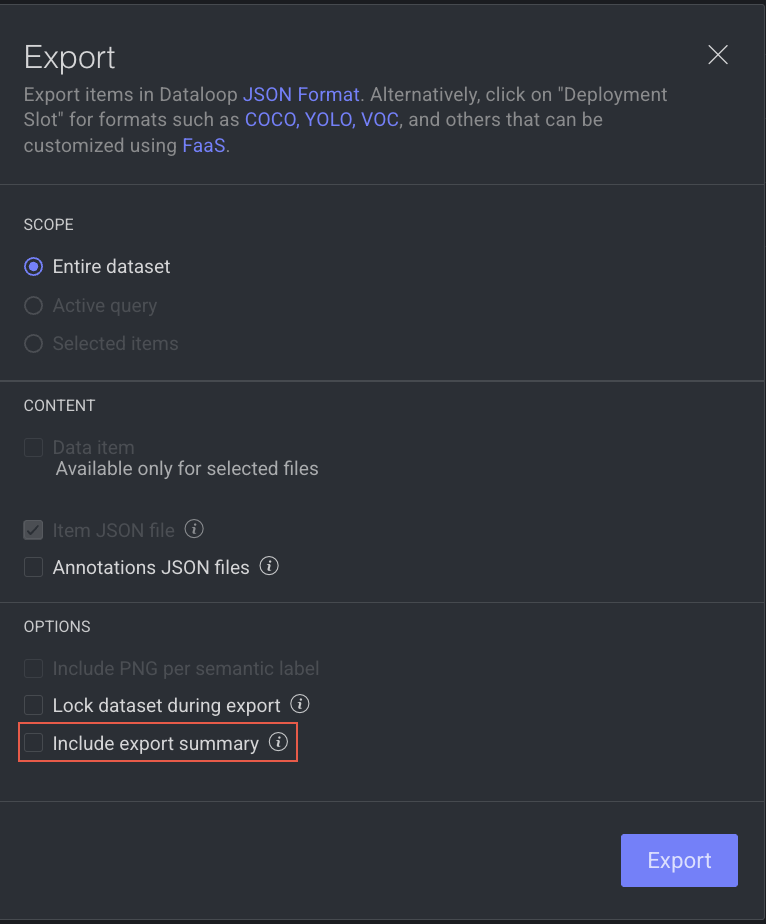
Click Export. A ZIP file will be downloaded with the following three additional JSON files along with the dataset items:
annotated_items_filenames.json: The filename list of the annotated items. For example:{"annotatedFilenamesList":[ "/shark/45e11254ff.jpg", "/lion/5f8df573bf.jpg", "/lion/56b70b4ecc.jpg", "/lion/7a9a41f459.jpg", "/lion/12f57cfa18.jpg", "/lion/05d42c9bd8.jpg", "/lion/2e33d2250b.jpg"]}Export summary - Wildlife Images Dataset - 2025-04-23T10/39/29.907Z.json: See the example below:Wildlife Images Dataset: Dataset name2025-04-23T10/39/29.907Z: Timestamp
{ "exportStartTime": "2025-04-23T10:39:26.345Z", // Timestamp when the export process started "datasetId": "66e95c87bc33824b0d5c0c60", // Unique ID of the dataset being exported "datasetName": "Wildlife Images Dataset", // Human-readable name of the dataset "recipeIds": ["66e95c87068abc18fe2f406b"], // List of associated recipe IDs used for annotations "itemsQuery": "{\"filter\":{\"$and\":[{\"datasetId\":{\"$in\":[\"66e95c87bc33824b0d5c0c60\"]}},{\"hidden\":false},{\"type\":\"file\"},{\"type\":\"file\"},{\"hidden\":false}]},\"join\":null,\"intersect\":null,\"except\":null,\"select\":null,\"sort\":{\"_id\":\"ascending\"},\"limit\":null}", // Query used to filter the items included in the export "annotationsQuery": null, // Optional query to filter annotations (null means all) "itemVectorsQuery": null, // Optional query to include specific item vectors (null means all or none) "annotationVectorsQuery": null, // Optional query to include specific annotation vectors (null means all or none) "itemsCount": 96, // Total number of items included in the export "annotatedItemsCount": 48, // Number of items that have annotations "annotationsCount": 0, // Total number of annotations (currently 0) "itemsWithoutTaskCount": 0, // Number of items not associated with any task "mlSubsets": {}, // Optional ML subsets metadata (empty here) "collections": {}, // Metadata about collections this dataset may be part of (empty here) "mediaTypes": ["image/jpeg"], // Media types included in the export (e.g., JPEG images) "annotationAttributes": [], // List of annotation attributes used (empty here) "annotationLabels": [], // Annotation labels used in the dataset (empty here) "annotationTools": [], // Annotation tools used (e.g., polygon, box) (empty here) "itemsListFilename": "items_filenames.json", // Filename containing the list of all item filenames "annotatedItemsListFilename": "annotated_items_filenames.json", // Filename listing only annotated item filenames "totalSize": 156848 // Total size of the exported dataset in bytes }items_filenames.json: The filename list of all the items in the dataset. For example:{"itemFilenamesList":[ "/turtle/9c2f24dd9a.jpg", "/shark/69ddff92d4.jpg", "/shark/09fc01c0d9.jpg", "/turtle/30bc9c0c6b.jpg", "/turtle/14f641a11f.jpg", "/shark/7d65b05fd1.jpg", "/shark/351d5ce5a9.jpg", "/shark/482cadb24e.jpg", "/shark/6e86c42370.jpg", "/shark/42e0b4ff0a.jpg", "/shark/0b37c5472f.jpg", "/shark/7eb99c36c6.jpg", "/turtle/0a47b7d021.jpg"]}
Learn how to Download an Export Summary File using the SDK.
Extract Embeddings from Datasets
Extracting embeddings is the process of generating numerical representations (vectors) of data, such as text, images, or other types of content, in a lower-dimensional space. Dataloop allows you to extract embeddings using a model (trained, pre-trained, and deployed) from the Marketplace. These embeddings capture the essential features or meanings of the original data in a way that makes it easier for machine learning models to process and analyze.
Navigate to the Data page using the left-side navigation.
In the Datasets tab, find the dataset that you want to extract embeddings.
Click on the Ellipsis (3-dots) icon and select the Extract Embeddings option from the list. An Extract Embeddings pop-up with a list of all the models (trained, pre-trained, and deployed) is displayed.
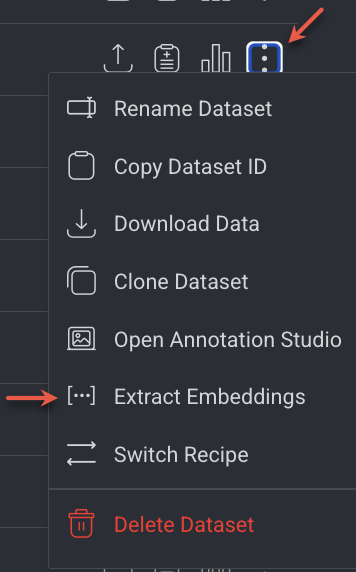
Or
Click Down Arrow (next to Create Dataset) -> Extract Embeddings. This option is enabled only after you select a dataset to perform the embedding extraction.
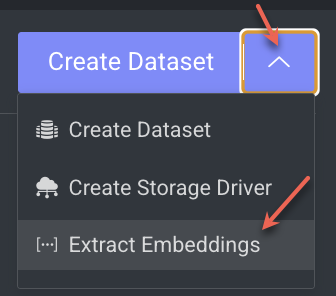
Select a Model from the Deployed section, or click on the Marketplace to install a new model.
Choose the option Automatically run on new dataset items to enable automatic extraction for newly added items. This creates a trigger that automatically generates embeddings for the new items.
Click Embed. The Extracting Embeddings process will be initiated. Use the Notifications bell icon to view status.
Bulk Operations
The Dataset browser facilitates bulk operations within the specified context like Move to Folder, Export, Clone, Classification, etc. . To carry out bulk operations:
Manually select one or more items using the Command or Windows key + mouse left-click.
Perform the available actions for the items, such as Move to Folder, Export, Clone, Classification, etc.
Rename Datasets
Navigate to the Data page using the left-side navigation.
In the Datasets tab, find the dataset that you want to rename.
Click on the Ellipsis (3-dots) icon and select the Rename Dataset option from the list. A Change Dataset Name pop-up is displayed.
Edit the dataset name.
Click Rename. A name change message is displayed.
Switch Recipes
Refer to the Switch Recipe article for more information.
Delete Datasets
Dataloop provides the capability to delete datasets stored in both the internal file system and external cloud storage.
Important
When deleting a dataset, it removes the items in the dataset, and any related tasks and assignments associated with that dataset are also removed.
To delete a dataset, perform the following instructions:
Go to the Data page using the left-side navigation.
In the Datasets tab, find the dataset that you want to delete.
Click on the Ellipsis (3-dots) icon and select the Delete Dataset option from the list. A confirmation message is displayed.
Click Yes. A confirmation message indicating the successful deletion of the dataset is displayed.