Model Versions
- 12 Feb 2025
- Print
- DarkLight
- PDF
Model Versions
- Updated On 12 Feb 2025
- Print
- DarkLight
- PDF
Article summary
Did you find this summary helpful?
Thank you for your feedback
Overview
A model version can be initialized as a baseline within the Marketplace catalog by selecting a specific foundation model architecture, which is usually in an untrained state initially.
This allows for the flexibility to begin training the model with datasets of your choice. Once the model has been trained, it can undergo evaluation to assess its performance and effectiveness.
Following evaluation, the model can be deployed to make further predictions and annotation tasks. This process enables a streamlined approach to developing, testing, and utilizing AI models for various predictive tasks.
Version Tab Details
The list of models and its details are available in the following table:
| Fields | Description |
|---|---|
| Model Name | The name of the model. Click on it to open the model's detailed page. |
| Application | The name of the application available in the model. Click on it to open the Manage Installations page of the Marketplace. |
| Dataset | The name of the Dataset associated to the model. Click on it to open the Dataset Browser page. |
| Created By | The avatar and email ID of the user who created the model. |
| Created At | The timestamp of the model creation. |
| Status | The status of the model, such as Pre-Trained, Deployed, etc. To learn more, refer to the Model Version Status section. |
| Labels | The number of the labels available in the model. Labels refers to the outcomes a model is trained to predict, based on examples provided during training. These labels define the range of predictions a model can make. |
| Configuration | Click on the information icon to view the available configuration. |
| Tags | It lists the available tags in the model. Tags are typically served as labels or keywords associated with models to facilitate organization, filtering, and search. Tags can represent a variety of attributes or characteristics of the models. |
Search and Filter Model Versions
Dataloop platform allows you to search models using Model Name, Model ID, Application Name, Dataset Name, and Creator Email ID, providing users with the capability to refine and narrow down the displayed models.
Use the Search field to search and filter the models.
Filter Model Versions by Status
Dataloop platform allows you to search models by Status. Use the Filter by Status field to filter models by status. To learn more, refer to the Model Version Status section.
Model Version Status
A model version status is indicated in the versions table, and at the Version-Details page. The status on a model version can be one of the following:
- Cloning: The model version is currently in the cloning process.
- Created: The model version was created but was not yet trained.
- Pre-Trained: The model (entity) was trained already.
- Pending: The model version is pending training. Training will begin when there are available resources on the training service (begins with 'mgmt-train' and ends with the model-id of the respective model-architecture. For example, a single service handles training for all ResNet model versions, etc.). Increase the auto-scaling factor to enable immediate training.
- Training: The model version is currently training.
- Trained: The model version finished the training process.
- Deployed: The model version is running as a FaaS service.
- Failed: Model training failed. This could be because of a problem with the model adaptor, the training method, configuration or compute resources issues. Refer to logs for more information.
Foundation Models
The Marketplace's Models tab showcases foundation model architectures, encompassing organization and project scope-level models. These foundational models serve as the basis for initiating model management, installing models, versioning, and training with diverse datasets.
How to Install a Foundation Model to Create an Initial Model Version?
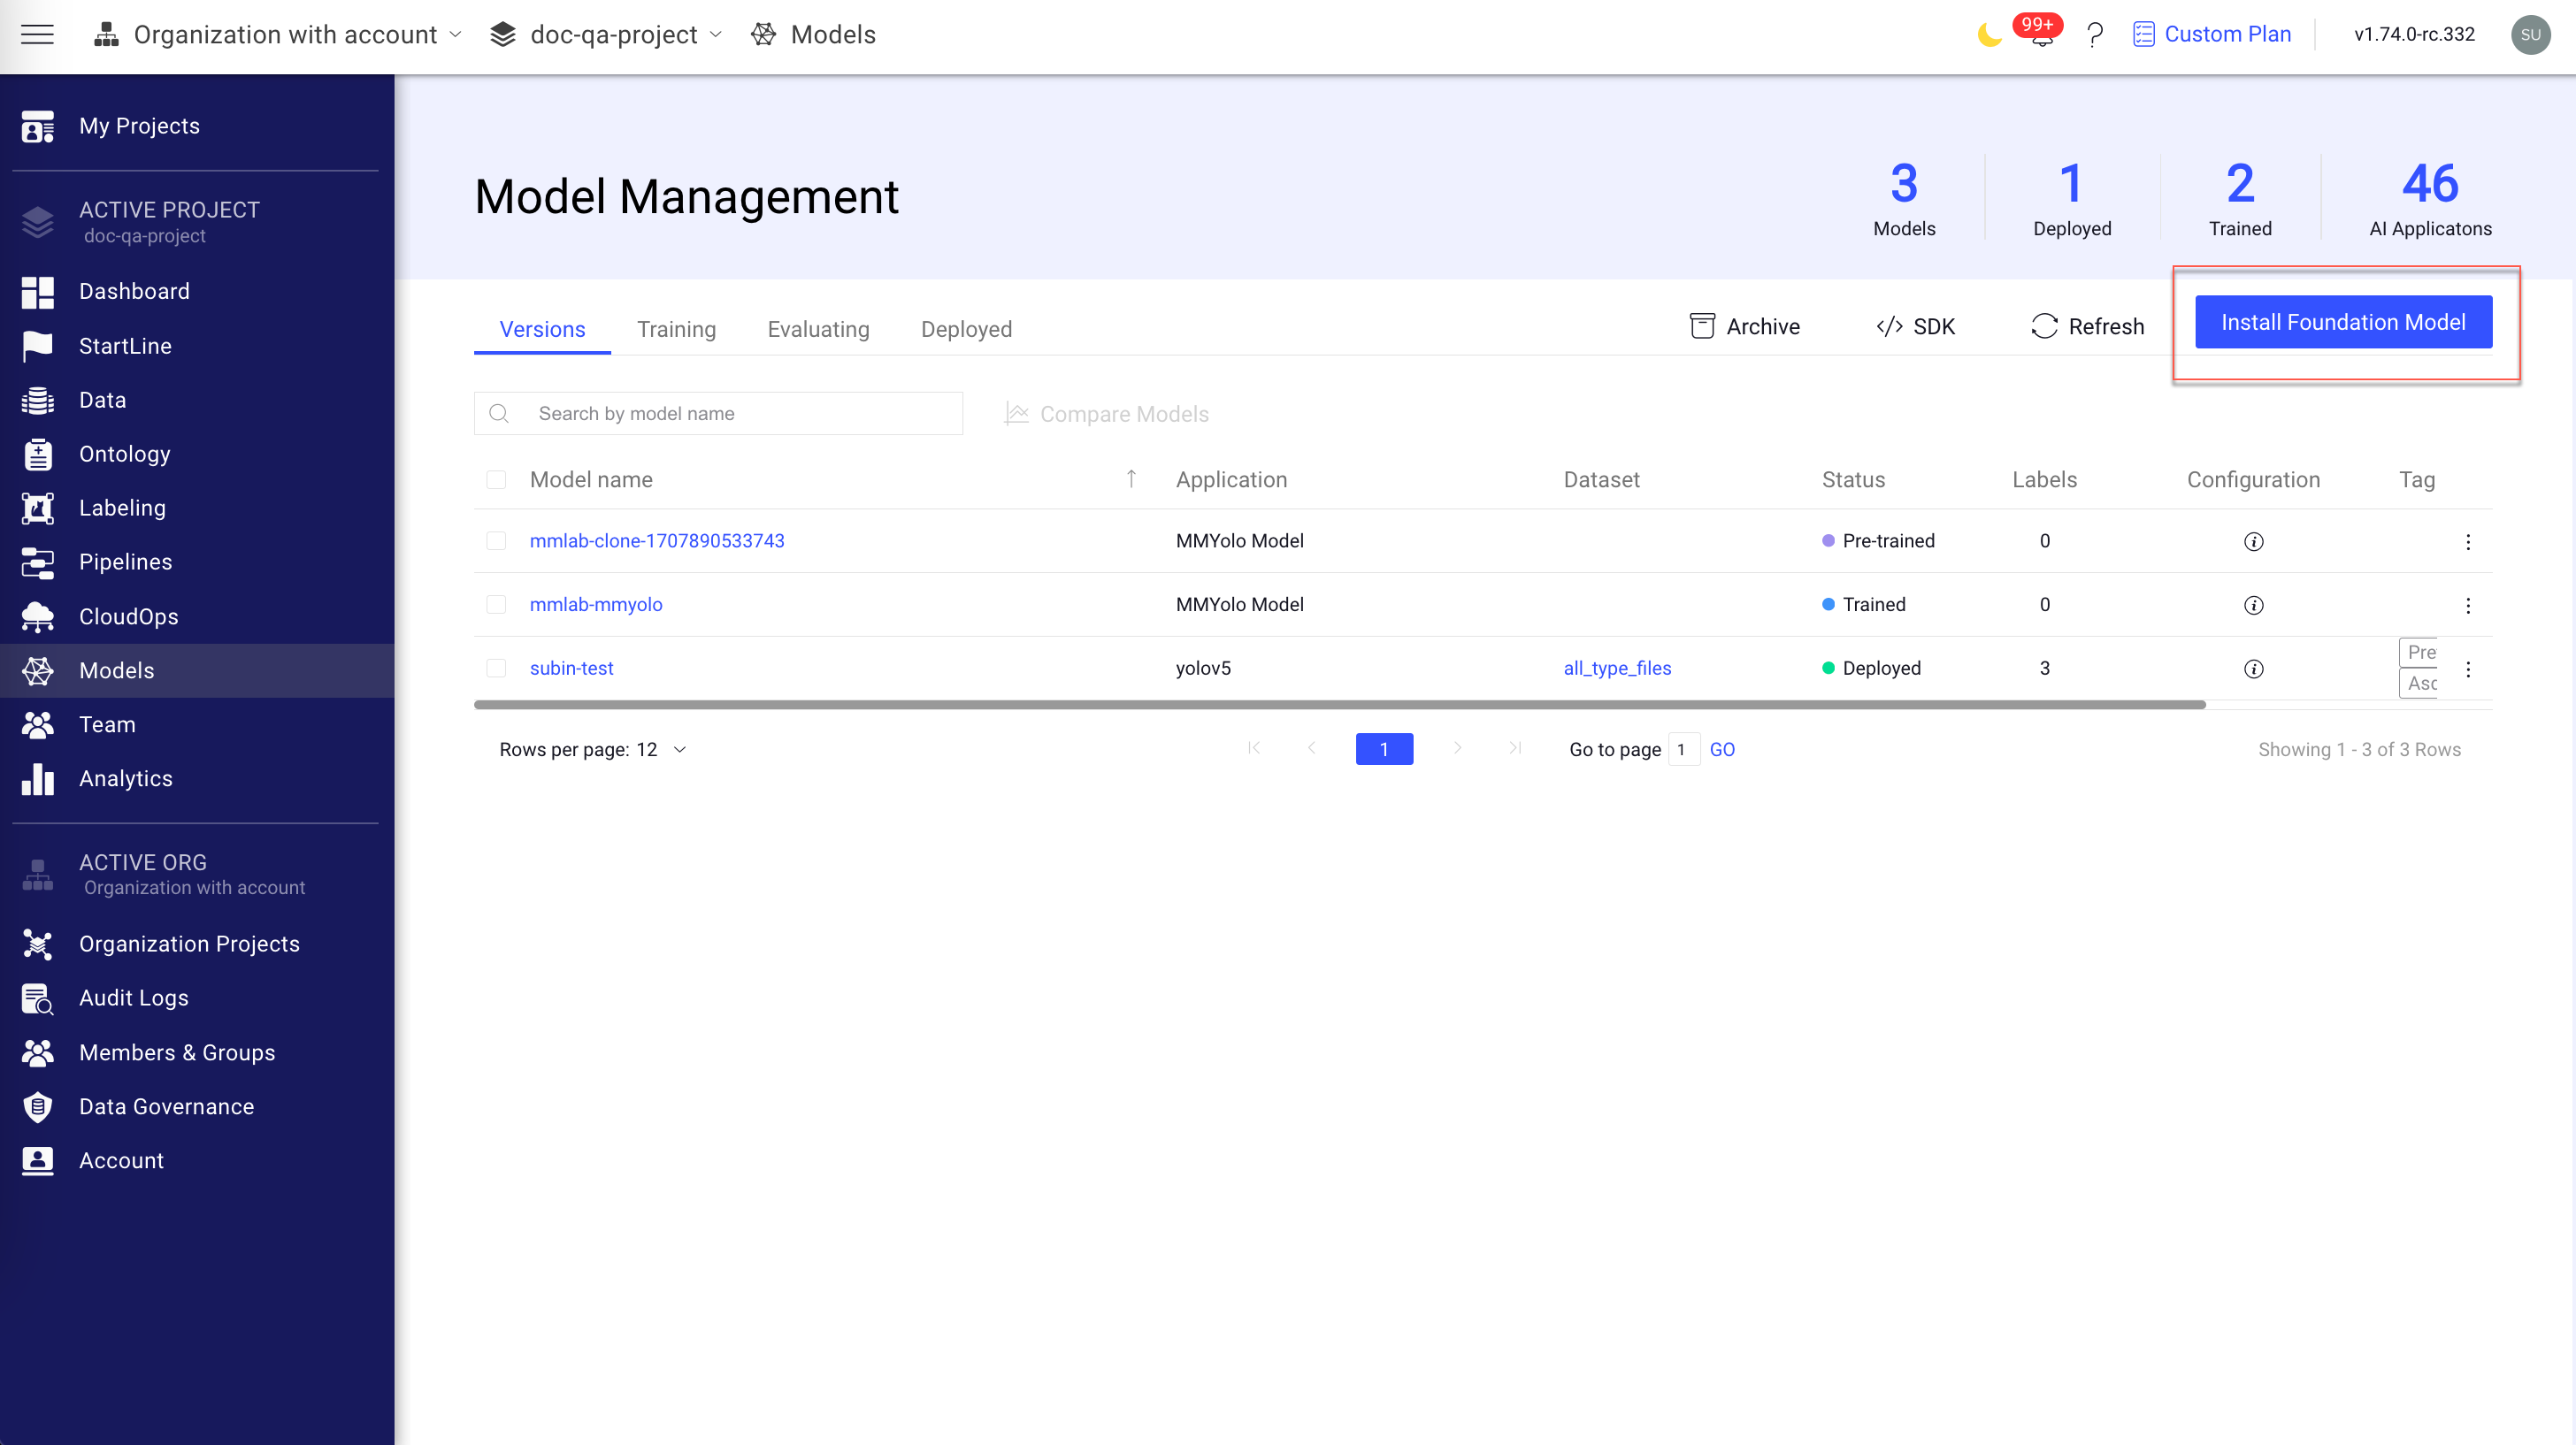
- Open the Models from the left-side menu. The Versions tab is displayed.
- Click on the Install Foundation Model. The Select Foundation Model window of the Marketplace is displayed.
- Use the search or filter feature to identify the model. To
- Select a model and click Install. The Install Model popup window is displayed.
- From the model variations' list, select the model variation that you want to install.
- Click Install Model. A confirmation message is displayed, and click View Model to view the newly installed model.
The new model variations are available in the Model Management → Versions tab.
Actions Available in the Model Versions
How to Clone a Model Version?
You can clone an existing model version to create a new one and train it with additional data.
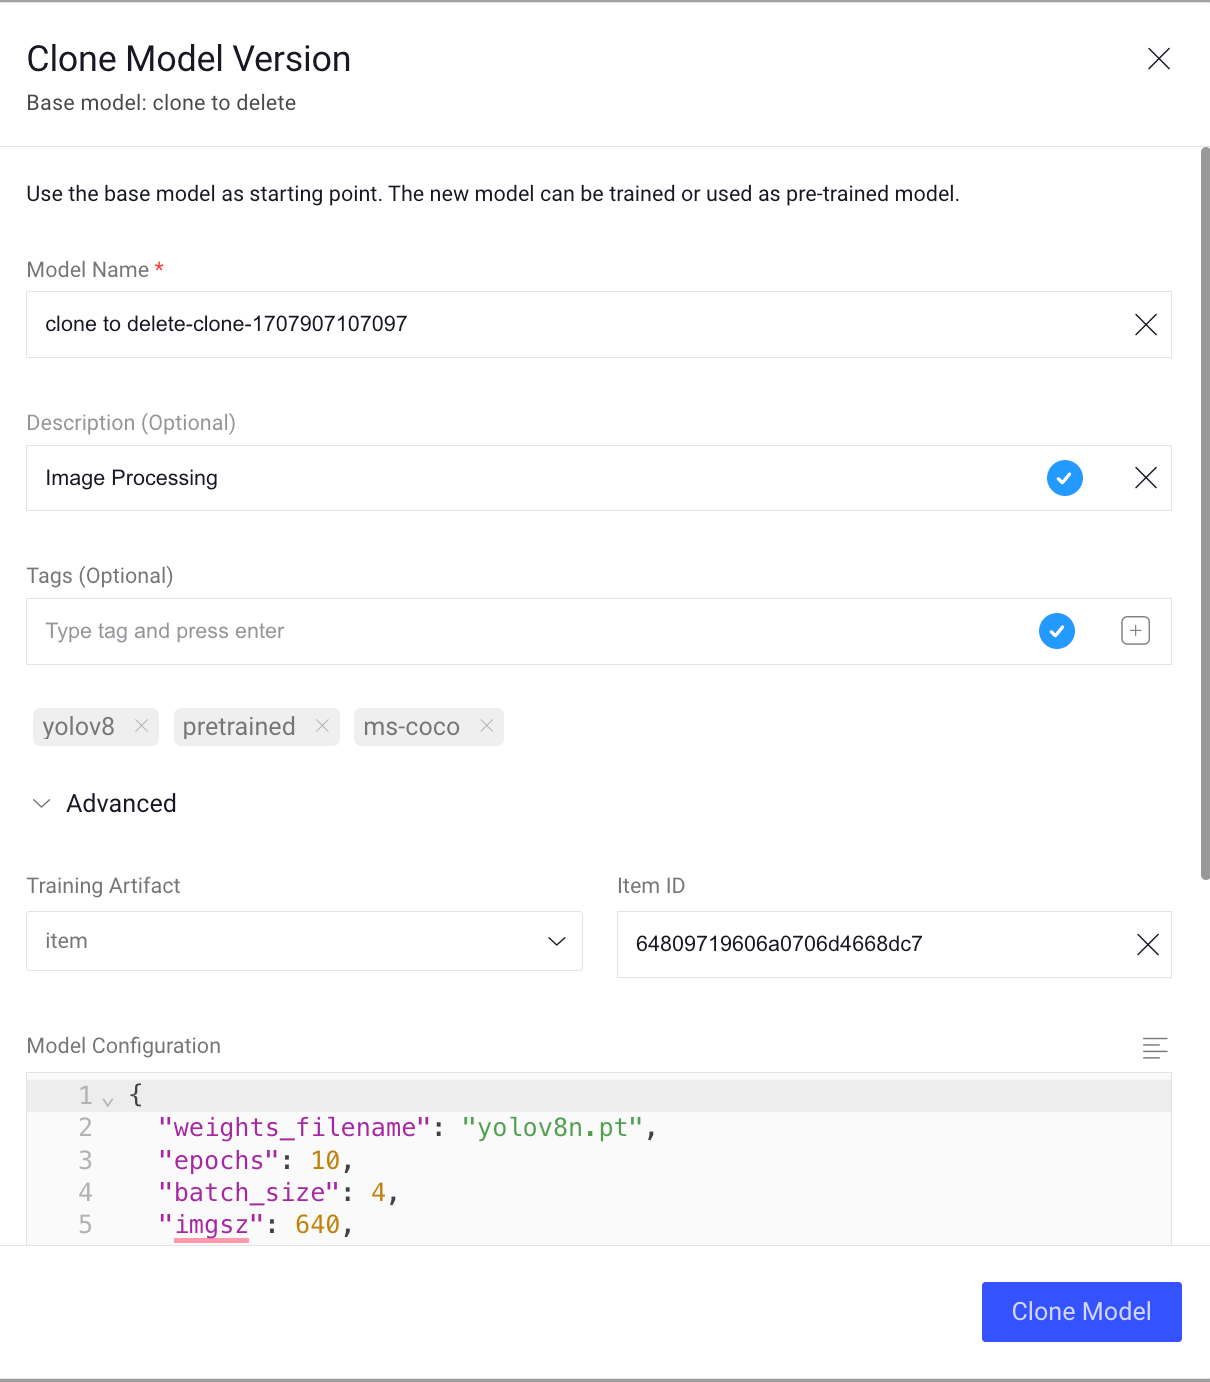
- Open the Models page.
- In the Versions tab, find the model version you wish to use as a basis for a new version, and click the 3-dots action button.
- Select the Clone Model Version option. The Clone Model Version window will be displayed.
- Enter a new name for the model and a description (optional).
- Add a Tag for the new model if needed. Tags from the base model will be displayed, if available.
- In the Advanced section, select the Training Artifact:
- Local (default): Training data (W&B) are saved in the Dataloop file system. Provide the folder path info in the Local Path field.
- Item: Provide an item-id, and training data will be saved on it.
- Link: Provide a URL and the file name to save the training data on a remote server.
- Make changes in the Model Configuration.
- Click Clone Model. A confirmation message is displayed, and the new model version will be displayed.
How to Compare Models?
Dataloop platform allows you to compare two or more models to analyze the parameters.

- Open the Models page.
- In the Versions tab, select the model versions you wish to compare.
- Click Compare Models available on the top-bar. The Multiple Models page is displayed.
- Analyze the details and parameters as required.
How to Create a Model Version by SDK
To create a model version using the Dataloop SDK, read this tutorial in Dataloop Developers Portal.
How to Train a Model Version?
To learn the instruction, refer to the Train a Model article.
How to Evaluate a Model Version?
To learn the instruction, refer to the Evaluate a Model article.
How to Deploy a Model Version?
To learn the instruction, refer to the Deploy a Model article.
Model Version Details
Model-Version has an internal details view, with more information about the model-version.
To access the model-version details view, click a model version from the Versions table.
The model-version details view includes four tabs:
Details
Contains information about the model, such as:
- Model creation date and creator details.
- Tags: shows tags currently on the model version, allowing you to add additional tags or remove existing ones.
- Labels used in the model - review and search for labels.
- Model configuration.
Explore
The Explore tab displays the metrics generated during the training process, or metrics uploaded by SDK to store on the model-version. To learn more, refer to the Training Metrics article.
Precision-Recall
Precision and Recall are two critical metrics used to evaluate the performance of an AI model, especially in tasks like classification where the outcomes are categorized as positive (relevant) or negative (irrelevant). These metrics are particularly useful in scenarios where the classes are imbalanced (i.e., one class is significantly more frequent than others).
You can measure precision and recall values after setting up a model evaluation. To set up a model evaluation, refer to the Model Evaluation article.
Visualizing Accuracy
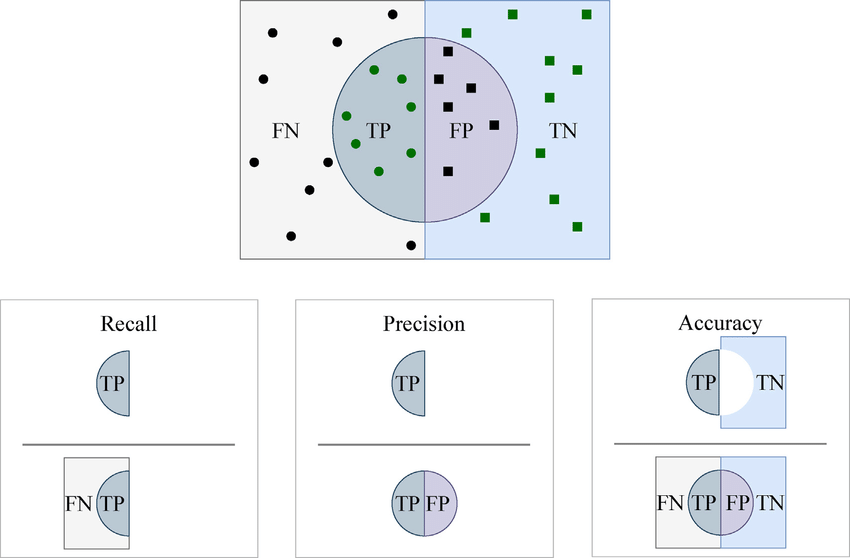
Visualizing accuracy, recall (aka sensitivity), and precision, which are the common performance measures for classification tasks. Given samples from two categories, we can refer to samples as positive or negative (two classes). The left rectangle represents positive samples, and the right rectangle represents negative samples. The circle contains all samples predicted as positive. Given the model predictions, each sample can be considered as TP (true positive), TN (true negative), FP (false positive), or FN (false negative).
Precision Recall Curve
The Precision-Recall Curve is a plot that illustrates the trade-off between precision and recall for different thresholds. A higher area under the curve (AUC) represents both high recall and high precision, where high precision relates to a low false positive rate, and high recall relates to a low false negative rate. This curve is particularly useful for evaluating models on imbalanced datasets.
Precision by Confidence Threshold
Demonstrates the performance of your model for the highest-ranked label across the entire spectrum of confidence threshold levels. Raising the confidence threshold leads to a reduction in false positives, enhancing precision. Conversely, lowering the confidence threshold results in a decrease in false negatives, thereby improving recall.
Precision
Precision, also known as positive predictive value, measures the accuracy of the positive predictions made by the model. It is the ratio of true positive predictions to the total positive predictions (including both true positives and false positives). In simpler terms, precision answers the question: "Of all the instances the model labeled as positive, how many are actually positive?"
Precision
= (True Positives (TP)/(True Positives (TP) + False Positives (FP))
High precision indicates that the model is reliable in its positive classifications, making few false positive errors.
Recall
Recall, also known as sensitivity or true positive rate, measures the model's ability to correctly identify all relevant instances. It is the ratio of true positive predictions to the total actual positives (sum of true positives and false negatives). Essentially, recall answers the question: "Of all the actual positive instances, how many did the model correctly identify?"
Recall
= (True Positives (TP)/(True Positives (TP) + False Negative (FN))
High recall indicates that the model is good at detecting positive instances, minimizing the number of false negatives.
Test
The Test tab is to allow users to directly interact with a deployed model to assess its inferencing capabilities on new, unseen data. This is crucial for understanding how the model performs outside a controlled training environment.
The Test tab is to allow users to directly upload images and click Test to start the model prediction process.
Testing a deployed model by uploading a file for inferencing involves evaluating the model's performance and behavior on new data that it hasn't seen during the training phase. This process helps verify that the model accurately interprets and analyzes the data, providing expected outcomes based on its learned patterns.
Why Test a Deployed Model?
Testing a deployed model is crucial for several reasons:
- Accuracy Verification: Ensures that the model performs as expected on real-world data.
- Performance Evaluation: Helps identify any latency or computational performance issues that may not have been evident during the development phase.
- Feedback Loop: Provides valuable information that can be used to further refine and improve the model.
Uploading a File for Inferencing: Users can upload a file that the model will use to make predictions. The file type and content depend on the model's purpose (for example, images for a vision model, text files for natural language processing, etc.).
Model Version Archive
As you experiment and create a model version, choosing your path forward can sometime mean that some model versions are no longer required. Removing them from the model-versions list will simplify it and improve your ability to filter and search for the versions you really need.
How to Archive a Model Version?
- Open the Models page.
- In the Versions tab, find the model version you wish to use as a basis for a new version, and click on the 3-dots action button.
- Select the Move to Archive option from the list. A confirmation message is displayed.
- Click Yes. A confirmation message is displayed.
How to Review an Archived Version and Restore?
- Open the Models page.
- In the Versions tab, and click on the Archive button. The Archived Models page is displayed.
- Review archive model versions, search and locate the model-version you wish to restore.
- Click on the 3-dot action-button on the right-side, select the Restore option and confirm the operation in the pop-up window.
- The model-version is now restored and can be found in the main Versions tab.