Triggers in DDOE's Pipeline system determine how and when data flows between nodes. They initiate execution in response to scheduled times, platform events, or manual actions, enabling dynamic and flexible data processing.
This guide provides an overview of trigger types, their behavior, and how to configure them across different interfaces, including the UI and SDK.
The triggered resource object is passed as an input parameter to the pipeline.
A trigger can be assigned to multiple pipeline nodes, each executing independently when the trigger fires.
What are Triggers?
A trigger is a configuration that initiates a pipeline flow.
It impacts the specific node to which it is assigned.
Triggers pass the relevant resource object (e.g., item, dataset) as input to the pipeline.
A single trigger can be assigned to multiple pipeline nodes, each executed independently when the trigger is fired.
Invoking Data to Pipelines
You can invoke your data to pipeline by using Automatic, Manual, and via SDK invocation.
Automatic Invocation
DDOE supports automatic triggers that execute pipeline flows without manual input. These can be configured to respond to time-based schedules or data-driven events.
Cron-Based Triggers
Cron-based triggers allow you to run a pipeline on a fixed schedule. They are available only for nodes without inputs.
Key characteristics:
Time-based execution: Runs automatically at defined intervals (e.g., hourly, daily, weekly).
Ideal use cases:
Daily model retraining
Hourly data scans
Periodic clean-up or maintenance tasks
Configuration: Uses standard CRON expressions to define the schedule.
Event-Based Triggers
Event-based triggers are designed to execute a pipeline when specific actions occur. They are available only for nodes with inputs, and all inputs must be defined—via fixed values, variables, events, or manual input.
Triggered by system events such as:
Item creation, update, clone, or deletion
Annotation creation or modification
Dataset or folder activity (e.g., new uploads, structural changes)
Ideal for:
Real-time, reactive automation
Workflows that must respond immediately to data or annotation updates
Note
When a trigger is linked to a pipeline, the pipeline is automatically executed every time the trigger is activated.
Manual Invocation
Users can also manually trigger pipeline flows directly from the dataset browser. You can trigger:
Specific individual items
All items matching a filter/query
An entire dataset or folder
Programmatic Invocation
For advanced control, DDOE SDK allows you to define and trigger pipeline executions via code.
Key Functions:
add_trigger(): Assign a trigger to a specific pipeline node.pipeline.update(): Save the updated pipeline configuration.
Execution Options:
You can use the SDK to manually invoke the pipeline from any custom script or application. Define precise input using:
Item IDs
Dataset IDs
DQL filters for bulk operations.
Set Event-Based Triggers
Configure an event-based trigger on a pipeline node to automatically initiate a pipeline in response to specific system events. These events are tied to actions occurring in the data source and can include Create, Update, Clone, and/or Delete operations.
An example, if a task node’s trigger is set to Created and Updated, the pipeline will be activated whenever an item is added or modified in the source dataset.
Event-based triggers enable functions to be invoked dynamically based on changes within the system, using the resource that triggered the event as the function’s input.
Triggers consist of:
Resources: Core entities in the DDOE platform, such as Item, Dataset, Annotation, or Task.
Actions: Events associated with these resources, like Create, Update, Delete, or Clone.
You can also apply a DQL (DDOE Query Language) filter to refine which resources trigger the pipeline, allowing for precise and controlled automation.
To set an event based trigger on a node:
Open Pipelines from the left-side menu.
Click on the pipeline from the list to add a trigger.
Identify and select the node to add the trigger. A right-side panel will be displayed.
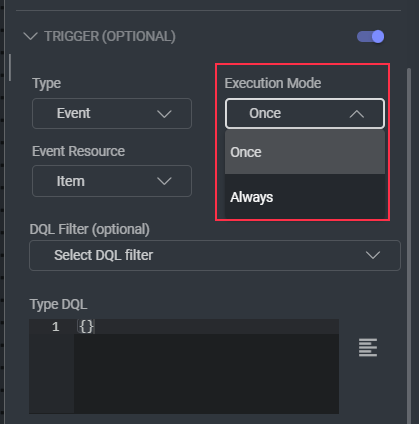
In the Config tab, click on the Trigger (optional) toggle icon. A trigger ⚡ (lightning) icon will be added on top of the selected node.

Type: Select the type Event trigger, if it is not selected by default. It allows you to invoke a function in response to specific system events, using the triggering resource as the function's input.
Execution mode: By default, Once is selected. Read more.
Event Resource: Select an event resource from the list. Event triggers support only the following types of function inputs: Item, Dataset, Model, Task, Assignment, and Annotation. Read more.
Event Action: Select an event action (created, updated, deleted, and clone.) that will trigger the function for the selected resource. It allows you to filter any items to target specific resources or events, ensuring the trigger responds only to these specified conditions. Read more.
Type DQL:
Write or Edit the DQL in the editor: Use DQL operators like $and, $or, $eq, $gt, etc.
Example Use Cases:
Only trigger on images: { "metadata.mimetype": "image/jpeg" }
Trigger when a specific tag exists: { "tags": { "$in": ["for_review"] } }
Trigger on items in a specific folder: { "dir": "/my-data/images" }
    {
    "$and": [
        { "hidden": false },
        { "type": "file" },
        {
        "metadata.mimetype": {
            "$in": ["image/jpeg", "image/png"]
        }
        }
    ]
    }
    ```
"hidden": false — The trigger will exclude hidden items, ensuring only visible ones are considered.
"type": "file" — Only items of type file (excluding folders, videos, etc.) will trigger this node.
Together, this DQL ensures the trigger activates only when a new visible file-type item is created (as seen from the Event Type: Item, Action: Created).
Resources
The following table lists available resources and their corresponding actions. Event triggers support only the following types of function inputs: Item, Dataset, Model, Task, Assignment, and Annotation:
Event Resource | DDOE Enum | Available Actions * |
|---|---|---|
Item |
| Created, Updated, Deleted, Cloned |
Dataset |
| Created, Updated, Deleted, Cloned |
Annotation |
| Created, Updated, Deleted |
Item Status |
| Updated, Task Assigned |
Task |
| Created, Updated, Deleted, Status Changed |
Assignment |
| Created, Updated, Deleted, Status Changed |
Model |
| Created, Updated, Deleted |
Note
Only one resource per trigger is allowed, but multiple actions can be set for that resource.
Actions
Triggers respond to specific actions performed on resources. Each trigger type defines when a pipeline will be activated based on user or system events.
Event Action | dl Enum | Execution Modes * |
|---|---|---|
Created |
| Once |
Updated |
| Once, Always |
Deleted |
| Once |
Clone |
| Once |
Status Changed |
| Once, Always |
Task Assigned |
| Once, Always |
The following describes how each trigger action behaves:
Created: Triggers the pipeline when a new item is added (uploaded or synced to a dataset). Notice: The event does not include items that were created as a result of a clone action.
Updated: Triggers the pipeline when an item is modified. Use the trigger
itemStatus.Updatedto run your pipeline over items once their status is changed within a task context ('approved', 'discard', etc.).Deleted: Triggers the pipeline when an item is removed.
Clone: Triggers the pipeline for items generated through a "clone" operation.
Task Assigned: Triggers the pipeline when an item is assigned to a task. To use this event, set the trigger to
ItemStatus.TaskAssigned.Status Changed: Triggers the pipeline when a task or assignment status updates (e.g., task marked as "completed", assignment marked as "done").
Execution Modes
Certain events, such as item updates, may occur multiple times for the same entity. The execution mode determines whether the pipeline runs every time the event occurs or only the first time.
Once – The pipeline executes only the first time an event is triggered for a specific resource. For example, if the resource is an "item" and the action is "Updated," the pipeline will run only for the item's first update.
Always – The pipeline runs every time the event is triggered for a resource. For example, if the resource is an "item" and the action is "Updated," the pipeline will execute for each update. In this mode, every occurrence triggers the full pipeline flow.
dl Enum | dl.TriggerExecutionMode.ONCE |
|---|---|
| Once |
| Always |
Avoid infinite Loops
Be cautious when setting up event triggers to prevent continuous looping. Examples of problematic setups:
A pipeline that adds items to a folder while an
item.createdtrigger is active.A pipeline that updates items while an
item.updatedtrigger withexecution_mode='always'is active.
Set Cron-Based Triggers
Allows you to configure a trigger that automatically starts the pipeline based on the scheduled intervals. Cron triggers initiate the flow of data based on a time interval (e.g., every hour, day, etc.) or at a specific time set by the cron expression. Read more about setting cron expressions. Cron triggers work with nodes that either do not receive input or have a default input value.
An example of using a cron trigger in a node is an App Function node that trains a model once a day; this node does not have inputs, but simply runs a service once a day to train the model. Similarly, you may create a Code node that will run as defined by the cron trigger, provided that the Code node either has a default input value or does not receive input.
The Cron trigger (scheduled execution) allows pipelines to execute at scheduled time intervals using Cron syntax. For more details on Cron syntax, visit: Wikipedia - Cron.
To set a cron based trigger on a pipeline node:
Open Pipelines from the left-side menu.
Click on the pipeline from the list to add a trigger.
Identify and select the node to add the trigger. A right-side panel will be displayed.
In the Config tab, click on the Trigger (optional) toggle icon. A trigger ⚡ (lightning) icon will be added on top of the selected node.

Type: Select the type Cron trigger, if it is not selected by default. It allows you to schedule the selected function to run at specific times by using a cron expression to define the execution intervals. Set or select a cron schedule:
Set Cron Schedule: Enter a time interval based on days, hours, minutes, and seconds. For example,
Minute
Hour
Day of Month
Month
Day of Week
0
*/2
*
C*
*
Result is Schedule: At 0 minutes past the hour, every 2 hours.Type Cron Schedule: Enter one of the following cron type:
Cron expressions format:Value
Schedule
0 * * * *
Every hour
*/15 * * * *
Every 15 mins
0 */2 * * *
Every 2 hours
0 18 * * 1-6
Every week Mon-Sat at 6pm
10 2 * * 6,7
Every Sat and Sun on 2:10am
0 0 * * 0
Every Sunday midnight
Add Triggers via SDK
Add event or cron triggers to start nodes using the SDK code.
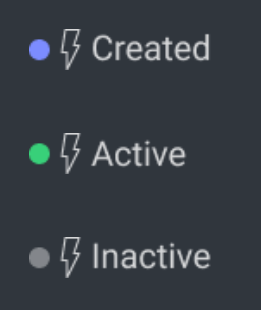
Trigger Status
Pipeline triggers have three statuses:
Created - A new trigger is set but not yet active.
Active - The trigger is running and responding to events.
Inactive - The trigger is paused and will not respond to events.
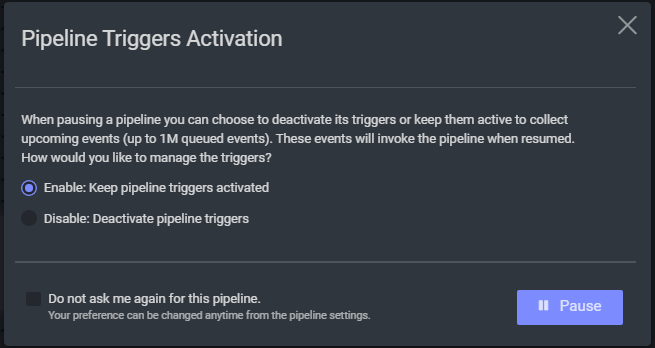
Disabling Triggers for Inactive Pipeline
When a pipeline is paused (inactive), its triggers can remain active to queue new events, or disabled to ignore new events.
When keeping the triggers active, any new event during pause will be added as a pending cycle.
Pending cycles are visible in the Pipeline Table page, under the ‘Pending’ columns, or in the pipeline view, on the cycles list.
Cron triggers cannot be kept active when a pipeline is paused.

When pausing a running pipeline with active triggers (excluding cron triggers), a popup will appear, allowing you to choose whether to keep the pipeline triggers active or deactivate them.
Resume Pipelines
When resuming a paused pipeline, all triggers reactivate automatically.
A dialog will appear to select whether to process pending cycles (queued events and or paused cycles).
Click here for more details.