Overview
Tasks can be configured to operate using one of the following two allocation methods, which dictate how items are distributed to the assignments.
Distribution: In this method, when tasks are created, dataset items are initially allocated to assignments. Any modifications to assignments, such as the addition or removal of assignees or the rebalancing of items, necessitate a recalibration of the assignments.
Pulling: In this method, dataset items are initially queued in a concealed assignment and subsequently distributed to assignees in small batches based on their progress. This method makes it quite straightforward to make changes to the team since no assignee is burdened with many items in their assignment.
Distribution Method
Items within a task are distributed among all users. The automatic option allocates an equal portion of items to each user, whereas the manual option provides greater control. As the task is actively being worked on by annotators, you have the flexibility to redistribute and balance the remaining items among annotators once more. Quality tasks (e.g., consensus, honey pot, qualification) are available only in the distribution method.
You can redistribute items to the assignees based on the specific context of their workload by using a Metadata Key or Value, or by employing a DQL query.
The items that do not meet the criteria will not be listed for redistribution and will remain with the current assignee.
Reassign Tasks
To reassign a task, follow the instructions. Ensure you have the Annotation Manager role.
Open the Labeling -> Tasks page from the left portal menu.
Identify the task and click on the Ellipsis icon.
Click Edit task. The edit task page is displayed.
Select the Assignments section.
Identify the user to whom you need to reassign and click Reassign.
Search for or identify the user from the list and click Select Assignee.
Click Apply Reassignment.
Click Save Changes.
Reassign Assignments
Open the Labeling -> Tasks page from the left portal menu.
Double-click on the task and click on the Ellipsis icon.
Click Reassign. A Reassign Assignment page is displayed.
Search for or use the filter to view available users.
Identify the user and click Select Assignee.
Click Apply Reassignment.
Click Save Changes.
Redistribute Tasks \ Assignments
To remove a specific assignment and have its items distributed among active assignees. For example, if an assignee leaves the project:
Redistribute items based on the Metadata or DQL query
You can now redistribute items based on the Metadata or DQL query by using Redistribution Settings.
To Redistribute a Task:
Open the Labeling -> Tasks page from the left portal menu.
Click on the Ellipsis icon and select Edit task.
Select the Assignments section from the list.
Identify the user to be redistributed and click Redistribute. A Redistribute Assignment page is displayed.
Select Available Users from the list and add them to the Assigned Users list, if needed.
Click Redistribution Settings.
Edit the following options and click Save Changes:
Auto Distribution
Only redistribute items with no annotations: This option is to keep the work already started in the original assignment and let the assignee complete it.
Redistribution Context: Redistribute items with a specific Metadata Key/Value or with a DQL Query. It redistributes items to the assignees based on the specific context of their workload.
Metadata Key/Value:
Data type: String or Number
Key and Value
DQL Query
Click Apply Redistribution.
Click Save Changes.
To Redistribute a Specific Task Assignment:
Open the Workflows > Tasks page from the left portal menu.
Double-click on the task and click on the Ellipsis icon.
Click Redistribute.
Refer to the To redistribute a task section and follow steps 5 onward.
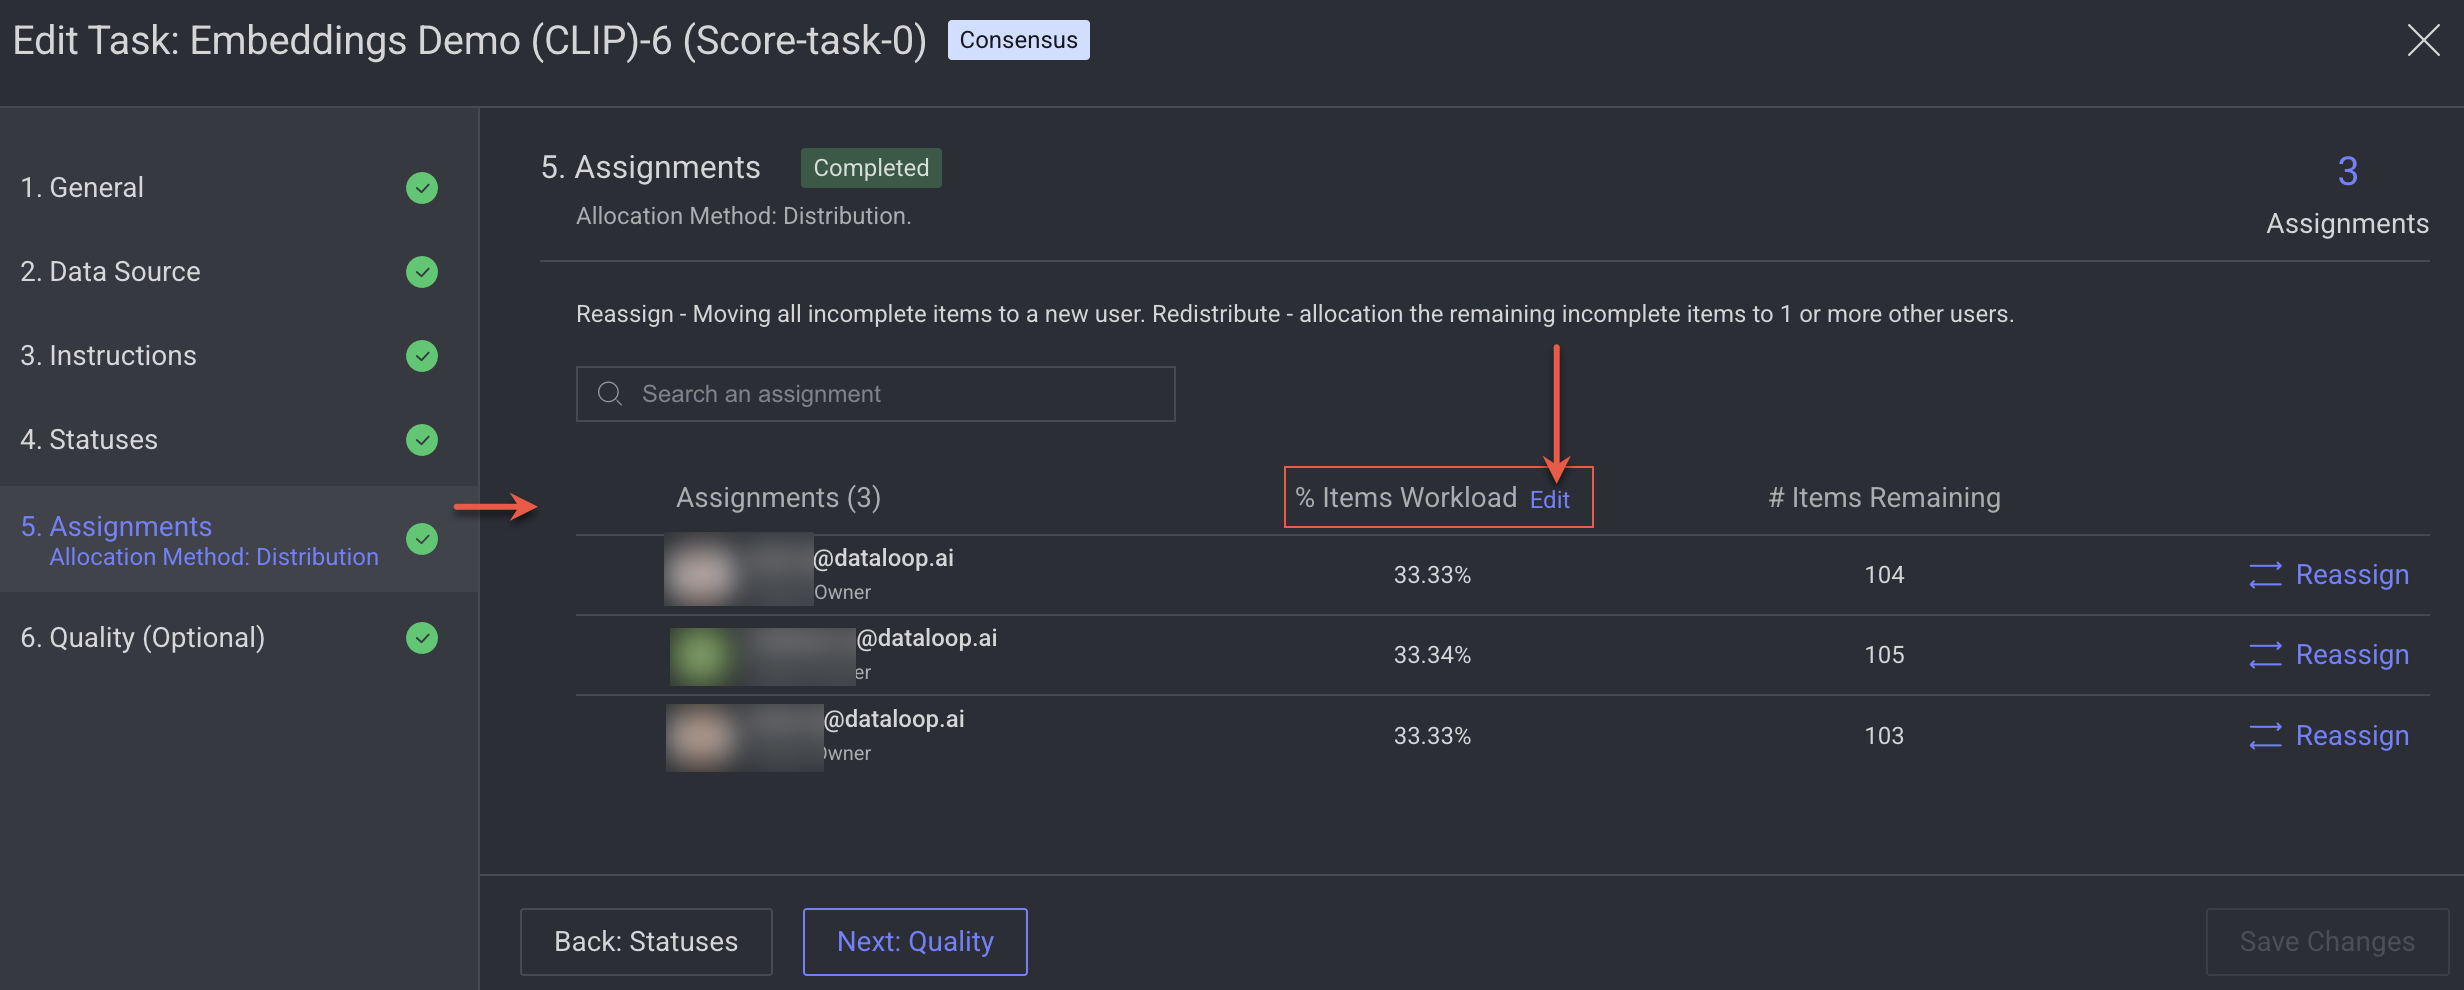
Edit Item Workloads
Edit Item Workloads of Pipeline’s Distribution Task: You have the ability to adjust the workload distribution of incoming pipeline items in distribution-type tasks generated by the pipeline ('My Task' node).
Note
Editing the allocation of incoming pipeline items will affect only future workload, with no impact on the current assignments.
To avoid future workload to inactive users, you can make the workload percentage to 0 by selecting manual distribution.
You cannot remove existing users from the list.
Open the Labeling > Tasks page from the left portal menu.
Find the pipeline task and click on the 3-dots.
Select Edit Task from the list.
Select the 5. Assignments section from the left-side menu.
Click on the Edit next to the % Items Workload column.
Select available users and add them into the Assigned Users list.
Click Confirm Workload.
Pulling Method
When creating an annotation or QA task and choosing the Pulling allocation method, the Dataloop system will assign a batch of X items to each assignee at a time.
As assignees work on their tasks, the system will allocate new batches, each of the same size (batch size), whenever their pool of items requires replenishment. It's important to note that an assignee cannot have more than Y items pending in their assignment, as determined by the "Max items" setting.
Items that have not yet been assigned are maintained in a queue, and this queue cannot be interacted with or viewed by users.
Pulling-based tasks offer greater control and flexibility during their execution, making it easier to adapt to changing requirements and needs.
Changing Team Size
Use the Edit task option from a task's ellipsis icon (3-dots) to add or remove users.
New users show as new assignments.
Removed users show as zeroed and locked assignments.
It allows you to track past activity and analytics.
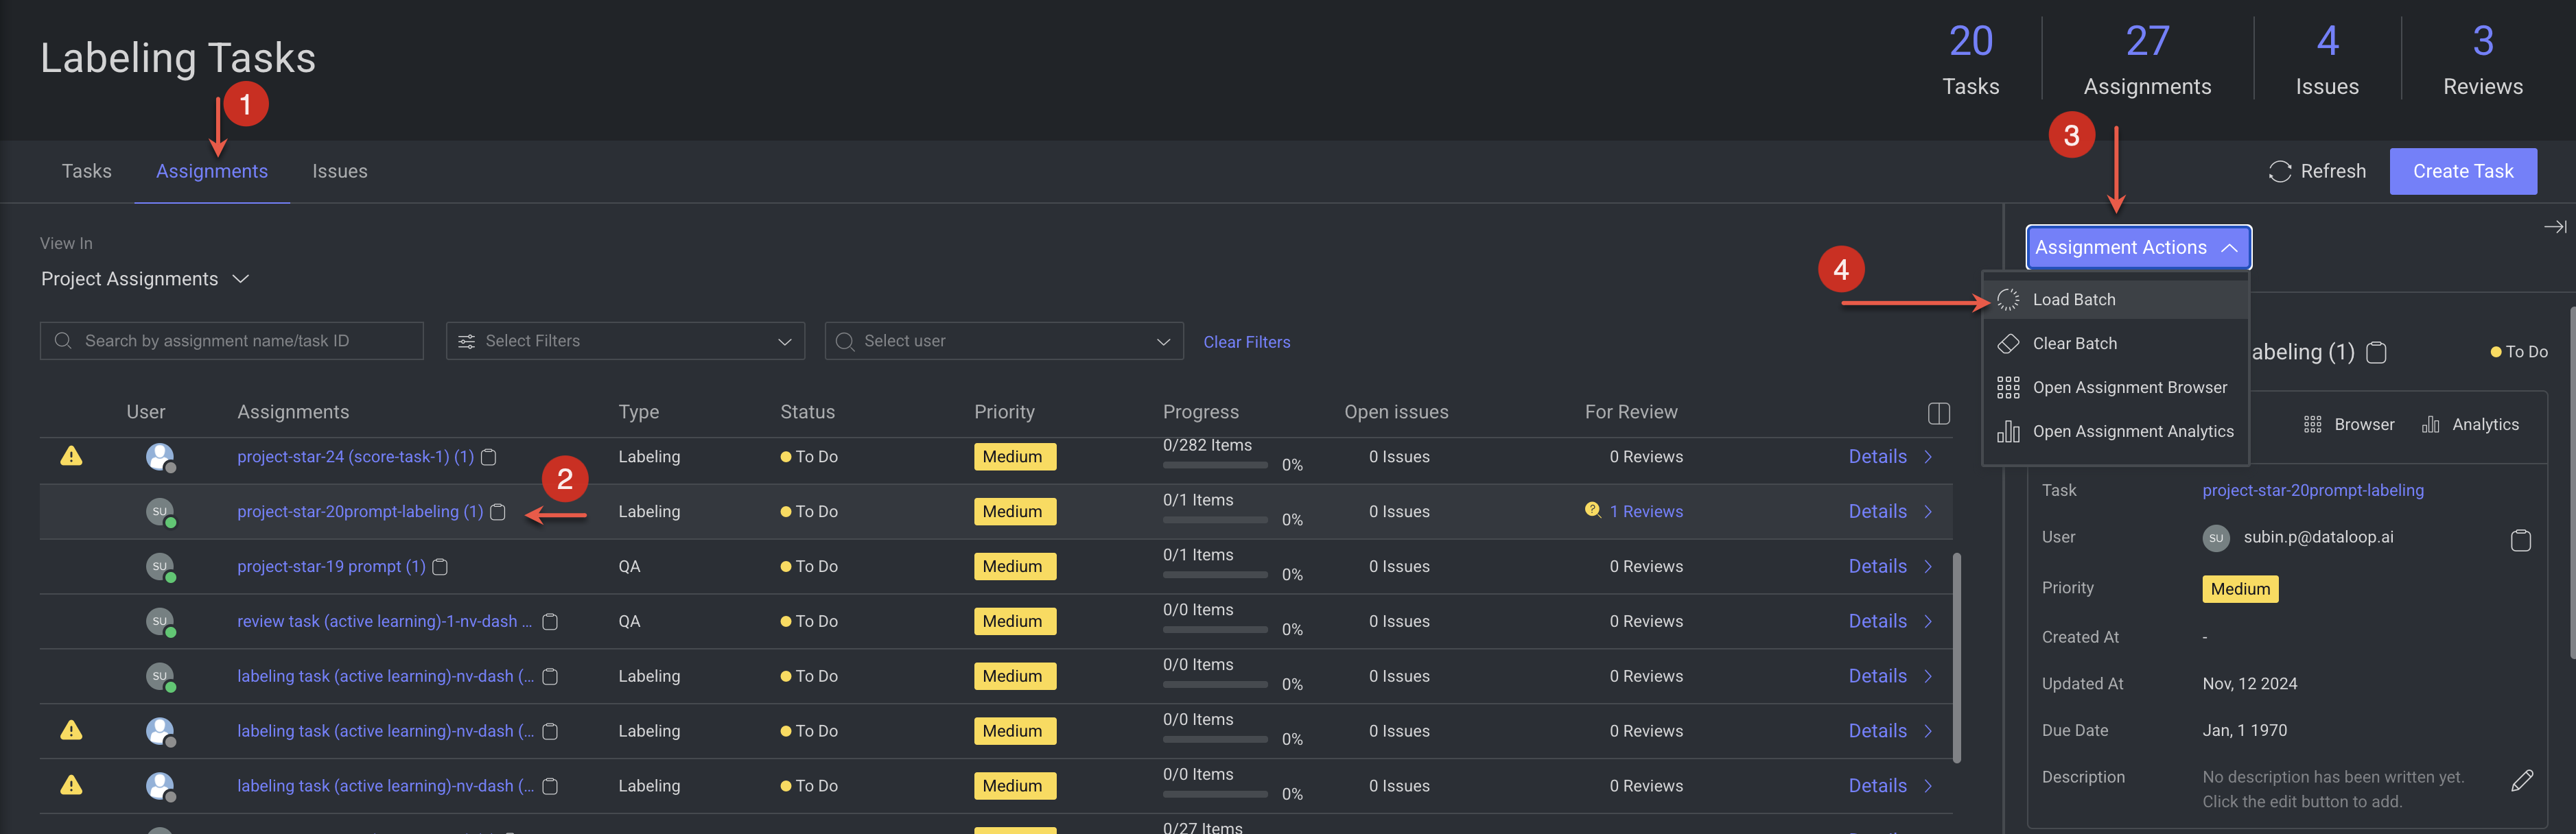
Clear Batch Assignments
With Pulling-based tasks, you can clear a specific assignment from its items and put them back into the general queue. For example, if an assignee is not working on a specific day, you can clear the respective assignment from items without removing the user from the task.
Clear \ Load Batch Permissions
Annotators role or above can perform Clear \ Load Batch assignments.
Open Labeling > Tasks page from the left-side menu.
Click on the task. The Assignment tab is displayed.
Select the assignment from the list, and click Assignment Actions.
Select Clear Batch from the list. A confirmation message
Assignment batch is being cleared, please wait for confirmation.is displayed.
![]()
Load Batch for Assignments
When the assignee is available, you can just load their assignment with a new batch, and they continue working with the new items they receive to the assignment.
Clear \ Load Batch Permissions
Annotators role or above can perform Clear \ Load Batch assignments.
Open Labeling > Tasks page from the left-side menu.
Click on the task. The Assignment tab is displayed.
Select the assignment from the list, and click Assignment Actions.
Select Load Batch from the list. A confirmation message
Assignment batch is being loaded, please wait for confirmation.is displayed.
QA Considerations
Items that have been completed by a user may undergo a Quality Assurance (QA) task at a later stage, and there could be an issue identified in one of the annotations. In such a scenario, the status of the item will be removed, and the item will be returned to the queue of the annotation task.
Items with issues will be specifically routed back to the original user who created the annotations, allowing them to address and rectify their work. These items with issues will receive priority in the queue and will be the first to be assigned again with the next batch pulled by the assignee.
Pulling Method in the Studio
Default Values
The below text and examples refer to default values of "batch size"=5 and "Max items"=7. The same behavior applies of course to any other values.
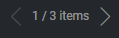
Initial Batch Load
When you first enter the Annotation Studio—whether for labeling or QA—the system automatically loads a batch of items. Based on our example settings, it loads the first 5 items, and the counter displays:
"Item 1 of 5".
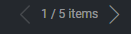
Progressing Through a Batch
As you complete or approve items, the counter progresses accordingly. After completing 4 items, the counter will show:
"Item 5 of 5".
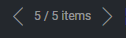
Completing the 5th item triggers the Studio to pull the next batch of 5 items, resetting the view to:
"Item 1 of 5".
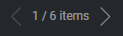
Incomplete Batch Transition
If you do not complete the 5th item and try to move forward, the Studio loads additional items without removing the uncompleted item. You'll now see:
"Item 1 of 6".
This happens because:
1 item remains from the previous batch.
5 new items are pulled.
The total (6) is still under the Max Items limit (7 in our example).
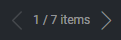
Skipping Items
If you skip 2 items in the initial batch, the Studio still pulls 5 new items (since 5 + 2 = 7), and the counter updates to:
"Item 1 of 7".
However, if you skip 3 items, you're left with 3 pending. Pulling 5 new items would exceed the Max Items limit of 7, so the Studio does not load more. You must complete at least 1 item from the remaining 3 before a new batch can be pulled.
Navigating Through Items
You can use the back button to revisit items within the current batch, including those you've already completed or approved. However, once a new batch is loaded, the back button no longer allows access to previously completed items.
To revisit those:
Open the Assignment Browser
Locate the item
Double-click to reopen it.
.png)
Bucket Assignment - Tasks Without Assignees
Distribution Type Tasks
You can create distribution-type tasks without any assignees using SDK.

Once the task is created, an icon labeled Bucket Assignment will be displayed on the task's assignment, indicating that the entire task's workload will be assigned to the task owner as a bucket.
The User Interface does not allow the creation of distribution-type tasks without any assignees.
Pulling Type Tasks
You can use either the SDK or the UI to create pulling-type tasks without any assignees. Once the task is created, no Bucket Assignment icon will be displayed on the task's assignment.
SDK Example
An example of task creation without any assignees - bucket assignment creation from the SDK.
import dtlpy as dl
import datetime

if dl.token_expired():
    dl.login()

project = dl.projects.get(project_id='ENTER YOUR PROJECT ID')
dataset = project.datasets.get(dataset_name='ENTER YOR DATASET NAME')

filters = dl.Filters()
task = dataset.tasks.create(task_name='ENTER YOUR TASK NAME',
                            due_date=datetime.datetime(day=15, month=7, year=2023).timestamp(),
                            filters=filters)
Make sure to input your project ID, dataset name, and the desired task name.
For more information about how to create a task using the SDK, see the Creating Tasks article.