Overview
As generative AI grows in popularity and rapidly evolves, so does the need to fine-tune models for specific commercial needs, training them on proprietary data to extend their base capabilities.
Dataloop’s RLHF studio (Reinforcement Learning Human Feedback) enables prompt engineering, allowing annotators to provide their feedback over responses (machine learning (ML) model-generated responses) to prompts. Both prompts and responses can be any type of item, for example, text or an image, and soon we will also support video and audio.
Uses Classic Ml Recipes
RLHF Studio uses the Classic ML setup. You don’t need labels, but you do need attributes to provide response feedback.

The purpose of the RLHF Studio is to enable organizations to fine-tune their generative AI models. The studio supports multiple prompts and responses, organized in a sequential chat flow, where annotators can provide feedback at any stage, rank the best response, and offer necessary feedback to enhance the model.
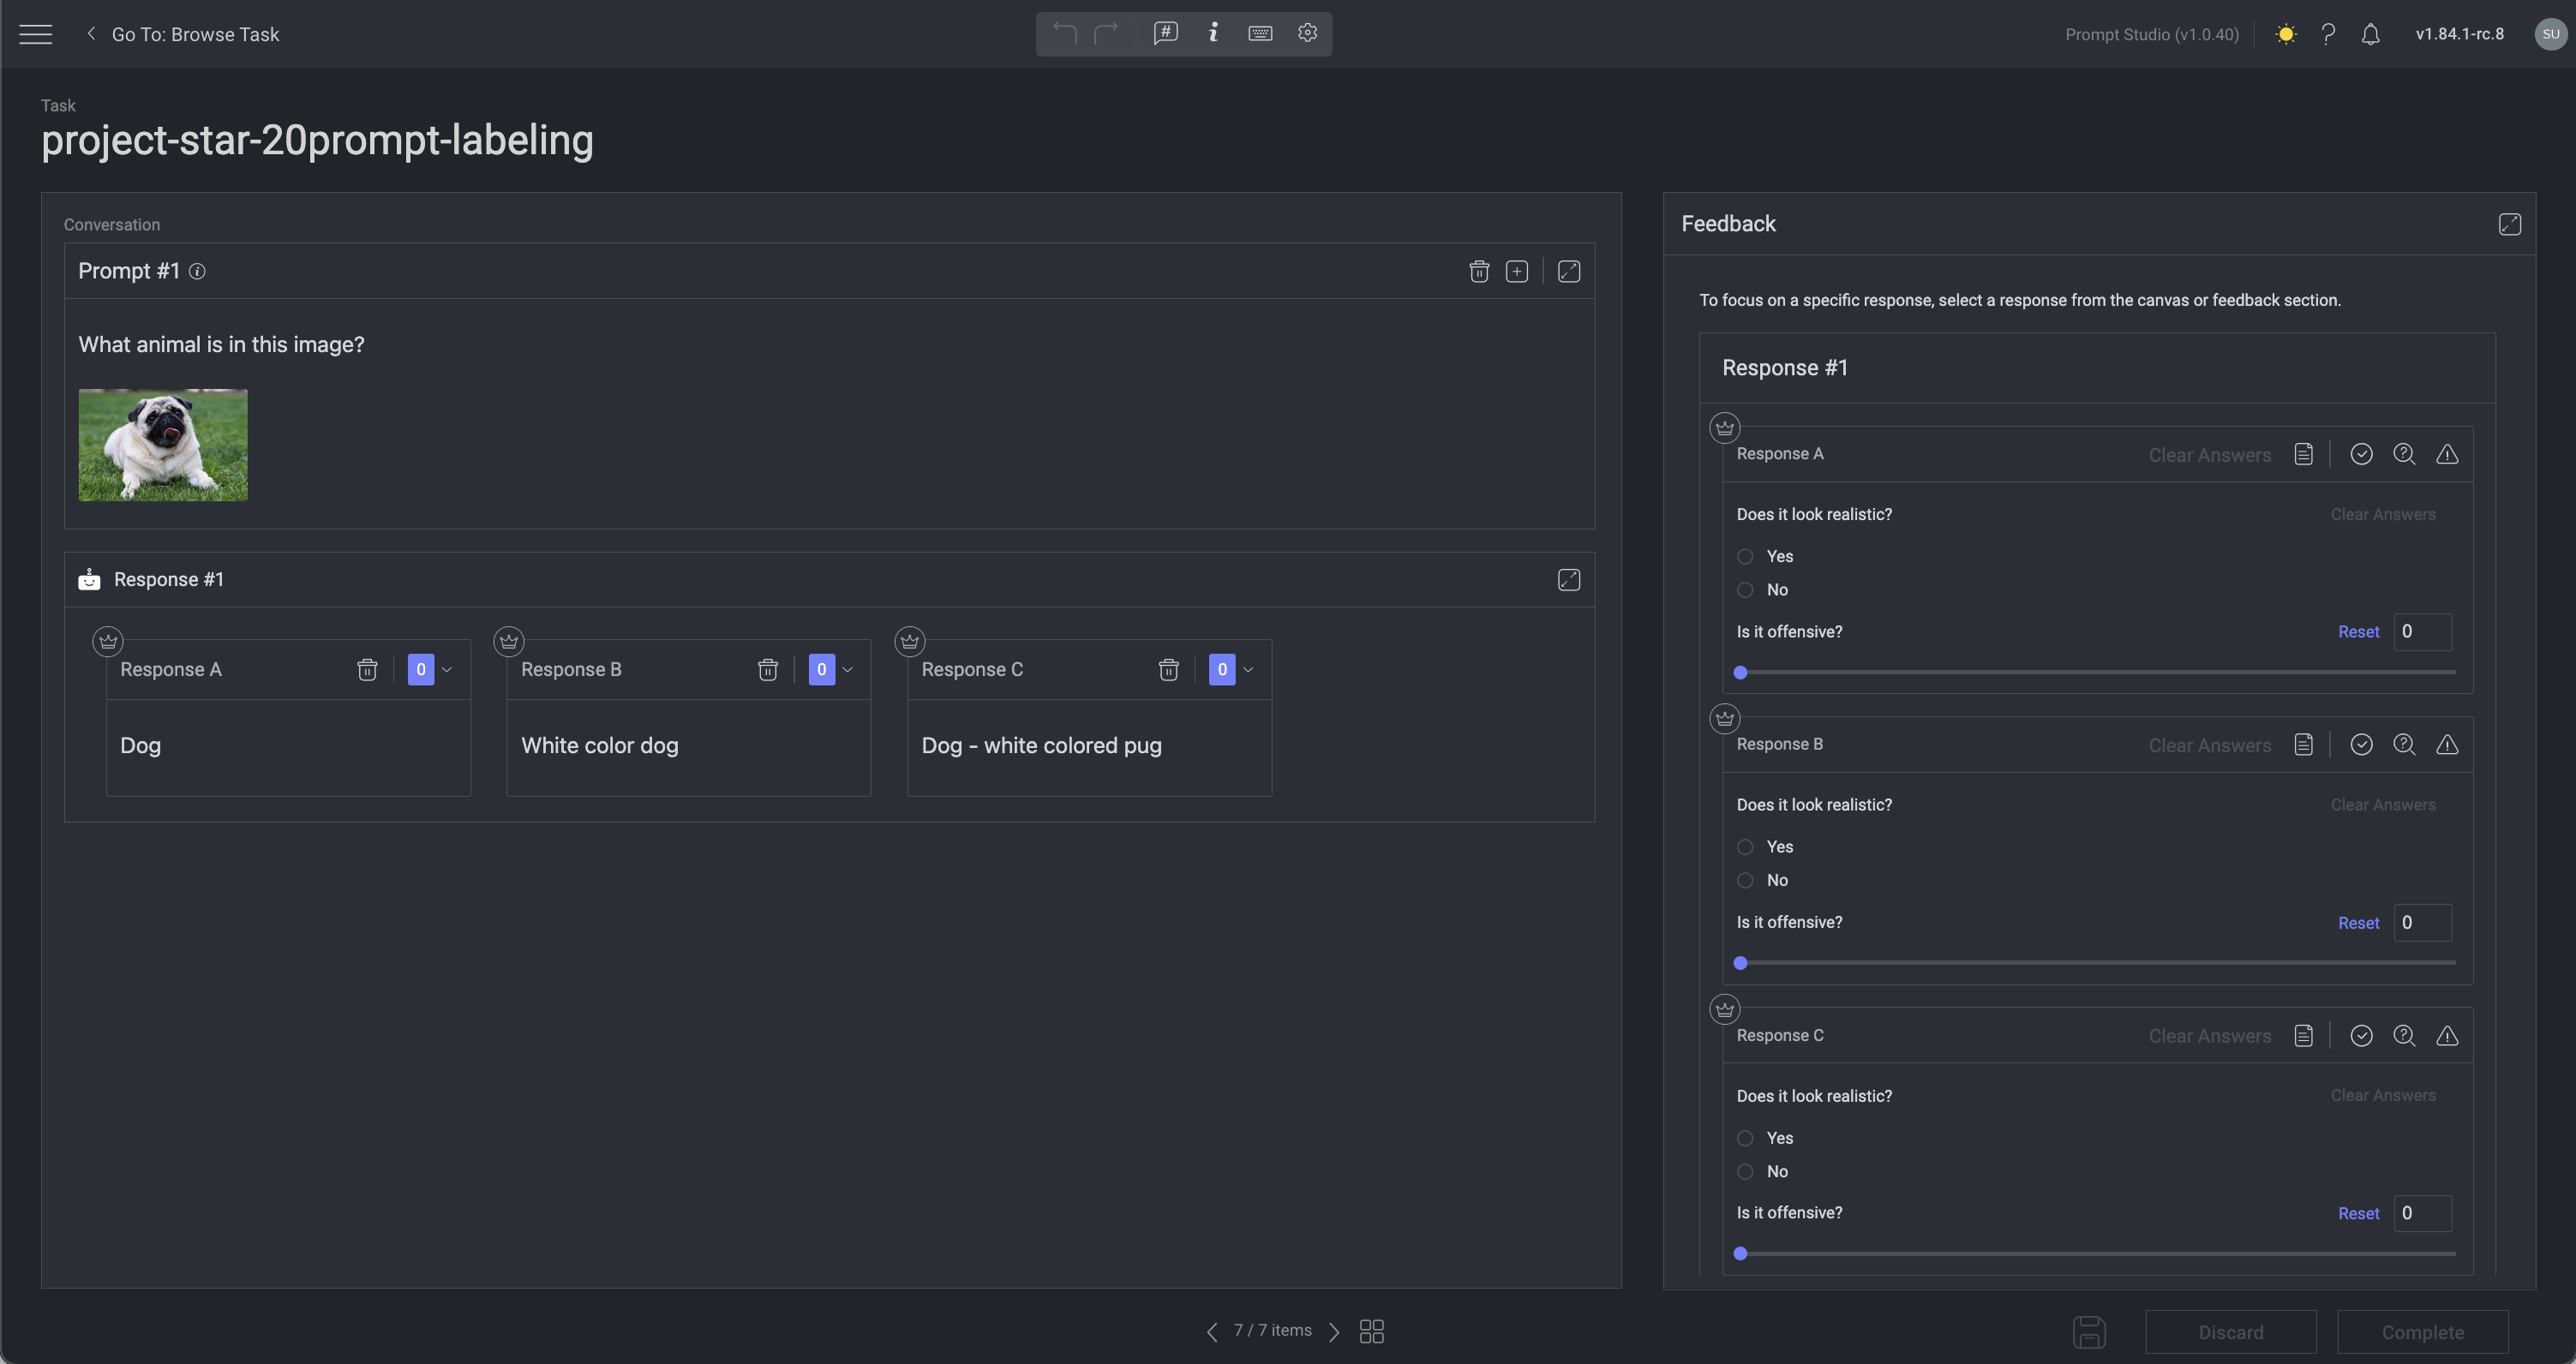
Once you open the JSON file, the RLHF Studio is displayed, and it has two sections:
Learn more about the JSON format
Prerequisites
To begin working with Prompt Studio in Dataloop, ensure you have:
A JSON formatted file with Prompts and Responses
A Classic ML Recipe to provide the Feedback.
Who Can Manage the RLHF Studio?
Project owners or Annotation managers can perform the following actions in the RLHF Studio:
Roles | Project Owner | Annotation Manager | Annotator |
|---|---|---|---|
Verify the prompts and their responses. | ✅ | ✅ | ✅ |
Rank the responses. | ✅ | ✅ | ✅ |
Edit prompt's response texts.** | ✅ | ✅ | ✅ |
Provide answers to the questions in the feedback section. | ✅ | ✅ | ✅ |
Add comments | ✅ | ✅ | ✅ |
Send the answers for review. | ✅ | ✅ | ✅ |
Upload prompts data | ✅ | ✅ | ❌ |
Set feedback questions | ✅ | ✅ | ❌ |
Approve feedback questions | ✅ | ✅ | ❌ |
Report an issue | ✅ | ✅ | ❌ |
Enable Recipe Option to Edit the Responses
** To allow annotators to edit responses, you must enable the following option in the recipe associated with the prompt: Allow editing of a prompt response in the RLHF Studio.
Conversation
This section contains prompts and responses. This section displays prompts and their corresponding responses generated by the ML models.
Multiple response options for each prompt (e.g., Response A, Response B, etc.), each representing outputs from the different models.
Response is displayed in its own box, allowing users to compare them side-by-side.
Edit the response content directly by clicking on the Expand icon and edit the text, enabling quick adjustments to the model’s output without needing to re-run the model.
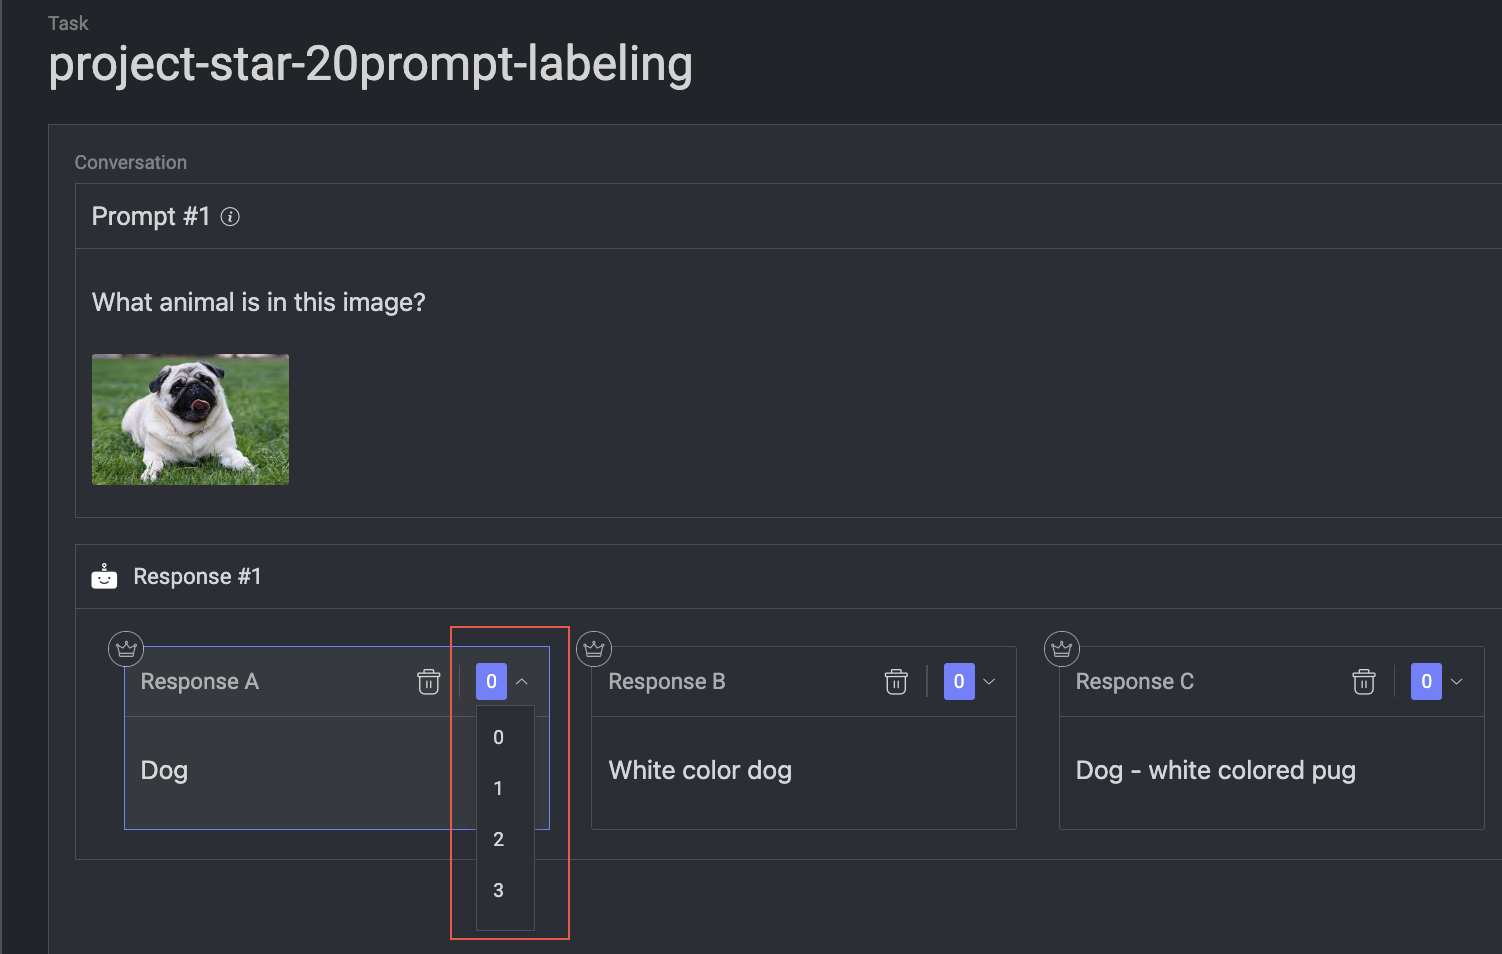
Responses can be ranked by accuracy or preference.
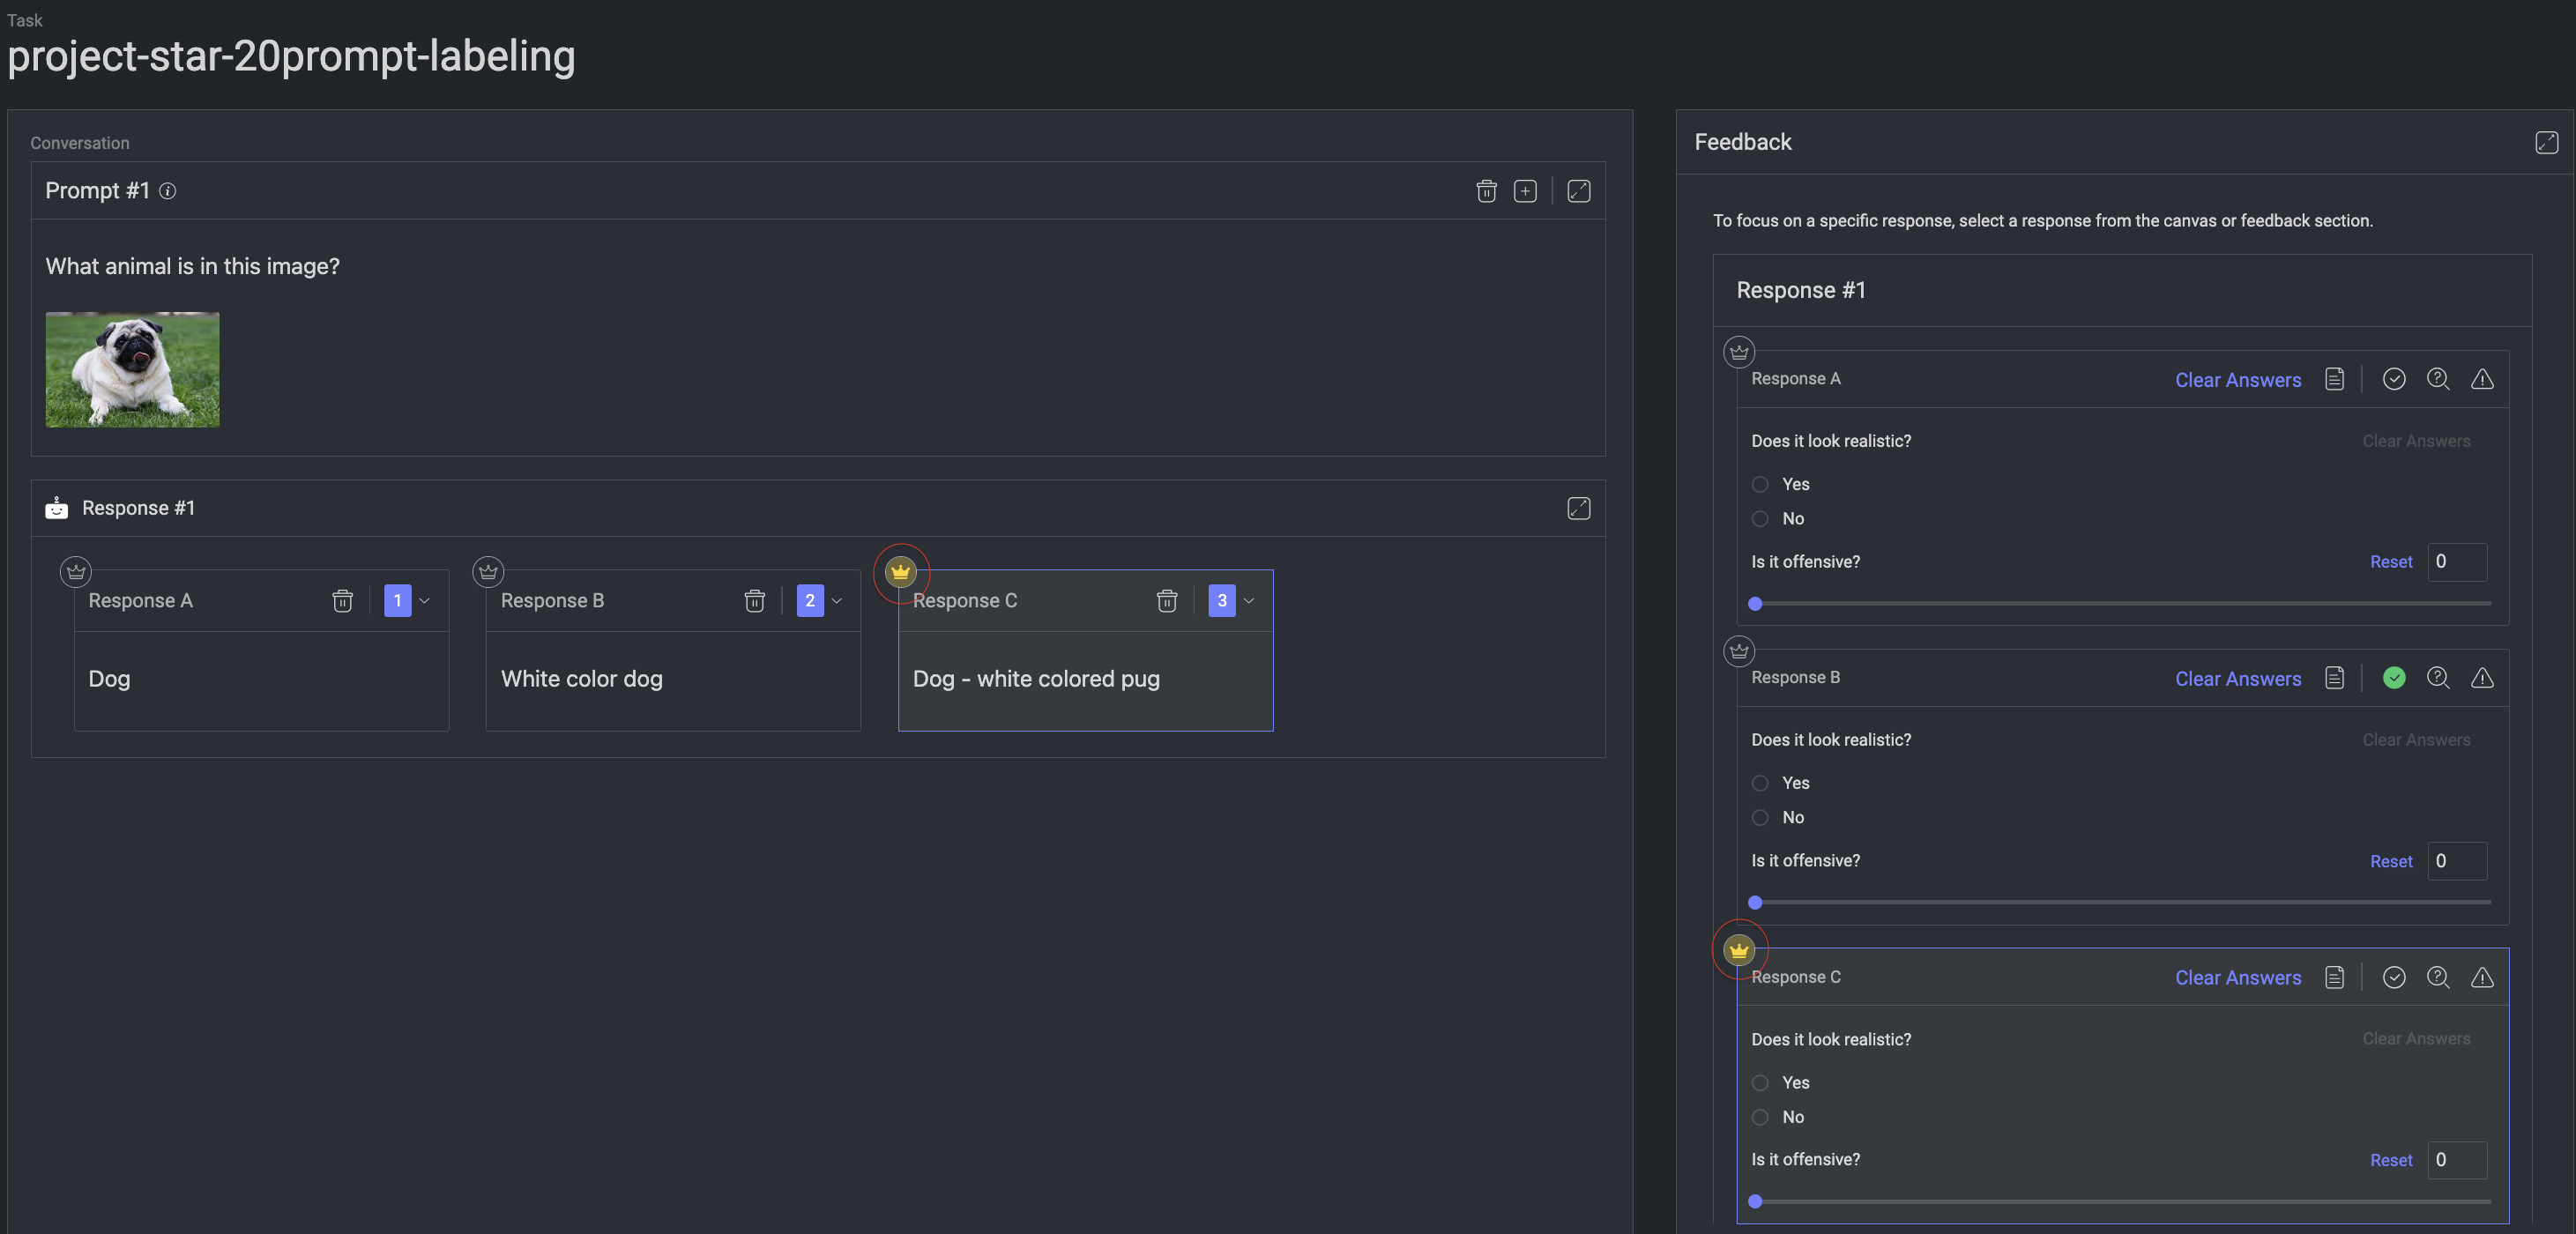
The best response can be selected by clicking the Crown icon.
The Text viewer for both Prompts and Responses supports Markdown formatting in addition to standard text. To create well-structured content with elements like headings, bold, italics, and other formatting options, use Markdown format. For example,
# Heading 1-> Heading 1## Heading 2-> Heading 2**bold**-> bold
Prompts
A prompt is an instruction, question, stimulus, or cue given to the model to provide responses. Dataloop supports more than one prompt for generating model responses. The project owners or managers upload the prompts' data to the dataset.
Set a Prompt
Use the JSON structure available here to create one and upload it to the Dataloop via SDK.
Response
A response is the action or answer that occurs as a result of a prompt. You can either use the prompt's studio itself to create the response by clicking on the plus icon on the prompt's section, or use the SDK to upload the responses created by ML Models. Dataloop supports more than two model responses; hence, a prompt might have multiple responses that were generated by different model versions or completely different models.
Add a Response to the Prompt
Open the JSON file in the Prompt studio.
Click the Plus icon to display the Response dialog.
Enter your response text or a URL for the prompt. If entering a URL, enable the Stream option.
Click Save. The new response will be created and added below the prompt.
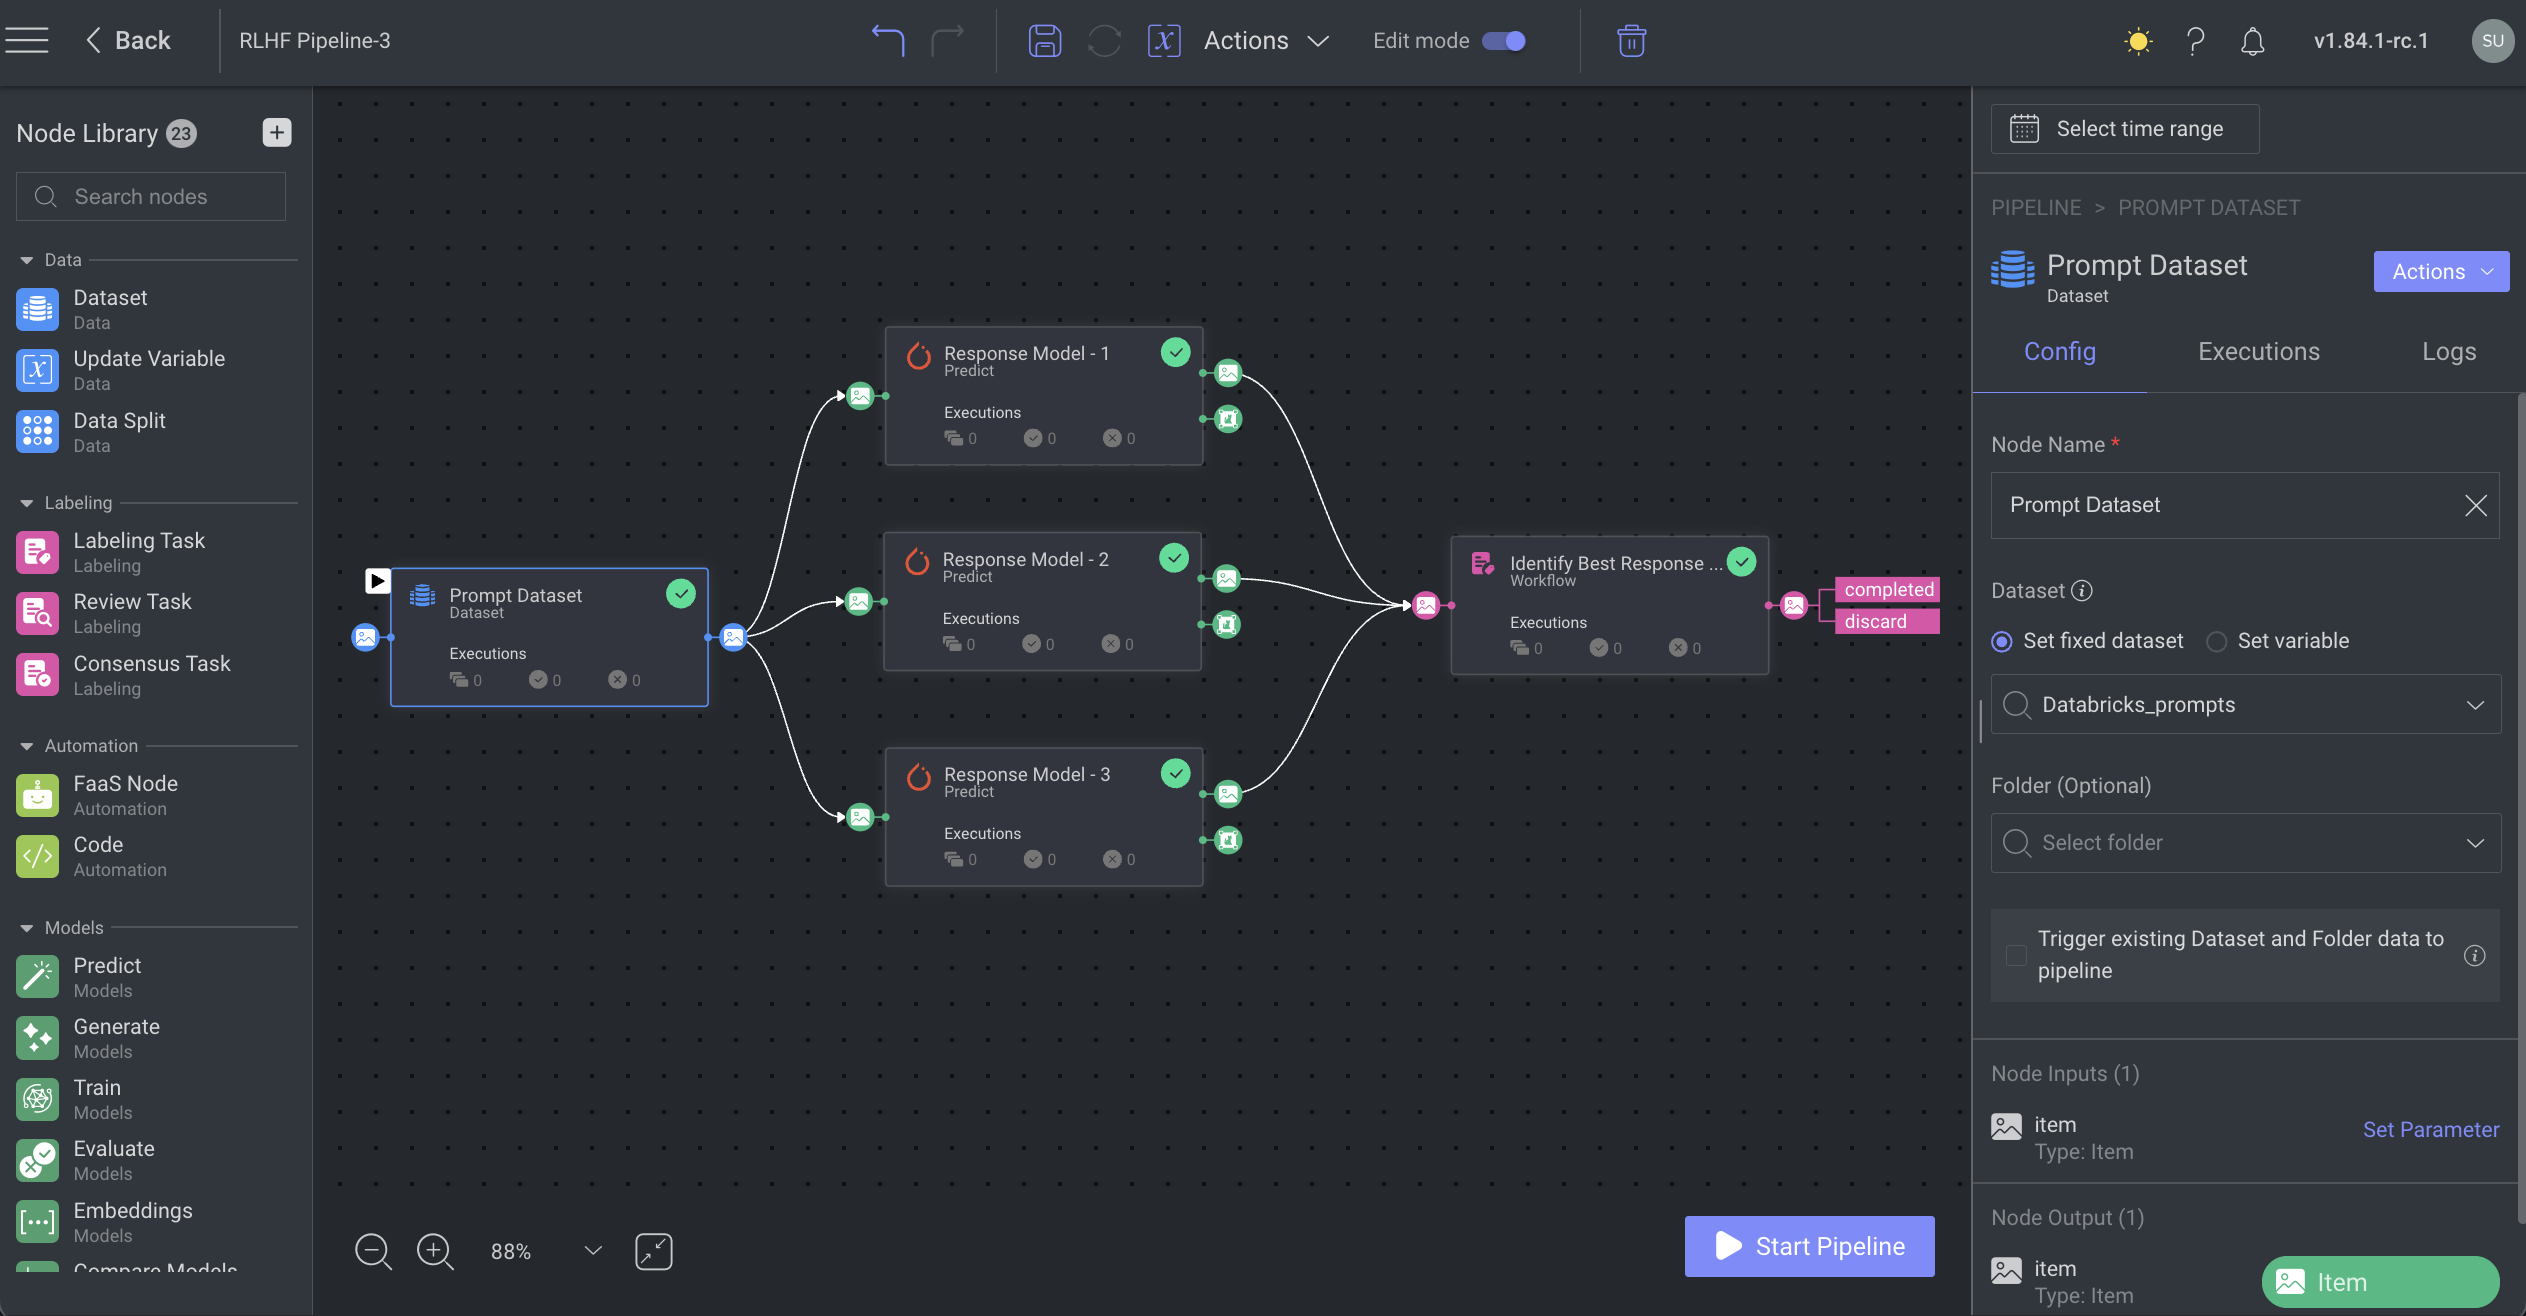
Generate Responses Using Dataloop's Models
To generate responses using Dataloop's models, follow these steps:

Access the Marketplace:
Navigate to the Marketplace within the Dataloop platform.
Go to the Dataloop Hub and select the Pipelines tab.
Install the RLHF Pipeline:
Locate the RLHF pipeline and click Install.
Once installed, the pipeline will appear in your workspace.
Configure the Dataset Node:
Click on the Dataset node to open its configuration settings.
Optionally, rename the node for clarity.
From the dataset list, select the appropriate dataset to use.
Set Up Predict Nodes:
For each Predict node:
Open its configuration settings.
Optionally, rename the node for better identification.
Choose the desired model from the available list for each node.
Create a Labeling Task:
Select the Workflow Labeling node.
Set up a labeling task to either rank the responses or identify the best one.
Start the Pipeline:
After completing the configurations, click Start Pipeline.
The models will process the prompts and generate responses, which will then be available for annotators to review and rank.
Edit Response's Text Content
Open the JSON file in the Prompt studio.
Click the Expand icon in the Response section.
Edit the content as needed.
Click Back. The changes will be updated.
Rank the Model's Responses
Dataloop RHLF Studio allows the annotator to rank the model responses.

Open the JSON file in the Prompt studio.
On the Response section, click on the dropdown and select a response rank (0 to 3) from the list.
Identify the Best Response
Dataloop allows you to select the best responses at the prompt level. For example, if a prompt has responses A, B, and C generated by different models, the annotator can provide information on which response is the best in the Conversation section.

Open the JSON file in the Prompt studio.
In the Response section, identify the best response.
Click on the Crown icon, and then click the Save icon to save the update.
Best Response
When a response is marked with the Crown icon, the annotation metadata is updated with the key
isBest: true.
Delete a Response
Open the JSON file in the Prompt studio.
Identify the response to be deleted.
Click Delete icon. The response will be deleted.
Feedback
This feature allows annotators to answer questions and provide feedback on model-generated responses. The questions in the feedback section are defined and customized by the project owner or manager via the path: Recipes > Your Recipe > Labels & Attributes tab > Create Section. The list of responses appears on the right side under the Feedback section based on the selection in Conversation > Response.
Set Feedback Questions
To customize the questions displayed in the feedback section:
The project owner or developer can go to Recipes > Your Recipe > Labels & Attributes tab.
Select Create Section to define or edit the feedback questions by adjusting the recipe’s attributes.
Dataloop supports various question types for feedback, including scales, multiple-choice, yes/no, and open-ended questions, etc.
Respond to Feedback Questions
In the Feedback section of the RLHF Studio, annotators can respond to various question types, including scale ratings, multiple choice, yes/no, and open-ended questions. Here’s a guide to using feedback features effectively:
Provide Comments: Use the comment (icon) feature to elaborate on your feedback. Once you’ve completed your answer, click the Save icon to submit your response.
Report an Issue: If you identify a problem in the feedback provided, use the Open Issue icon to flag it. This helps annotators to track and address issues efficiently.
Mark Feedback for Review: Use the For Review option to mark responses by annotators that had issues during the QA process. This makes it easier for a QA reviewer to revisit flagged feedback for further evaluation.
Approve Feedback: Use the Approve icon to confirm that the feedback answers meet the required standards and are ready for final approval.
Keyboard Shortcuts
General Shortcuts
| Action | Keyboard Shortcuts |
|---|---|
| Save | S |
| Delete | Delete |
| Undo | Ctrl + Z |
| Redo | Ctrl + Y |
| Zoom In/Out | Scroll |
| Change Brightness | Vertical Arrow + M |
| Change Contrast | Vertical Arrow + R |
| Pan | Ctrl + Drag |
| Search Labels | Shift + L |
| Search a label | Shift + 1-9 (for the sub-labels, use the Tab key) |
| Navigate in label picker | Up and Down arrows |
| Select label in label picker | Enter |
| Tool Selection | 0-9 |
| Move selected annotations | Shift + Arrow Keys |
| Previous Item | Left Arrow |
| Next Item | Right Arrow |
| Add Item Description | T |
| Mark Item as Done | Shift + F |
| Mark Item as Discarded | Shift + G |
| Enable Cross Grid Tool Helper | Alt + G |
| Hold G to show Cross Grid Measurements | G |
| Go to annotation list | Shift + ; |
| Navigate in annotation list | Up and Down arrows |
| Select/deselect an annotation | Space |
| Hide/Show Selected Annotation | H |
| Hide/Show All Annotation | J |
| Show Unmasked Pixels | Ctrl + M |
| Hide/Show Annotation Controllers | C |
| Set Object ID menu | O |
| Toggle pixel measurement | P |
| Use tool creation mode | Hold Shift |
| Copy annotations from previous item | Shift + V |