A Service in the Dataloop platform is a serverless, Python-based execution unit that allows you to run custom code in response to data or system events—without managing servers or infrastructure. It’s deployed from a code package and triggered by inputs like items, annotations, or tasks. When provided with the matching input for a function, it runs and returns the output.
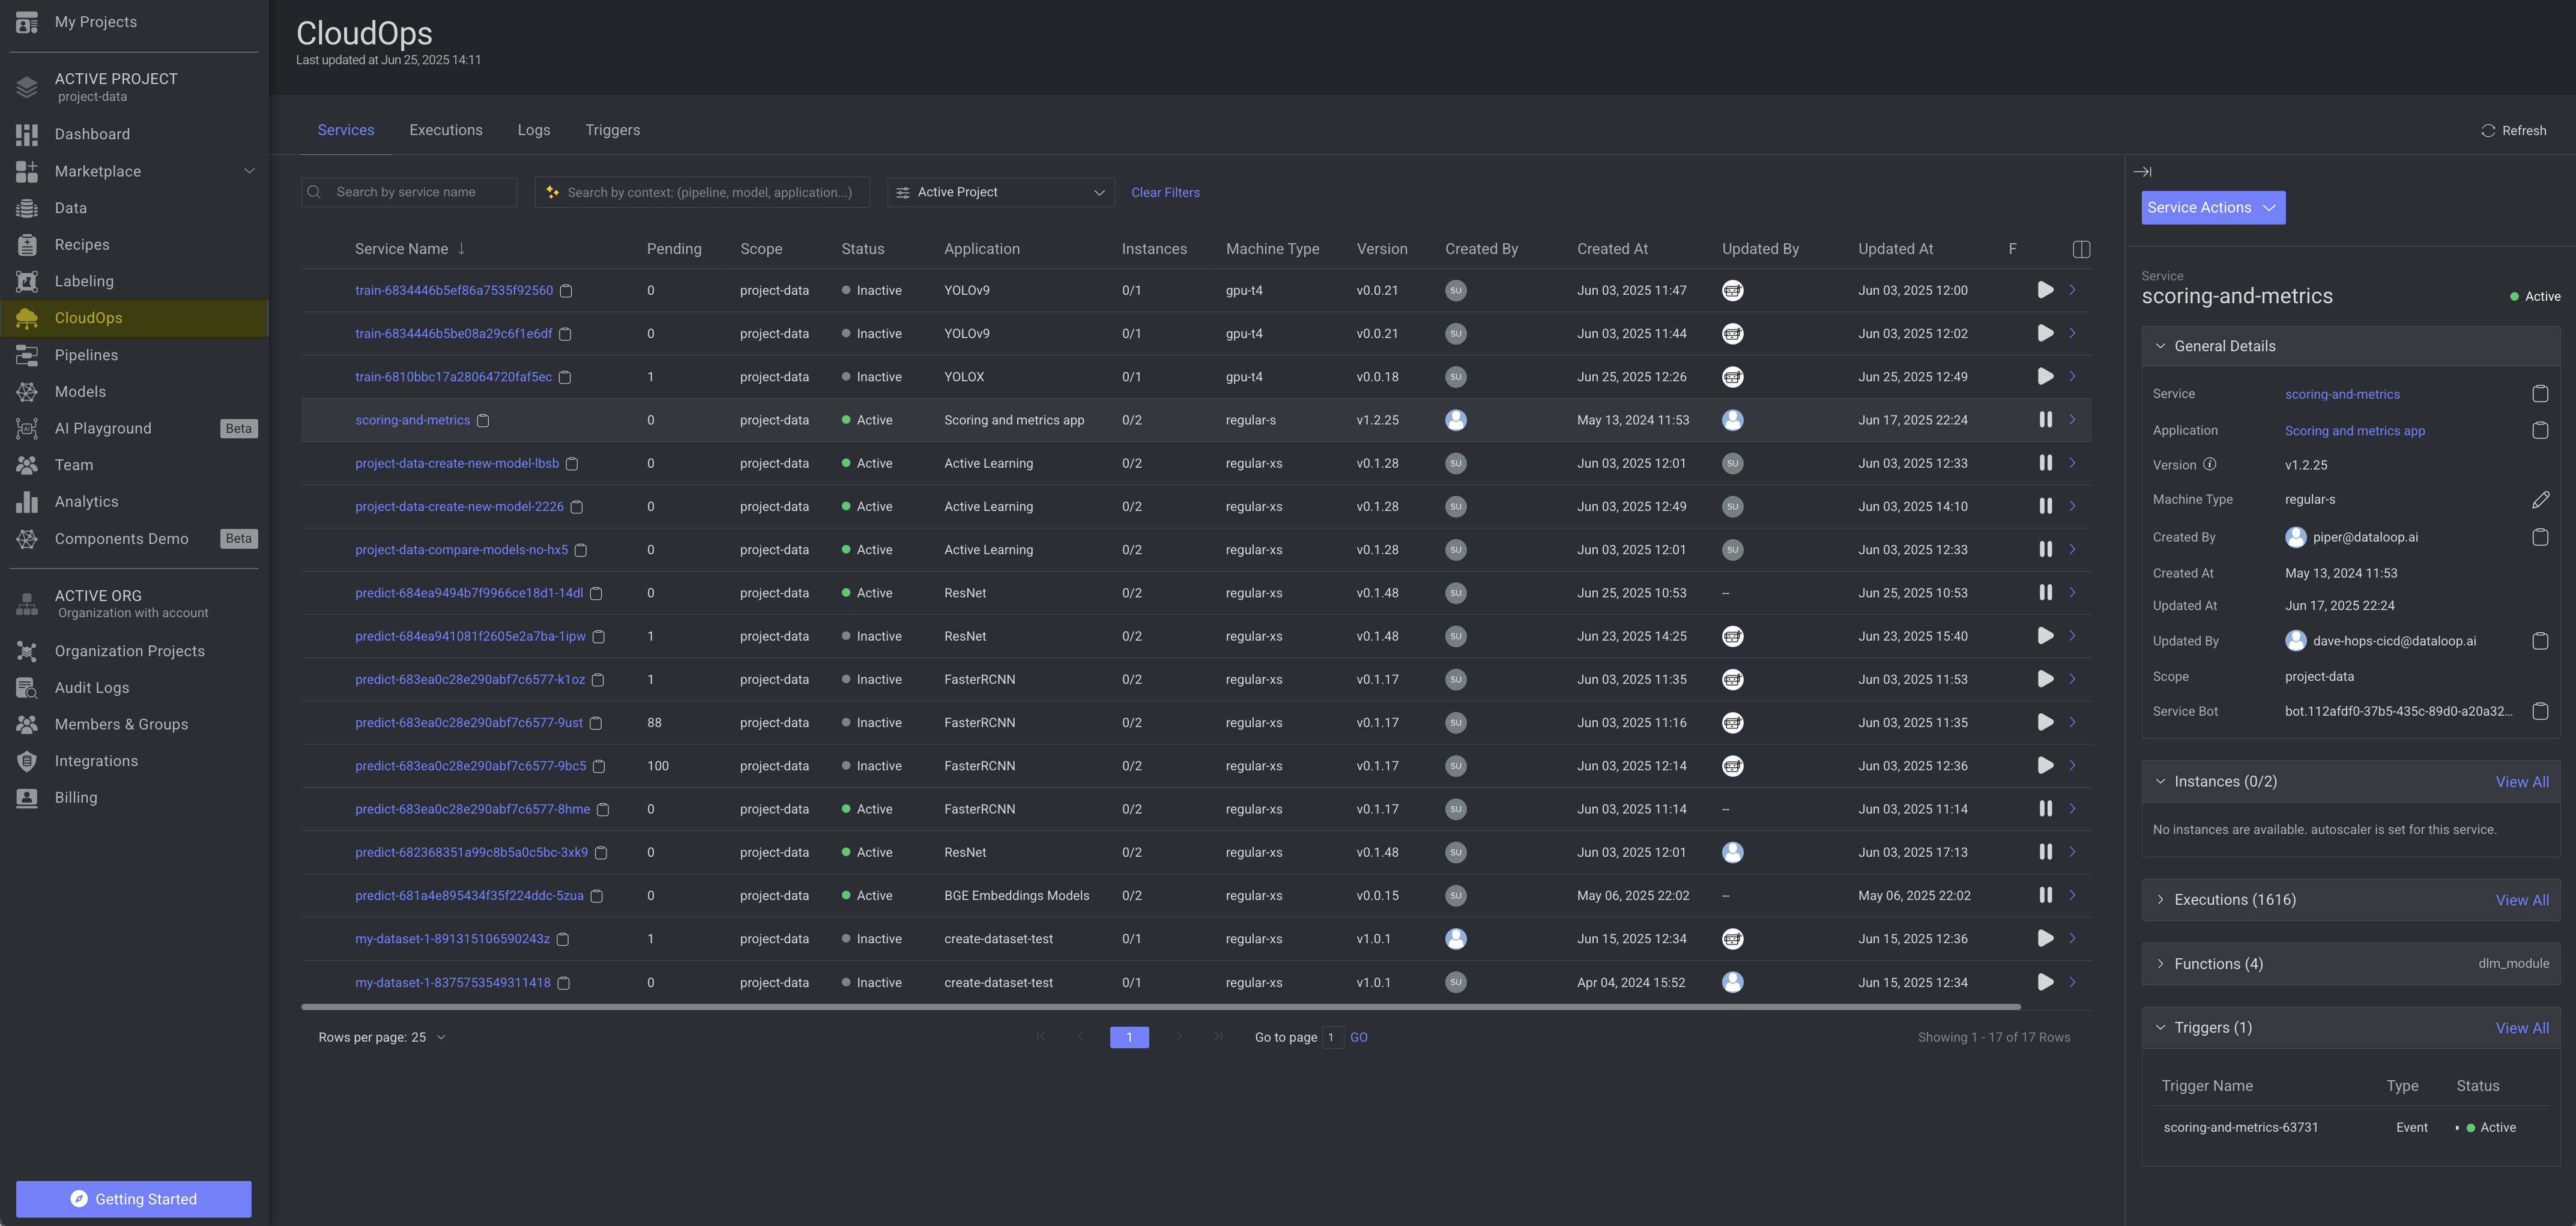
The services tab provides you the comprehensive list of all applications service installations created from the application package, and pipelines.
Key Features:
Serverless: No need to handle VMs or containers.
Triggered Execution: Runs automatically based on events (e.g., new item uploaded).
Secure: Uses Secrets Manager for safe access to external systems.
Scalable: Auto-scales based on demand and concurrency settings.
Modular: Encapsulates specific logic (e.g., image preprocessing, AI inference).
Reusable: Can be part of pipelines or called directly via API.
Once packaged as a service, you can:
Use it as a pipeline step
Trigger it automatically when a new image is uploaded
Call it via REST API
Scale it to run across hundreds of items concurrently
The list of services shows the following column details:
Fields | Description |
|---|---|
Service Name | The name of the service and click on it to open the respective service page. Click on the Copy icon to copy the Service ID. |
Pending | The number of executions that are pending, for example, the status is Created. |
Scope | The project where the service is deployed. |
Status | The status of the services. To learn more, refer to the Service Status section. |
Application | The name of the application to which the service belongs. |
Instances | It displays the number of the instances. The execution last updated date. |
Machine Type | The name of the machine type used to run the service. |
Version | The version number of the application (codebase) or package deployed by the service. To update it, click on the Update button when available. |
Created By | The avatar and email ID of the user who created the service. |
Created At | The timestamp of the service creation. |
Updated By | The avatar and email ID of the user who updated the service. |
Updated At | The timestamp of the service update. |
Functions | The number of functions available for the service, such as evaluate_model, predict_dataset, etc. |
Play or Pause icon
Play icon: Click on the Play icon to resume the services that are paused.
Pause icon: Click on the Pause icon to pause the services that are active.
Service Details
Selecting a service displays more information of the service on the right-side panel. The Details tab includes the following sections:
Service Actions: The service page allows you to perform various service related action.
General Details:
Service ID: Click on the copy icon to copy the Service ID.
Application: It displays the application name.
Click on the name to open the Manage Installations page of the Marketplace.
Click on the copy icon to copy the application ID.
Version: The application version (package/DPK) that is running on the service.
Machine Type: The type of the machine used to for the service. Click on the pencil icon to edit it.
Created By: Email ID and Avatar of the user who created the service.
Service Created and Updated date
Service Bot ID: It displays the Bot ID. Click on the copy icon to copy the Service Bot Username.
Model type and name: It displays the model type and name. Click on the copy icon to copy the Model ID.
Instances: The Instances section provides you the number of instances of the function.
Executions: The Executions section provides you the number of executions available in the service. You can view details, such as execution ID, status, and creation date. Also, click on the execution ID to open the Executions tab of the service. To learn more, refer to the Execution article.
Functions: The Functions section provides you the name of the functions available in the service.
Triggers: The Triggers section provides you the number of triggers available in the selected service. To add a new trigger, click on the Click here. Learn more.
Schema Based Search and Filter
Schema Search is an integral component of the CloudOps, providing users with the capability to refine and narrow down the displayed services based on specific criteria. These filters offer a powerful tool for managing and exploring large information efficiently.
Click on the search field and specify the following criteria to perform a search. Press the Enter key to initiate the search:
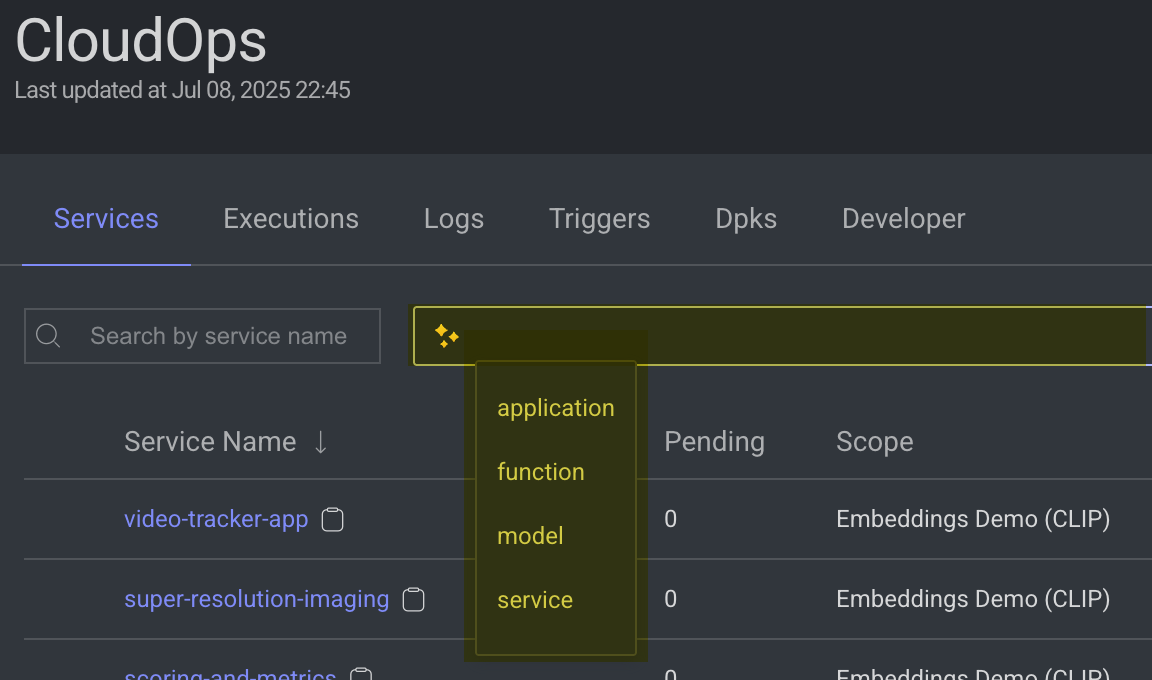
Find Services based on Application:
application.idapplication.name
Find Services based on Functions:
Function name
Find Services based on:
service.idservice.name
Find Services based on Model:
model.idmodel.name
You can utilize the filter functionality by specifying the following criteria:
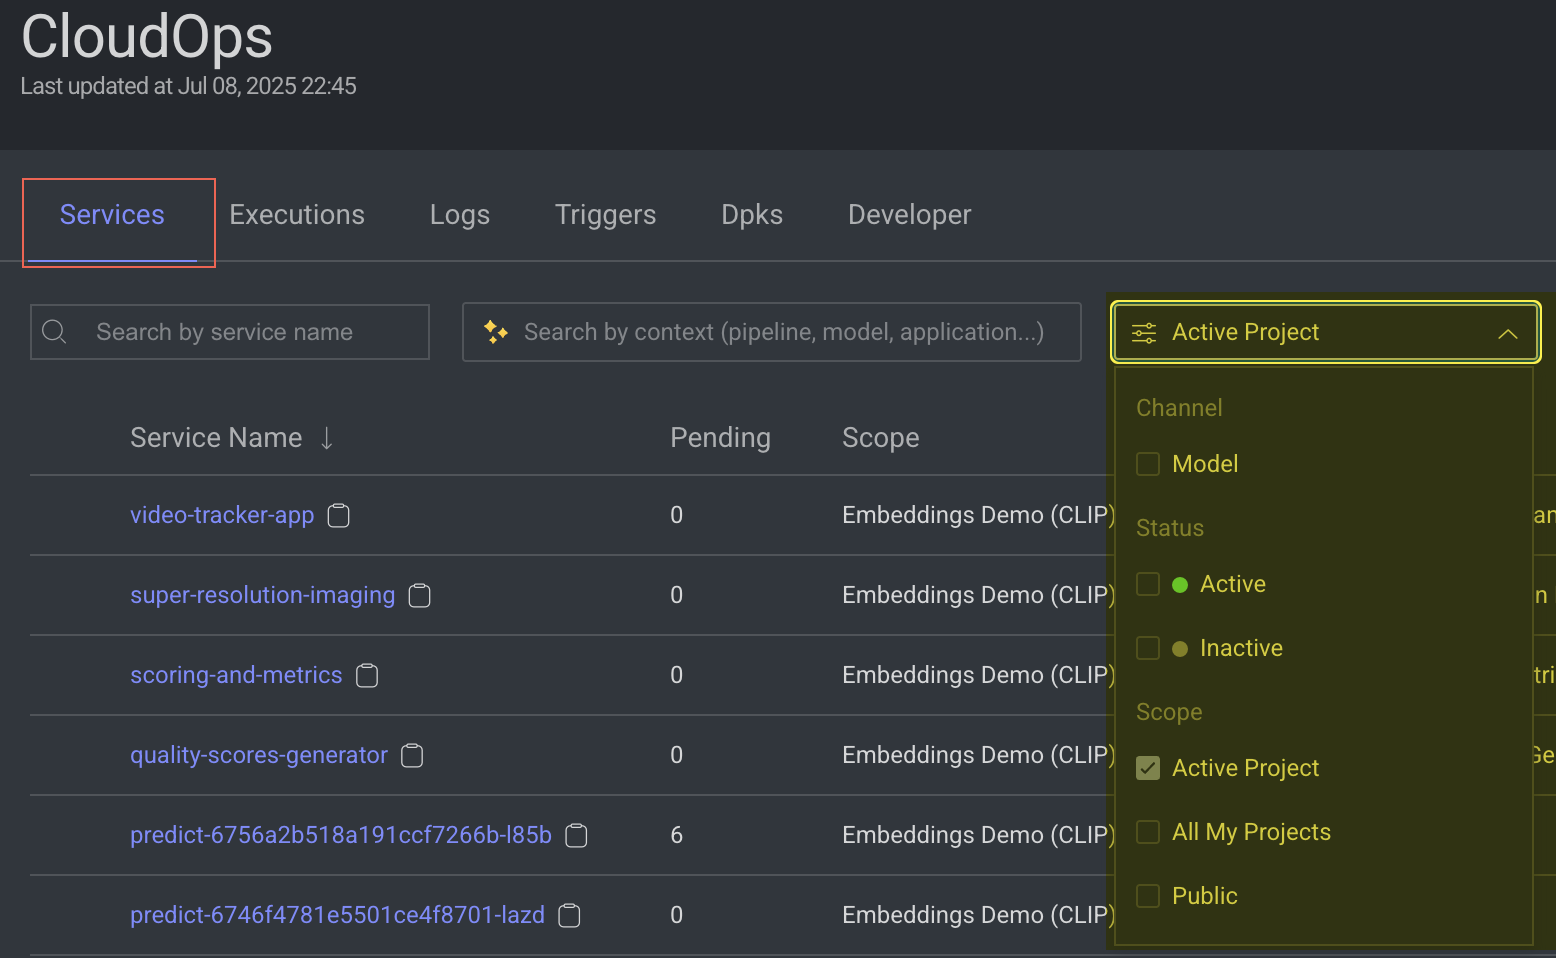
Filter Variable | Description |
|---|---|
Channel - | It displays services such as predict, train, and evaluation services. |
Status - Active | It displays services that are in active status. |
Status - Inactive | It displays services that are in inactive status. |
Scope - | By default, it displays all the services or apps in the current project. |
Scope - | It displays all the services or apps in the projects that the current user has access. |
Scope - | It displays Dataloop global services and apps. |
Edit Service Settings
It allows you to make changes on the Service Installation Configuration page, where you can add new triggers, edit service configuration.
Open CloudOps from the left-side menu.
Select the service from the list. A right-side panel will be displayed.
Click on the Service Actions, select the Edit Service Settings option from the list. The Edit Service window is displayed.

Settings
In the Settings section, review the following details and make changes, if needed:
init inputs value (1): The initial input or configuration values provided to a function when it is first invoked or initialized. The values are displayed, if theinitinputs are defined in thedpk/dpkConfig.Hover over and click on the Edit Init Input to add a new value.
Enter a value and click Save Changes.
Integrations: The secret values are displayed, if the
secretis defined in thedpk/dpkConfig.Click on the Edit Secret to select secret(s) from the list. Also, you can search secrets by using the secret names and type.
To create a secret, click Edit Secret -> Create New -> Create Secret.
To create an Integration, click Edit Secret -> Create New -> Create Integration.
Click Save Changes.
Service Configuration: Click on the Edit Configuration to make changes to the following fields, if needed:
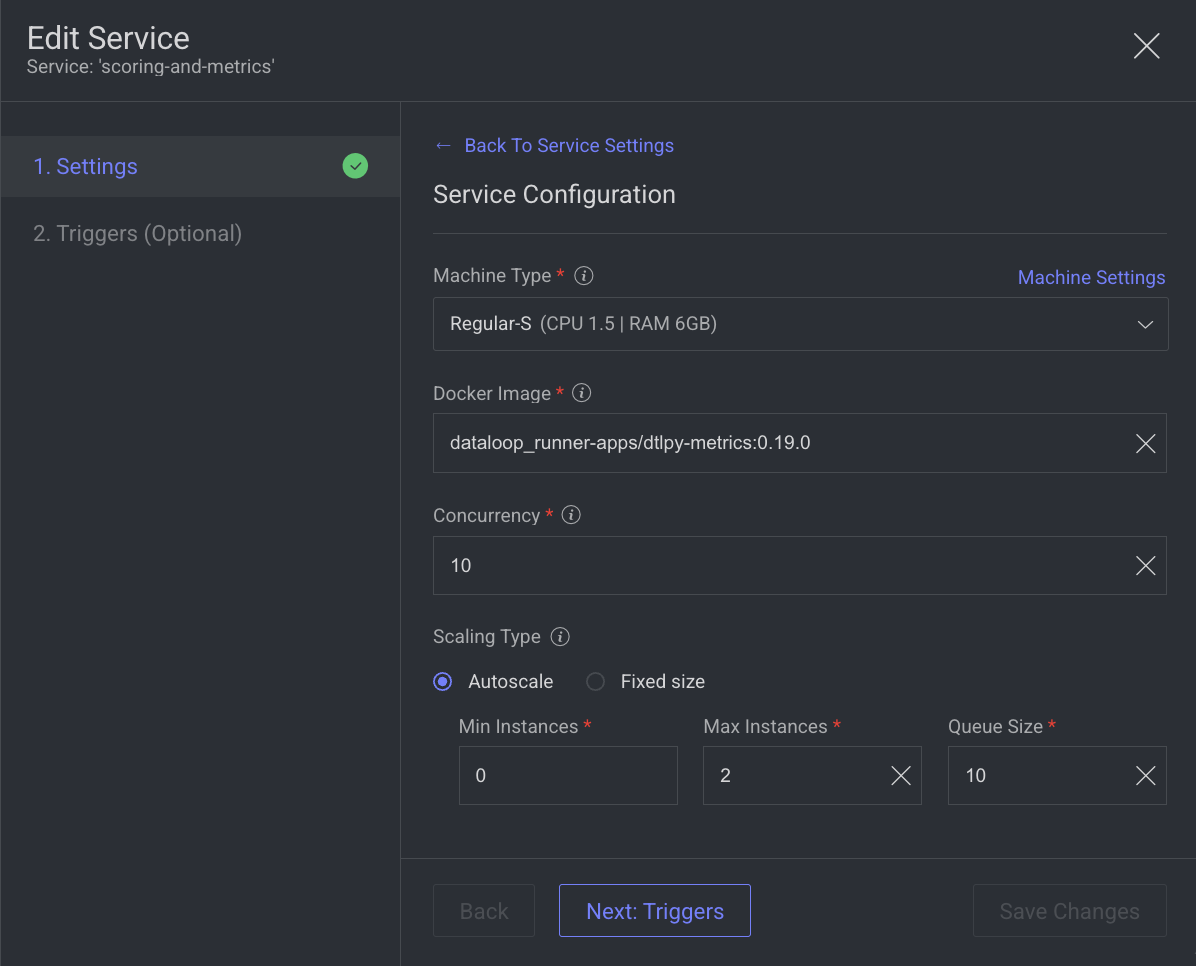
Machine Types: The machine type on which the service will run (refers to CPU, GPU, RAM).
Change the machine type from the list.
Click on the Machine Settings to enable Preemptible Machine, the reclaimable compute instances.
Docker Image: A container image encapsulating essential dependencies and code for service execution. By default, the docker image based on the SDK version is displayed.
Concurrency: Number of concurrent executions per instance. By default, the value 1 is displayed.
Scaling Type: Choose the scaling type based on your workload.
Autoscale: A component of the Dataloop Application system that automatically adjusts the number of serverless computing Resources allocated to the Application Service based on current demand. The purpose of the Autoscaler is to ensure that the system can handle peaks in demand without over provisioning Resources and incurring unnecessary costs.
Min Instances: By default, 0. If you set the min instances to 0, the service will not run until it has something in the queue, it will be suspended.
Max Instances: By Default, 10.
Queue Size: By default, 10.
Fixed size: By default, 1 instance is selected.
Execution Configuration: Click on the Execution Configuration to make changes on the following fields:
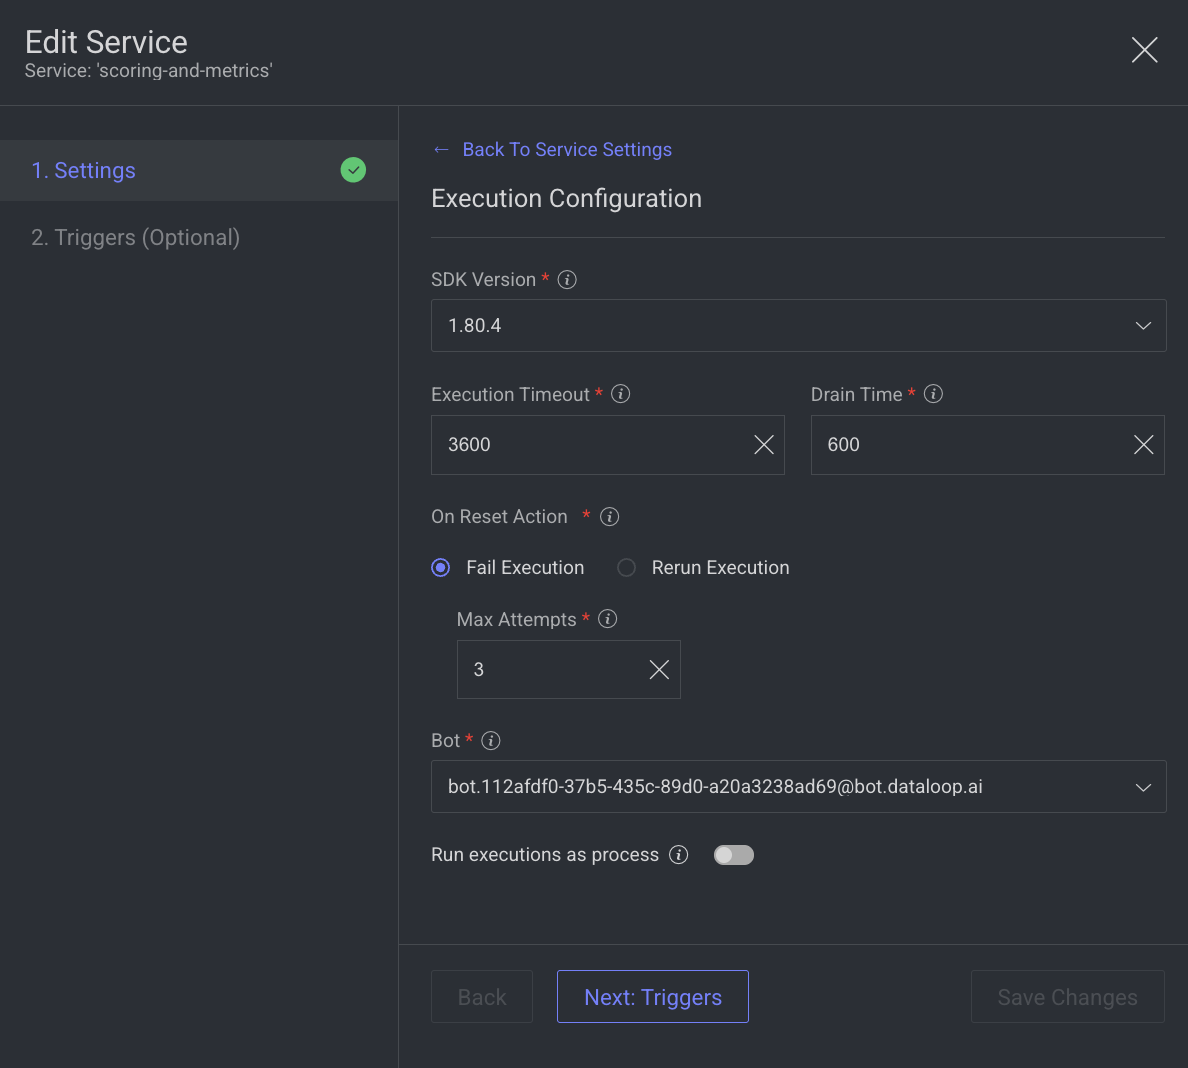
SDK Version: The SDK version is displayed.
Execution Timeout: The maximum execution duration before service restarts (in seconds). By default, 3600 is displayed.
Drain Time: Delays service restart to complete ongoing executions (in seconds). By default, 600 is displayed.
On Reset Action: Action taken when a service is reset or restarted (e.g. timeout). Select one of the following when you reset the execution.
Fail Execution
Rerun Execution
Max Attempts: Configures to automatically retry failed executions up to x attempts. Maximum number of execution attempts allowed. By default, 3 is displayed.
Bot: A dummy user used for running the service ('developer' role). A default Bot is displayed. Select a new one from the list, if needed.
Rerun executions as process: Defines if each execution will start a new thread or a process. Enable to make the execution as a process.
In the Triggers (Optional), review and make changes, if needed:
Click on the Pause/Play icon to deactivate/activate a trigger.
Click Add Trigger to add a new trigger.

Click on the Delete button to delete the trigger. A confirmation message is displayed.
Click Save Changes to update the changes. A confirmation message is displayed.
Activate or Deactivate Services
It allows you to deactivate or activate the service.
Open CloudOps from the left-side menu.
Select the service from the list. A right-side panel will be displayed.
Click on the Service Actions, select:
Deactivate Service: Click on it to deactivate the service that is in Active status.
Resume Service: Click on it to resume the service that is in Deactivate status.
Share Custom Applications Across Projects
Share Application Across Projects helps to reuse the same installed application across multiple projects without needing to reinstall or duplicate it.
By sharing the application’s CloudOps service with other projects, you:
Save time and resources – no need to repeatedly install and configure the same app for each project.
Maintain consistency – all projects use the same version and configuration of the application, reducing errors and mismatches.
Simplify updates – update the shared service once, and all linked projects automatically benefit from the changes.
Optimize costs – avoid duplicate infrastructure usage by centralizing the service.
After you install an application—such as Annotation Studio, a Function Application, a Model, or any other supported app—within a specific project, the system will automatically create a corresponding service entry in CloudOps → Services for that project.
This service acts as the “backend” for your application. By sharing this service, you can make the same application accessible from other projects without having to reinstall or redeploy it.
Requirements
To use an application from another project:
Same Organization – The application’s service must belong to the same organization as your current project.
Service Bot Membership – The application’s service bot (from the original project) must be added as a member of your current project.
User Access – You must be a member of the original project where the application is hosted.
Steps
Open CloudOps from the left-side menu.
Select the service from the list. A right-side panel will be displayed.
Copy the Service Bot Email ID from the General Details section by clicking on the copy icon.
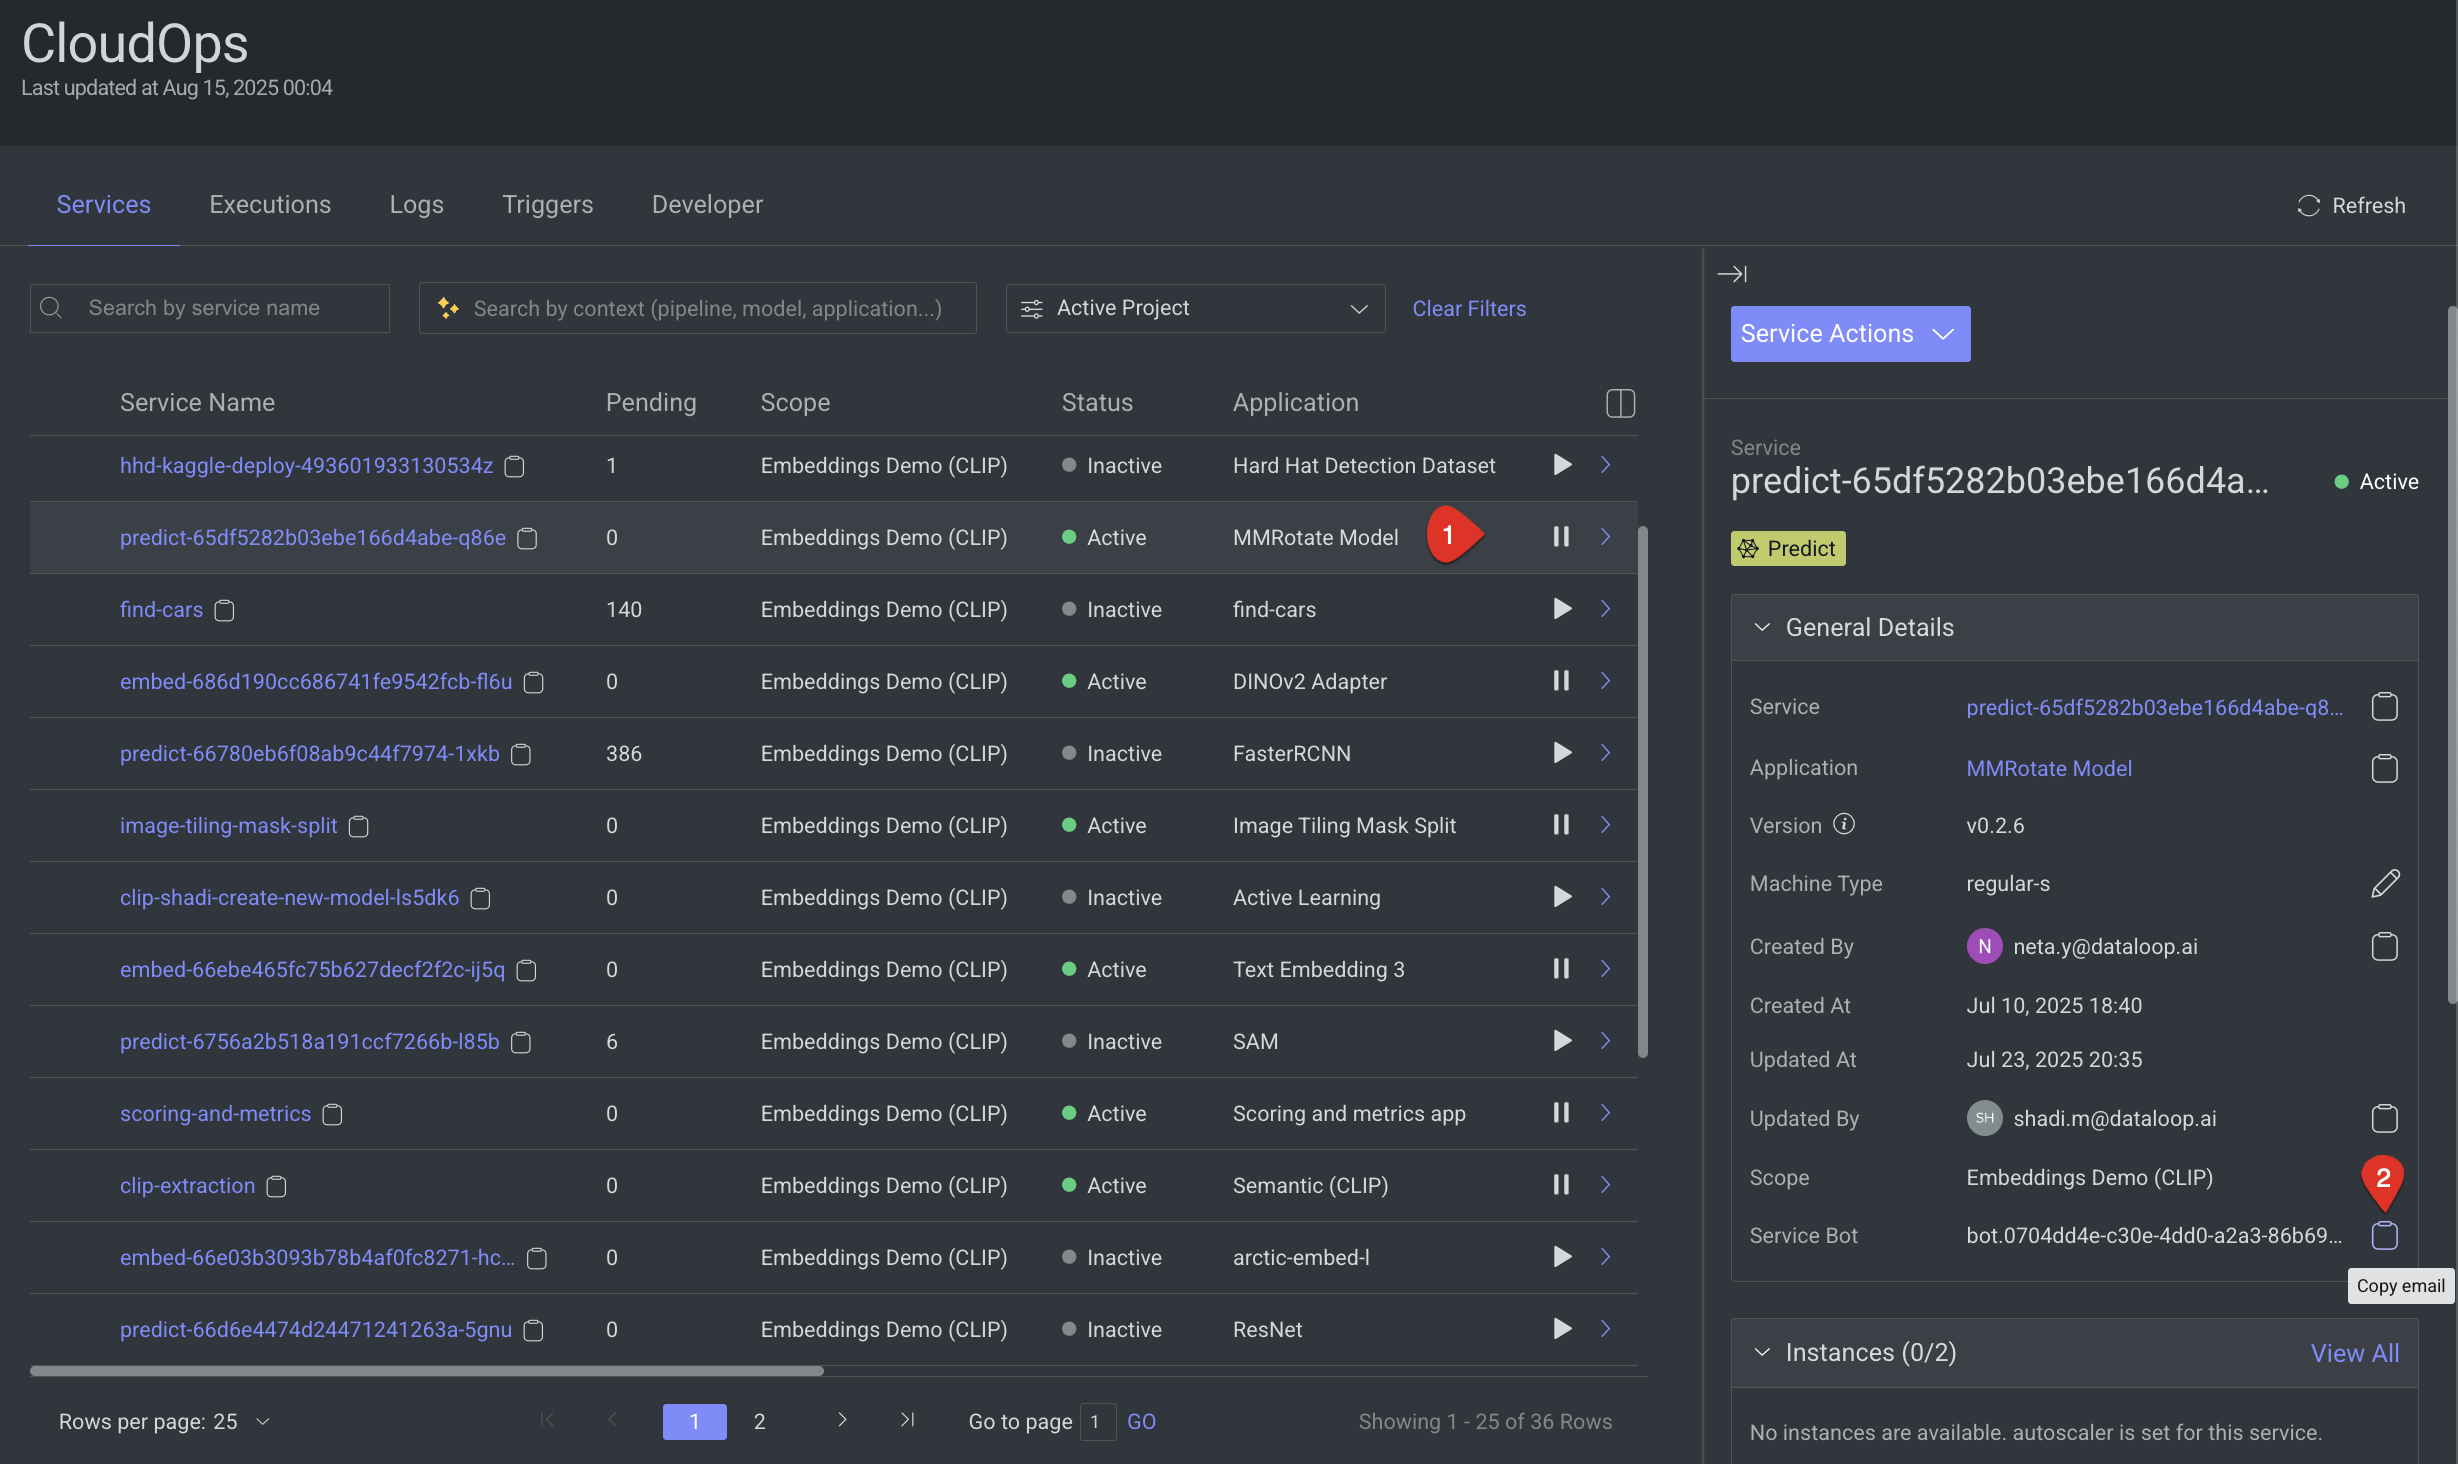
Open the other project where you want to share the application.
Open the Team from the left-side panel.
Click Add User & Groups.
Email Address: Paste the Service Bot Email ID in the Email Address field under the Users tab.
Role: Select the user role Developer or higher from the list.
Click Add Users. The bot user email will be added in the bot users list.
Verify the application based on it nature, for example, annotation studios in the browsers, etc.
Service Alerts
Service alerts notify you of potential issues that may affect the stability or performance of your deployment. Below is an example of an alert you may encounter during operations:
High Resource Usage Detected
Triggered when a service consumes >85% memory or >90% CPU for more than 1 continuous minute within the last 24 hours.
Appears in both the Service Details → Execution tab and the service’s right-hand panel.
Indicates that the service may be under heavy load and could require scaling or performance optimization.

Click on the ‘x’ icon to close the alert. The alert will be hidden for the service for 72 hours. If high usage is detected again after that, the alert will reappear automatically. When a user updates the compute configuration or pod type for a service, the alert history for that service is reset:
Previous high-usage alerts are cleared.
New alerts will trigger only based on usage after the configuration change.
This applies to changes made through both the UI and the SDK.
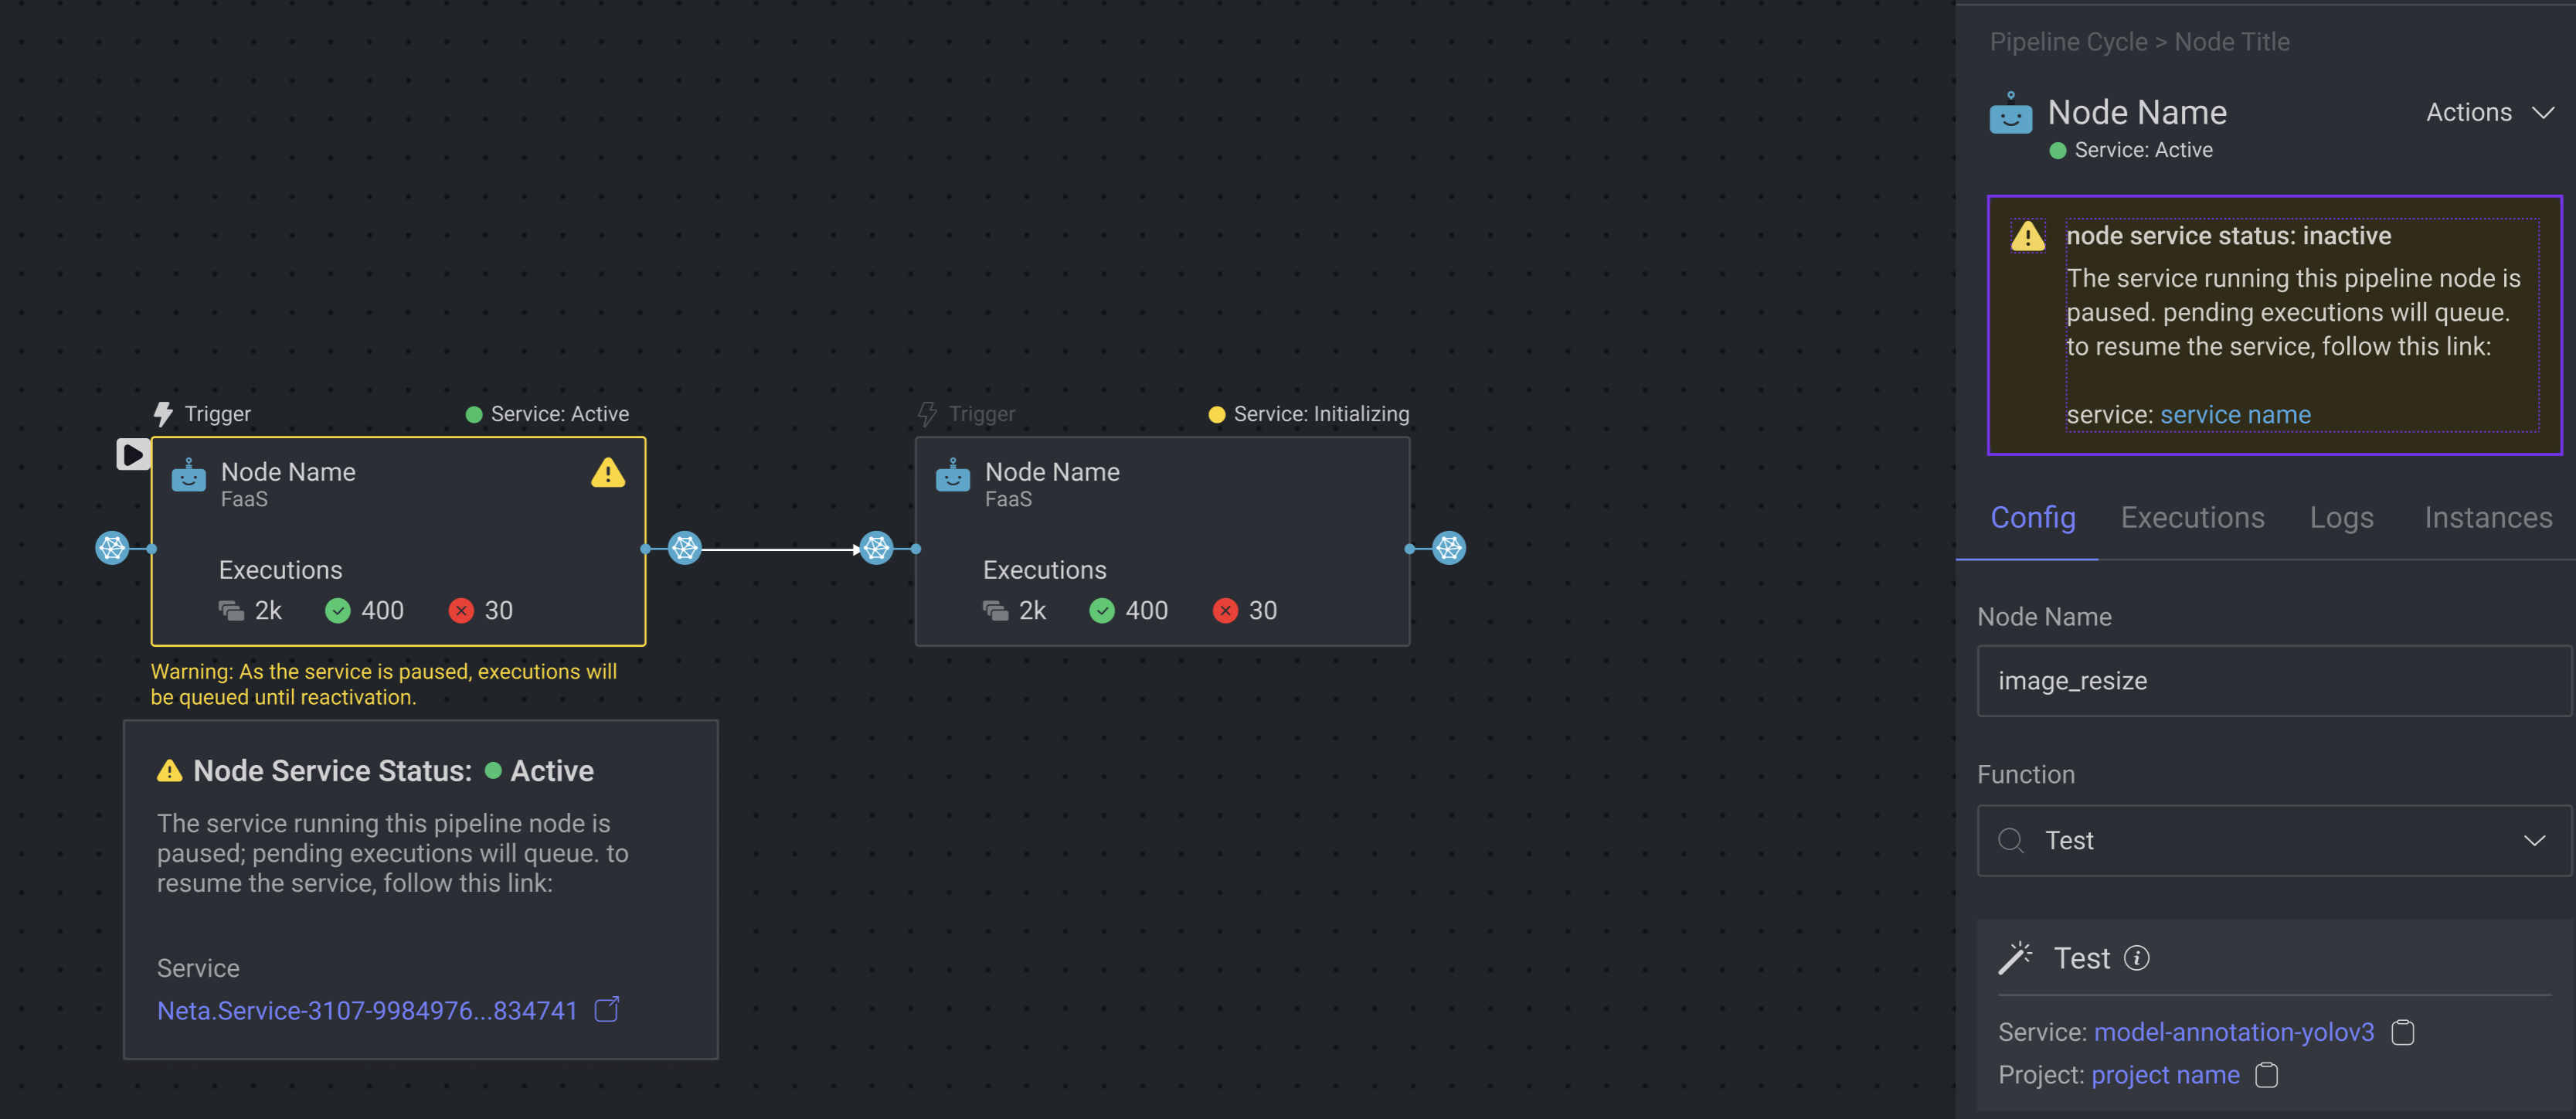
If the service is part of a pipeline, the alert will also appear in the Pipeline UI.
Open a Service Page
You can either click on the service name from the CloudOps > Services tab or, follow the steps:
Open CloudOps from the left-side menu.
Select the service from the list. A right-side panel will be displayed.
Click on the Service Actions.
Select Open Service Page from the list. It opens the Monitoring tab of the service page. Read more
Open VS Code
It allows you to open the VS Code page and allows you to debug application services.
Open CloudOps from the left-side menu.
Select the service from the list. A right-side panel will be displayed.
Click on the Service Actions.
Select Open VS Code from the list. Read more
Add Triggers to Services
Adding a trigger to a service enables the automation of specific functions based on defined events. The available functions are entirely dependent on the type of application the service belongs to. Multiple triggers can be configured for a service based on the functions with custom filters (e.g., specific folders, file types), giving users flexible configuration options. For example:
In the YOLOX application, triggers can automate actions such as
Evaluate Model,Predict Model,Train Model, andPredict Dataset.In contrast, the Scoring & Metrics application offers functions like
Create Task Item Score,Consensus Agreement,Create Model Item Score, andModel Agreement. Read more
There are two types of triggers you can set:
Event Based Triggers
Event-based triggers are designed to execute a service when specific actions occur within the Dataloop system. It allows you to invoke a function in response to specific system events, using the triggering resource as the function's input.
Triggered by system events such as:
Item creation, update, clone, or deletion
Annotation creation or modification
Dataset or folder activity (e.g., new uploads, structural changes)
Ideal for:
Real-time, reactive automation
Workflows that must respond immediately to data or annotation updates
Add Event Based Triggers
Open CloudOps from the left-side menu.
Select the service from the list. A right-side panel will be displayed.
Click on the Service Actions.
Select Add Trigger from the list. The Edit Service panel is displayed.

Trigger Name: Enter a trigger name. By default, a trigger name based on the service name is displayed.
Function: Select a function from the available list for the trigger to execute it. The available functions are entirely dependent on the type of application the service belongs to. If the function has “item” input, then “item” will be the default value in the resource field.
Trigger Type: Select Event. The Event based and Cron based triggers are available. If function inputs are not supported by event triggers, then cron trigger will be the default selection, and you cannot select “event” trigger.
Resource: Select an entity type from the list. Event triggers support only the following types of function inputs: Item, Dataset, Model, Task, Assignment, and Annotation. Refer to the following table for more details.
Resource Filter (Optional): Select an entity type from the list Item, Item Status, Model, etc. Event triggers support only the following types of function inputs: Item, Dataset, Model, Task, Assignment, and Annotation.
Any Item: The trigger applies to any item.
Filtered Items: Set criteria (DQL filter) in Query Editor to target specific resources or events, ensuring the trigger responds only to these specified conditions. Also, select a saved filter from the dropdown.
Events: Select the event (update, create, delete, clone, etc.) that will trigger the function for the selected resource.
Click Save Changes. The newly created trigger will be added to trigger list.
Resource Type | Available Events |
|---|---|
Item |
|
Dataset |
|
Annotation |
|
Item Status |
Option to enable this trigger on every occurrences. |
Task |
|
Assignment |
|
Model |
|
Cron Based Triggers
Cron-based triggers allow you to run a service on a fixed schedule.
Key characteristics:
Time-based execution: Runs automatically at defined intervals (e.g., hourly, daily, weekly).
Ideal use cases:
Daily model retraining
Hourly data scans
Periodic clean-up or maintenance tasks
Configuration: Uses standard CRON expressions to define the schedule.
Add Cron Based Triggers
Open CloudOps from the left-side menu.
Select the service from the list. A right-side panel will be displayed.
Click on the Service Actions.
Select Add Trigger from the list. The Edit Service panel is displayed.
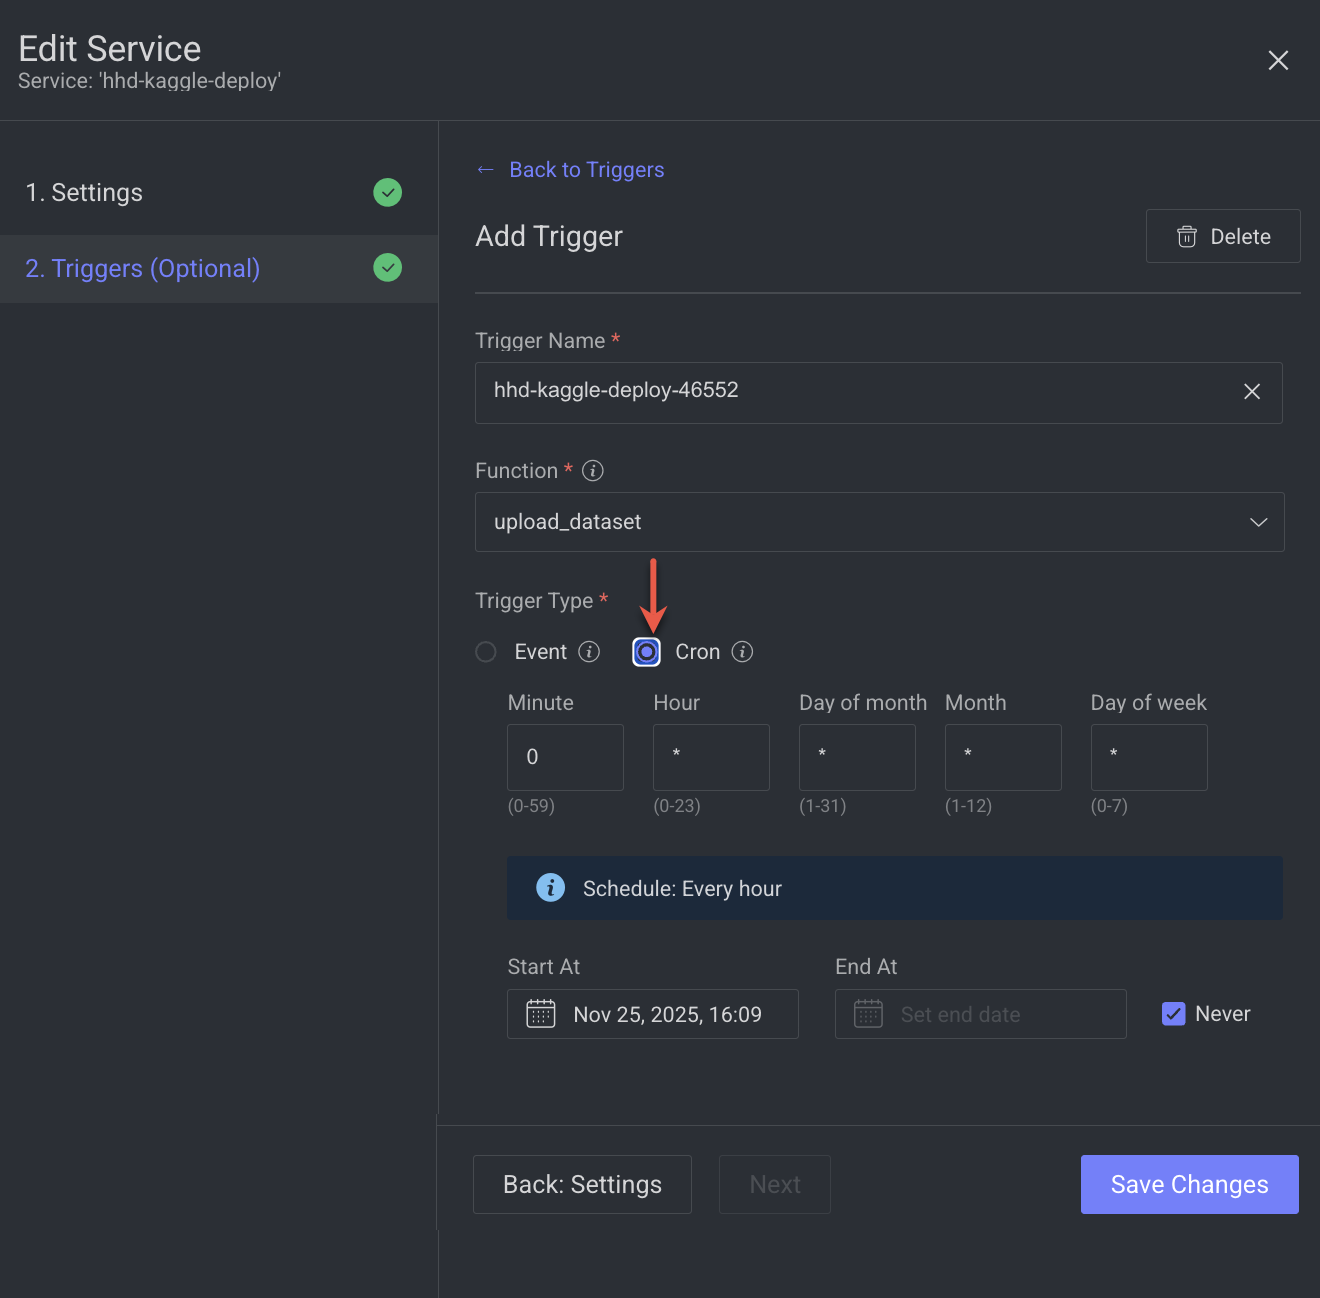
Trigger Name: Enter a trigger name. By default, a trigger name based on the service name is displayed.
Function: Select a function from the available list for the trigger to execute it. The available functions are entirely dependent on the type of application the service belongs to. If the function has “item” input, then “item” will be the default value in the resource field.
Trigger Type: Select Cron. The Event based and Cron based triggers are available. If function inputs are not supported by event triggers, then cron trigger will be the default selection, and you cannot select “event” trigger. It allows you to schedule the selected function to run at specific times by using a cron expression to define the execution intervals. Enter a specific schedule by using the cron expressions.
Set the schedule as per the below format.
Cron expressions format
Value | Schedule |
|---|---|
0 * * * * | Every hour |
*/15 * * * * | Every 15 mins |
0 */2 * * * | Every 2 hours |
0 18 * * 1-6 | Every week Mon-Sat at 6pm |
10 2 * * 6,7 | Every Sat and Sun on 2:10am |
0 0 * * 0 | Every Sunday midnight |
For example,
Minute | Hour | Day of Month | Month | Day of Week |
|---|---|---|---|---|
0 | */2 | * | C* | * |
Result is Schedule: At 0 minutes past the hour, every 2 hours.
Start At: The current date is displayed by default. Select a start date to set a time frame for the cron event.
End At: This option is disabled by default, so there is no end date. To select an end date, uncheck the Never checkbox.
Click Save Changes.
Activate UI Slots
It allows you to activate the UI button to enable you to invoke and execute the functions from different places in the platform. You can activate UI slots only if the function has UI slots.
Open CloudOps from the left-side menu.
Select the service from the list. A right-side panel will be displayed.
Click on the Service Actions.
Select the Activate UI Slots from the list. Read more
Open GitHub Code
It allows you to open the GitHub Code reference for the selected model. It will be unavailable if there is no fixed model selected.
Open CloudOps from the left-side menu.
Select the service from the list. A right-side panel will be displayed.
Click on the Service Actions.
Select the Open GitHub Code from the list. It opens the respective GitHub repository.
View Service Audit Logs
It allows you to view the Audit Logs page related to your service.
Open CloudOps from the left-side menu.
Select the service from the list. A right-side panel will be displayed.
Click on the Service Actions.
Select the View Audit Logs from the list. The Audit Logs page is displayed.
Delete Services
It allows you to uninstall the service. Deleting a service may have unintended implications for related objects including pipelines, UI slots, etc.
Open CloudOps from the left-side menu.
Select the service from the list. A right-side panel will be displayed.
Click on the Service Actions.
Select the Delete Service from the list. A confirmation message is displayed.
Click Yes to delete the service.