Tools
Labeling tools help you annotate items according to your project’s requirements. DDOE’s recipes provide a variety of tools tailored to different data types — such as images, audio, video, and text — allowing you to choose the most suitable option for your task.
When you create a label in your recipe, all tools are selected by default. You can customize this selection to match your needs. Once specific tools are chosen, they will be available in the Annotation Studio exactly as configured in the recipe.
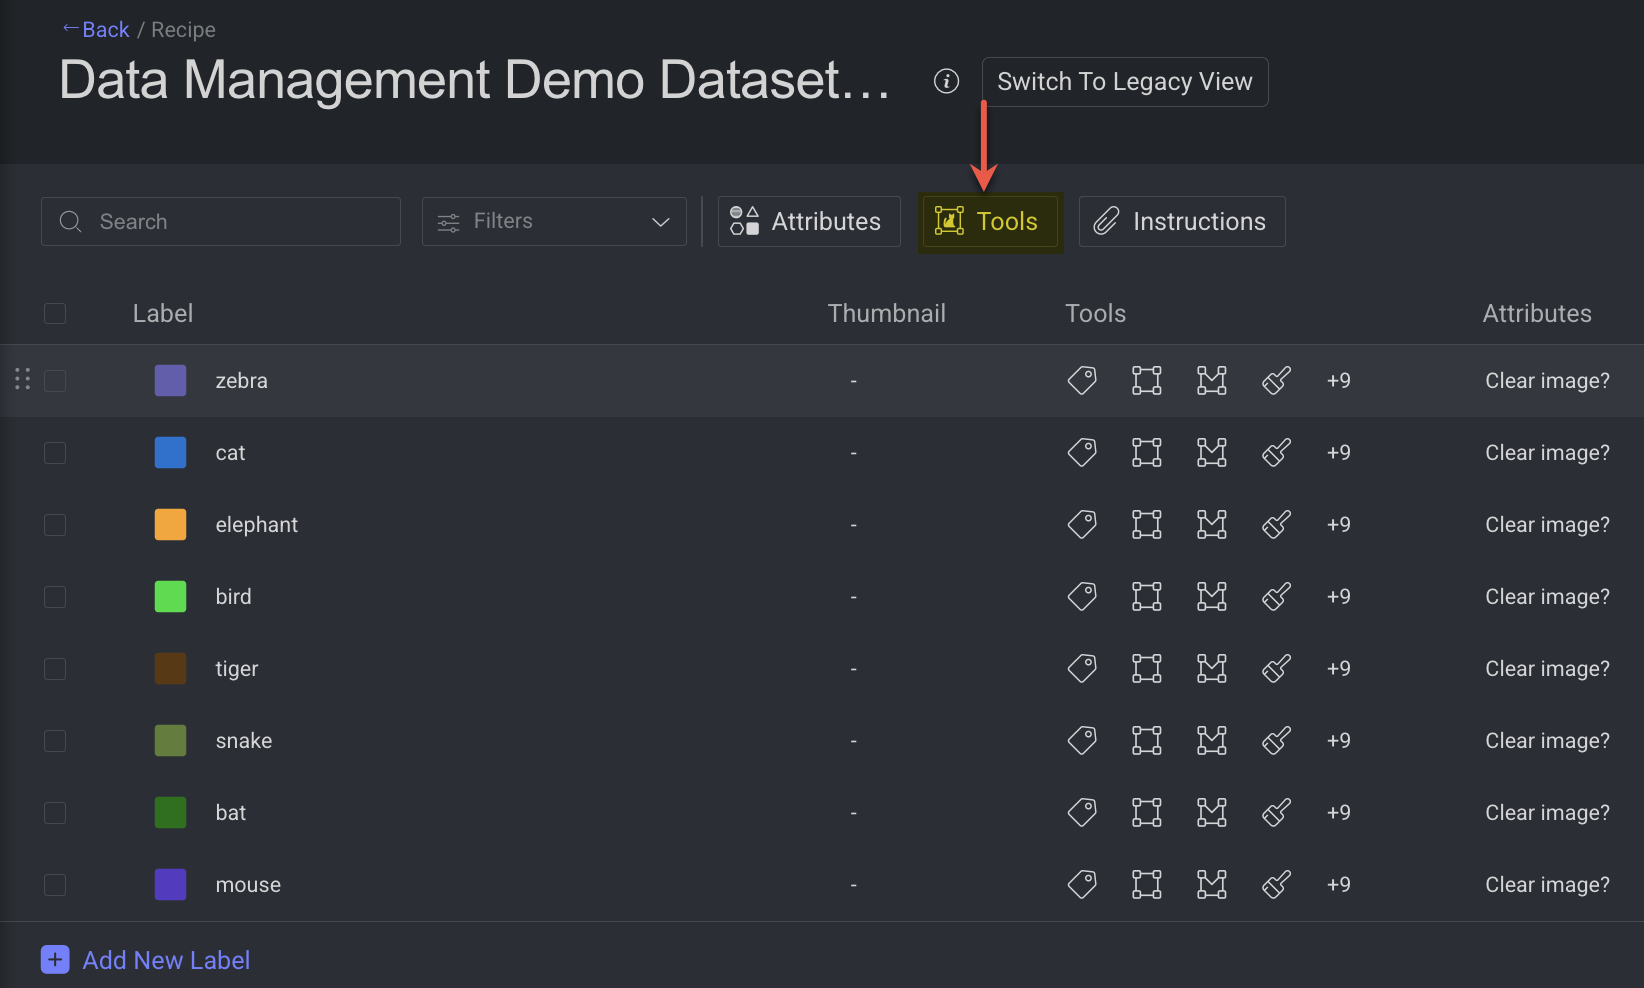
Configure Annotation Tools
By default, Tools are available for all the labels and enabled.
Go to the Recipes section.
Find and open the recipe.
Select the Tools button.
In the Tool Management, identify the tool from the list and make the following changes:
Labels: Choose list of labels from the list where this tool should be able to use.
Enable or disable: Enable if this tool must be available for the selected recipe.
Tool Settings: Only specific tools will have this option to set more advanced settings. For example, Bounding box, etc.
Click Done to close the window.
Click Save to save the changes.
Configure Tools for a Label
By default, Tools are available for all the labels and enabled.
Go to the Recipes section.
Find and open the recipe.
Find the label and click on tools column. A dropdown panel is displayed.
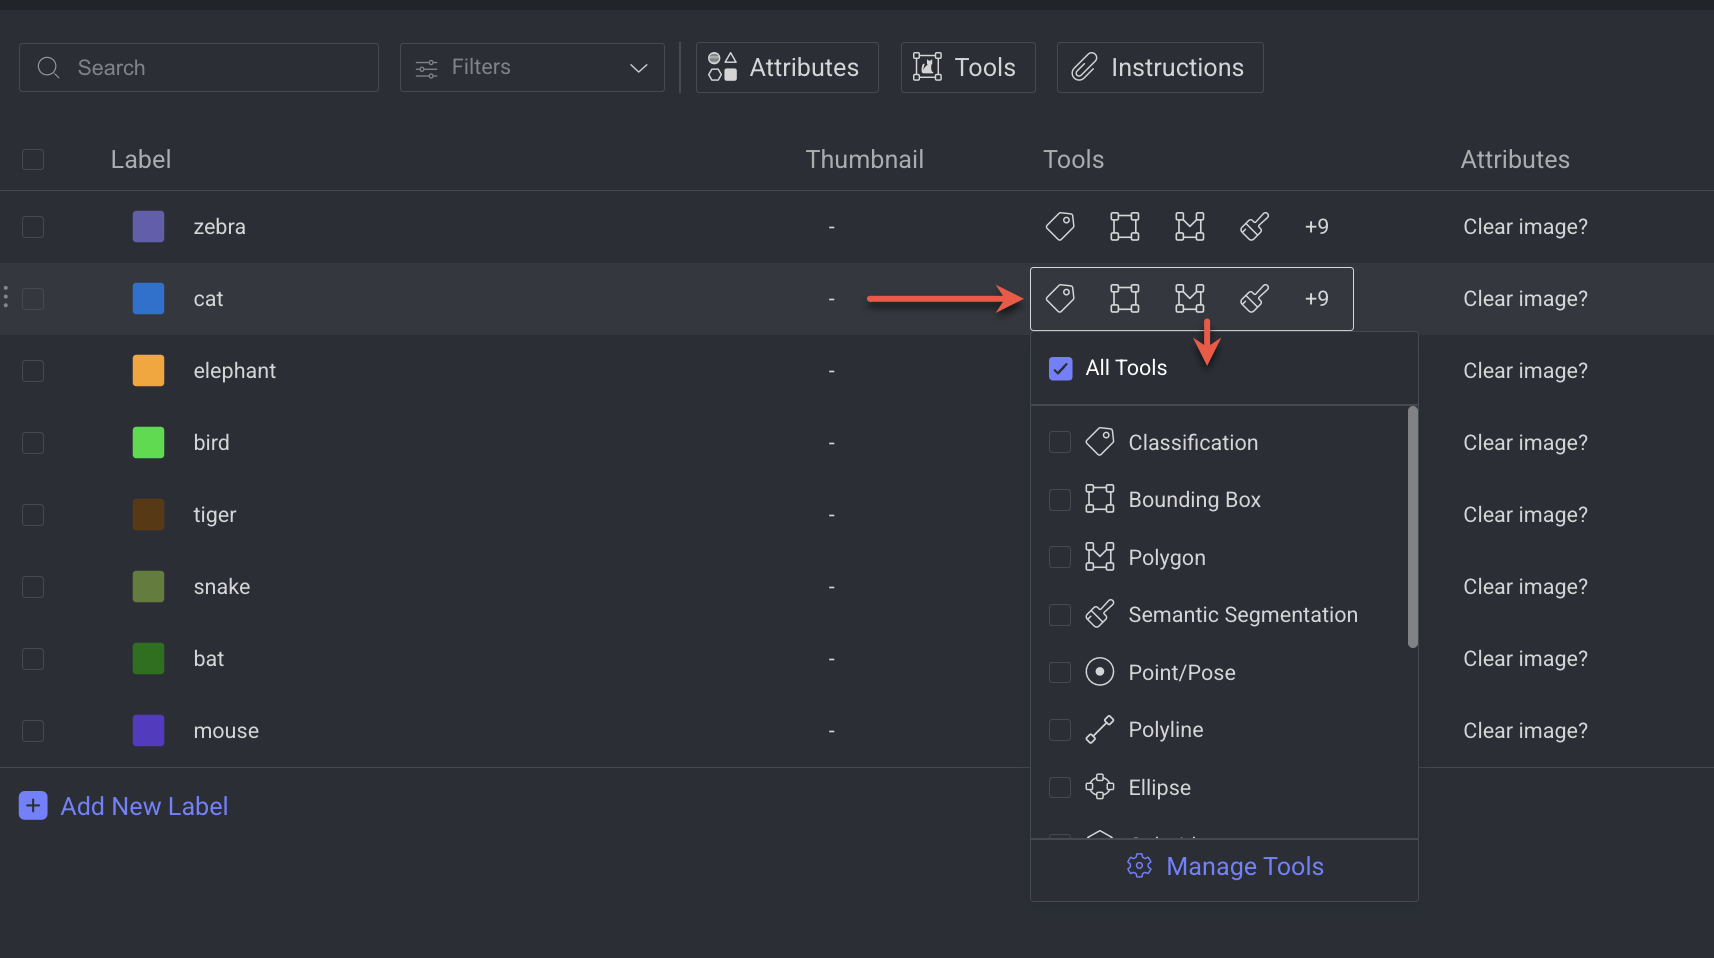
Select or deselect required tools from the list. If you need more options, click Manage Tools. The Tool Management page is displayed.
In the Tool Management, identify the tool from the list and make the following changes:
Labels: Choose list of labels from the list where this tool should be able to use.
Enable or disable: Enable if this tool must be available for the selected recipe.
Tool Settings: Only specific tools will have this option to set more advanced settings. For example, Bounding box, etc.
Click Done to close the window.
Click Save to save the changes.
Tools List and Settings
Configure and customize annotation tools for different data types, enabling or disabling specific features to match your project’s labeling requirements.
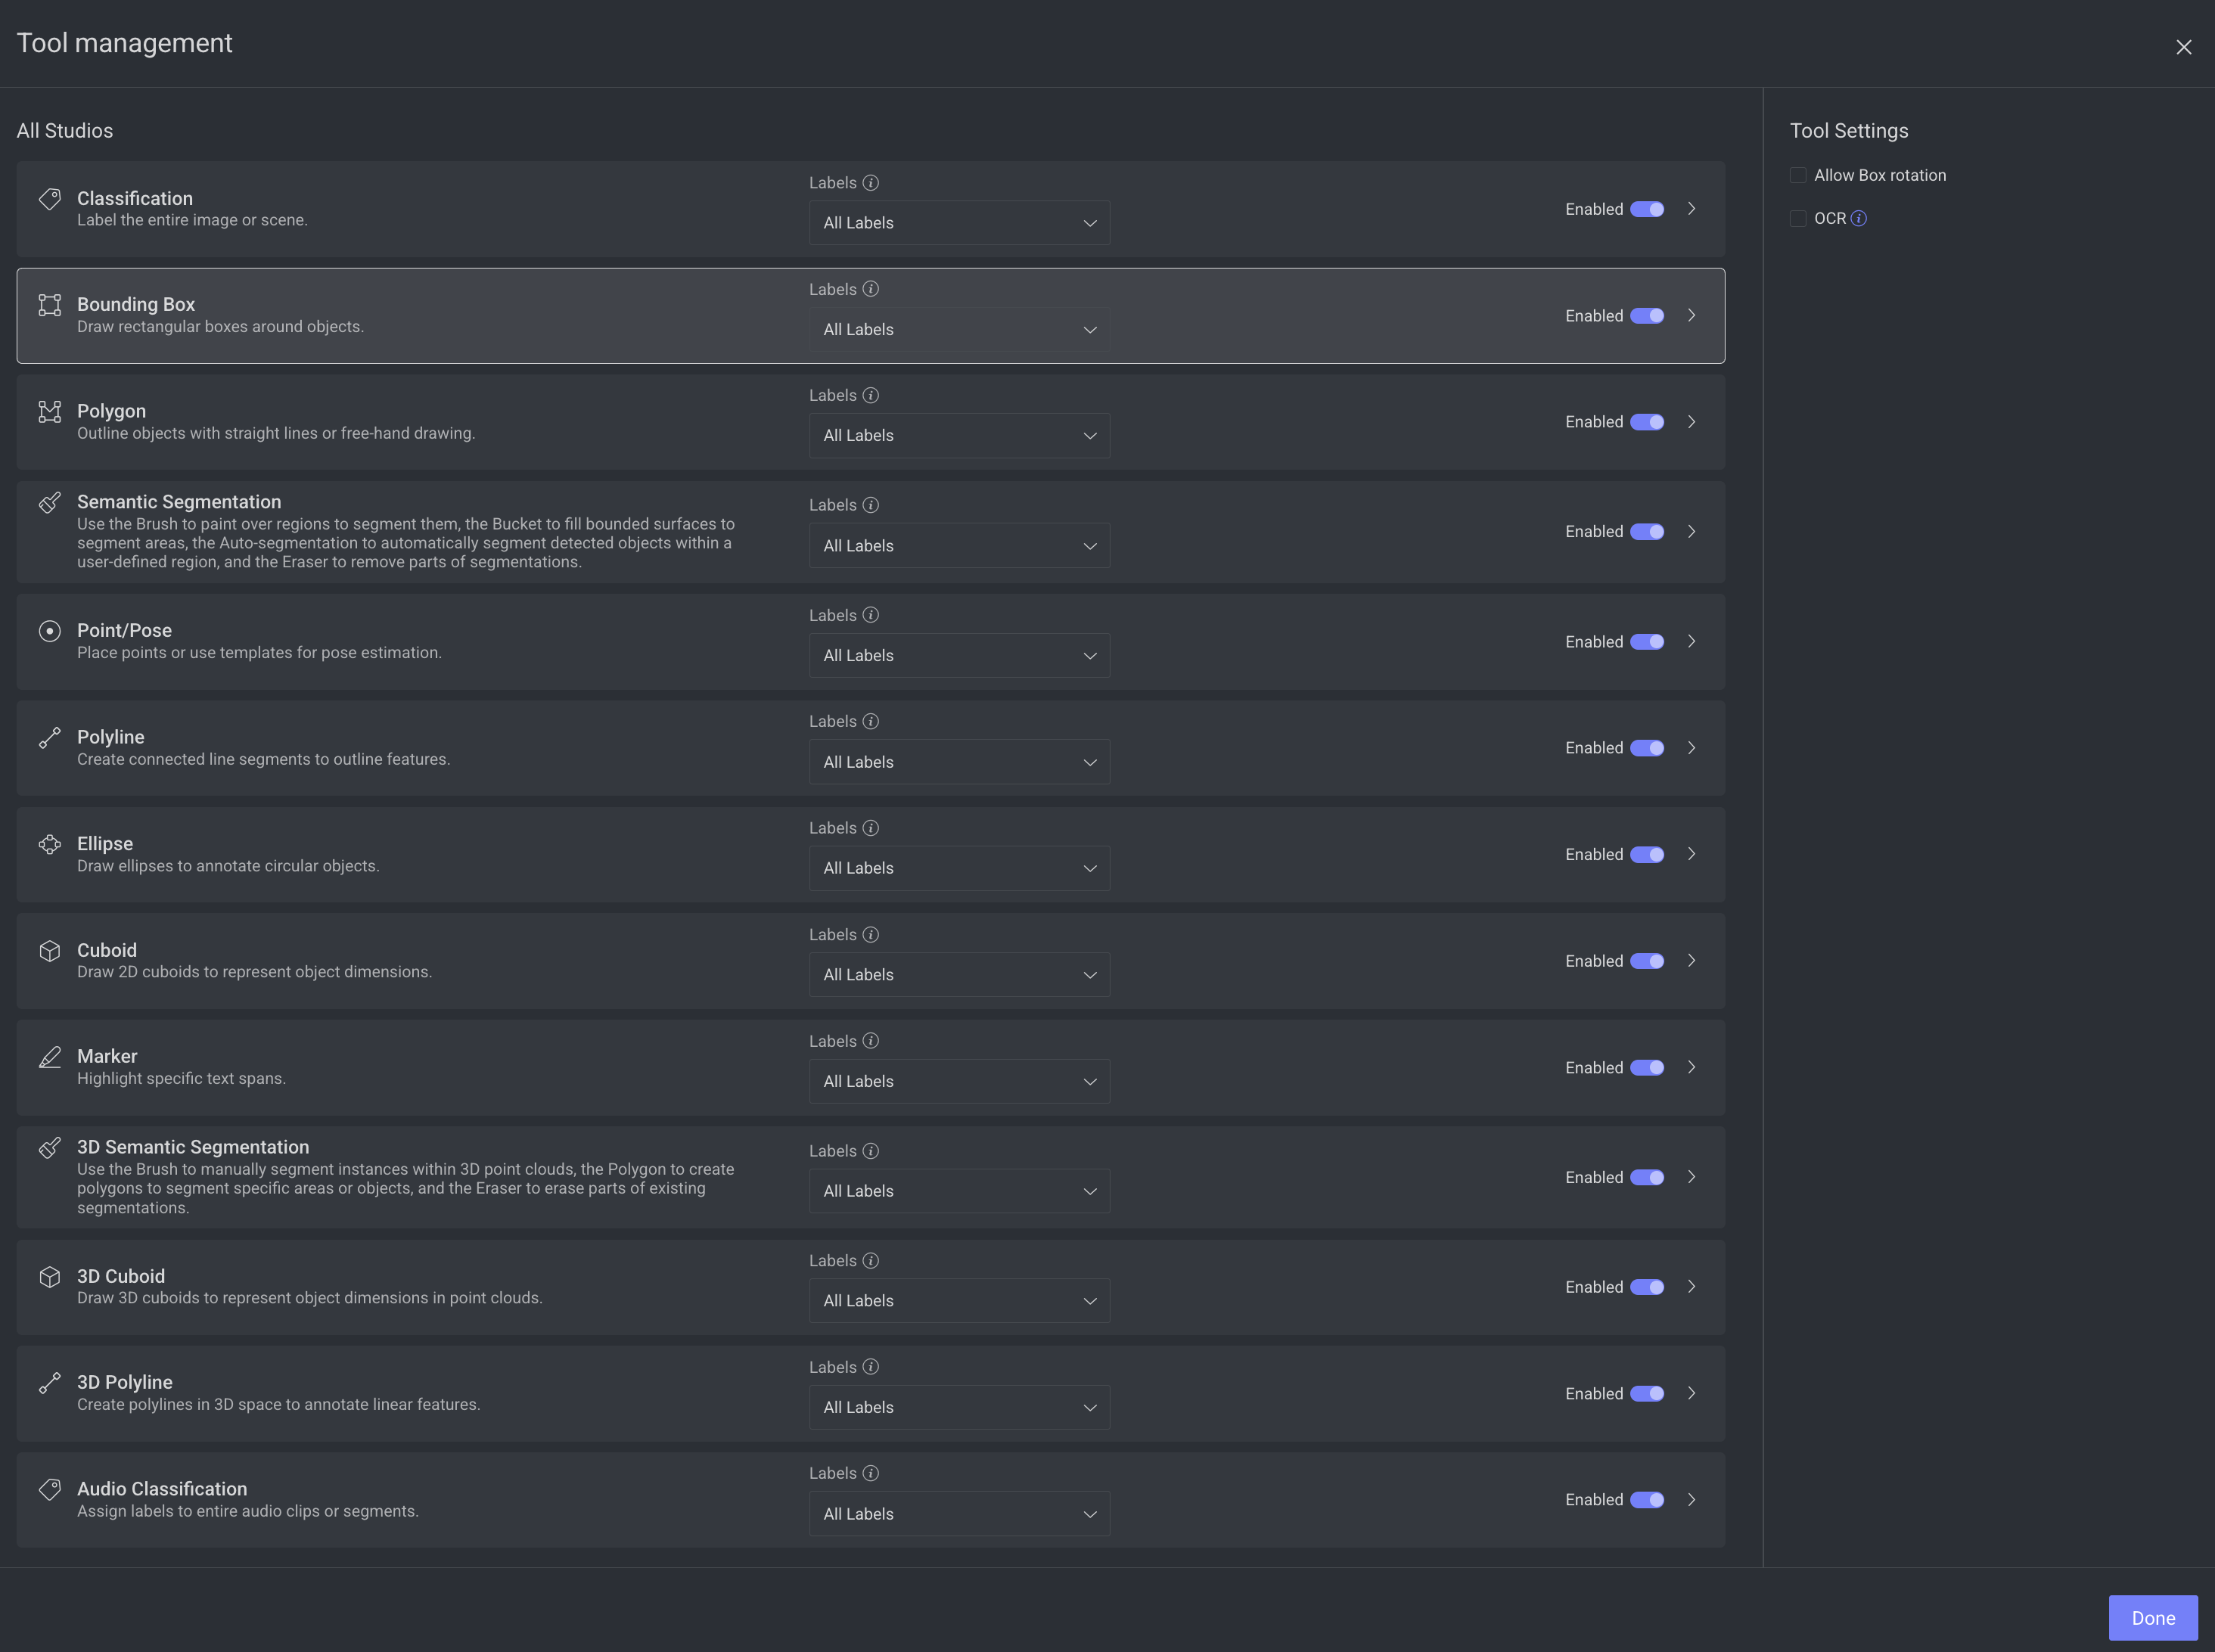
By default, Tools are available for all the labels and enabled.
Tool Name | Tool Settings |
|---|---|
Classification | - |
Bounding Box |
|
Polygon |
|
Semantic Segmentation |
|
Point / Pose | Pose Templates: Standardize and expedite pose annotations in images or videos by providing predefined point structures, ensuring consistent labeling of complex forms like human bodies. Create New Templates. |
Polyline |
|
Ellipse | - |
Cuboid |
|
Marker | - |
3D Semantic Segmentation | - |
3D Cuboid | - |
3D Polyline | - |
Audio Classification | - |
Create Pose Templates
Standardize and expedite pose annotations in images or videos by providing predefined point structures, ensuring consistent labeling of complex forms like human bodies.
Open the Recipes from the left-side menu.
Click on the recipe to open it.
Select the Tools button.
Select the Point / Pose tool from the list.
Click Create New Template from the right-side panel. The Create Pose Template popup is displayed.
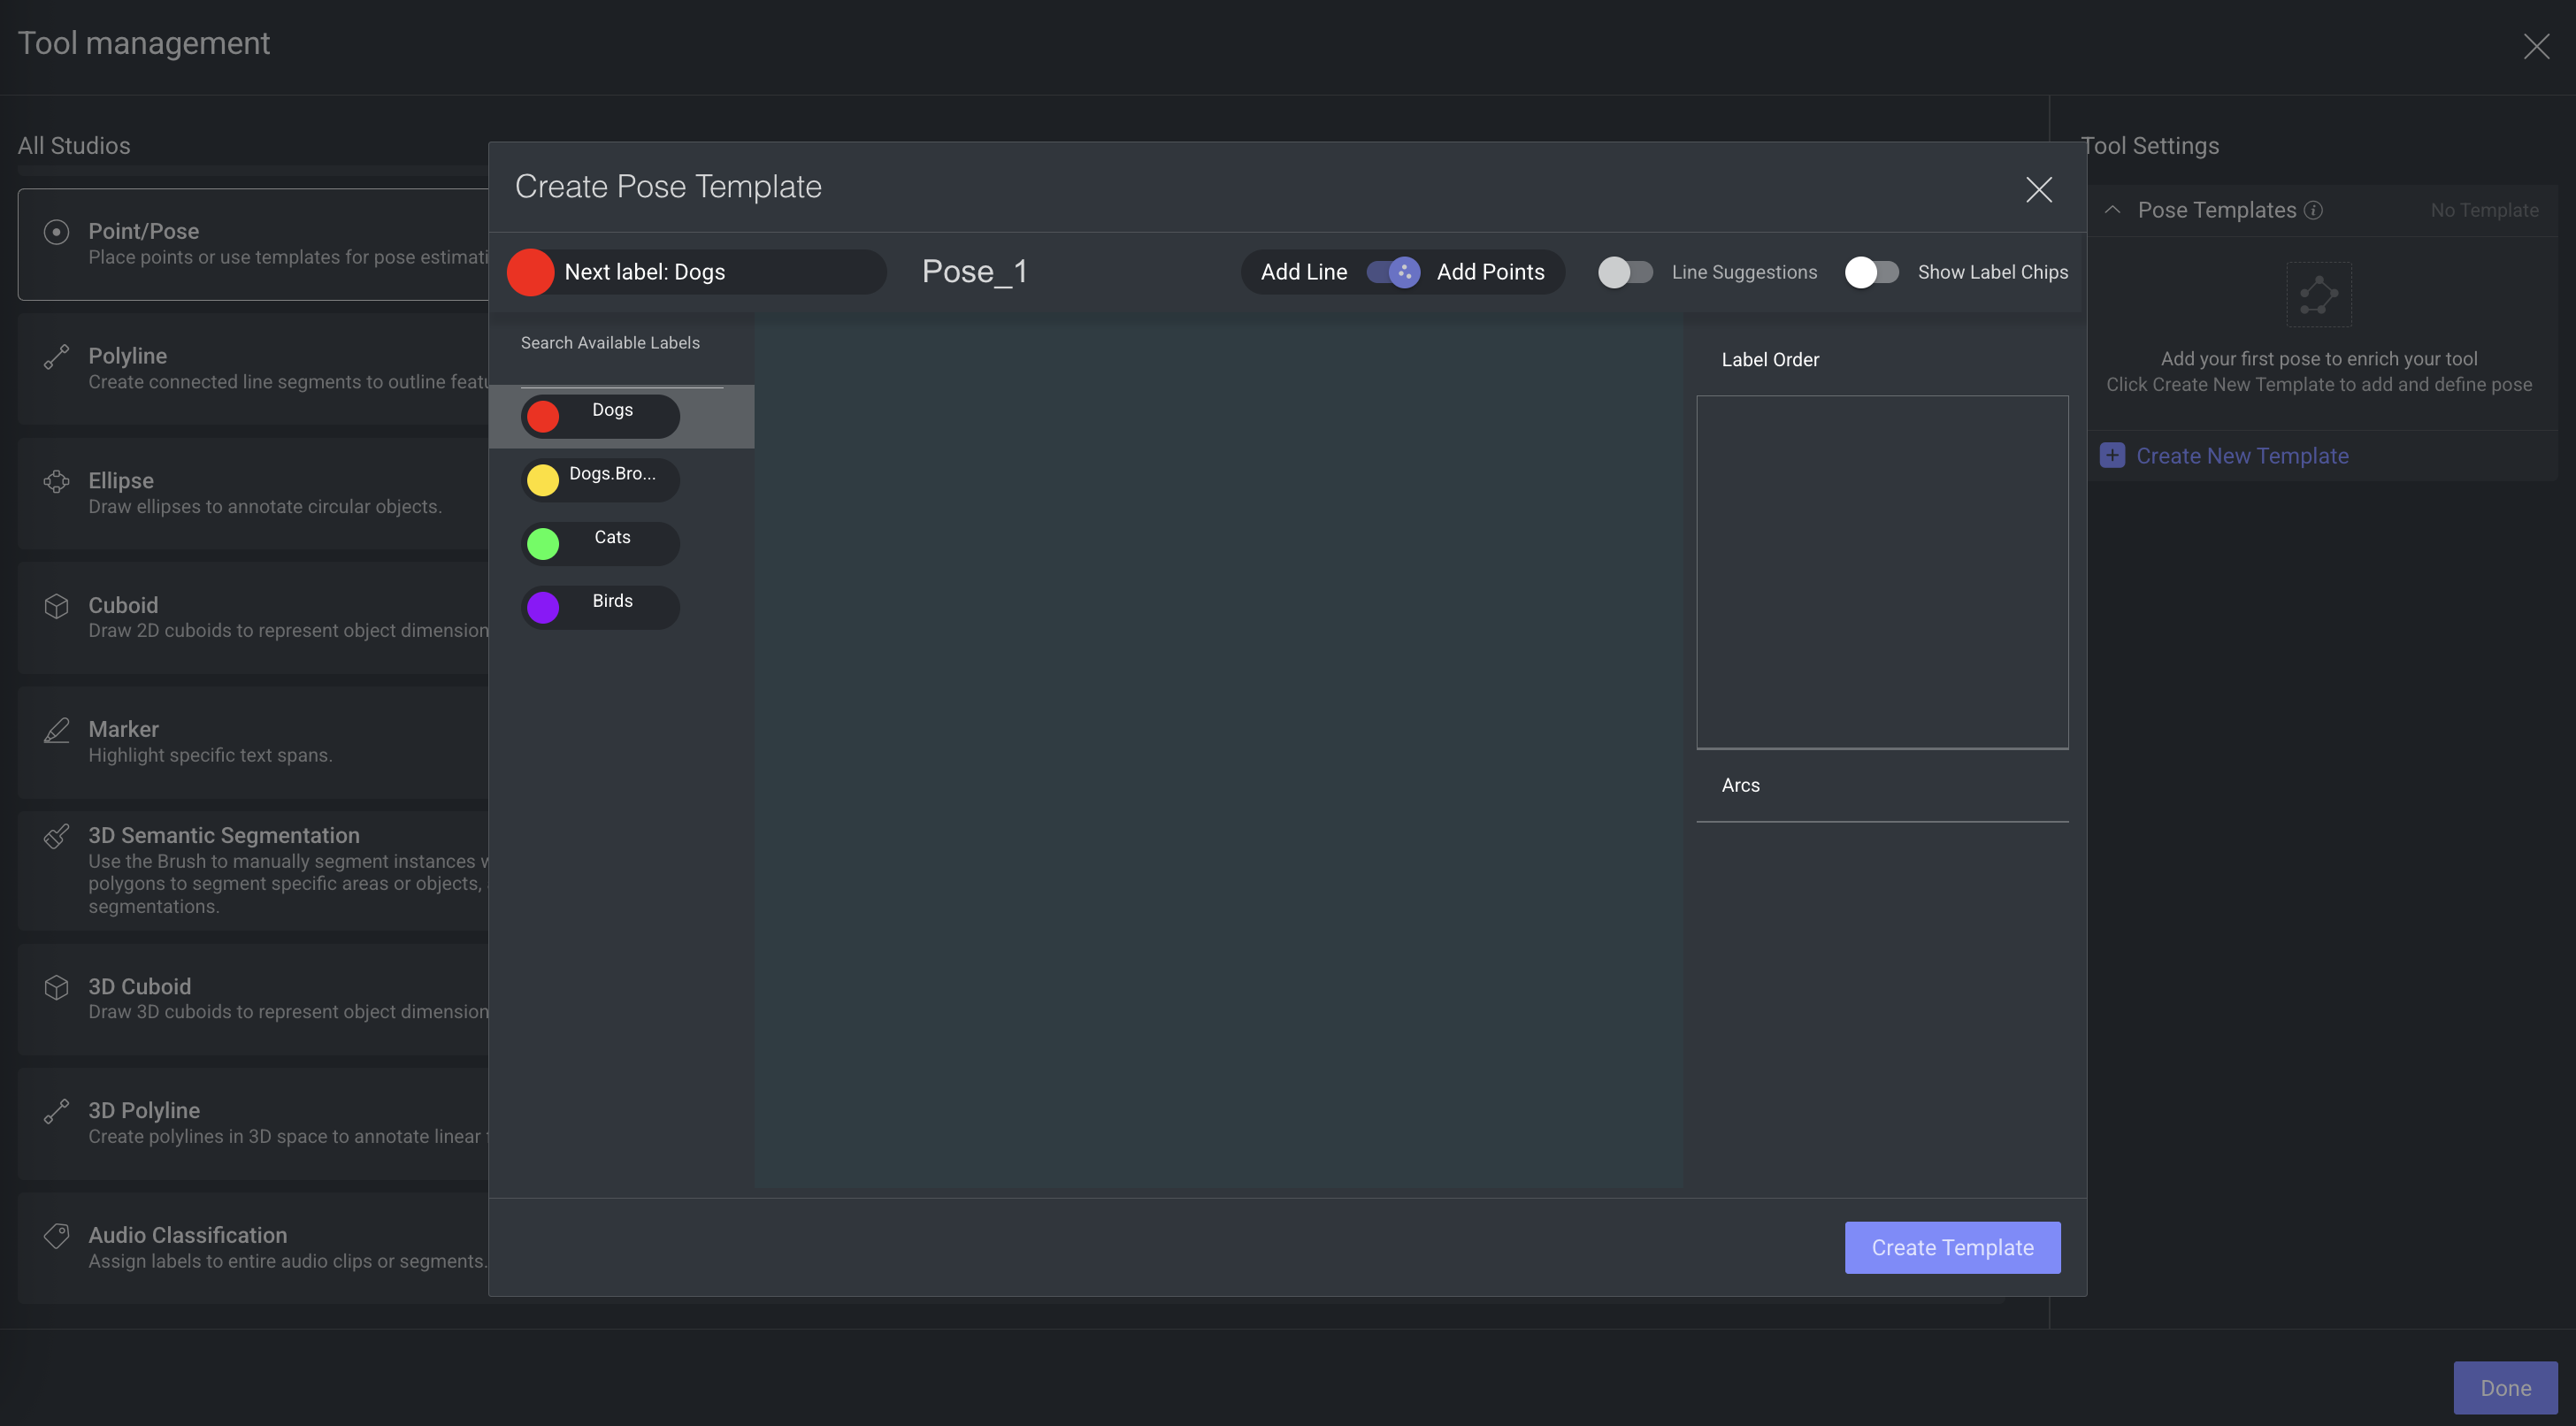
Search or select a label from the left-sde panel.
Click on the Canvas. The selected Label Point is displayed in the canvas and in the Label Order panel on the right-side.
Select the next label perform the above action.
To reorder, select the label from the Label Order panel, and drag and drop as required.
To Delete, double-click on the label in the canvas, or click on X icon next to the label in the label Order panel.
Show label Chips: Enable it to view the Label name as a chip in the canvas.
Add Points: Allows to add labels as points.
Add Line: Allows to add line between two points to show their relation.
Line Suggestions: Allows to provide line suggestion when hover-over between points.
Once complete, click Create Template to save the template.
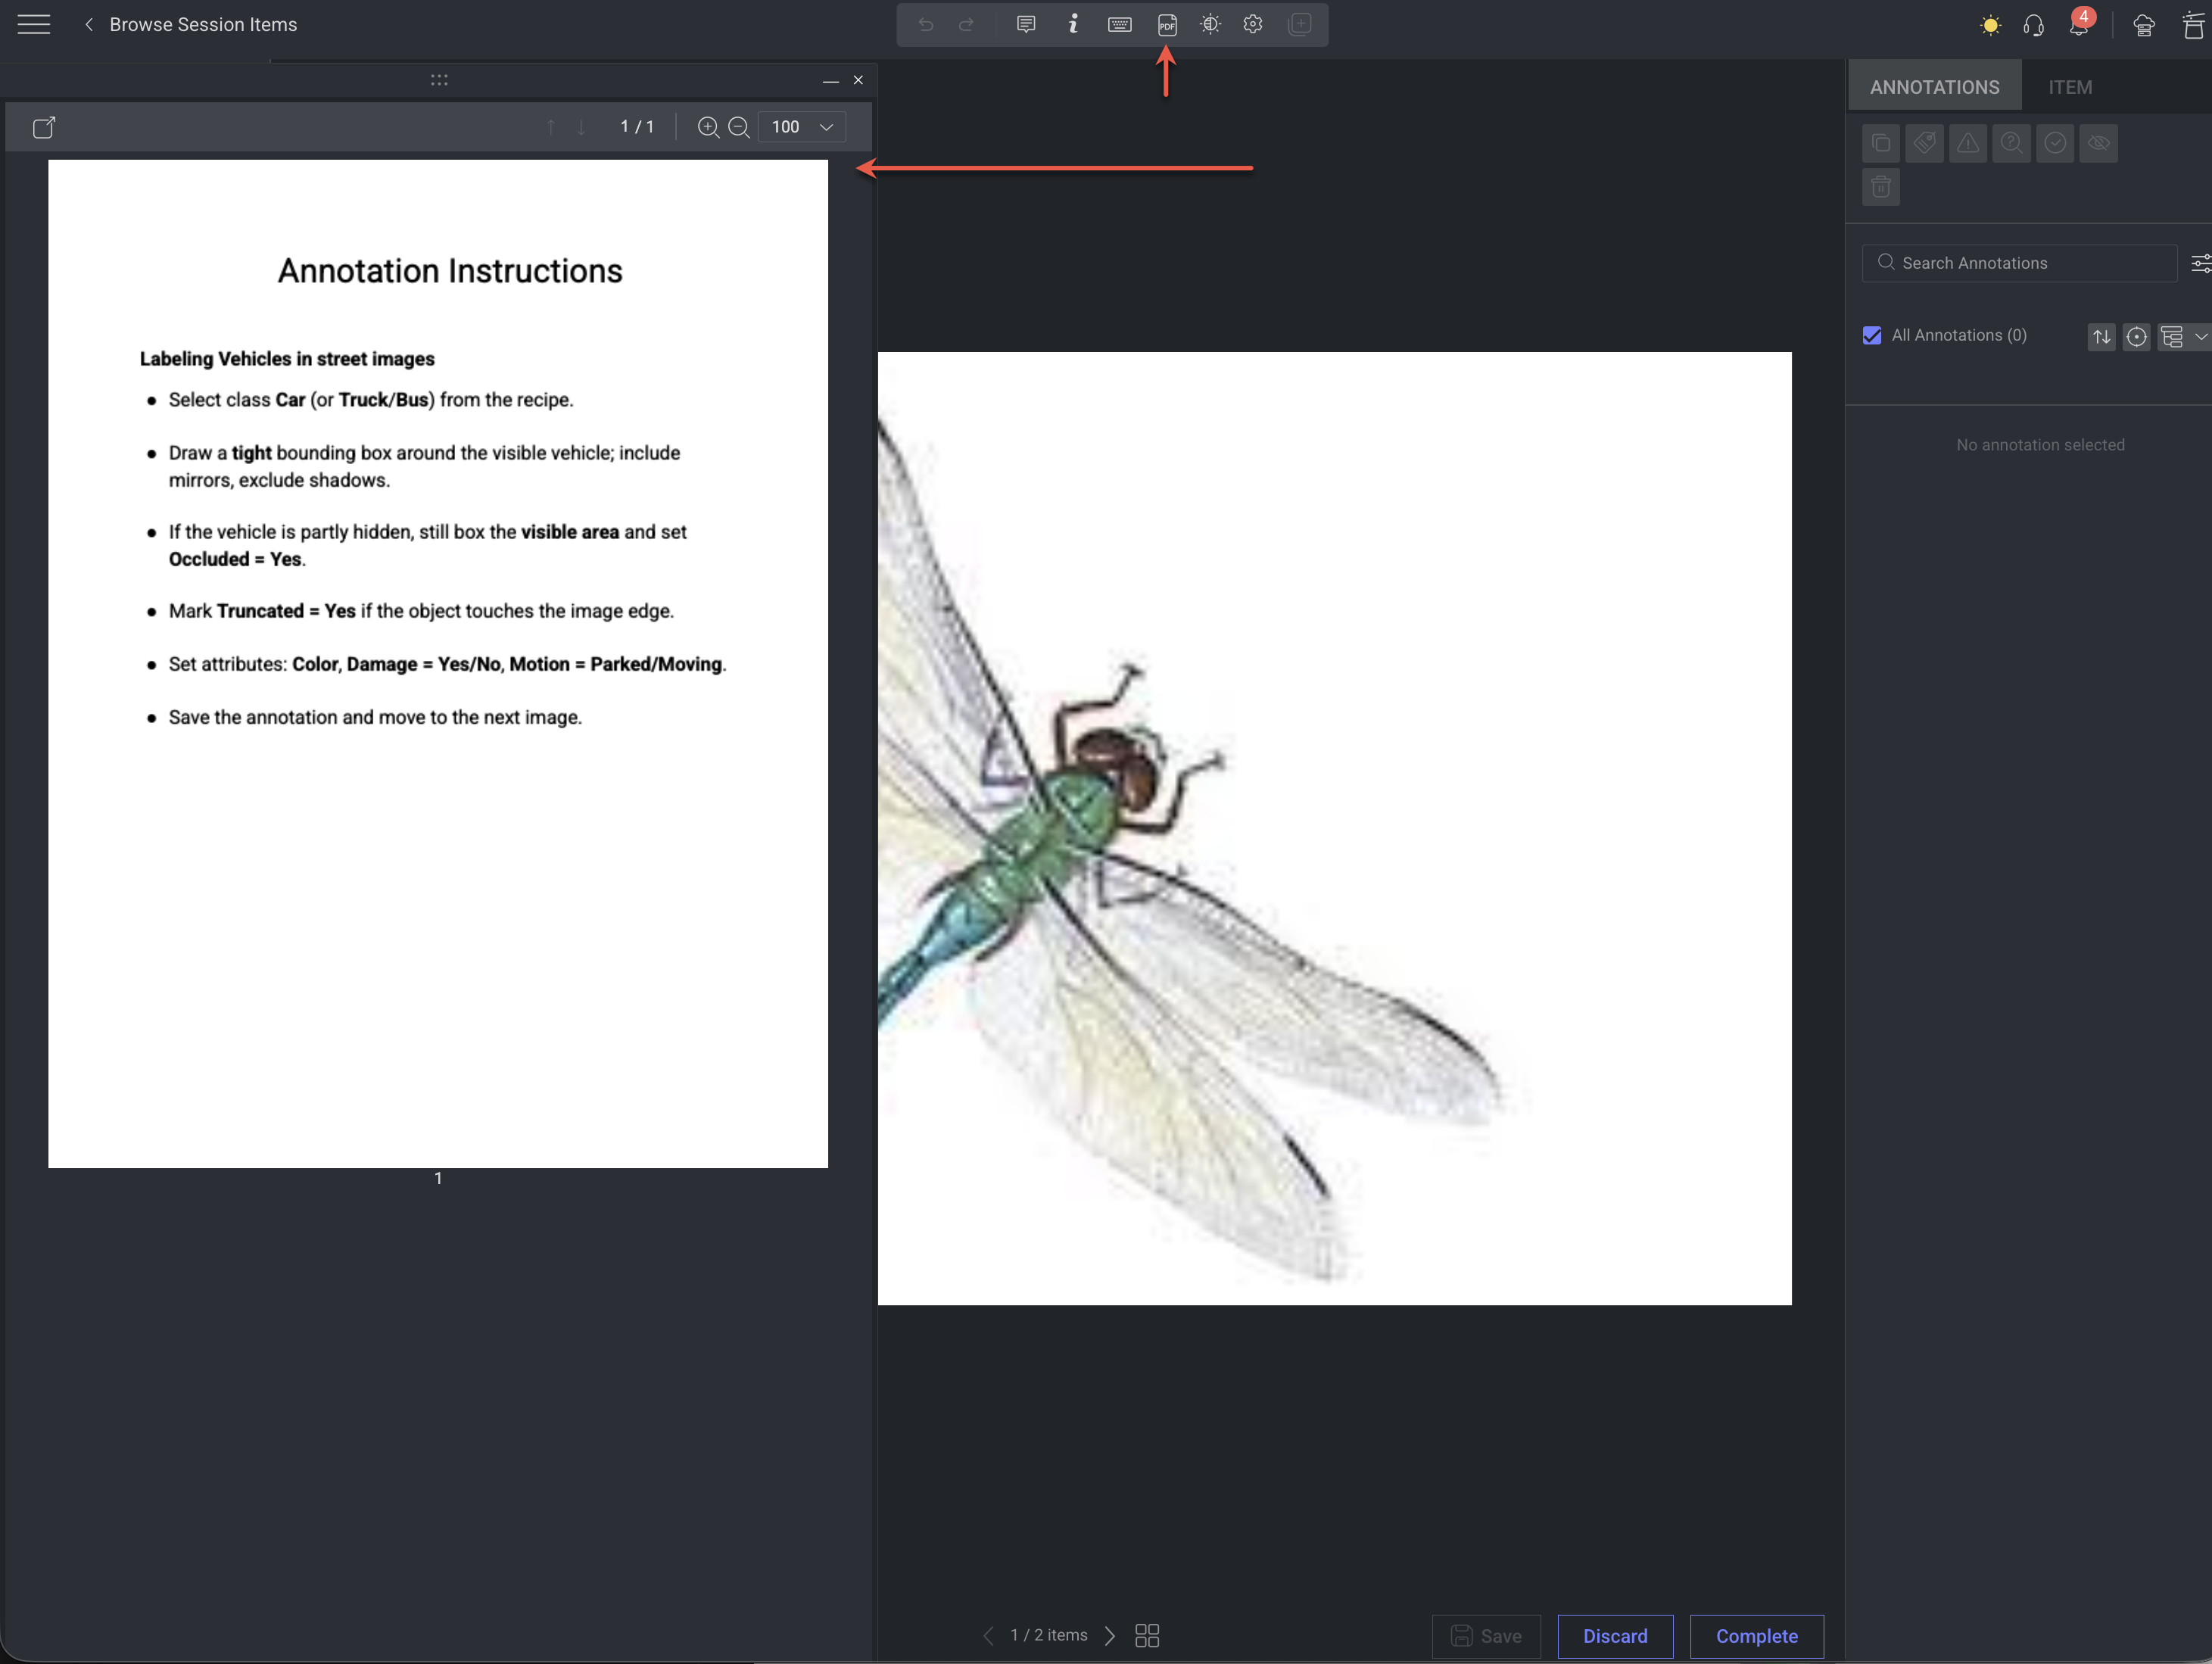
Instructions
Annotation and QA instructions are PDF guides displayed in Annotation Studios. Annotation instructions tell annotators how to label; QA instructions define how reviewers validate results—both ensure consistency.
You can view instructions from the recipe’s Instructions panel or inside the relevant task by opening it in the appropriate studio (Annotation or QA).
If you close the Instructions pane, it won’t stay open when you reopen the task, it’s hidden by default. To display, click on the PDF Viewer.
A preview of instruction is available in the Instructions.
You can reuse instruction PDFs from other recipes in the same project by selecting them from the list.
Editing in annotation studio isn’t supported—update your source document, export to PDF, then upload a replacement.
Upload Annotation Instructions
Provide annotators with a clear PDF guide covering label definitions, tool usage, rules, and examples to ensure consistent, accurate labeling. You can upload and preview this PDF directly in recipe’s Instructions. When creating a Labeling Task, you can choose a specific page range from the PDF to display.
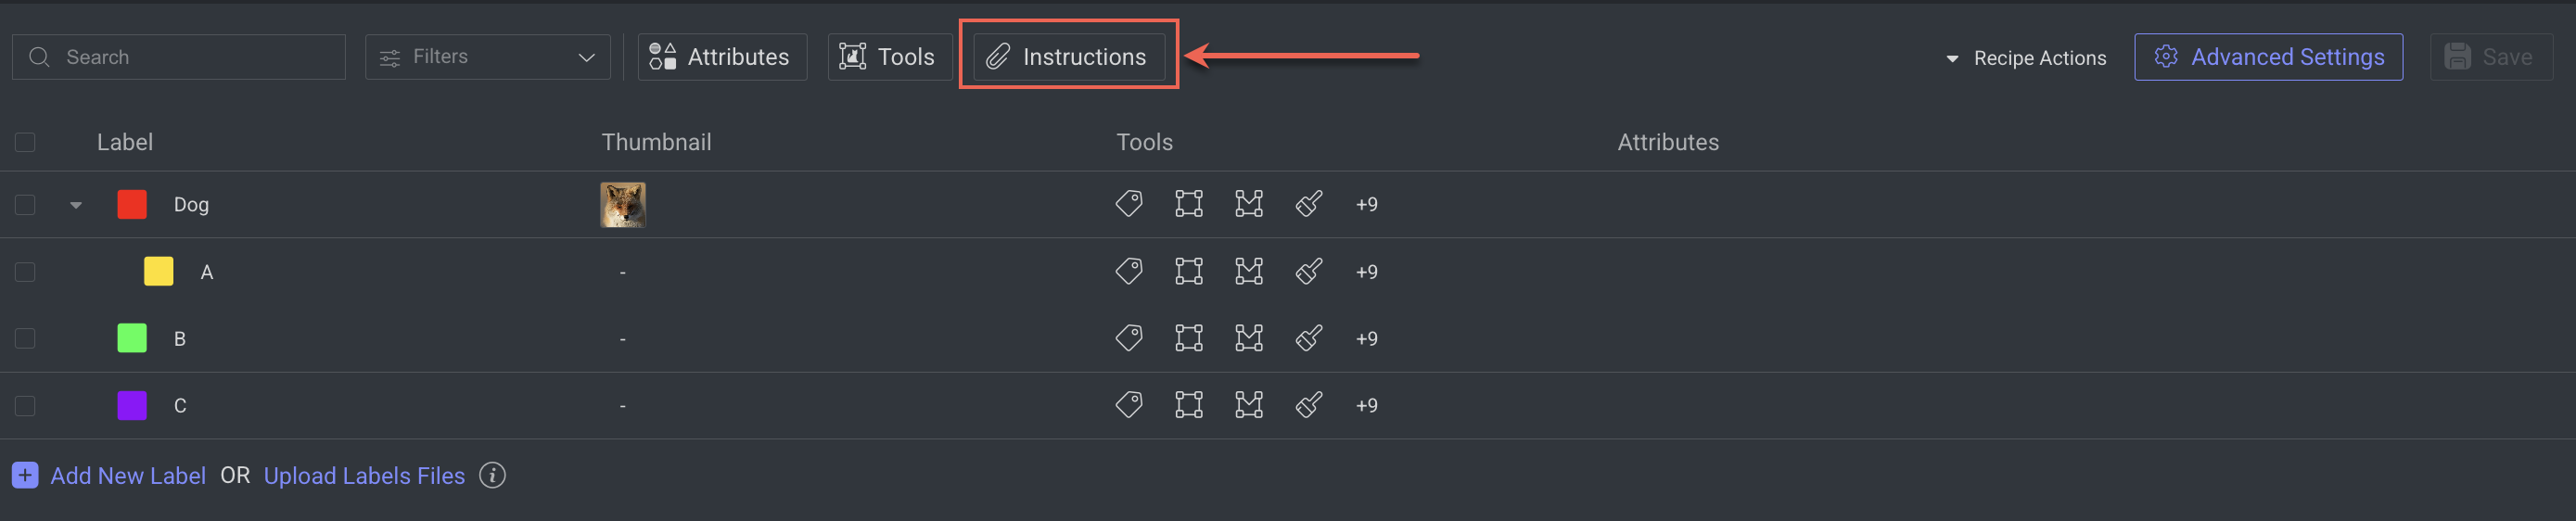
Go to the Recipes section.
Find and open the recipe from the list.
Click Instructions. The PDF Instructions popup panel is displayed.
Click on the Annotation Instructions field, and click Upload PDF.
Select the Instructions PDF and Upload it. The PDF file will be uploaded and a preview of it will be displayed in a tab format.
Delete Annotation Instructions
Go to the Recipes section.
Find and open the recipe from the list.
Click Instructions. The PDF Instructions popup panel is displayed.
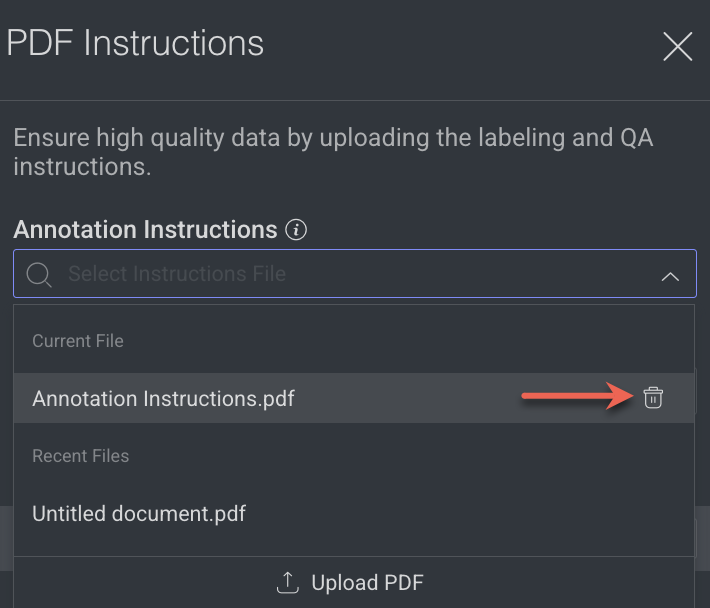
Click on the QA Instructions field, and hover-over the instruction to be deleted. A Trash icon is displayed next to the file name.
Click on the Trash icon to delete the file.
Upload QA Instructions
Offer QA reviewers specific criteria for evaluating annotations, identifying issues, and providing feedback to annotators. With DDOE, you can upload and view your latest QA instructions PDF document directly in the annotation studio.
When you create a QA task, you can select a specific range of pages from the PDF. If there is no QA Instructions PDF document, the annotation instruction PDF document is displayed.
Go to the Recipes section.
Find and open the recipe from the list.
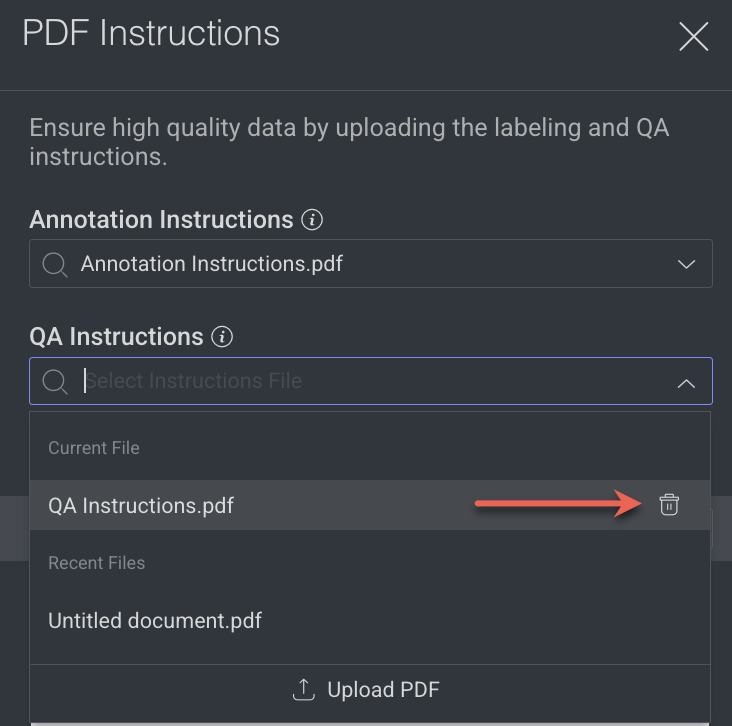
Click Instructions. The PDF Instructions popup panel is displayed.
Click on the QA Instructions field, and click Upload PDF.
Select the Instructions PDF and Upload it. The PDF file will be uploaded and a preview of it will be displayed in a tab format.
Delete QA Instructions
Go to the Recipes section.
Find and open the recipe from the list.
Click Instructions. The PDF Instructions popup panel is displayed.
Click on the QA Instructions field, and hover-over the instruction to be deleted. A Trash icon is displayed next to the file name.
Click on the Trash icon to delete the file.
Use Instructions on Labeling Tasks
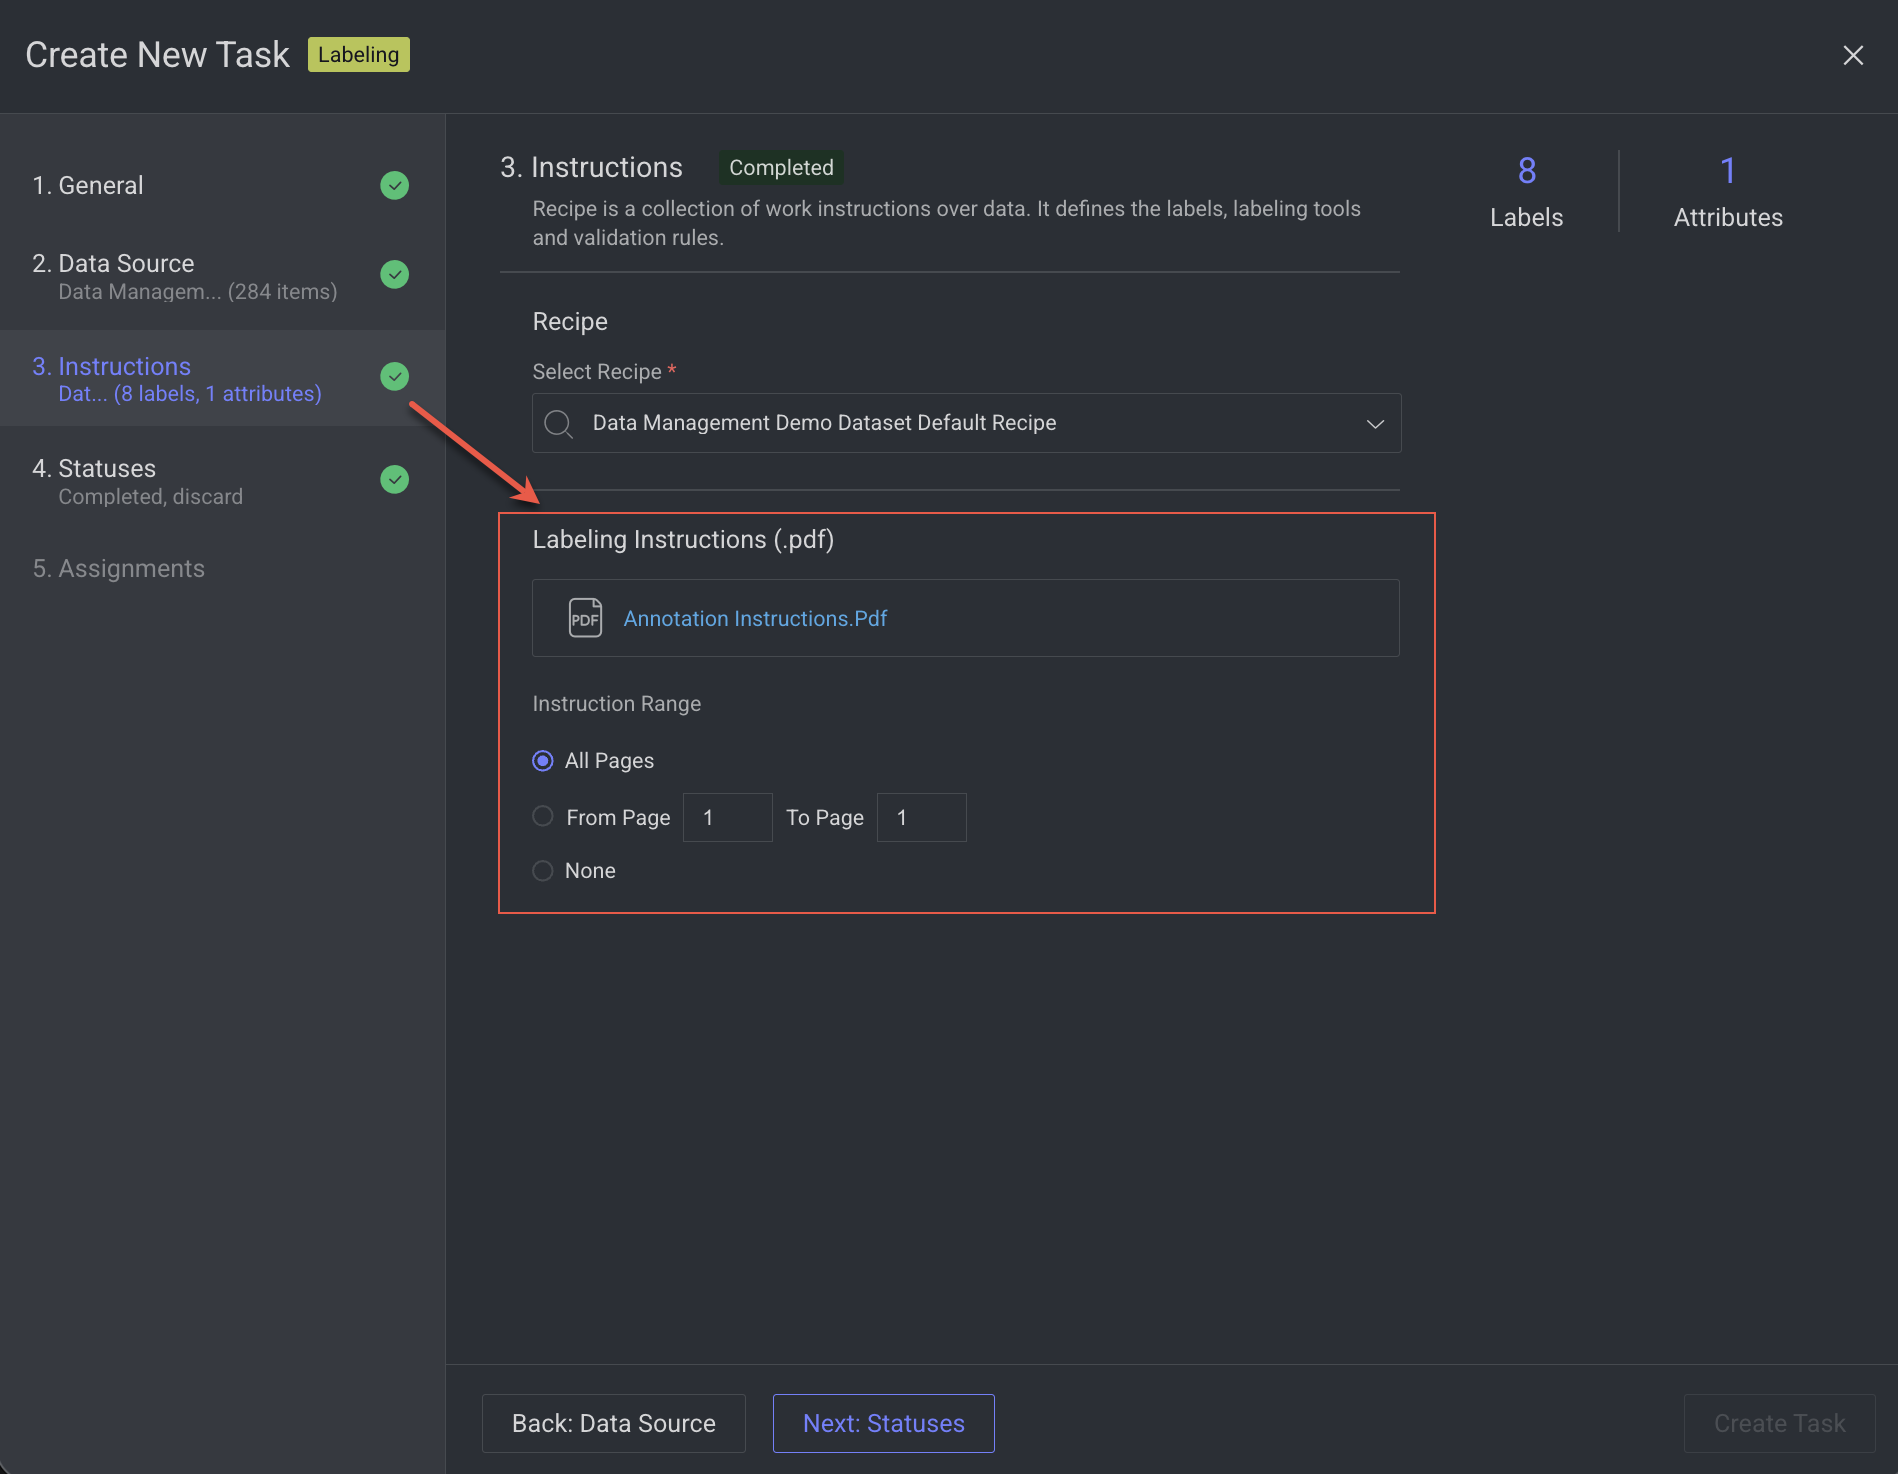
After uploading your Instructions PDF to a Recipe, you can use that recipe when creating labeling or QA tasks.
During task creation, select the recipe containing your uploaded instructions.
Once selected, the linked Annotation Instructions (for labeling tasks) or QA Instructions (for QA tasks) will appear, allowing you to choose a specific page range from the PDF to display in the studio if available.
View Instructions on Studios
You can view instructions from the recipe’s Instructions panel or inside the relevant task by opening it in the appropriate studio (Annotation or QA). If you close the Instructions pane, it won’t stay open when you reopen the task, it’s hidden by default. To display, click on the PDF Viewer.
Note: Annotator will only able to see Annotation Instructions, not QA instructions.