Dataloop’s Video Tool brings pixel-accurate frame annotations to videos, and as such - requires annotation to take place while using the WebM file format.
Challenges
Non-Streamable Video Formats
Currently, there are many video compression formats and video containers. Some are non-streamable and therefore annotators have to wait until the entire video downloads to their browser. Some are loosely encoded and require referencing to a different (previous or later) frame, such as I, P, and B frames.
Time-Based vs Frame-Based
The HTML5 video component (the component browsers used to play video files) is a time-based component, but it lacks the functionality to find a specific frame-by-time specification.
Dataloop bypasses these challenges with the following simple equation:
- Frames = Duration * FPS
- FrameOfSecondX = SecondX * FPS
We recognize that the above equation does not work in the following cases:
FPS changes between seconds
- Videos in which a specific second has one frame, whereas other frames have the average FPS. Usually, these cases can be seen in corrupted videos.
- Videos in which the FPS is unstable and changes between seconds. Frequently, these cases can be seen in live stream/low-quality or re-converted videos.
The number of frames is different from Duration * FPS
- Videos where the start time is negative. Frequently, these are videos that rely on I/P frames that cannot be located in the video (i.e., are not in the 0 seconds to end time range). This can be related to cutting videos into sub-videos with loose encodings, such as MP4.
- Videos where the number of frames written in the header is wrong. This is typically due to bad format conversions.
Also, found that different browsers react differently. Where due to B frames, different browsers start at different frames at the same time.
WebM
To overcome the challenges, and provide frame-accurate annotations, Dataloop endorses converting videos into the WebM-VP8 video compression format.
WebM media file format: The WebM format is an audiovisual media format. It offers a royalty-free alternative format that can be used in HTML5 video and audio elements. The format supports streaming and VP8 coding formats.
VP8 compression format: The VP8 format features a pure intra-mode, i.e., using only independently coded frames without temporal prediction, to enable random access in applications like video editing. VP8 enables the use of decoder implementations with a relatively small memory footprint.
Ensuring Frame-Accurate Annotations
Dataloop ensures frame-accurate annotations only on videos that are WebM-VP8 encoded. Users can upload any video format (for more information, see the Supported File Format) to our platform for data management purposes. Annotation accuracy is best achieved on WebM-VP8 videos.
The videos need to meet these requirements:
- Number of frames (nb_read_frames & nb_frames) = Duration * FPS
- Start time = 0
- Average frame rate = frame rate (avg_frame_rate = r_frame_rate)
Convert Videos to WebM Format
- There will be no immediate conversion to WebM format of video files when uploaded to the platform, allowing users to take data-management (e.g. filtering) and video-processing (trimming, joining, etc.) actions first.
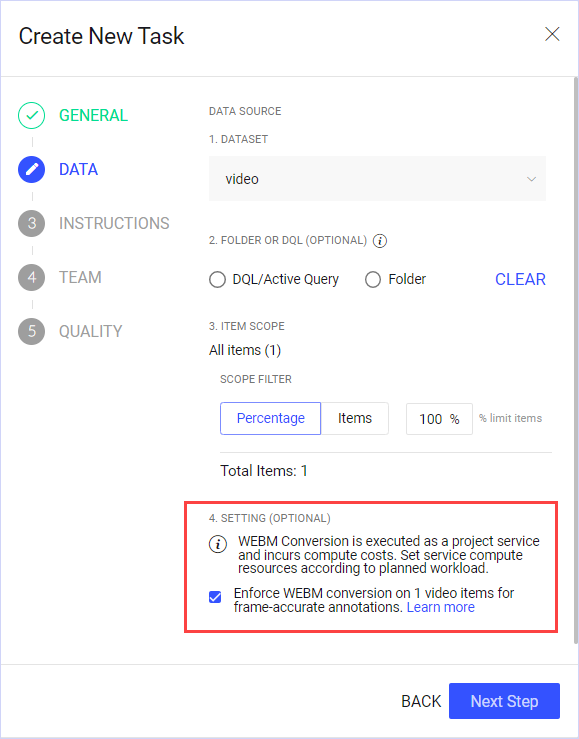
- Users will have the option to either enable conversion to WebM, or to use the original video format when creating a new task. The option is enabled by default.
- Opting for WebM conversion during task creation will install the WebM conversion service in the project. The conversion-compute costs are borne by the project’s account.
- As a service within the project, privileged users (owners, developers) can configure its resources based on the expected load. This includes setting up auto-scalers, changing instance types, monitoring the service execution log, and more.
- Uploading video data items without conversion allows for data management and preprocessing (e.g., trimming long videos) without unnecessary compute and time consumption.
To convert videos to WebM format:
- Select the video file from the dataset browser.
- Perform the steps available in the Create an Annotation Task article.
- In the Data Source section, ensure that WebM Conversion section is enabled.

-
When creating a task, all video items not already in WebM format will be processed by a new WebM service that will be deployed, installed, and run in your project.
-
As a project-installed service, you can configure the WebM service to run with auto-scaling, select the instance type, and achieve faster video conversion. Compute costs for your project-installed WebM conversion will be charged to your account based on usage, instance type, auto-scaling, and other factors.
-
The new converter writes any errors and discrepancies found in frames and FPS information between the converted WebM and the original video file to the item's metadata.
-
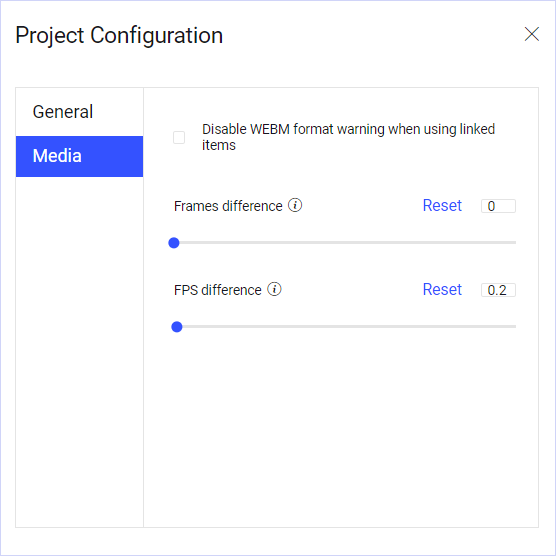
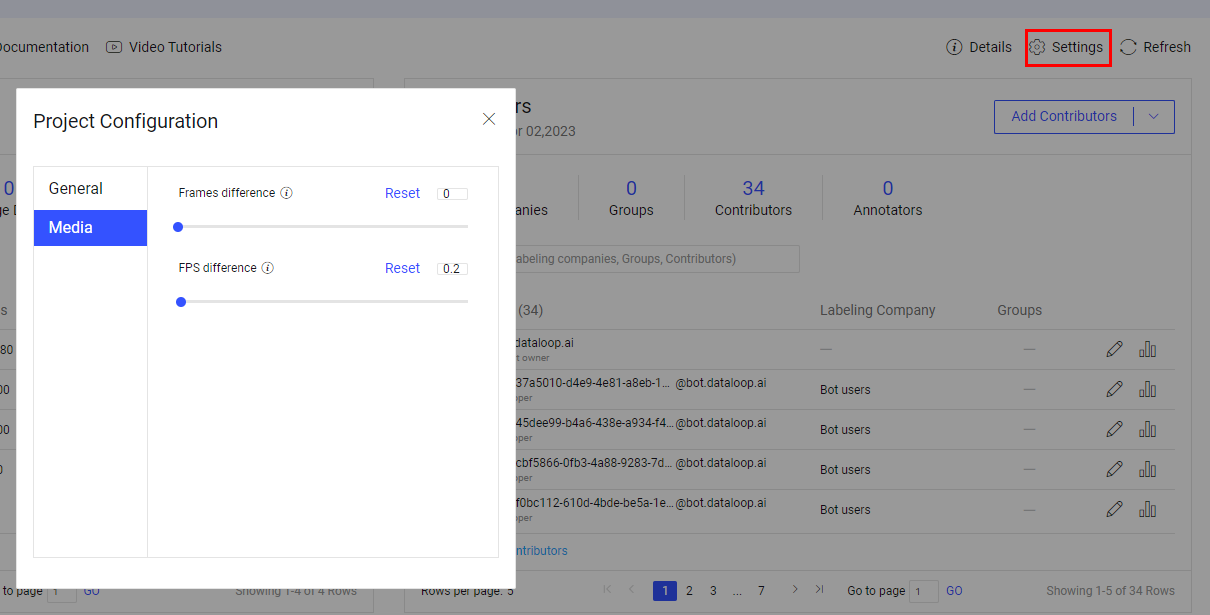
As a project manager or developer, you can set the tolerance level for frames and FPS differences, allowing the annotation studio to continue functioning without blocking annotators, provided the differences are within the limits you set.
- From the Project-overview, click Settings > Configuration.
- In the new pop-up, change to the MEDIA module
- Change the Frames and FPS difference tolerance from the default values (0) to values you'd like to set in your project.

Once the conversion is complete, a new replacement-Modality file is created and used by the Video Annotation Studio in the annotation process.
The default configuration can typically handle video files smaller than 1.07 GB. For larger video files, consider upgrading the instance type to a stronger machine.
Customize the WebM Converter
You can deploy your own (customized version) WebM converter from the GitHub to convert Data according to your needs (specific triggers, filters - datasets/folders/etc.). The WebM converter is available on Dataloop’s GitHub, free to fork, and can be customized to meet project-specific requirements.
In-Studio Alerts
Files that fail to pass the conversion process cannot be annotated and are effectively blocked in the annotation studio, with a corresponding message explaining the reason for the situation.
An error message will be displayed in the annotation studio, blocking annotators from work, if:
- If you choose to enforce WebM in the task and conversion failed for any reason (corrupted files), service problems, etc.
- If the difference between the WebM file and original video (frames count or FPS) is higher than the threshold set in the project settings (by default - 0, For example, no tolerance to the difference in frames and FPS).
Frames and FPS Difference
WebM files that have Frame Difference or FPS differences compared with the original file, will also show an alert in the studio and will be effectively blocked for annotations.
The threshold for alerting on frames and FPS difference can be adjusted, e.g., developers can allow for 1 or 2 frames difference, or X FPS difference, understanding the possible consequences on frame-accurate annotations.
To adjust the Frame and FPS difference:
- From the Project Overview, click on the Setting icon and select Config.
- Select the Media tab.
- Adjust the values and save.

WebM for Linked Items
Linked items cannot be converted to WebM, since their binaries are not intended to be on the Dataloop platform. However, the same frame-level-accuracy concerns apply for linked items that aren't in WebM format, and the corresponding messaging is shown for users in Annotation Studio.
Project managers can choose to permanently hide such WebM format warnings for linked items in their project by enabling the option "Disable WebM format warning when using linked items" in the Project settings.
Train Your Model
After uploading your video to the Dataloop platform and annotating it, you will need to follow these steps to use the frame-accurate annotations to train your model. As annotations are only accurate for the WebM file, and NOT the original file uploaded:
- Download your video file in JSON with the annotations from Dataloop.
- In the JSON file you downloaded, you will find the WebM file item ID (“ref”) and URL to stream the WebM file of your video:

- Use the annotations and the WebM file to train your model.