Overview
As a broad and highly customizable platform, Dataloop has a built-in annotation studio for image, video, audio, text, documents, and Lidar. The Dataloop team is always working on introducing new ones, and is made it possible for customers to build their own. Dataloop follows a certain template for the annotation-studio, to make it easy to switch between them and quickly get familiar with and become highly productive.
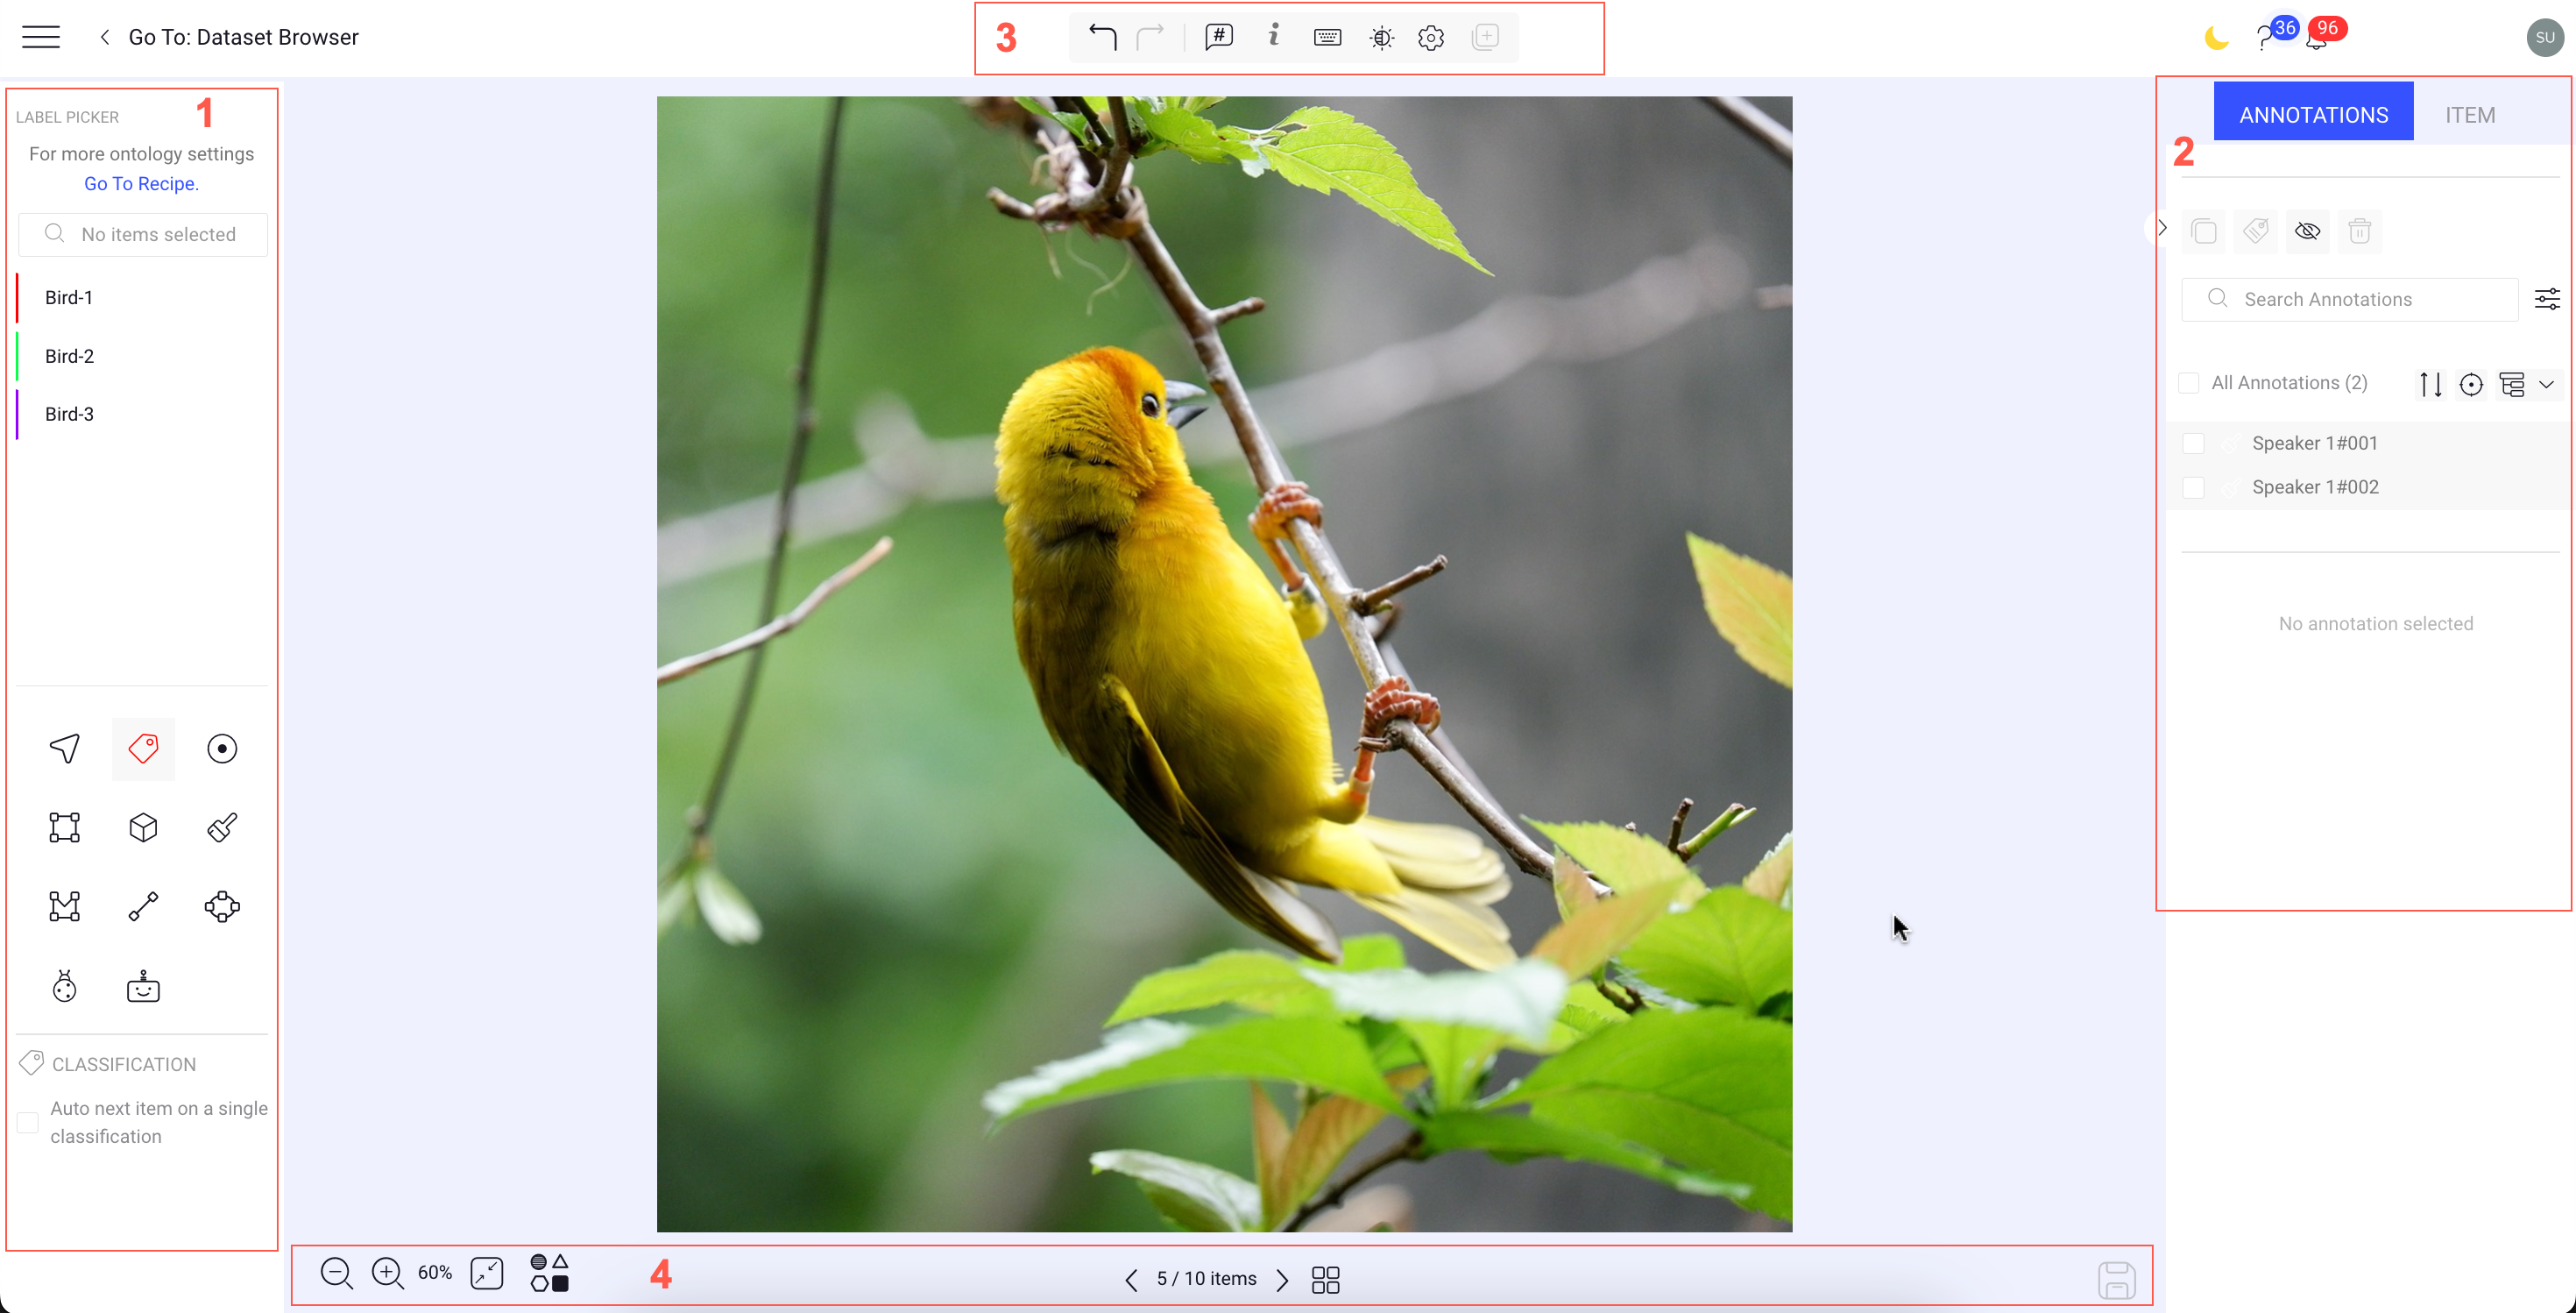
The main sections of the Annotation Studio are explained below.
Important
The features, such annotation tools, settings, etc. available on the annotation studio are according to the type of the annotation studio.
Label Picker
A Label Picker is a feature within the annotation studio that allows you to pick or select labels to assign to specific objects or elements in the data being annotated. You can perform the following activities on the Label Picker section. The available labels are determined in the Recipe.

Scroll and click a label to activate it.
Use the search bar to easily find labels.
Resize the label list to better fit your number of labels by clicking and dragging the separator line.
Use the Shortcut keys to navigate between labels.
If labeling scope defined in the Recipe for annotation tools, the Label Picker automatically updates based on the selected annotation tool.
Applicable labels (those that can be used with the selected tool) remain enabled and selectable.
Non-applicable labels (those not supported by the selected tool) are still visible but appear disabled (greyed out).
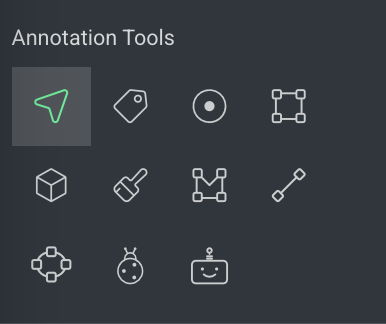
Annotation Tools
Annotation tools are designed to facilitate the process of data annotation. Data annotation involves adding metadata, labels, or tags to raw data, making it understandable for machines.
Annotation Tool Controls
Selecting a tool will automatically display its specific settings, providing access to enhanced functionality.
If labeling scope defined in the Recipe for annotation tools, the Label Picker automatically updates based on the selected annotation tool.
Applicable labels (those that can be used with the selected tool) remain enabled and selectable.
Non-applicable labels (those not supported by the selected tool) are still visible but appear disabled (greyed out).
List of Annotation Tools
Explore the Annotation Tools in Annotation Studio, each carefully designed to cater to specific annotation needs. The following table provides a concise overview of these tools, offering a versatile toolkit for insightful and collaborative annotation within the platform.
Annotation Tools / Studio | ||||||||
|---|---|---|---|---|---|---|---|---|
🚫 | ✅ | ✅ | ✅ | 🚫 | ||||
✅ | ✅ | |||||||
✅ | ||||||||
🚫 | ✅ | 🚫 | ✅ | |||||
✅ | ✅ | ✅ | ✅ | ✅ | ||||
✅ | ✅ | ✅ | ||||||
✅ | ||||||||
✅ | 🚫 | |||||||
✅ | ✅ | |||||||
✅ | ✅ | ✅ | ||||||
✅ | ||||||||
✅ | ✅ | |||||||
✅ | ✅ |
Reinforcement Learning Human Feedback (RLHF) Studio
The RLHF is a unique studio, see the RLHF article for more information.
Annotations
The Annotations tab on the right-panel allows you to control and manage annotations involves utilizing the annotations list and attribute controls, particularly when attributes are configured in the Recipe.

Create Annotations
Open the Annotation Studio.
Select the desired from the annotation tools section.
Click and drag the mouse on top of the image. The selected place of the image changes color to match the color of the label.
A new annotation is created, and the new annotation is listed both on the annotation list and the transcription list.
Annotations Lists
The annotations list displays all annotations added to the item and incorporates numerous features, facilitating efficient work even with dozens or hundreds of annotations.
Annotation Selection
Selecting an annotation from the list enables you to apply operations, reflecting the activation of its controller on the item.
Also, it displays the details of the selected annotation, attributes details, and option to add notes.
The list enables two selection modes:
Single Selection: Click anywhere on an annotation to have it selected, replacing any previous selection you made.
Multiple Selection: Use the checkbox to add annotations to your selection.
Annotation ID
Annotation IDs are used to differentiate instances of annotations. For example, In the above screenshot, Bird-3#002. Here, the annotation ID is 002. There might be five annotations with the label Bird, but each requires a unique ID.
Action Buttons
Actions available on the annotations are displayed when you hover over.
Hover over annotations to view related action icons, including:
Edit annotation label and attributes.
Hide or Show Selected (Keyboard shortcut key - H) annotations: Click on the Eye icon or press the H keyboard shortcut key to hide or show selected annotations.
Hide or Show All (Keyboard shortcut key - J): Click on the Keyboard shortcut key J to hide or show all annotations, regardless of the selections.
Labeling QA task controls:
Open Issue: Create an issue if there is any correction required in the annotation.
For review: Flag an issue for review after correcting it.
From the top-side of the annotation list, you can use the following actions:
Clone: Click on the clone icon to clone one or more annotations from the list. You cannot clone semantic annotations.
Change Label & Attributes: Click on it to change the annotation labels, attributes, and speaker names (for Audio Annotations).
Open Issue: Create an issue if there is any correction required in the annotation.
For review: Flag an issue for review after correcting it.
Approve: It allows you to approve the item after verifying the annotations.
Hide or Show Annotations: (Shortcut key - H) annotation visibility by clicking on the Eye icon or press H shortcut key. Once any annotation is hidden, a banner indicates that "One or more hidden annotations. Show All". By clicking on the Show All, all the hidden annotations will display again.
Delete: Click on the Trash icon to delete an annotation.
Add a Note to the Annotation
In the Annotation Studio, identify the annotation list on the right-side panel.
Select the annotations from the list.
The selected annotation will be listed at the bottom of the annotation list, click on the Note icon next to the Information icon.
Enter the note as required and click Save.
View Annotation Information
In the Annotation Studio, identify the annotation list on the right-side panel.
Select the annotations from the list.
The selected annotation will be listed at the bottom of the annotation list, click on the Information icon. The following details are displayed:
Annotation creator's and updated by email ID.
Annotation ID.
Clone Annotations
In the Annotation Studio, identify the annotation list on the right-side panel.
Select one or more annotations from the list to clone.
Click on the Clone icon from the top-side of the annotation list. The cloned annotation will be created and added to the list.
Change Label and Attributes of Annotations
In the Annotation Studio, identify the annotation list on the right-side panel.
Select the annotation from the list.
Click on the Change Labels & Attributes icon from the top-side of the annotation list, or hover over the annotation and click on the Edit icon. The Annotation Definition popup window is displayed.
To change the Label, select the Label from the Labels tab, or
To change the Attributes, select the Attribute from the Attributes tab.
Click Save Changes.
Hide or Reveal Annotations
Hide or Show Annotations
Hide or Show Selected (Keyboard shortcut key - H) annotations: Click on the Eye icon or press the H keyboard shortcut key to hide or show selected annotations.
Hide or Show All (Keyboard shortcut key - J): Click on the Keyboard shortcut key J to hide or show all annotations, regardless of the selections.
In the Annotation Studio, identify the annotation list on the right-side panel.
Select the annotation from the list.
Click on the Hide or Reveal Annotations (Eye) icon from the top-side of the annotation list, or hover over the annotation and click on the Hide or Reveal Annotations (Eye) icon.
Move Annotations
Single Annotation Movement: When the respective tool is active (for example bounding-box tool for moving box annotations) use the mouse left button to drag and drop an annotation directly on the canvas.
Moving Multiple Annotations: Moving multiple annotations is designed to enable position refinement, for example when copying annotations between sequential frames. Use Shift+Mouse or the Arrow keys to move annotations in small steps.
Copy Annotations
You can copy and paste Annotations over the same items, as well as between different items.
Use the traditional Ctrl+C to copy and Ctrl+V to paste one or more selected annotations - paste in the same item, or into any other item within the assignment.
Use the Clone action to create a copy of selected annotations without even touching the keyboard.
Import All annotations from the previous item into your current one by clicking the “Import annotations from previous item” button, located on the top-right side of the annotation studio.

Delete Annotations
In the Annotation Studio, identify the annotation list on the right-side panel.
Select the annotation(s) from the list.
Click on the Trash icon from the top-side of the annotation list.
Click Yes to confirm the deletion.
Grouping Modes
By default, the annotation list displays all annotations as they are created, listed sequentially.
After reaching 15 annotations, the list automatically switches to group-by-label mode to optimize loading.
Disable auto-grouping for 50+ annotations in the Recipe:
If ☑️ checked, prevents automatic grouping when a frame has more than 50 annotations, allowing better flexibility in managing large annotation sets.
If ⬜ unchecked, the platform will automatically group annotations when a frame contains more than 50 annotations.
Users can click the Annotation Grouping button to toggle between the list view and group-by-label or group-by-creator modes.
Group By Label or Creator
In the Annotation Studio, identify the annotation list on the right-side panel.
Click the Down-arrow next to the Annotation Grouping icon.
Select the Label or Creator option from the list as required.
Remove Grouping
In the Annotation Studio, identify the annotation list on the right-side panel.
Click on the Annotation Grouping icon to remove the grouping of annotations.
Annotations Filter
The filter in the annotation studio includes the following sections:
Annotation type: It displays annotations based on the annotation tool types, such as box, point, polygon, note, etc. This filter type is not available for Audio items.
Annotation status: It displays annotations based on the annotation status, such as no status, issue, for review, etc.
Annotation properties: It displays annotations based on the annotation properties, such as object ID, description, etc.
By default, all the filter are unchecked. When you select a filter, it displays only the annotations according to the selection you made.
Each filter shows the total number of annotations.
When you select multiple filters, only annotations that satisfy all filters will be displayed.
To filter annotations:
In the Annotation Studio, identify the annotation list on the right-side panel.
Click on the Annotation Filter icon next to the Annotation Search field.
Select the filter criteria as required and click on the same filter icon or click outside to apply the changes.
Annotations Sorting

Click on the arrows icon to sort your annotations on either Ascending or Descending by:
Creation Time (default)
Update Date/time
Label
Type
Confidence
To sort annotations:
In the Annotation Studio, identify the annotation list on the right-side panel.
Click on the Annotation Sort icon next to the All Annotations list.
Select the sort by options from the list. The available options are:
Creation Time: Sort the annotations by their creation time.
Update Date or Time: Sort the annotations by their update time.
Label: Sort the annotations by their label name.
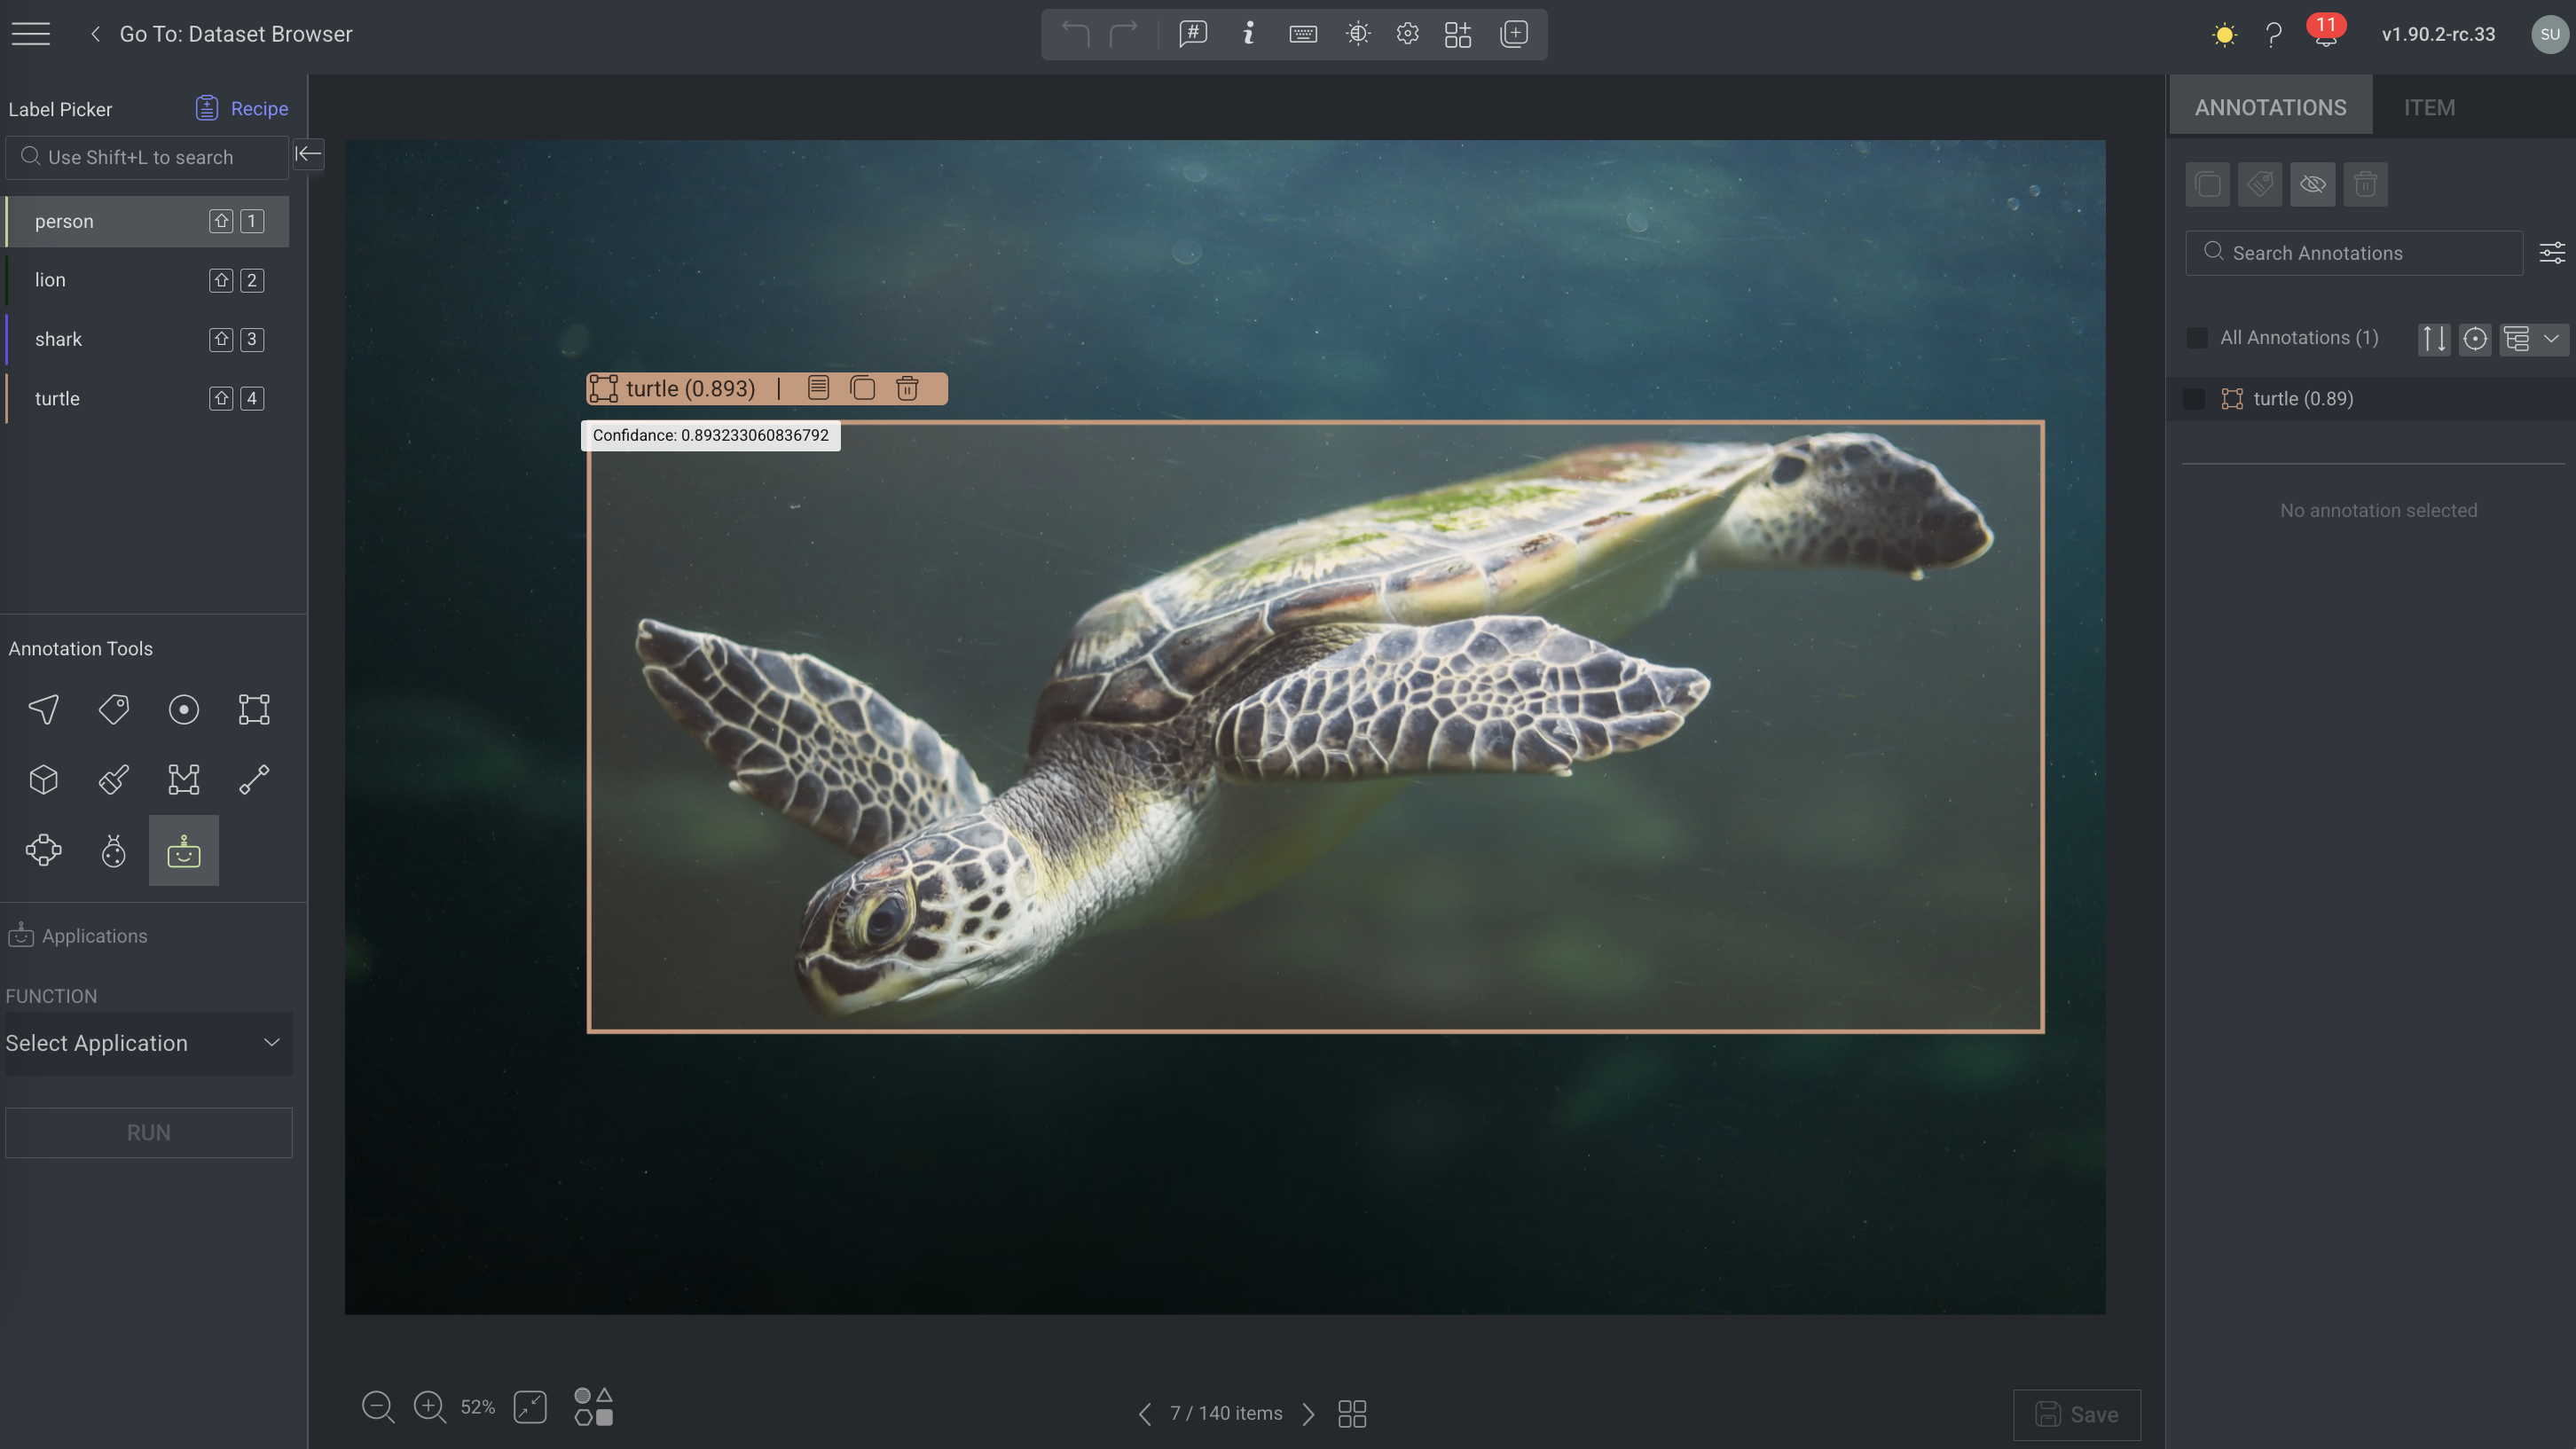
Type: Sort the annotations by the annotation type.
Confidence: It is a numerical representation that indicates how certain the model or the annotator is about a specific annotation or prediction. This value is usually expressed as a probability between 0 and 1, where: 0 represents no confidence at all, and 1 represents complete confidence.
Advanced Search Box
Type in the search box to have the annotations list that displays only annotations that match the search criteria. You can search in every aspect of the annotations:
Tool: Enter the tool name, like BOX or POINT.
Label: Enter any label from the recipe.
Creator: Enter the name of the annotations' creator to view only related annotations.
Focus Mode
The annotation focus mode allows you to filter out annotations that are out of view from the annotation list when you zoom or pan. The annotation list will then display only those annotations that are available within the zoomed area.
To focus on an annotation:
In the Annotation Studio, identify the annotation list on the right-side panel.
Click on the Annotation Focus icon to focus only the selected annotations, when you zoom or pan.
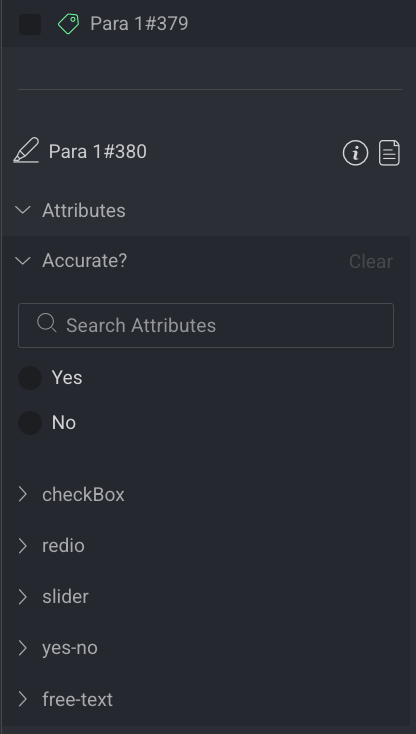
Attributes
When attributes are defined in the recipe and annotation is selected (annotation is also selected immediately after it’s created) the attributes section will be visible, allowing the user to set them.
Select the attributes relevant to the object.
Use the Search field to search for a specific attribute value.
Skipping a ‘mandatory’ attribute will show a yellow flag, to highlight it for the user.
Set attribute values in bulk
Setting attribute values in bulk for annotations from different labels is currently disabled. It can be enabled from the respective recipe setting:
Go to the Ontology > Relevant Recipe > Instructions.
Under Global Settings, select the Allow bulk attribute update without single-label validation option.
Search Attributes
You can quickly and efficiently search for attribute values to streamline the annotation process. Use the Search field to find specific attribute values.
Reviewing Attributes
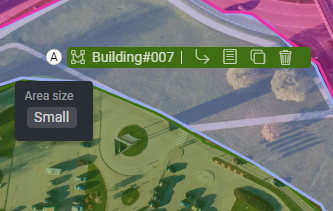
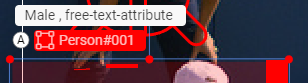
Annotations with attributes selected will be marked with an 'A' sign, hover over it to see the attributes. For mandatory attributes, the 'A' will be highlighted in yellow.
Click on the 'A' button on the bottom left to toggle the display of all the annotation's attributes on the canvas.
Item
The Item tab displays information according to the type of the selected item, including:
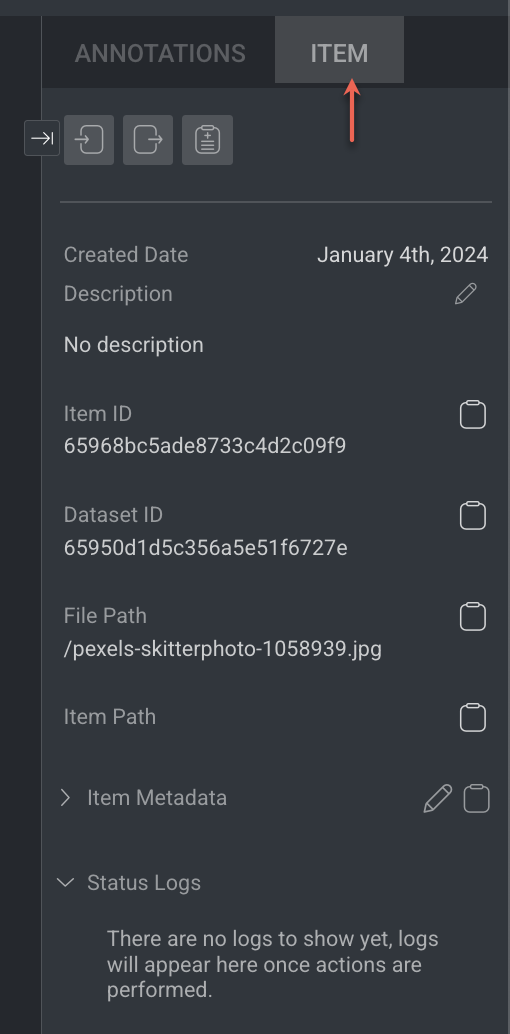
Created Date: The creation date of the selected item.
Description: The text description, which can be viewed and edited from this panel, allows you to add descriptions including emojis during file uploads. This feature provides an additional method to search for items using specific text or descriptions. Click on the Pencil icon to edit details.
Emojis may not display correctly. Instead of the intended symbols, the system could show random or nonsensical characters (gibberish). For example, adding this 🙂 emoji might result in the description field displaying it as \u1f642.
Item ID: Unique identification for the item. Click on the Copy icon to copy the item ID.
Dataset ID: Unique identification for the item's Dataset. Click on the Copy icon to copy the Dataset ID.
File Path: A URL link to the item on the Dataloop platform. Click on the Copy icon to copy the file path.
Item path: A URL link to the item on the Dataloop platform. Click on the Copy icon to copy the item path.
Item Metadata: Item metadata refers to the descriptive information and attributes associated with individual items within a dataset. Click on the Pencil icon to edit details.
Functions: It displays the functions performed with this item, providing information such as Application Name, Function, Status, Date, Log details, and options to view execution details, among others.
Status Log: It allows you to track and monitor your team's actions on data items. You can easily follow task status changes, see who applied each status, such as Completed, Discard, Status Completed Removed, or any custom status), and when it was done. The way status logs are shown in the annotation studio depends on the user's role, either as an Annotator" or an Annotation Manager and above:
Annotators - Task-Specific View: Annotators only see status logs for the tasks they are assigned to.
Annotation Managers and Above - Full View: Managers and higher roles can see all status logs across different tasks. This gives them a complete overview of what's happening in the project, even for tasks they’re not directly managing.
Import Annotations: Click on the Import icon to import annotations in a JSON file or paste annotation source info.
Export Annotations: Click on the Export icon to export annotations and masks.
Recipe: Click on the Recipe icon to open the Recipe page of the selected item.
View Item Details
In the Annotation Studio, click on the Item tab on the right-side panel.
You can view the details available in the Item section.
View Recipe
Go to the Annotation Studio.
In the Label Picker section of the left-side panel, click on the Go to Recipe to view the recipe that is linked to the current dataset.
OrGo to the Annotation Studio.
Select the Item tab in the right-side panel.
Click on the Recipe icon available on top of the right-side of the Item tab.
Import Annotations into an Item
Go to the Annotation Studio.
Select the Item tab in the right-side panel.
Click on the Import Annotations icon available on top of the right-side of the Item tab.
In the Import Annotations popup, click on the following:
Import JSON file: Upload a JSON file.
Paste: You can directly copy and paste the JSON data representing the annotations.
Click Import.
Export Annotations from an Item
Go to the Annotation Studio.
Select the Item tab in the right-side panel.
Click on the Export Annotations icon available on top of the right-side of the Item tab.
Select the Export Annotation option from the list. A JSON file will be downloaded.
Export Mask from an Item
In image annotation, a mask typically represents a specific area or object within the image, often in the form of a binary or grayscale image where the annotated regions are marked
Go to the Annotation Studio.
Select the Item tab in the right-side panel.
Click on the Export Annotations icon available on top of the right-side of the Item tab.
Select the Export Mask option from the list. An image file (PNG) will be downloaded.
View Available Applications and Functions on an Item
Go to the Annotation Studio.
Select the Item tab in the right-side panel.
Click on the Functions section at the bottom of the right-side panel -> Item tab. The available functions are listed.
Parenting Annotations
Parenting allows the creation of hierarchical relations between annotations. Any annotation can be set as a child’ and a parent to others at the same time.
Important
An annotation can have only one parent at any point in time.
To set an annotation as a child of another:

Select one or more annotations (for example -using the selection tool)
Hover the mouse over the designated parent annotation - its controller will appear
Click the Parent icon from the controller.
To disconnect an annotation from its child connections (all at once)

Hover over a parent annotation. Its controller will become visible.
Click the Disconnect all children icon, to remove all its connections to child annotations.
To disconnect an annotation from its parent annotation

Hover over a child annotation. Its controller will become visible.
Click the Disconnect from parent icon, to remove its connection to a parent annotation.
Canvas
The Canvas serves as the main workspace for performing annotations. In addition to annotation tasks, you can:
Modify Labels & Attributes by clicking on the label name.
Set Object ID for better identification.
Clone Annotations to duplicate existing labels.
Delete Annotations when necessary.
Set Object ID
Object Id is a numbering system that helps distinguish between similar annotations (since they already have a unique annotation ID, mostly used by developers).
Hover over an annotation controller to find the Object ID feature. Click the icon and type in any ID number up to 4 digits (i.e., 0-9999), or click the "plus" button to assign the next number available in a sequence, and then press ENTER.
When activating the ‘auto-assign object id’ option in the recipe, every new annotation created will be assigned an object ID, that can be changed by the user.
Object-IDs are displayed in the annotations list, and in the annotation controller.

Item Info & Controls (Top-Panel)
Item Info & Controls are available depends on the type of annotation studio. The following features are mainly available on the annotation studios.
Undo-Redo
Applicable for all actions performed directly over Canvas when creating or updating annotations.
Go to the Annotation Studio.
In the top-side control:
Select the Undo icon to cancel the change you made.
Select the Redo icon to reverse the change you had previously undone.
Item Description
The item description feature allows you to add a description for the items available in the dataset.
Go to the Annotation Studio.
In the top-side control, select the Item Description icon next to the Redo icon.
Enter the description and click Save. The newly added description will be available under the Item tab.
Item Info
Details and enables copying item-related information and context such as File-name, item path, dataset ID, and more.
Go to the Annotation Studio.
In the top-side control, select the Item Info icon. The following details are displayed:
File Name
File Path
Item ID
Dataset ID
Dataset Name.
Keyboard Shortcuts
Keyboard shortcuts are also accessible through the top panel of each Annotation Studio, with each studio featuring both general and studio-specific keyboard shortcuts.
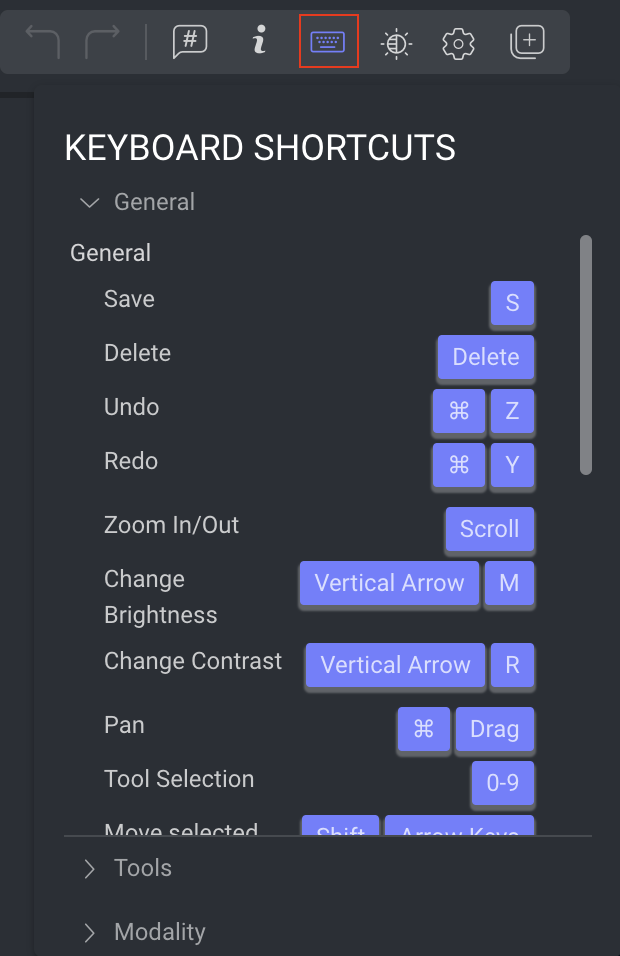
The available shortcut keys for the Image annotation studio are listed below:
General Shortcuts
| Action | Keyboard Shortcuts |
|---|---|
| Save | S |
| Delete | Delete |
| Undo | Ctrl + Z |
| Redo | Ctrl + Y |
| Zoom In/Out | Scroll |
| Change Brightness | Vertical Arrow + M |
| Change Contrast | Vertical Arrow + R |
| Pan | Ctrl + Drag |
| Search Labels | Shift + L |
| Search a label | Shift + 1-9 (for the sub-labels, use the Tab key) |
| Navigate in label picker | Up and Down arrows |
| Select label in label picker | Enter |
| Tool Selection | 0-9 |
| Move selected annotations | Shift + Arrow Keys |
| Previous Item | Left Arrow |
| Next Item | Right Arrow |
| Add Item Description | T |
| Mark Item as Done | Shift + F |
| Mark Item as Discarded | Shift + G |
| Enable Cross Grid Tool Helper | Alt + G |
| Hold G to show Cross Grid Measurements | G |
| Go to annotation list | Shift + ; |
| Navigate in annotation list | Up and Down arrows |
| Select/deselect an annotation | Space |
| Hide/Show Selected Annotation | H |
| Hide/Show All Annotation | J |
| Show Unmasked Pixels | Ctrl + M |
| Hide/Show Annotation Controllers | C |
| Set Object ID menu | O |
| Toggle pixel measurement | P |
| Use tool creation mode | Hold Shift |
| Copy annotations from previous item | Shift + V |
Annotation Tool - Semantic
| Action | Keyboard Shortcuts |
|---|---|
| Toggle Paint Bucket Mode | Shift + B |
| Toggle Eraser | Shift + E |
| Toggle Auto Segmentation | Shift + A |
| Toggle Super Pixel | Shift + S |
| Toggle Drawing | Shift + D |
| Draw Straight Line | Shift + Drag |
| Change Opacity | X + Scroll |
| Stroke Size | Alt + Scroll |
| Delete Super Pixel | Alt + Left Click |
Annotation - Pose
| Action | Keyboard Shortcuts |
|---|---|
| Next Label | Ctrl + > |
| Previous Label | Ctrl + < |
| New Pose | N |
Annotation Tool - Polygon
| Action | Keyboard Shortcuts |
|---|---|
| Delete Vertex | Right Click |
| Clear / Close Polygon | Esc |
| Clear / Close Polygon | Enter |
Annotation Tool - Modality
| Action | Keyboard Shortcuts |
|---|---|
| Next layer | > |
| Previous layer | < |
| Toggle visibility | Space |
PDF Viewer (Optional)
The PDF Viewer feature in Dataloop allows you to view Annotation Instructions in PDF format when they’re uploaded as part of the associated recipe.
Click on the PDF Viewer icon to open it. Once the PDF is opened, you can use several handy tools, including:
Open in Browser Tab: View the PDF in a separate browser tab for easier access.
Page Navigation: Move up and down between pages within the PDF.
Zoom Controls: Zoom in or out to adjust the PDF’s display for better readability.
Refer to the Annotation Instructions article to learn more.
Adjustments
The adjustments setting allows you to configure the following features according to your requirement.
Opacity, brightness, and contrast are only supported for images up to 8192 px (either width or height).
Opacity
It controls the transparency level of an annotation or element within the image.
Go to the Image Annotation Studio.
In the top control panel, click on the Adjustments icon next to the Keyboard Shortcut icon.
Adjust the Opacity progress bar as required.
Brightness
It controls how light or dark the image appears.
Go to the Image Annotation Studio.
In the top control panel, click on the Adjustments icon next to the Keyboard Shortcut icon.
Adjust the Brightness progress bar or enter a value as required.
Contrast
It adjusts the difference between the light and dark areas of an image. It enhances the distinction between light and dark areas, making annotations more pronounced.
Go to the Image Annotation Studio.
In the top-side control, click on the Adjustments icon next to the Keyboard Shortcut icon.
Adjust the Contrast progress bar or enter a value as required.
Border Thickness
It controls the width of the border surrounding an annotation.
Go to the Image Annotation Studio.
In the top-side control, click on the Adjustments icon next to the Keyboard Shortcut icon.
Adjust the Border Thickness progress bar or enter a value as required.
Transcription Finder
The transcription finder allows you to search and replace audio transcription texts in the Audio Studio. This function is available only in the Audio Classification Studio.
Settings
Various options for annotators to toggle and tune their work, such as:
Pixel measurement
This shows the pixel length value for Box, Polygon, and Polyline tools.
Go to the Image Annotation Studio.
In the top-side control, click on the Settings icon.
Enable the Pixel Measurement option to view the pixel value on the annotation.
Keep Zoom and Position
When moving between items, especially frame snapshots out of video files.
Go to the Image Annotation Studio.
In the top-side control, click on the Settings icon.
Enable the Keep Zoom and Position option. It allows you to keep the Zoom and Position settings of an item when moving between items, especially frame snapshots out of video files.
Pixel Smoothing
Smoothen the display of pixels when viewing low-resolution images at high zoom.
Go to the Image Annotation Studio.
In the top-side control, click on the Settings icon.
Enable the Pixel Smoothing option, by default it is enabled. It smoothens the display of pixels when viewing low-resolution images at high zoom.
Cross Grid Measurement
It provides a cross-grid for the mouse cursor, a tool that may assist in achieving higher annotation accuracy.
Go to the Image Annotation Studio.
In the top-side control, click on the Settings icon.
Enable the Cross Grid Measurement option, by default it is enabled. It displays a cross-grid for the mouse cursor, a tool that may assist in achieving higher annotation accuracy.
Coordinates
It displays the mouse coordinates over the item when hovering it.
Go to the Image Annotation Studio.
In the top-side control, click on the Settings icon.
Enable the Coordinates option. It displays the mouse coordinates over the item when hovering it.
Copy Annotations from the Previous Item
Go to the Image Annotation Studio.
In the top-side control, click on the Copy annotation from previous item icon.
Click Yes to confirm. A confirmation message is displayed.
Item's View Controls (Bottom-Panel)
The controls on the bottom-side panel display based on the annotation contexts and work controls.
Workflow Context
Assignment controls, including moving between items, displaying the item gallery, and the status buttons (Complete / Discard). It displays only while working on an annotation or QA task.
Browse between the assignment items using the Left and Right arrows
Open the Thumbnails' gallery viewer, and click a thumbnail to open that item
Save button - Clicking the button when it is enabled triggers saving changes to the Dataloop platform, before the auto-saving feature takes care of that.
Status buttons - Complete and Discard.
View Controls
From left to right, work controls at the bottom panel deliver the following functionalities:
Zoom control - Small steps using (+) and (-) buttons.
Fit to screen.
Preview Attributes: Enable/disable the attribute details visibility over the item, next to each annotation.