Overview
DDOE's Video Annotation Studio provides a user-friendly interface for annotating videos with precision, supporting frame-by-frame labeling, object tracking, and advanced tools like interpolation. It allows for seamless collaboration, customizable workflows, and integrates with DDOE’s data management and automation systems for efficient project scaling. Ideal for large-scale video datasets, the studio is perfect for industries like autonomous driving, surveillance, and media analytics.
DDOE’s Video Tool brings pixel-accurate frame annotations to videos, and as such - requires annotation to take place while using the WebM file format. For more information, see the WebM and Frame-Accurate Annotation article.
Video Annotation Concepts
Standard video playback controls: Play, pause, jump frames, adjust play-speed
Selecting labels and creating annotations (much like in Image Studio): annotations are shown at frame-level in the Annotation Bar area.
Annotation Bar controls: Enables you to set the annotation start and end frames, as well as toggle occlusion (hidden annotation) on/off. All these states are visualized in the annotations bar.
The frames on which changes in an annotation occur are considered as Key-frames (annotation creation, position changes, label change, attribute change, occlusion on/off, annotation ending).
The ranges between every 2 keyframes (from-to) are listed on the right-side panel. Click such a range to have the video jump to the first keyframe.
The video timeline displays the mapping of annotations according to their number on each frame and allows you to jump to areas of interest.
Video Controls
![]()
Adjust volume
Take a snapshot
Adjust play speed - from X0.5 to X8
Jump to start
Jump back X frames (enter the number of frames into the text box, default is 1)
Play/pause
Text box to enter the number of frames for jumping backward/forward
Jump to the end of the video
Change annotation position automation
Linear interpolation (default)
None (off)
AI Tracker (Default Model)
Playback time - current position/total video length
Video Timeline
The video timeline includes:
A marker showing the current playback position
A window surrounding the marker:
The window determines the scope of frames presented in the annotation bar.
The window can be resized to increase or decrease the number of frames.
The marker or window can be grabbed and moved anywhere on the timeline.
Click anywhere on the timeline to have the marker set at that position.
Use the mouse scroll wheel to zoom in and out of the timeline and better manage longer video files.
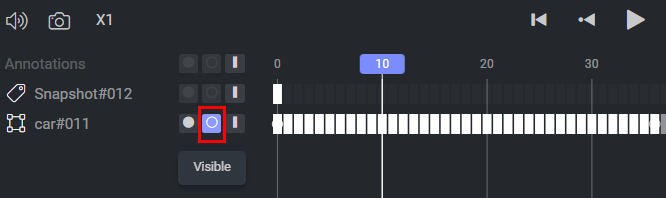
Annotations Bar

The Annotations Bar shows a line with frames per annotation that’s in the current frame of the video. A marker shows the current playback position, placed on the exact current frame.
Drag & drop the marker, or click anywhere on the timeline to set it as the current playback time.
Use the controls on the left to set a keyframe at the current position:
Set Start Frame (removes previous Start Frame).
Set End Frame: The annotation will end on this frame.
Set occlusion on/off: Set ON when the annotation is hidden and Off when it's back. Changes are visualized over frames with different opacities.
Use the controls that are just over the Annotation Bar to set these start, end, or occlusion to all annotations at once.
Advanced Tracking Tools
DDOE platform offers the following three interpolation methods while annotating videos:
Linear
AI tracker
None
Linear Interpolation
Video Interpolation automatically calculates the linear change of size and position between two keyframes, allowing users to speed up work by eliminating the need to make small changes on every frame. By default, Linear interpolation is selected in the video studio.
Use the Linear Tracker
Create an annotation while Linear Interpolation is selected.
Move forward to a later frame and adjust the annotation position.
Move backward and play the video to see how the annotation changes automatically between frames.
Important
Linear interpolation is most effective when annotating high frame-rate video files that contain mostly linear movement (for example, shoppers in stores or cars in traffic). It is considered less effective with low frame rate videos or videos with non-linear object motion.

AI Tracker
The AI Tracker is a machine-learning-based application that can track objects automatically, potentially saving time over manual corrections. Activate the AI Tracker by switching the interpolation method.

Once you create an annotation, the AI Tracker calculates size/position only for the next few seconds of the video. Do not move annotations or play the video during this calculation to avoid having the AI Tracker perform the calculation again before it finishes the previous one, as this may lead to errors.
Model Selection in Video Studio Recipes
Annotation Manager or above can now select which model is used for the AI Tracker directly from the Advanced Settings of the Video Studio section of the recipe.
Frames per Tracker Execution
Annotation Manager or above can now define how many frames are processed in each tracker run, from the Advanced Settings of the Video Studio section of the recipe. The default value is 10.
When the AI Tracker Runs
The AI Tracker will now execute interpolation only when:
Moving to the next frame, or
Clicking the Play button
It will no longer trigger automatically after every annotation edit, reducing unnecessary processing and improving performance.
None - No Tracker
In case where the task requires only human labeling, use the none interpolation method option. The annotations will be affected only by the human labelers’ annotations, with no automation assistance.
KeyFrames
A KeyFrame represents any frame in which an annotation is created, modified, or ends. KeyFrames are automatically generated during the annotation workflow to reflect meaningful changes.
When KeyFrames Are Created
A KeyFrame is added whenever any of the following actions occur:
Creating a new annotation (start frame)
Manually moving or resizing an annotation
Changing the annotation’s label or attributes
Turning occlusion on or off (hidden/visible)
Ending an annotation (end frame)
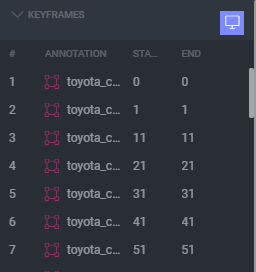
Viewing KeyFrame Ranges
In the Annotations tab on the right panel, KeyFrame ranges are displayed in order of appearance on the timeline.
Each range represents the segment between one KeyFrame and the next.
Click any KeyFrame range to jump directly to its first frame, making it easier to navigate to areas of interest in the video.
KeyFrame Indicators on the Timeline
KeyFrames are also shown visually on the annotation bar as full circles above the frame bar.
Hover over a KeyFrame indicator to view options.
Click the Trash icon to delete a KeyFrame and remove it from the list.

KeyFrames in JSON File
KeyFrames are recorded in the JSON file under Annotations.metadata.system.snapshots_. It specifies the annotation data relevant from this point forward, including position, label, and attributes.
Setting an End-Frame
By default, when creating a new annotation it has its first frame, and it lasts until the end of the video. If not specifically setting an end-frame at the end of the video file, which will be recorded as a fixed frame, the annotation will only have the first frame specified.
Automated Frames
Automated frames are generated automatically between two KeyFames when the Linear or AI Tracker is used since they can automatically adjust annotation position/size.
Automated Frames in JSON File
Automated frames are represented as additional frames recorded as snapshots at Annotations.metadata.system.snapshots_. They can be seen as type Linear.
Reflected Frames
Reflected frames exist between two keyframes. Since reflected frames are not automated, it means that nothing changed in the annotation in these frames.
For example, setting an annotation as hidden in frame 10 and visible again in frame 20 means that we have keyframes in frames 10 and 20, and reflected frames between 11 and 19, having the same information as frame 10.
Reflected Frames in JSON File
Reflected frames have no representation in the annotations JSON file.
Scope of Changes – Label & Attributes
Any changes made to an annotation’s label/attribute, for example, changing the annotation’s label, will automatically take effect in all following frames, until the next keyFrame. Any automated/reflected frame between the frame of change and the next keyFrame will be automatically adjusted.
This enables making corrections/changes to annotations much easier, eliminating the need for changing all frames one by one.
Scope of Changes – Size and Position
Changing the size and position of an annotation in an existing frame, where size and position have been previously determined, will only affect that specific frame. Changes are not calculated forward to the next frame or next keyFrame.
Video Snapshots
The Snapshot feature generates a still image out of a selected frame in a video.
Click the Snapshot icon on the left of the video bar and a popup window will present a preview of the snapshot image.
Click Save.
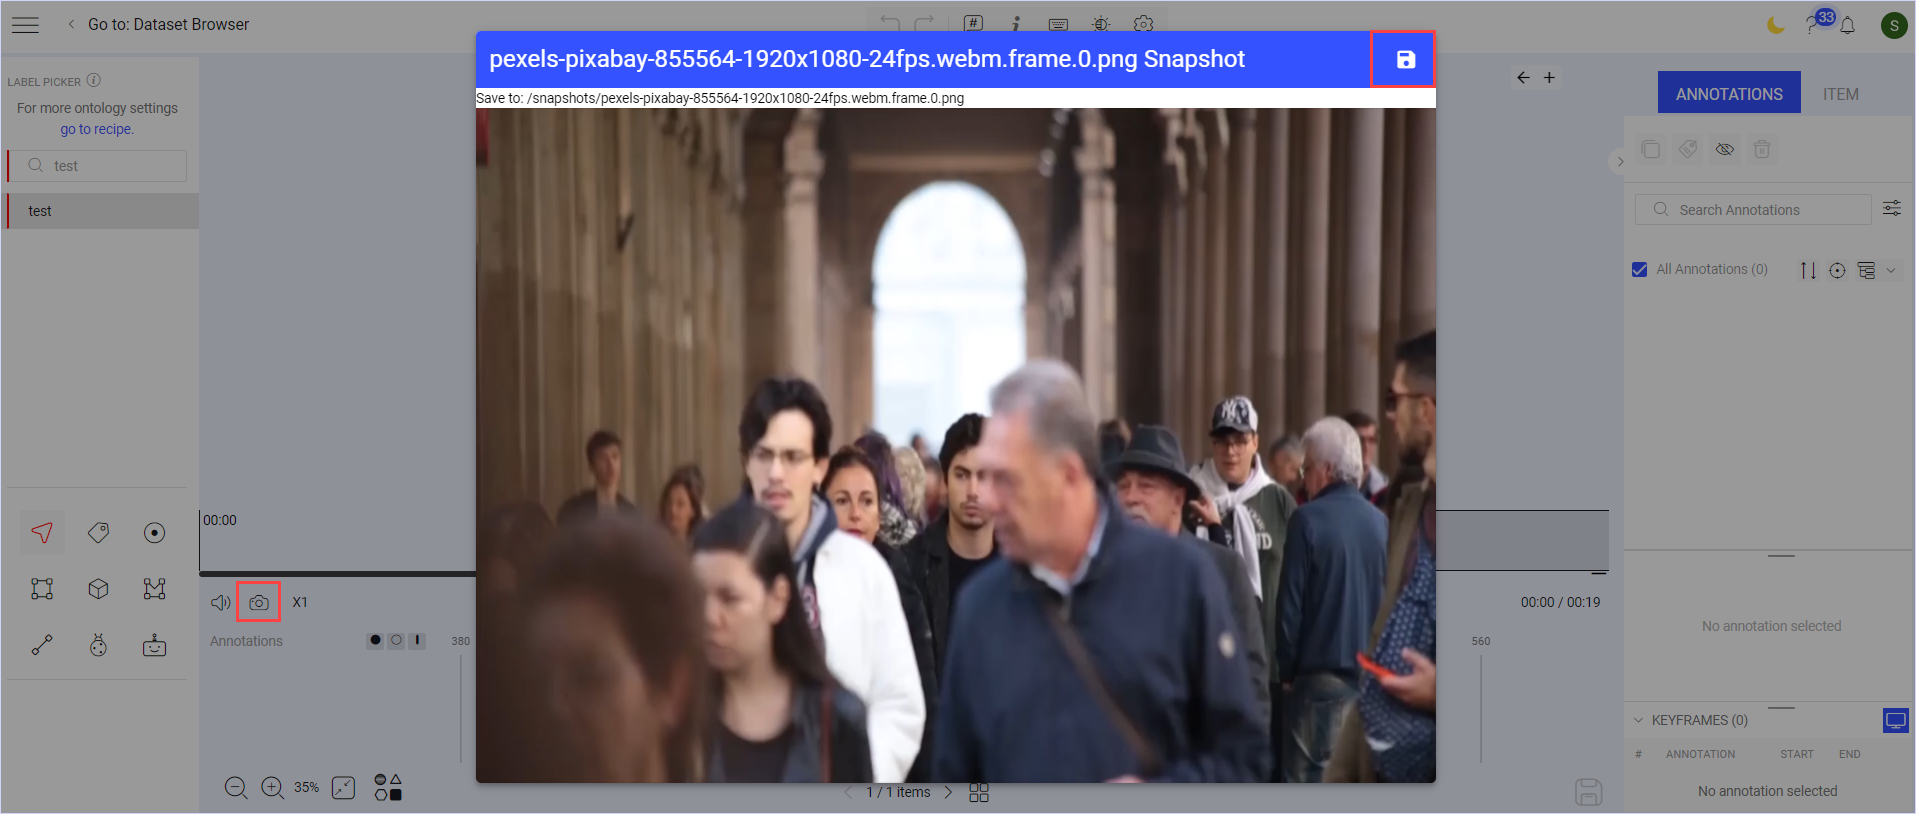
The generated image will be given the name of the video clip with its frame number at the end. All snapshot Image files are automatically saved inside a folder named “Snapshots.”

Snapshot Linking
When a snapshot is created from a video, it is stored within the original video as a one-second scene classification, visible in the control panel.
Selecting this snapshot classification opens the annotation window, which includes a Snapshot link.
Clicking the link icon will take you directly to the snapshot image file, located in the Snapshots folder within the dataset directory.
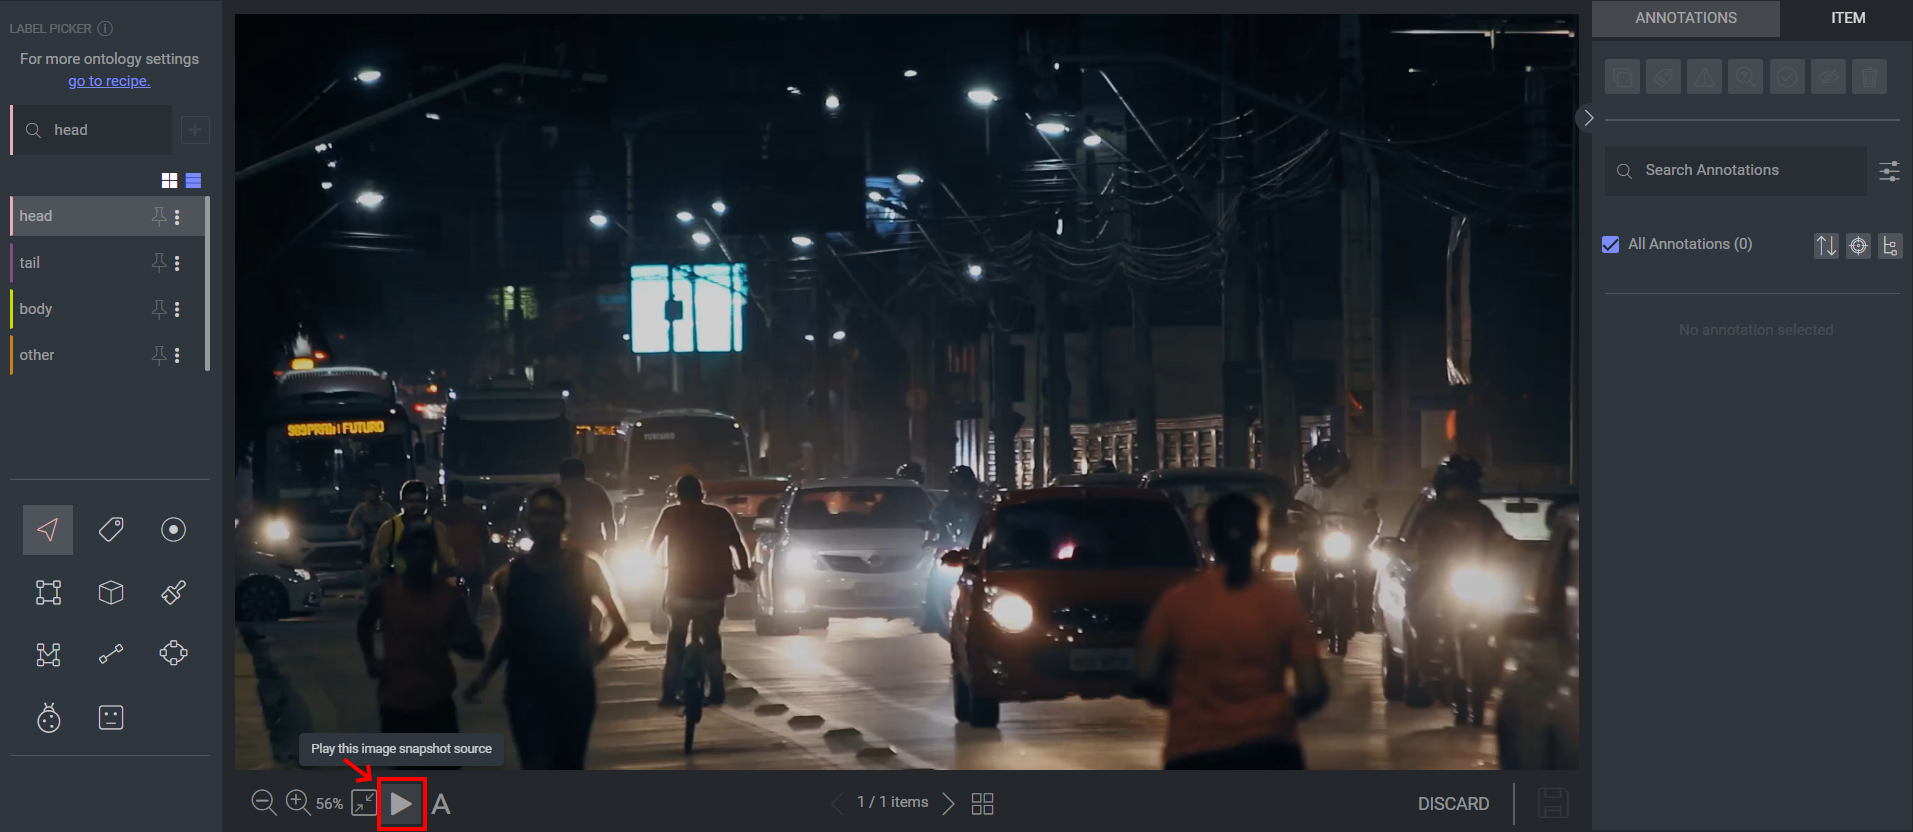
Snapshot Image
A snapshot image can be annotated and edited just like any other image file. However, it also includes a preview of its original video source.
To access the preview, click the video play icon.
This opens a popup window displaying a one-second preview from the original video.
Click the rewind icon to replay the preview as needed.
Hidden Annotations (Occlusion)
During video playback, an annotation might be hidden for a certain period. For example, a person walking in the street while being hidden by a passing car. Once visible again, the person is the same and must be annotated with the same annotation; hence, the annotation needs to be flagged as Hidden in a certain range of frames.
How to Hide Annotation?
Important
The first frame of an annotation cannot be a hidden one.
Annotate the object you wish to annotate.
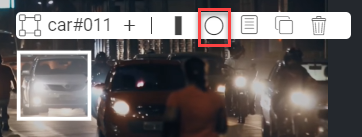
Set the annotation as hidden using the Set Visible/Set Hidden icon, either from the annotation controller or the annotation toolbar. While hidden, annotations are still visible on the canvas.
When the object is visible again, set it accordingly using the Set Visible/Set Hidden icon, either from the annotation controller or the annotation toolbar.
An object can have multiple ranges of hidden frames. The hidden frames are shown in the video annotations bar, making it easier to understand the annotation’s sequence.

Keyboard Shortcuts
General Shortcuts
Action | Keyboard Shortcuts |
|---|---|
Save | S |
Delete | Delete |
Undo | Ctrl + Z |
Redo | Ctrl + Y |
Zoom In/Out | Scroll |
Change Brightness | Vertical Arrow + M |
Change Contrast | Vertical Arrow + R |
Pan | Ctrl + Drag |
Search Labels | Shift + L |
Search a label | Shift + 1-9 (for the sub-labels, use the Tab key) |
Navigate in label picker | Up and Down arrows |
Select label in label picker | Enter |
Tool Selection | 0-9 |
Move selected annotations | Shift + Arrow Keys |
Previous Item | Left Arrow |
Next Item | Right Arrow |
Add Item Description | T |
Mark Item as Done | Shift + F |
Mark Item as Discarded | Shift + G |
Enable Cross Grid Tool Helper | Alt + G |
Hold G to show Cross Grid Measurements | G |
Go to annotation list | Shift + ; |
Navigate in annotation list | Up and Down arrows |
Select/deselect an annotation | Space |
Hide/Show Selected Annotation | H |
Hide/Show All Annotation | J |
Show Unmasked Pixels | Ctrl + M |
Hide/Show Annotation Controllers | C |
Set Object ID menu | O |
Toggle pixel measurement | P |
Use tool creation mode | Hold Shift |
Copy annotations from previous item | Shift + V |
Annotation Tool - Video
Action | Keyboard Shortcuts |
|---|---|
Previous Frame | < |
Next Frame | > |
Hide/Show Selected Annotation | / |
Toggle Play/Pause | Space |
Decrease Play Speed | Z |
Increase Play Speed | X |
Sets annotation start for selected annotations | Shift + S |
Sets annotation end for selected annotations | Shift + E |
Toggles annotation occlusion for selected annotations | Shift + O |
Annotation - Pose
Action | Keyboard Shortcuts |
|---|---|
Next Label | Ctrl + > |
Previous Label | Ctrl + < |
New Pose | N |
Annotation Tool - Polygon
Action | Keyboard Shortcuts |
|---|---|
Delete Vertex | Right Click |
Clear / Close Polygon | Esc |
Clear / Close Polygon | Enter |
Before You Begin
Recipe Video Settings: Explore the available Video Settings that influence annotation workflows within the DDOE platform.
Supported Video formats: View the supported image formats in the Video Studio.
Supported Video Annotation Tools and Types: Supports the following annotation tools: classification, point (with pose), box, note, polygon, polyline, cuboid and auto annotation tools.
Create Video Annotations
Use the label picker to search for labels and select them. Use the pin-to-top option to access frequently used labels.
Use the default tool or select one. For example, classification, box, etc.
Create an annotation on the frame you need.
Adjust Annotations
A common action is setting a new start frame for an annotation after it was created, usually just a few frames back.
Use the marker in the annotation bar to move a few frames back, until you find the right frame.
Click the Start-frame button - that’s it, a new start frame is set.
Working on Annotations
As the video continues, change the annotation as needed. Every change is reflected as a keyframe, visualized in the annotation bar and in the keyframes list.
Move an annotation to adjust it to the tracked object's location.
Set the annotation to hidden when the object is not visible.
Use the ‘Hidden’ action button in the Annotations Bar.
Use the ‘Hidden’ action button from the annotation controller (in the canvas itself).
Resume the annotation's visibility by clicking the button again.
Change annotation labels.
Click the label name in the annotation controller.
Select a different label and approve.
The label color will change in the annotation bar, and a keyframe is created.
Set or change an attribute: Select an annotation and set or change its attribute. A new keyframe is created on that frame.
Auto Grouping for 50+ Annotations
When the number of annotations exceeds 50, the platform automatically groups them to maintain optimal performance. In this mode, the option to expand annotations in the annotations panel is disabled. To turn off this feature, refer to the Disable auto-grouping section in the recipe advanced settings.
Ending Annotations
When a new annotation is created, it ends by default on the last frame of the video.
Set a new end-frame by clicking the button (from the annotation controller or the Annotations Bar) to change the end-frame to be in the current play position.
Applying this functionality to Note Annotations during the QA process facilitates effective communication between annotators and annotation managers.
Using Zoom
Maintain Zoom and Focus Across Frames
Keep Annotation Focused Across Frames setting in the Recipe ensures a consistent and streamlined review experience in the Video Studio.
When an annotator selects an annotation and navigates between frames, the zoom level remains unchanged and the annotation stays centered on the canvas.
This allows annotators to efficiently track annotations across keyframes without needing to readjust the view, enhancing accuracy and workflow continuity.
Pre-Processed and Blocked Video Files
Video Studio does not allow annotation work while video files are being converted to WebM format. The duration of this pre-processing depends on the number and size of the video files.
If the conversion process fails for any reason or if a media-attribute discrepancy between the WebM and the original file is detected, the video studio will prevent annotation work on the file, as annotations cannot be guaranteed to be frame-accurate.
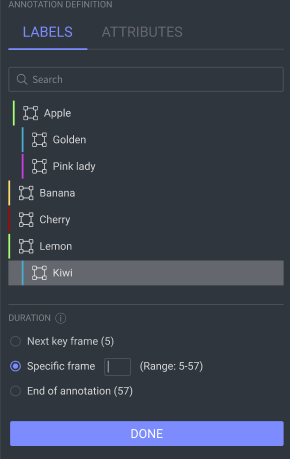
Changing Video Annotations
The process of changing video annotations (labels and attributes) enables faster and more accurate work, especially when correcting models' pre-annotations. When performing such an update, select one of the following duration options:
Next keyframe
Specific frames: Set the requested range of frames
End of annotation
Video Annotation - JSON Output
You can export the video annotations in the JSON format.
More Actions
For more actions, see the Annotation Studio Basics article.