Every account is managed within the context of an Organizational entity, where you can collaborate on projects and share data and resources.
Organization Setup
An Organization is created, named, and linked to your account during the initial setup. If your account does not have an Organization, contact our support team. You cannot create additional Organizations but can join existing ones. To join an existing Organization, request that one of its administrators to add you as a member.
Join an Organization and Invite Members
The Organization represents your company, division, or other management entity working on one or more projects. An organization is created during the onboarding process when you provide the name of your company. If you want to join an existing organization, contact an administrator of that organization and ask to be invited to join. Learn more to invite a member.
Once invited in, you will receive an invitation email and follow the instructions. As soon as you have your organization set up, you can add members to your organization
Sub-Orgs and Client Orgs
Your customers/partners can have their own organizations, so you can provide them with services and share projects.
Go to the relevant platform (either Dataloop.ai or any designated environment), signup by themselves, go through the onboarding process, and create their organization.
Go to the Team >> Add Labeling Company.
Enter the company name and admin email ID, then click Add. The new company is added as an annotation manager in the project and will be able to provide services, add workforce from your organization, manage tasks, etc.
Active Organization (Active ORG)
As members of organizations, you have the context of 'Active organization'. You can view the currently active organization in the left-side menu.
Users with more than one organization membership can change their active organization by clicking on the Organization name dropdown list and searching for or selecting the required organization.
Ownership of new projects
New projects are automatically set to own by the currently active organization and charge them accordingly. Before you open a new project, ensure that you set the correct organization as the active organization.
Invite Org. Members
You can add members to the organization via invitations, by providing the user’s email address. Invited users receive an email to acknowledge their addition to the organization.
Go to Members & Groups from the left navigation pane.
Click on Invite Member. A popup window is displayed.
Enter the email ID of the member.
Select a permission role from the list. The Owner role is the highest and the Worker role is the least permission member of the organization.
If you already have an account with DDOE, accepting the invitation will add you to the organization, and you can set it as an ‘Active Organization.’
If you do not have an account with DDOE, accepting the invitation will take you through the account setup process, and by default, you will be joined into the organization. Until the users accept the invitation, they are listed in the invited section.
.png)
Bulk import of Org. Members
To bulk import members into an organization, use the Import option on the Members & Groups page. Download the template .txt file and then upload the .txt file with the required information of members.
Auto-join to Org. by Domain
Enterprise users can choose to allow automatic joining to their Organization of any new user from their domain and eliminate the need for manual invitations or bulk import operations.
To enable the auto-join feature in an organization, contact DDOE support.
Review Users Projects
While reviewing the list of organization members on the Members & Groups page, you can explore other members' project lists by clicking on the Member Projects icon.
What should I do if I see the message “You are not a member of this project, therefore cannot access it”?
If you're an Admin, you can either claim ownership of the project or contact the current project owner and request to be invited.
If you're a Member or Worker, you should reach out to your supervisor and ask them to add you to the project.
To find more details, see the Adding Team members section.
Organization Groups
Groups within an organization represent the categorization of its members based on various criteria. This categorization might include departments, teams, or any other subdivisions within the organizational framework. Groups provide a way to organize and manage members more efficiently, facilitating communication, collaboration, and coordination within the organization.
User groups allow forming teams as a flexible resource, which are reused collectively in the DDOE system, specifically with workflow tasks.
Labeling service providers can assemble work groups and add them to clients' projects. It allows them to manage their workforce from a single location (in their Organization) rather than individually in every project and task.
Create User Groups
To create a group, follow the instructions:
From the Members & Groups page, click on Create Group. The Create New Group page is displayed.
Enter a group name.
Select users from the Available org Members /Groups section and click the right arrow to add them to the Selected org Members /Groups section.
Click Create Group when you are complete.
Edit and Delete User Groups
To edit or delete a group, follow the instructions:
From the Members & Groups page, select the Groups tab.
Select the group from the list.
Click on Manage Group to edit the group details, or click the Delete Group icon to delete the group.
Add Groups into Projects
Once you are added as an Annotation manager from a labeling service provider to a customer's project, you can add users to this project either individually, by email, or import a group of users from your Organization.
From the customers' project, go to the Users page.
Click on Add Users & Groups, and select the Groups tab.
Active Organization
To view the groups from their Organization, users' Active Organization must be the same as the one that is used when first added to the project.
Add Groups into Tasks
Members groups that are added to projects as groups of users are managed collectively by the Organization owning that group. Adding a group as assignees to an annotation or QA task allows flexibility in resource management.
Every member of the group receives an assignment in a task.
Removing a member from the group will turn the respective assignment to Inactive and clear it from pending items.
New members added to the group automatically receive assignments and items to work on.
Pulling tasks with Org Groups
The flexibility above-mentioned requires setting a task to work in the Pulling allocation method.
You cannot add groups as task assignees when setting it to the Distribution allocation method.
Organization Projects
Select Organization Projects from the left-side navigation menu to view a summary of all projects in your current Active ORG. The following details are available on the Organization Projects page:
Name: It displays the name of the project.
Owning Org: It displays the name of the organization to which the project belongs.
Created by: It displays the email ID of the user who created the project.
Created on: It displays the project's creation timestamp.
Active task definition
Tasks that are not 100% complete are considered active and counted as part of active datasets and active projects containing such active tasks.
Claim a Project Ownership
Organization Admins can set themselves as Project-owners in projects owned by the organization. For example, if an Org-Member creates a project, manages it, and then leaves the company without proper transfer of the project, the Org-Admin can become the Project-Owner without requesting permission.
To set an Organization admin as a project owner:
Log in as the Organization Admin and ensure that your active-ORG is the correct one.
Select the Organization Projects option from the left-side menu.
Locate the relevant project from the list.
Click the more icon, and select the Claim Ownership option.
Notification Channels
The Notification Channel feature in the Organization Projects page allows you to manage notifications. The DDOE notification system manages predefined system alerts and sends notifications to the notification bell on the platform and their emails to notify users based on their subscription to notifications.
Only organization administrator or owner can enable or disable the channel.
All subscribed users across the organization's projects will receive notifications via these channels.
Notification Channels are part of the Organization. Once you are added to an organization, all the channels will be added to each existing project of the organization by default.
When a new project is created, your organization's channels will be added to the new project.
To manage user notification subscriptions, refer to Notification Subscriptions.
Email Channel
An email channel subscription allows you to receive all the platform notifications via email.
You will receive emails for each notification.
- You will not receive more than one email notification for the same error within an hour.
- Service or Pipeline notifications: You will receive notifications for each service ID, Pipeline ID, or error type.
- Workflow notifications:
- You will receive notifications for task ID or Assignment ID.
- You will receive notifications for every new task or assignement.
- If you deactivate the email channel, it does not stop the system's notifications. You will receive system notifications via email.
Channel Actions
Click on the 3-dots menu to view the following actions:
Test Channel: Select this option to test your email channel. A test notification will be sent to your email.
Open GitHub: Clicking on this option will take you to the Notification channel email page of GitHub. You can configure the code as needed if you have permission. This option is available only for the email channel.
Go to the Service Page: Clicking on this option takes you to the applications service page if you have permission.
Uninstall Channel: Clicking on this option allows you to uninstall the channel if you have permission. This option is blocked for channels provided by DDOE.
Rename an Organization
Organization administrators and owners can rename an organization.
Go to the Organization Projects.
Click on the icon next to your organization title.
Rename the Organization's name.
Click Rename.
Set the Paying-Account on Other Projects
Labeling service providers servicing their clients on the DDOE platform need to account for all work and resource consumption that takes place in the project.
To set a service provider's account as the paying subscription on a project created by a different organization (for example, the project is owned by a client, by a service provider organization is paying for it):
A user from the service provider organization must be added to the client's project with the role of 'Project owner'.
Go to My Dashboard >> Find the project card >> Click the Ellipsis icon action button >> Select Set under [your organization name] account.
User Profile
The User Profile section in the DDOE platform serves as a centralized area where users can manage their user account-related information.
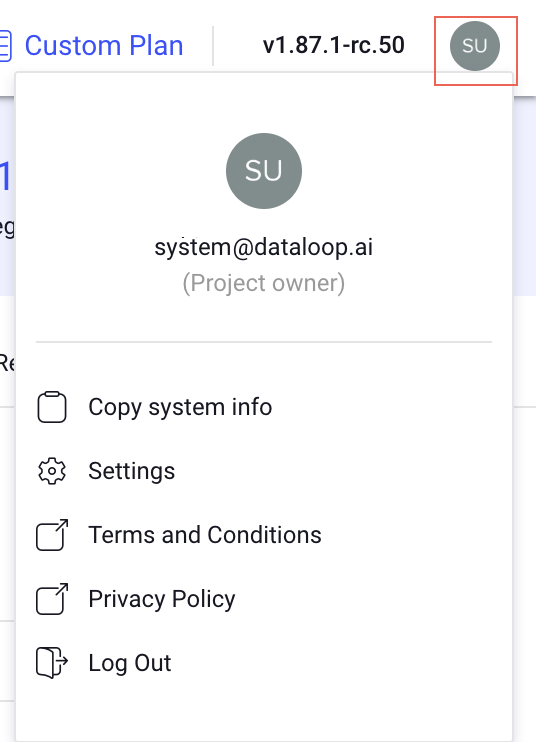
Here’s a breakdown of its key components:
Current Project Role: Displays the user's role in the active project (e.g., Project Owner, Annotator Manager, etc.).
Copy System Info: Provides a quick way to copy technical system information. For example,
{
"Projects Name": "project-star",
"Project ID": "85899006-7814-467c-abab-655d21b553d4",
"Project Role": "Project owner",
"Dataset name": "NA",
"Dataset ID": "NA",
"Item name": "NA",
 "Item ID": "NA",
 "Item link": "NA",
 "Task name": "NA",
"Task ID": "NA",
"Task Item Link": "NA",
"Task Browser Link": "NA",
 "Assignment name": "NA",
 "Assignment ID": "NA",
 "Assignment Item Link": "NA",
 "Assignment Browser Link": "NA",
 "Filter Query": "NA",
 "Org": "Organization with account",
 "Org ID": "d25cecad-34f7-4e38-9750-bd9a1d387bfd",
"User email": "user@dataloop.ai",
"URL": "https://rc-con.dataloop.ai/iam/d25cecad-34f7-4e38-9750-bd9a1d387bfd/datagovernance",
"Timestamp": "Mon, 06 Jan 2025 12:37:20 GMT"
}
User Settings: Allows customization of personal settings, such as:
Time Zone: Select your time zone based on your location.
Notification Subscriptions: Enable or disable project notifications.
Terms and Conditions: Contains the legal agreement users accept when using the platform. Outlines the rules, rights, and responsibilities of both the platform and the user.
Privacy Policy: Explains how the platform handles user data. Covers topics like data collection, storage, usage, and sharing practices. Ensures compliance with regulations like GDPR or CCPA.
Log Out: Click to log out.