Overview
The application enables users to deploy packages and execute services utilizing compute resources and data available within the DDOE platform. Designed for flexibility and scalability, it empowers users to meet diverse operational requirements while streamlining and automating complex workflows. Usage of this application consumes from the Serverless Automation budget. Functions run in the Application framework often make extensive use of DDOE Python SDK, to interact with the platform. For detailed SDK guides, read here.
Package (DPK): A Package is a collection of static code with a schema that holds all the Modules, functions, and the code base from which they can be taken. Packages are used to build models or deploy services and refer to an entity that is processed using the application technology. Packages can be public, global, or specific to a particular Project and are limited to a maximum size of 100 MB.
Function: Functions are the basic functional units of application. You can define the functions in the class, and when the service is deployed, you can run any of them. Functions are defined within a module, and multiple functions can be an access point to the application.
Service: A serverless computing service allows users to run code without the need to manage servers or infrastructure. It can also be conceptualized as a deployed package that serves the code. When provided with the matching input for a function, it runs and returns the output.
Application: An application is a software that is built using the Function as a Service computing model. In this model, the application's functionality is implemented as individual, independent functions or pieces of code. Each function is designed to perform a specific task and is triggered by events such as user actions, incoming data, or time-based events.
Organizational Applications
Organization-level applications allow administrators and developers to deploy applications that can be shared and reused across multiple projects within the same organization. Unlike project-level applications, these applications are installed once at the organization scope and are deployed to the organization's System Project.
Once installed, the application becomes available to projects within the organization, providing a centralized way to manage shared services, workflows, and integrations.
Benefits
Create and deploy applications at the organization level.
Share applications across multiple projects within the organization.
Enable application services to access data from projects across the organization, based on the applicable permissions.
Reduce duplicate application deployments by maintaining a single organization-wide installation.
System Project and Organization Files
Each organization has a dedicated System Project that contains a Binaries dataset used to store organization-level files, deployment packages (DPKs), and application resources.
Access to files in the System Project is controlled by user roles:
User Role | Read Access | Write Access |
|---|---|---|
System Project Member | Yes | Yes |
Project Developer and Above | Yes | No |
Annotation Manager and Below | No | No |
Deployment Rules
Organization-level DPKs and applications are stored and managed centrally within the System Project.
A DPK can be installed only once at the organization scope, by adding
scope = ‘organization’in theapp jsonIf a DPK is installed at the organization level, it cannot be installed again within one of the organization's projects, and vice versa.
Organization-level applications follow the same authentication and authorization model as organization-level DPKs.
Supported Codebase Sources
The application codebase can be sourced from:
Stream-based codebases (
OrgorPublicscope)Git repositories
Items stored in the organization's System Project
Package
A Package is installed by uploading files or connecting the codebase from Git.
Packages should have a well-defined class structure.
Classes contain different functions.
Modules translate and define classes.
A Package is a static code with a schema that contains all modules, functions, and the code base from which they can be taken. It also stores its revision history, allowing services to be deployed from previous package revisions.
Prerequisites
Working with DDOE SDK requires having Python installed with the
Dtlpypackage. Read these instructions for more information.Using Applications requires being a member of an Organization. To become a member, ask a manager to add you.
A Package is split into Modules (not Python modules). For each Module, the Package specifies where the entry point of the Module within the Codebase is, as well as how-to load it and the configuration by which the Module should be loaded, and how the Class's functions should be run.
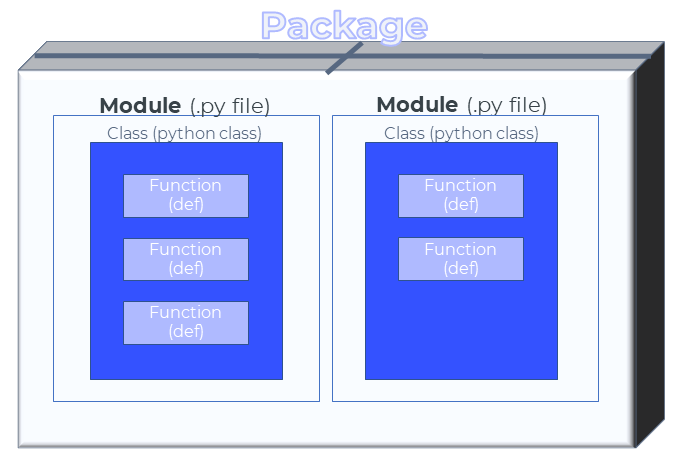
Only project members with the role Developer or Project Owner can push/delete a package.
Codebase
A codebase contains the source code, modules, and functions that make up an application or service deployed on the platform.
You can add a codebase in one of the following ways:
Upload a
.zipfile – The platform stores the uploaded package as an item.Connect a Git repository – The platform supports both public and private Git repositories. For private repositories, you must provide the required authentication secrets to access the source code.
If you wish to download the codebase, use the following script:
# Get the service
service = dl.services.get(service_id='my_service _id')
# get the item object of the code base
code_base = dl.items.get(item_id=service.package.codebase_id)
# Download the code to a local path
code_base.download(local_path='where_to_download_the_codebase')
Versioning
Packages have a versioning mechanism. This mechanism allows you to deploy a Service from an old revision of the Package.
Every time you modify the package attributes or codebase by pushing a package or by performing package.update(), a new version of this package is created. The package revisions field contains a list of all prevision states of the Package.
If the codebase has no changes, you can use, package.update(); if not, you need to push a new one. When you deploy a Service you can specify a specific revision from which to deploy the Service, the default is the last update.
If the codebase has no changes, you can use, package.update(); if not, you need to push a new one.
# the package latest version
package.version
# List of all package versions
package.revisions
Modules
These are not Python modules.
Modules are a reference to a Python file containing the Python class (by default, ServiceRunner) with functions inside it.
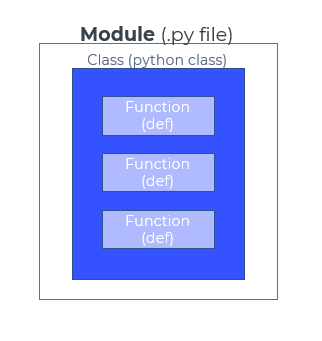
The idea behind separating a package into modules is to allow users to develop many services that share some mutual code using one codebase. This means you can translate and define the code-base or a substance of it to a service, without needing a new code-base.
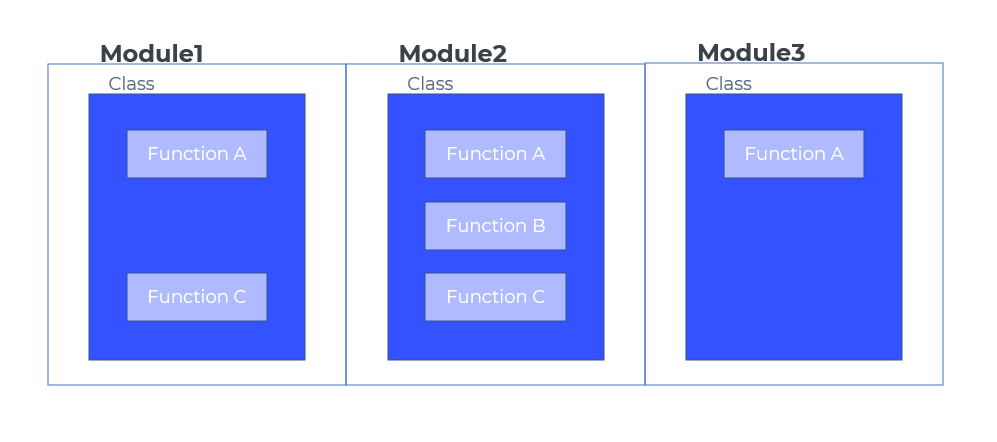
Using the module, you can load a model on the service deployment and then run any function that references it (see the init method for reference) or proceed to the next step in the pipeline.
A Module contains 2 fields that determine which code within the Codebase to load, initialize and run. The fields are entryPoint and className.
Entry Point
The entry point is the name of the Python file containing the class and functions of the package code. It should end with .py. The default entry point is main.py.
The entry point specifies the relative path from the Codebase root to the main file that should be loaded when loading the Module.
Class Name
The className specifies the name of the Python class within a file that should be loaded in the Service. The class referenced by className must extend dl.BaseServiceRunner to work. The Python class (by default, is ServiceRunner. You can name it however you like. Just change the class_name attribute of the Package's Module) will be loaded when the service is deployed, see the init method for reference.
Module JSON
A module does not have its own JSON file. The basic scheme looks like this:
{
    "name": "default_module",  # module name
    "className": "ServiceRunner",  # optional
    "entryPoint": "main.py",  # the module entry point which includes its main class and methods
    "initInputs": [],  # expected init params at deployment time
    # list of module functions that can be executed from remote
    "functions": [
        {
            "name": "run",  # function name - must be the same as the actual method name in the signature
            "description": "",  # optional -  function description
            # expected function params
            "input": [
                {
                    # input name - identical to input param name in the signature
                    "name": "item",
                    "type": "Item",  # Item / Dataset / Annotation / JSON
                }
            ],
            "output": [],  # not implemented - keep blank
        }
    ],
}
Class Functions
This is the basic running unit of the application. You can define the functions on the class and when the service is deployed, you can run each of them.
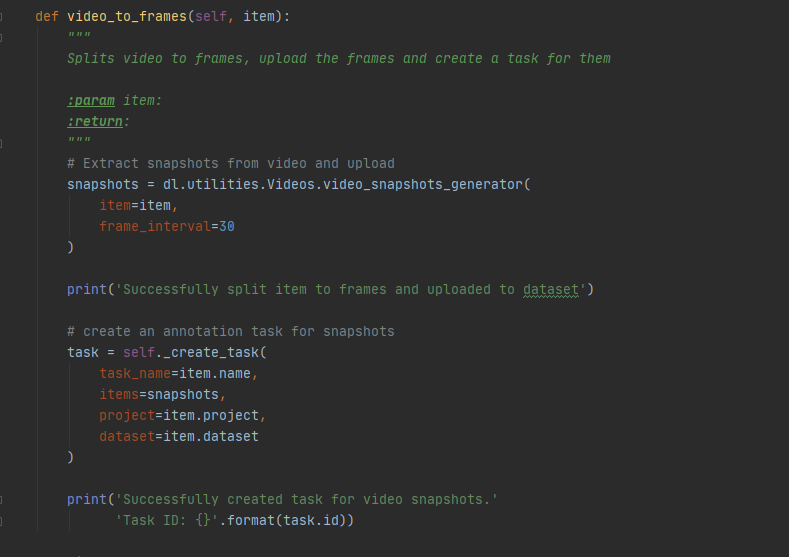
Class Functions Input types
Each function's input has a name and a type. Input types can be grouped into two categories:
JSON: This allows the function to receive all possible inputs as well as have no prepossessing done by the runner.
Dataloop types("item", "dataset", etc.): When invoking the function, the ID of the resource should be passed as an input. See the types referenced in the repositories.
Package JSON
{
  "name": "default_package",
    "modules": [
      {
        "name": "default_module",
        "className":"ServiceRunner",
        "entryPoint": "main.py",
        "initInputs": [],
        "functions": [
          {
            "name": "run",
            "description": "This description for your service",
            "input": [
              {
                "name": "item",
                "type": "Item"
              }
            ],
            "output": []
          }
        ]
      }
    ]
}
Service
A Service is a package deployed using defined compute resources.
Init method – Runs on service initialization.
Execution – Function invocation on items or other entities is considered an execution.
A Service is a running deployment of Modules within a Package. Running a service requires having a bot user.
The Service entity specifies the Module it deploys, the arguments passed to the Module's exported class' init method, and the infrastructural configuration for it, such as the number of replicas (machine instances) and concurrent executions.
Once the service is ready, its functions can be invoked with the required input parameters and entities.
Multiple services can be deployed from the same module.
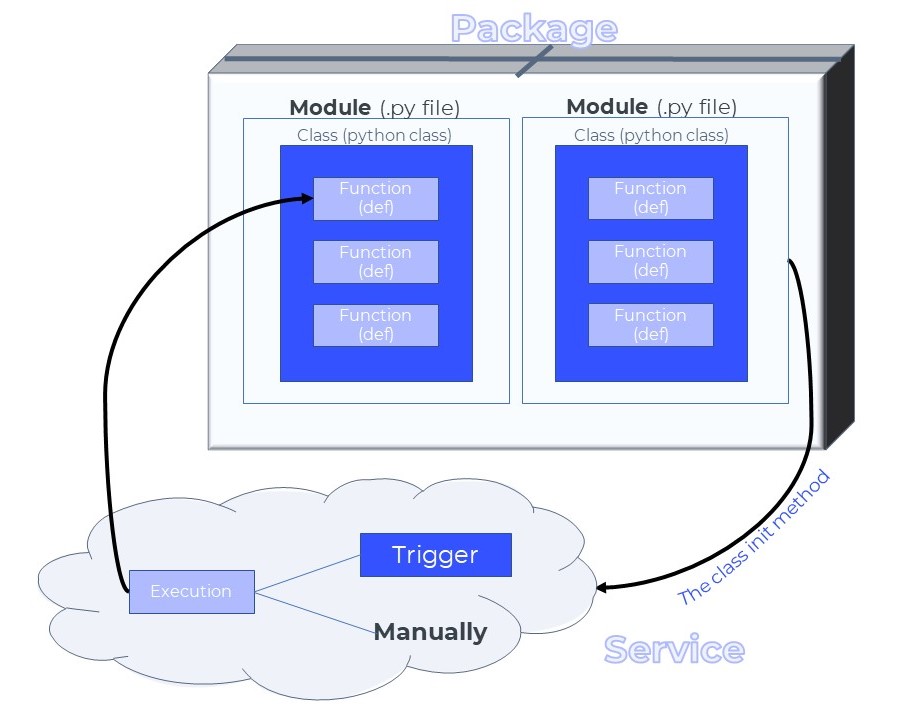
Init Method
The init method is invoked immediately after loading the Module and is used for initializing the replica of the Service.
The modules'
Initmethod inputs schema is defined in the Modules'initInputsfield.The actual value passed to the
initmethod at loading time is taken from theinitParamsfield of the service.
For example:
For the Image bounding box classifier service, the
initmethod will download the model and load it to its memory.All subsequent function invocations in a Service will use the loaded model to calculate the bounding box for the image.
Service Status
A service has an operational status assigned to it. Status can be one of the following values:
Active: An active service has running replicas or an autoscaler configured to create replicas automatically when executions are created for the service.
Inactive: When a service is paused, all replicas go down. Any trigger or UI slot set for the service will become inactive as well.
Initializing: Initializing one or more of the service replicas. This status is usually displayed after activating a service, or when the auto scaler is in action.
Error: When the service fails to deploy. The service replicas have active errors (can be found under Error info).
Versioning
A deployed service gets a version that represents its state. Every time a service is updated its version number increments and its previous value is saved in the service revision. Services can be deployed using earlier versions.
To view the service revisions:
# List service revisions history from past updates using  'service.update()' command
service.revisions
# Current service version for currently used package codebase (services can use old package versions)
service.package_revision
Service JSON
{
  "name": "service-name",           # service name
  "packageName": "default_package", # package name
  "packageRevision": "latest",      # What package version to run?
  "runtime": {
    "gpu": false,                   # Does the service require a GPU?
    "replicas": 1,                  # How many replicas should the service create
    "concurrency": 6,               # How many executions can run simultaneously?
    "runnerImage": ""               # You can provide your docker image for the service to run on.
  },
    "triggers": [],                 # List of triggers to trigger service
    "initParams": {},               # Does your init method expect input if it does provide it here?
    "moduleName": "default_module"  # Which module to deploy?
}
Execution
An execution is a single function invocation with input data. As a Dataloop entity, Executions has unique IDs, statuses, and logs, which allows for monitoring it from invocation to completion.
Execution Input
The execution input is similar to the input the function requires, provided to the method the execution invokes.
For example:
dl.FunctionIO(name='model_filename', type=dl.PackageInputType.JSON),
dl.FunctionIO(name='dataset', type=dl.PackageInputType.DATASET),
dl.FunctionIO(name='item', type=dl.PackageInputType.ITEM)
#When executing:
execution = service.execute(execution_input=dl.FunctionIO(name='item', value='item-id',type=dl.PackageInputType.ITEM), project_id='project-id', function_name='function-name')
The input of DDOE type ( item, dataset, annotation, etc.) must be passed with an ID of the corresponding entity. The input of type Json can have any JSON serializable value and will provide it as is to the method.
Execution Status
Every execution has a status:
execution.statusLogholds an array of all status updates of the executionexecution.latest_statusis the latest status update of the executionThe execution status can be updated by using the Progress object
Progress updates are API calls and can only be updated in increments of five.
For example: When performing progress.update(progress=4) and then progress.update(progress=7) the update to 7 won't be in effect. However, performing progress.update(progress=9) will have an effect.
class ServiceRunner(dl.BaseServiceRunner):
    def detect(self, item: dl.Item, progress: dl.Progress):
        progress.update(status='inProgress', progress=0,
                        message='execution started')
        ###############
        ### DO WORK ###
        ###############
        progress.update(status='inProgress', progress=30)
        ####################
        ### DO MORE WORK ###
        ####################
        progress.update(status='inProgress', progress=80)
        ####################
        ### DO MORE WORK ###
        ####################
        progress.update(status='inProgress', progress=100,
                        message='execution completed')
Retry Mechanism
Executions failure to complete may occur for various reasons, for example:
Bug in the service code
Timeout. To view and update the execution timeout value, see View and Update Execution Timeout.
Lack of execution resources
Service unavailable
By setting the value of the max_attempts attribute, services can be configured to automatically retry failed executions. Consequently, the number of attempts on a single execution can be read from the attempts attribute.
Waiting for Execution
Processes can be paused until an execution is completed with either status (success/failed/aborted/etc), using the execution.wait() method.
Execution cURL
To export the execution in a cURL format:
curl = service.executions.create(return_curl_only=True)Rerun Execution
To rerun failed executions:
execution = dl.executions.get('execution_id')
execution.rerun()
Execution JSON
{
  "id": "string",
  "url": "string",
  "createdAt": "2020-11-18T17:41:25.740Z",
  "updatedAt": "2020-11-18T17:41:25.740Z",
  "creator": "string",
  "attempts": 0,
  "maxAttempts": 0,
  "toTerminate": true,
  "input": {},
  "output": {},
  "feedbackQueue": {
    "exchange": "string",
    "routing": "string"
  },
  "status": [
    {
      "timestamp": "2020-11-18T17:41:25.740Z",
      "status": "created",
      "message": "string",
      "percentComplete": 0,
      "error": {},
      "output": {}
    }
  ],
  "latestStatus": {
    "timestamp": "2020-11-18T17:41:25.740Z",
    "status": "created",
    "message": "string",
    "percentComplete": 0,
    "error": {},
    "output": {}
  },
  "duration": 0,
  "projectId": "string",
  "functionName": "string",
  "serviceId": "string",
  "triggerId": "string",
  "serviceName": "string",
  "packageId": "string",
  "packageName": "string",
  "packageRevision": 0,
  "serviceVersion": 0,
  "syncReplyTo": {
    "exchange": "string",
    "route": "string"
  }
}
Trigger
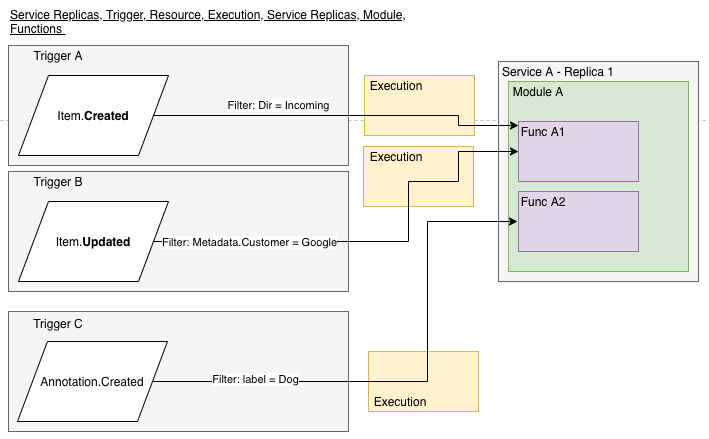
The Trigger is a service configuration for automatic invocation of items (or other entities) to functions based on schedule or event criteria.
CRON Trigger – Schedule-based trigger. For example: every 1 hour, 1 day, etc.
Event Trigger – Criteria-based invocation. For example: when the item is created, updated, deleted, etc.
The DDOE application enables you to register functions to events in the system. Use the Triggers entity for the registration. A Trigger contains a project on which it monitors events, a resource type, the action that happened to the resource, a DQL (The Data Query Engine) filter that checks whether to invoke the operation based on the resource JSON, and an operation.
Currently, the only supported operation is the creation of an execution.
Trigger Events - Resource
Events of which entities to listen to?
Resources are entities in the DDOE system: Item, Annotation, Dataset, Task, etc. Each resource is associated with an action to define a specific event for the trigger. Once an event trigger occurs, the resource object is delivered as an input for the execution created.
Note: You can only have one resource per trigger. If you wish to have more than one, use a manual execution from a new function.
dl Enum | API Value | Dataloop Entity | Available Actions (*) |
|---|---|---|---|
dl.TriggerResource.ITEM | Item | Platform item | Created,Updated,Deleted,Clone |
dl.TriggerResource.DATASET | Dataset | Platform dataset | Created,Updated,Deleted |
dl.TriggerResource.ANNOTATION | Annotation | Platform item's annotation | Created,Updated,Deleted |
dl.TriggerResource.ITEM_STATUS | ItemStatus | Platform Item's status | Updated**, taskAssigned |
dl.TriggerResource.TASK | Task | Platform task | Created,Updated,Deleted,statusChanged |
dl.TriggerResource.ASSIGNMENT | Assignment | Platform assignment | Created,Updated,Deleted,statusChanged |
dl.TriggerResource.MODEL | Model | Platform Model | Created,Updated,Deleted |
(*) Your function can be triggered by the following actions when taken over a resource (a specific resource must be set!):
Created: run your function on any newly created item.
Update: run your function on any updated item. See (**) for more details regarding "itemStatus.Updated".
Deleted: run your function on any deleted item.
Clone: run your function on items created by a 'clone' operation.
taskAssigned: once an item is assigned to a task, run the function over this item. To use this event, set the trigger: "ItemStatus.TaskAssigned".
statusChanged: once a task/assignment status is changed, run the function over this task/assignment (task 'completed', assignment 'done').
(**) Use the trigger "itemStatus.Updated" to run your function over items once their status is changed within a task context ('approved', 'discard', etc.).
Trigger Events - Action
What event action types are available?
Actions are the events that will trigger the function.
For further explanation regarding the actions, read the explanations above (*).
header | dl Enum | API Value | Available Modes |
|---|---|---|---|
cell | dl.TriggerAction.CREATED | Created | Once |
cell | dl.TriggerAction.UPDATED | Updated | Once, Always (excluding Task & Assignment) |
cell | dl.TriggerAction.DELETED | Deleted | Once |
cell | dl.TriggerAction.CLONE | Clone | Once |
cell | dl.TriggerAction.STATUS_CHANGED | statusChanged | Once, Always (excluding Task & Assignment) |
cell | dl.TriggerAction.TASK_ASSIGNED | taskAssigned | Once, Always |
Trigger Execution Mode
Some events, such as item updates, can happen more than once on the same entity. Trigger execution mode defines those repeating events that will trigger the service every time they happen, or only on the first time they happen.
Once: The function will only run once when triggered. For instance, for an "item" resource and an "Updated" action, the function will only work on the first updated item.
Always: The function will run each time when triggered. For instance, for an "item" resource and an "Updated" action, the function will run for every updated item.
dl Enum | dl.TriggerExecutionMode.ONCE |
|---|---|
dl.TriggerExecutionMode.ONCE | Once |
dl.TriggerExecutionMode.ALWAYS | Always |
Be careful not to loop a trigger event. Known examples:
Creating a function that adds items to a folder, while an event trigger "item.created" is set for this function.
Creating a function that updates items, while an event trigger "item.updated" with execution_mode='always' is set for this function.
The function will be triggered again and again when implementing the above functions.
Trigger JSON
{
  "name": "service-name",
  "packageName": "default_package",
  "packageRevision": "latest",
  "runtime": {
    "gpu": false,
    "replicas": 1,
    "concurrency": 6,
    "runnerImage": ""
  },
    "triggers": [
      {
        "name": "trigger-name",
        "filter": {
          '$and': [{'dir': '/train'}, {'hidden': False}, {'type': 'file'}]},
        "resource": "Item",
        "actions": [
          "Created"
        ],
        "active": true,
        "function": "run",
        "executionMode": "Once"
      }
    ],
    "initParams": {},
    "moduleName": "default_module"
}
Trigger at Specific Time Patterns
DDOE application enables you to run functions at specified time patterns with constant input using the Cron syntax.
In the Cron trigger trigger specification, you specify when you want the trigger to start, when you want it to end, the Cron spec specifying when it should run, and the input that must be sent to the action.
# start_at: iso format date string to start activating the cron trigger
# end_at: iso format date string to end the cron activation
# inputs: dictionary "name":"val" of inputs to the function
import datetime
up_cron_trigger = service.triggers.create(function_name='my_function',
                                          trigger_type=dl.TriggerType.CRON,
                                          name='cron-trigger-name',
                                          start_at=datetime.datetime(2020, 8, 23).isoformat(),
                                          end_at=datetime.datetime(2024, 8, 23).isoformat(),
                                          cron="0 5 * * *")
Triggers Examples
Trigger for Items Uploaded to Directory /Input
filters = dl.Filters(field='dir', values='/input')
trigger = service.triggers.create(function_name='run',
                                  resource=dl.TriggerResource.ITEM,
                                  actions=dl.TriggerAction.CREATED,
                                  name='items-created-trigger',
                                  filters=filters)
Trigger for Items Updated in Project
trigger = service.triggers.create(function_name='run',
                                  resource=dl.TriggerResource.ITEM,
                                  actions=dl.TriggerAction.UPDATED,
                                  name='items-updated-trigger')
Trigger for Annotated Video Items that are Being Updated
filters = dl.Filters(field='annotated', values=True)
filters.add(field='metadata.system.mimetype', values='video/*')
trigger = service.triggers.create(function_name='run',
                                  resource=dl.TriggerResource.ITEM,
                                  actions=dl.TriggerAction.UPDATED,
                                  name='items-updated-trigger',
                                  filters=filters)
Trigger for Datasets that are Being Updated
trigger = service.triggers.create(function_name='run',
                                  resource=dl.TriggerResource.DATASET,
                                  actions=dl.TriggerAction.UPDATED,
                                  name='dataset-updated-trigger')
Trigger for Annotations Created from Box Type
filters = dl.Filters(field='type', values='box', resource=dl.FiltersResource.ANNOTATION)
trigger = service.triggers.create(function_name='run',
                                  resource=dl.TriggerResource.ANNOTATION,
                                  actions=dl.TriggerAction.CREATED,
                                  name='annotation-created-trigger',
                                  filters=filters)
Trigger for Annotations Updates of Label "DOG"
filters = dl.Filters(field='label', values='DOG',resource=dl.FiltersResource.ANNOTATION)
trigger = service.triggers.create(function_name='run',
                                  resource=dl.TriggerResource.ANNOTATION,
                                  actions=dl.TriggerAction.CREATED,
                                  name='annotation-created-trigger',
                                  filters=filters)
Trigger for Item Status Change in a Task
trigger = service.triggers.create(function_name='run',
                                  execution_mode=dl.TriggerExecutionMode.ALWAYS,
                                  resource=dl.TriggerResource.ITEM_STATUS,
                                  actions=[dl.TriggerAction.UPDATED],
                                  name='item-updated-status')
UI Slot
UI Slots are predetermined locations/buttons in the Platform. Assigning a function to one or more specific UI Slots allows users to invoke entities in context (items, annotations, datasets) to the selected function.
For example: Assigning YOLOv5 to the Annotation Studio allows running the model on the item and generate annotations._
Utilizing Cache
Enabling cache in your projects allows services to use cached services, increasing performance while reducing API calls. To activate the cache, contact DDOE.
IP Address Whitelisting
Hosting Applications on a remote server or having applications send data/events to one may require whitelisting the IP addresses used by the DDOE system.
Whitelisted IPs:
34.76.183.75
104.199.5.216
35.241.168.191
35.240.12.251
34.78.187.121
34.78.238.94
34.78.5.89
GIT Reference & Examples
For Application-related developer tutorials and examples, refer to Dataloop GIT tutorials.
Annotation Automation
Examples of functions that perform automation on items and annotations.
There are 3 functions in this package:
Box to Segmentation – Receives a box detection annotation and an item and returns a segmentation of the detected object.
4-Points – Receives a 4-point Polygon that represents object edges and returns object segmentation.
Auto Annotation – Receives and auto annotates an item using Maskrcnn.
git clone https://github.com/dataloop-ai/annotation-automation.gitImage Exif
Example of a function that extracts image Exif information and uploads it to item's metadata.
git clone https://github.com/dataloop-ai/image-exif.gitVideo Tracker
Example of functions that track bounding-box annotations:
git clone https://github.com/dataloop-ai/video-tracker.gitMore References
Using External Credentials (Secrets, Token Keys, API Keys, etc.)