Overview
In Dataloop’s Annotation Platform, a Recipe is a comprehensive configuration that defines how data should be annotated for a specific task. A recipe contains all components required to standardize and manage the annotation process — including the project’s ontology (labels and attributes), annotation tools, studio settings, recipe details, advanced settings, recipe actions, and detailed PDF-based work instructions.
Recipes ensure consistency and structure across annotation workflows, allowing teams to standardize labeling practices and improve data quality for training machine learning models. Recipes can be easily created, cloned, customized, or switched per dataset, supporting both flexibility and scalability in annotation projects.
.png)
Core Components of Classic Recipe
Ontology – Define a hierarchical label structure, set custom label colors, and upload label thumbnails.
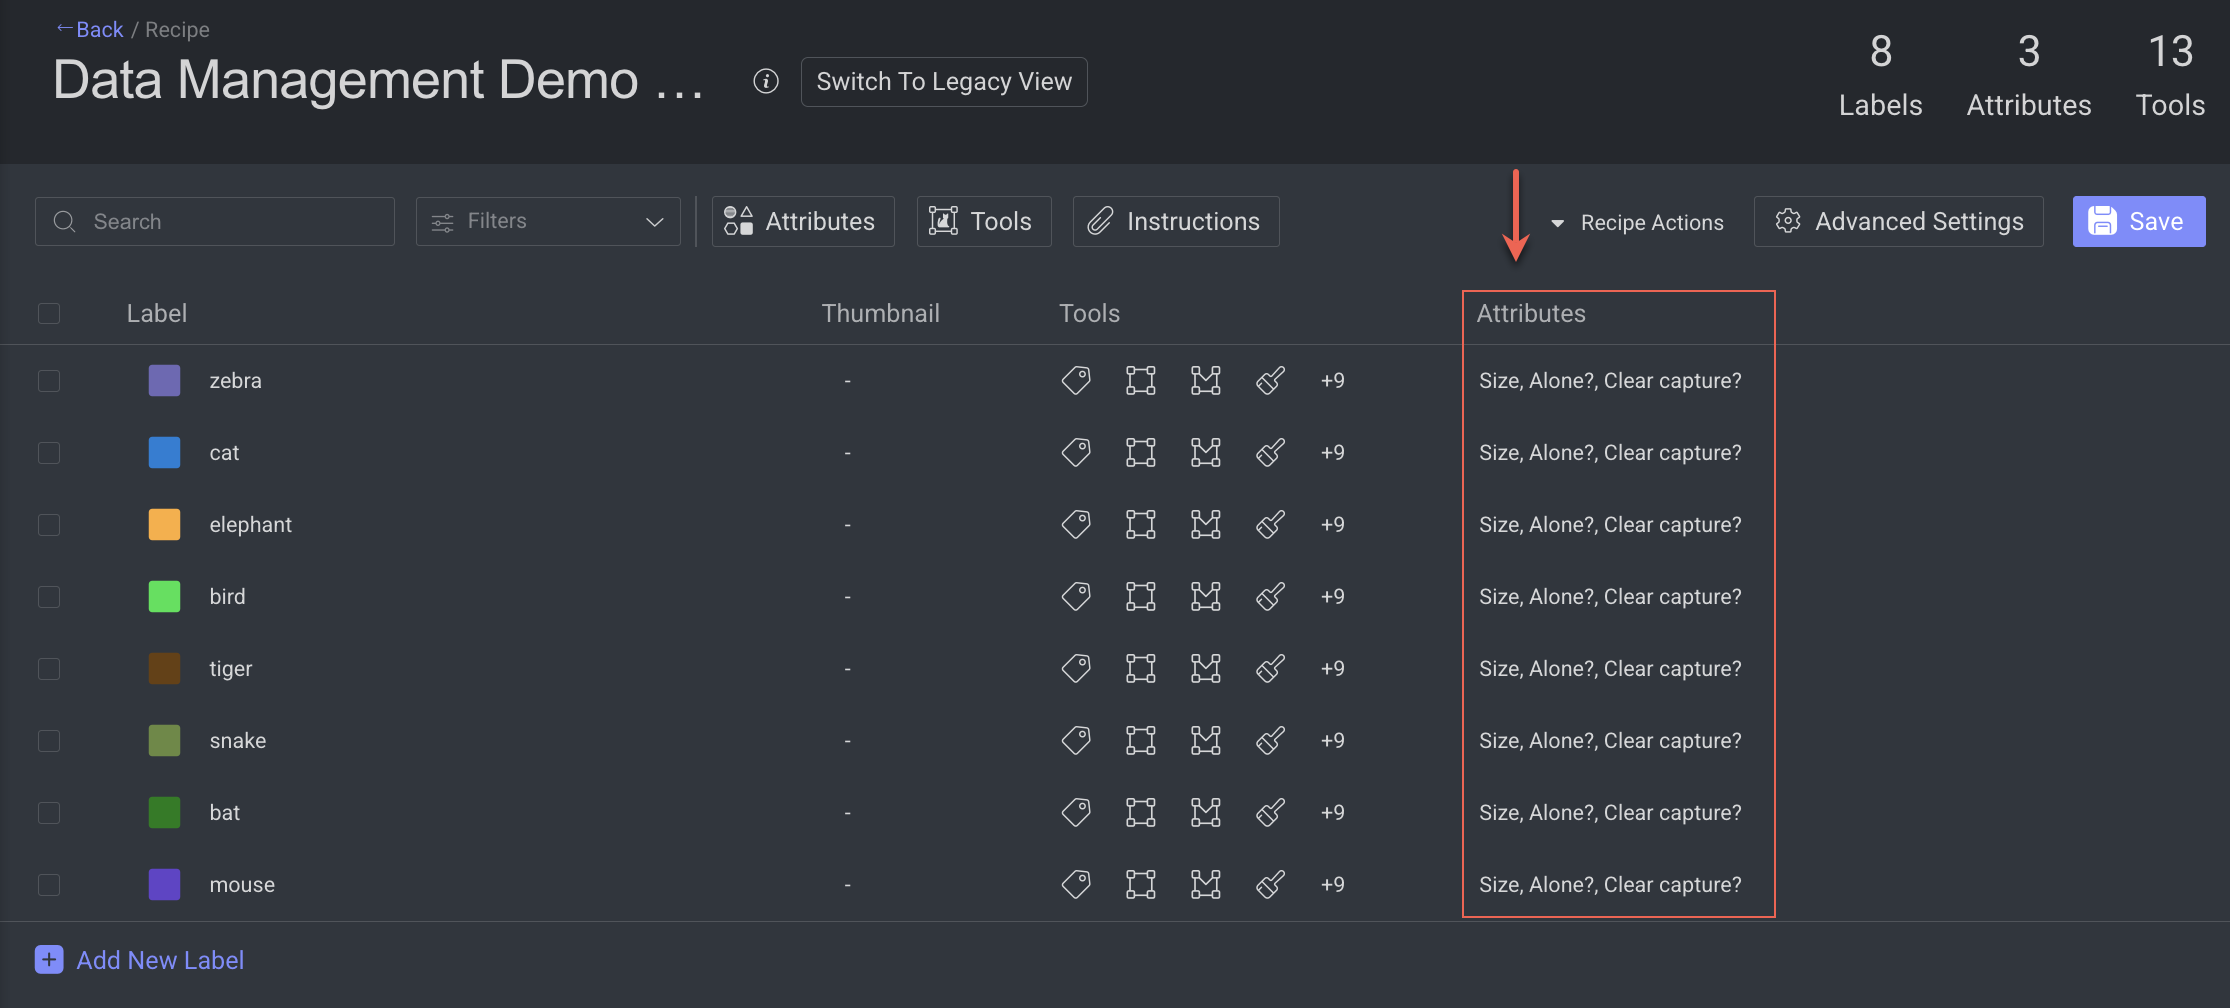
Attributes – Create and manage attribute types and values.
Annotation Tools – Choose and configure tools for different annotation types.
Studio Settings – Adjust workspace display, shortcuts, and interface behavior.
Advanced Settings – Control automation, task rules, and performance parameters.
Instructions – Attach and manage Annotation and QA instruction PDFs to guide users during labeling and review.
Create Classic Recipes
Navigate to Recipes from the lift-side menu.
Click Create Recipe.
.png)
Recipe Name: Enter a name for the new recipe.
Select the task type: Classic ML.
Click Create Recipe. The new recipe page is displayed.
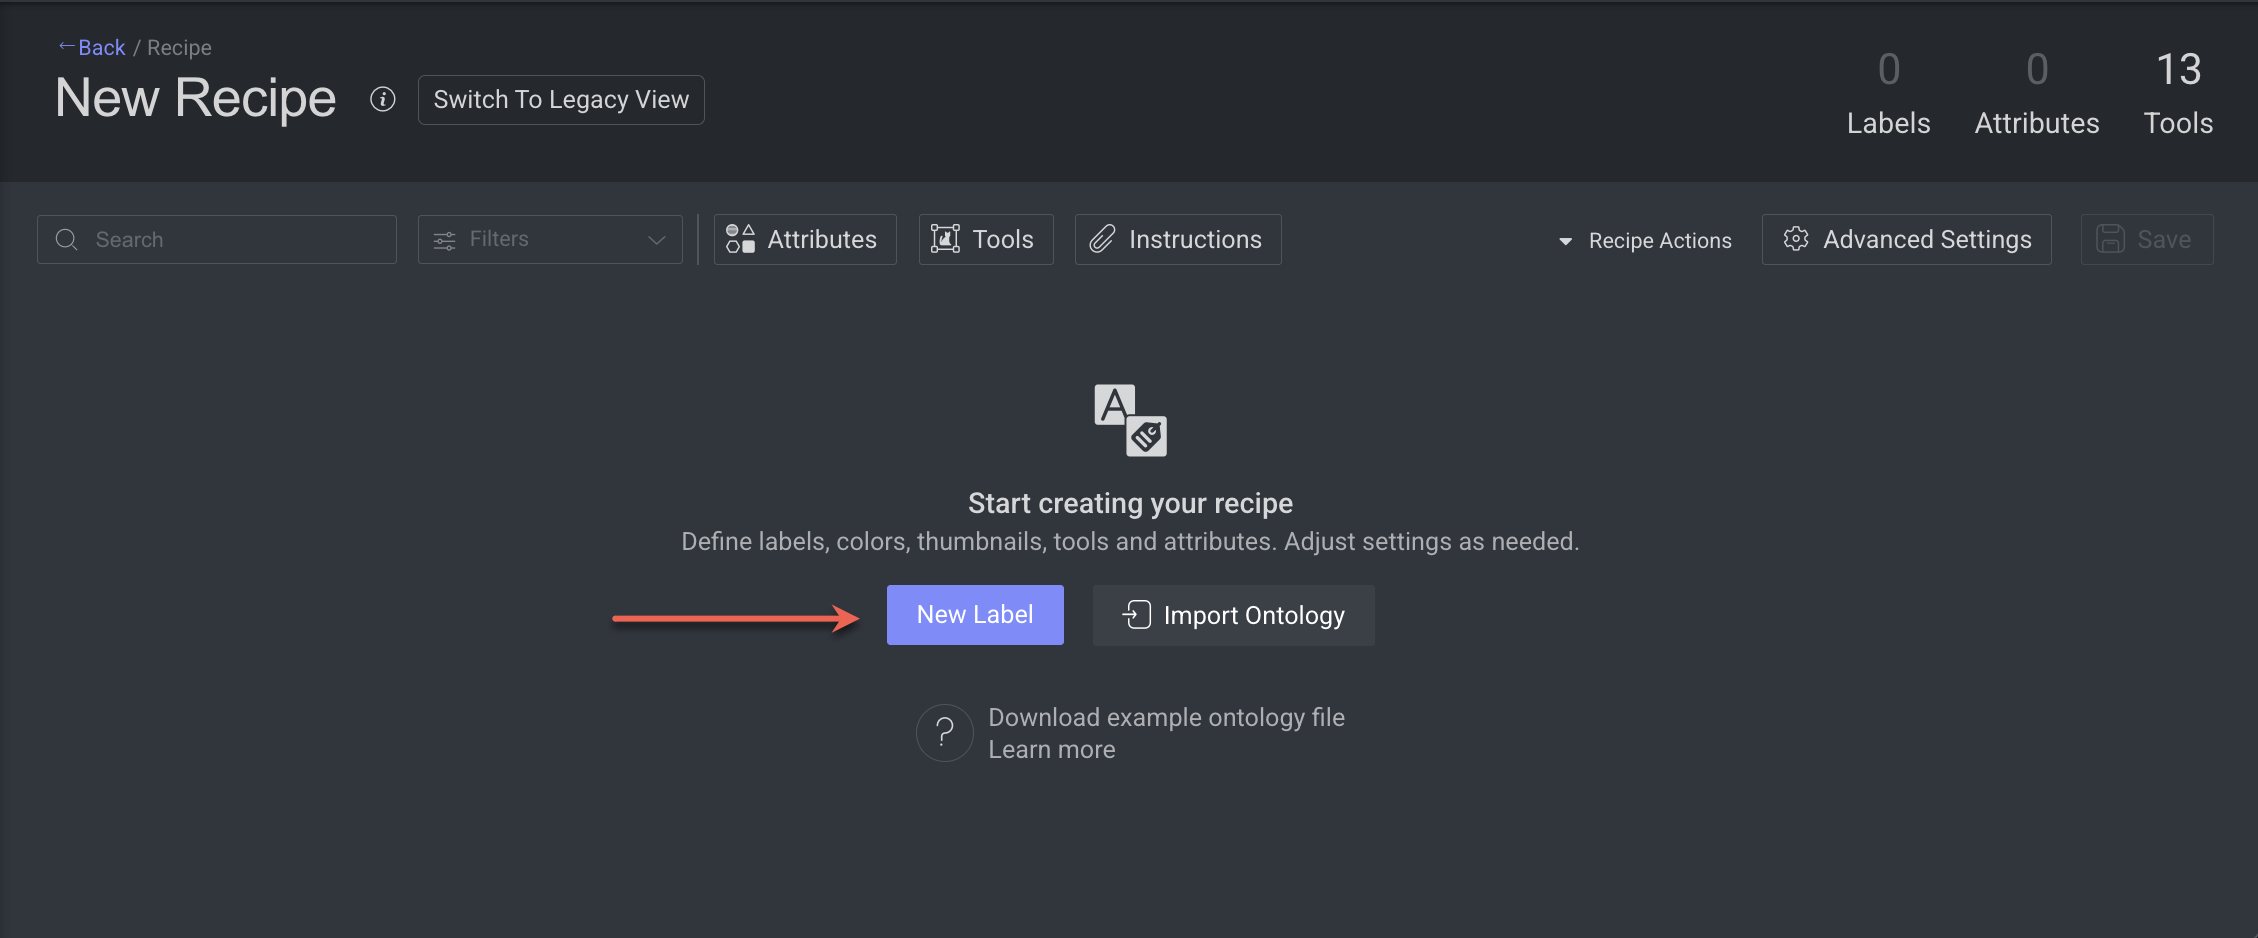
Start creating labels, or import ontology. To create labels, click New Label. The labels, tools, and attributes creating page is displayed.

Enter a name for the label and Press Enter.
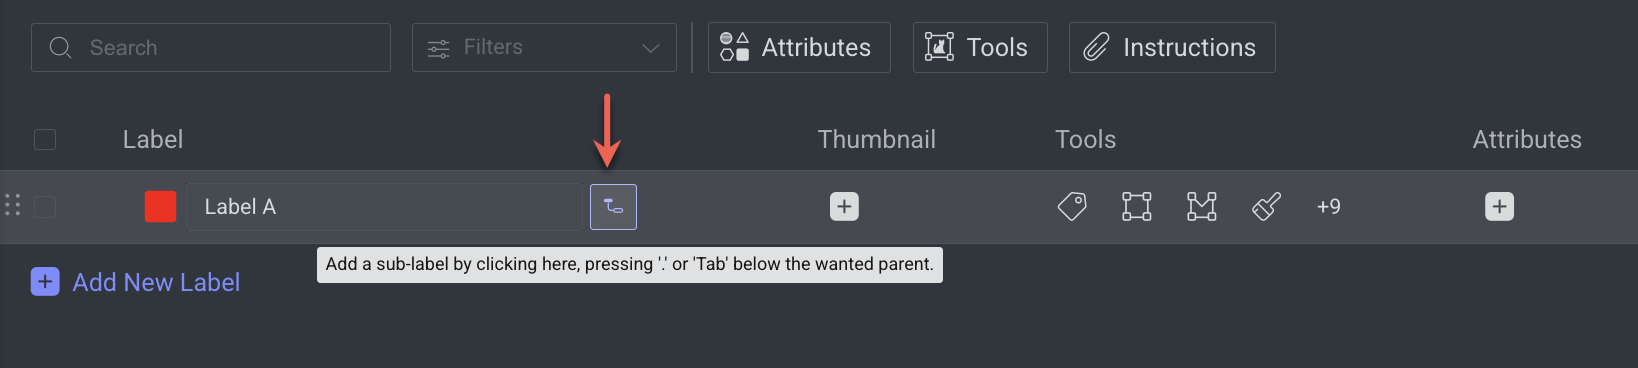
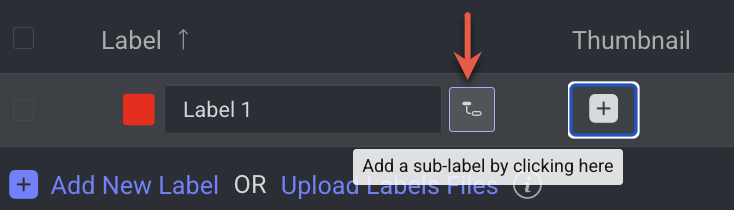
Sub-labels: Click on the Sub-label icon to add sub-labels. A sub-label section will be displayed.
Enter a name for the sub-label. For example, the parent label name
Label Awill be added to the name that you have given for the sub-labelSub label A:Label A.Sub label AThumbnail: Click on the + icon under the Thumbnail column, and upload an image to the selected label or sub-label.
Tools: Select one or more annotation tools for the label according to the task or data type.
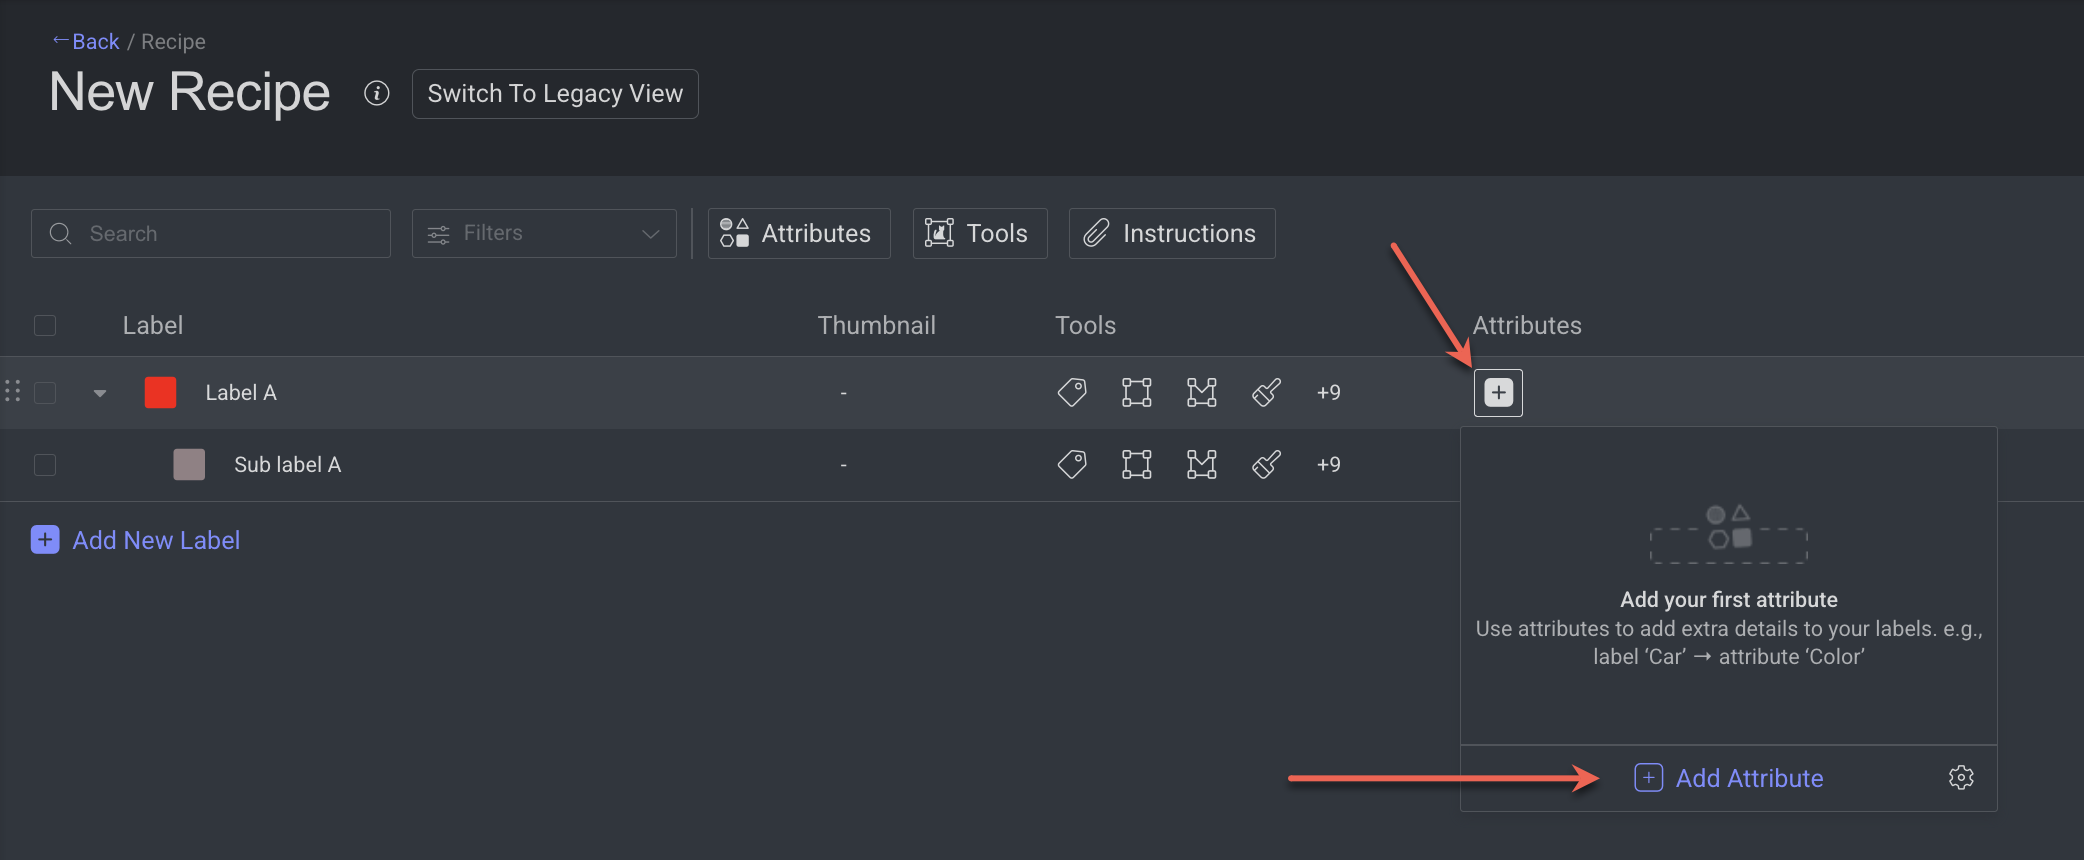
Attributes: Click on the + icon under the Attributes column to add attributes for the selected labels.
To add an another new label, click Add New Label and follow the steps.
Recipe Actions: The recipe actions allows you to:
Advanced Settings (if required): Customize recipe rules and relationships specific to your data type.
Click Save. The new recipe will be created and saved.
Edit Classic Recipes
Dataloop allows you to make changes recipes.
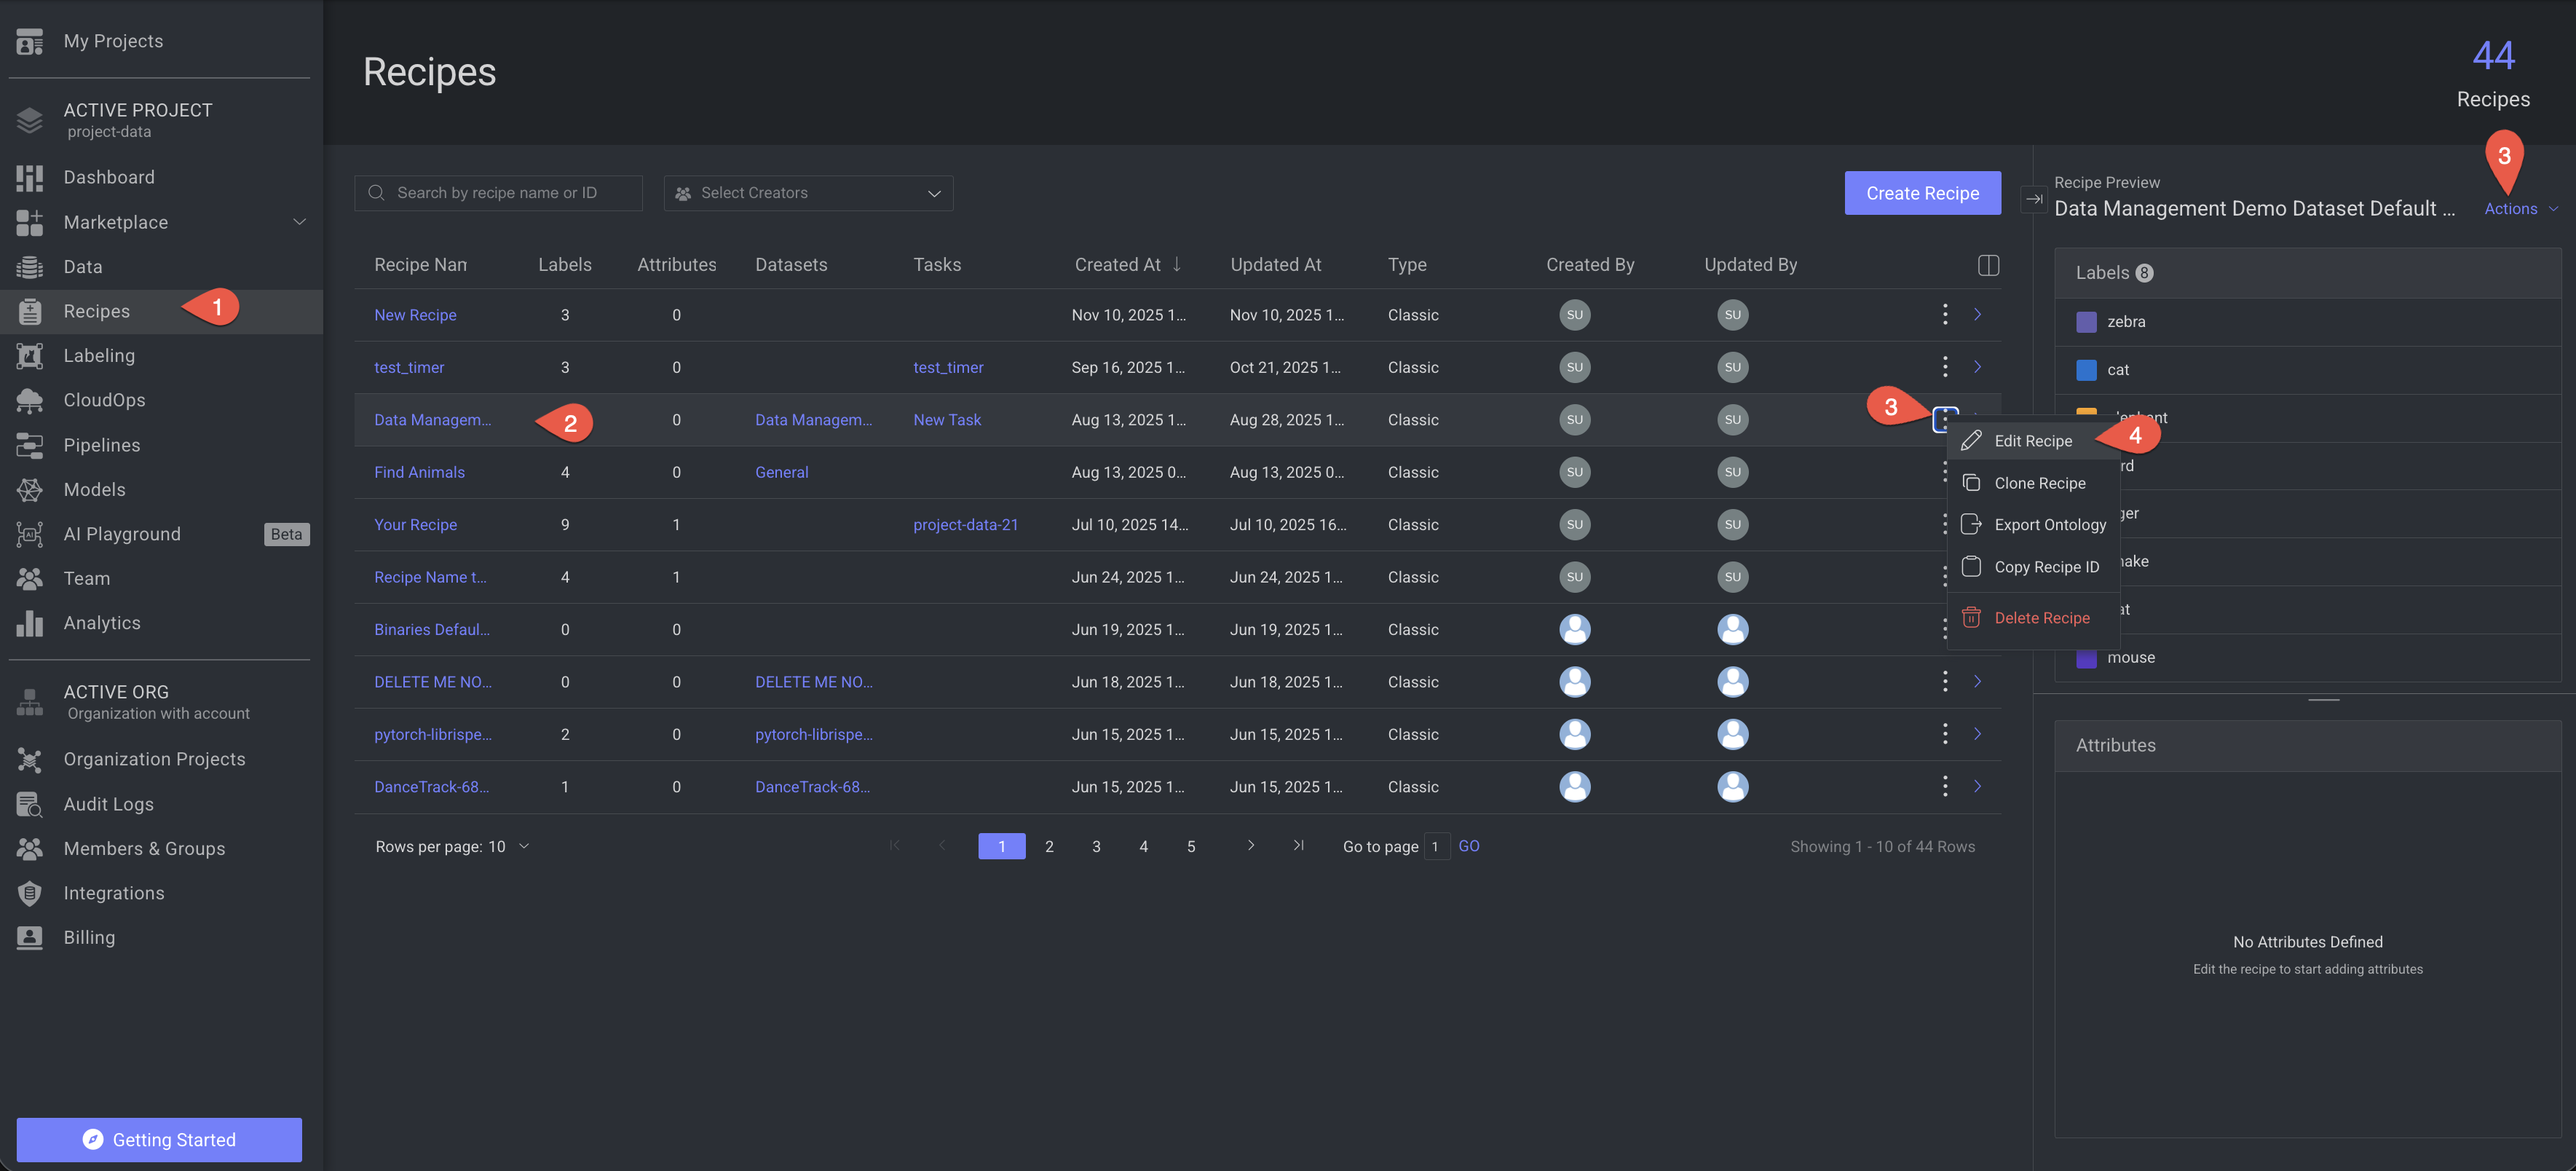
Navigate to Recipes from the lift-side menu.
Find and select the recipe from the list to edit.
Click on the ⋮ Three Dots or Actions from the right-side panel.
Select Edit Recipe from the list.
Make the changes on the following fields:
Changing the Label Name.
Add, modify, or delete labels and sub-labels
Adding Thumbnails
Updating annotation tools list.
Add, modify, or delete attributes
Updating the Advanced Settings, etc.
Click Save to save the changes.
Labels
Labels are descriptive identifiers used to categorize or classify data elements—such as “Dog,” “Building,” or “Stop Sign.” They provide structured meaning to raw data (e.g., images, videos, or text), enabling its effective use in machine learning and AI workflows.
Purpose & Role in Ontology
Labels are defined within an ontology, ensuring:
Consistency in how data is annotated
Clarity across teams and projects
Uniformity that supports accurate and scalable annotation processes
This structured approach allows ML models to reliably interpret and learn from labeled datasets.
System Labels (Special Case)
Certain labels are automatically added by the system (for example, when OCR is enabled, a text label is created by default). These follow strict rules:
Disabled by default: System labels are initially disabled and cannot be activated or used unless specific system conditions are met.
Non-editable hierarchy: Cannot be reordered, have new sub-labels, or be deleted.
Customizable appearance: While the structure of a system label cannot be modified, its color and thumbnail can be changed for easier visualization in annotation tasks.
Add Labels
Navigate to Recipes from the lift-side menu.
Find and select the recipe from the list.
Click on the ⋮ Three Dots or Actions from the right-side panel.
Select Edit Recipe from the list.
Click Add New Label. A new field will be created.
Provide a name for the label, and make other updates as follows:
Adding Thumbnails
Configure annotation tools list.
Add attributes
Updating the Advanced Settings, if required.
Click Save to save the changes.
Add Sub-Labels
Labels in the recipe have a Dot Name Spacing (dot-separated structure), allowing you to create tree-like label descriptions (sub-labels that are in a hierarchy with other labels). A well-defined labels hierarchy enables annotators to accurately classify annotations based on logical structure, with correlation with Dataloop advanced tools for labels-based search and filter on items and annotations level.
To add a Sub-Label:
Hover-over next to the label, and click on the Add sub-label icon.
Enter a name for the sub-label.
Press Enter key to save it. The sub-label will be added under the parent label.
Click on the Parent label.
Press
.(dot) orTabA sub-label field will be added under the parent label.
Provide a name for the sub-label and press enter. The sub-label will be created.
In New Label, For example, the parent label name Label-1 will be added to the name that you have given for the sub-label Sub-label-1: Label-1.Sub-label-1
Label_2
Label_2.M1
Label_2.M1.N1
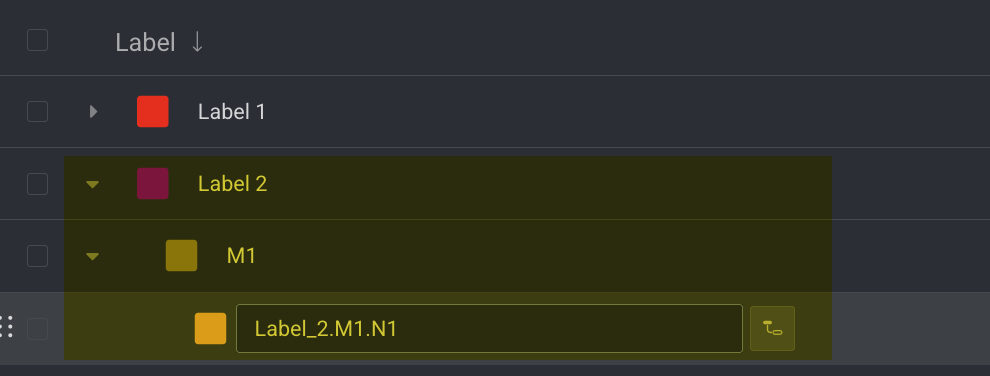
Click on the > icon of the parent label to expand and view the sub-labels.
Keyboard Shortcuts
Keyboard shortcuts make it faster to create and manage sub-labels in Recipes, allowing you to add, navigate, and organize labels without using the mouse.
Action | Keyboard Shortcut |
|---|---|
Add a sub-label (when creating a new label, below the parent) | Press |
Specify a sub-label by typing parent name + dot | Type |
Go back one level to the parent label (when name field is focused) |
|
Go back one level to the parent label (when name field is empty) |
|
Search and Filter Labels
Use the search field to find labels by label name.
.png)
You can also filter labels using the following criteria:
Classification
Bounding box
Polygon
Semantic Segmentation
Point/Pose
Polyline
Ellipse
Cuboid
Marker
3D Semantic Segmentation
3D Cuboid
3D Polyline
Audio Classification
Multiple Selection
Single Selection
Slider
Yes/No
Free Text
With Thumbnail
Without Thumbnail
Edit Labels
Navigate to Recipes from the lift-side menu.
Find and select the recipe from the list to edit.
Click on the ⋮ Three Dots or Actions from the right-side panel.
Select Edit Recipe from the list.
Search and find the label to make the changes on the following fields:
Changing the Label Name.
Add, modify, or delete labels and sub-labels
Adding Thumbnails
Updating annotation tools list.
Add, modify, or delete attributes
Updating the Advanced Settings, etc.
Click Save to save the changes.
Delete Labels
Dataloop allows you to delete single or multiple labels at a time.
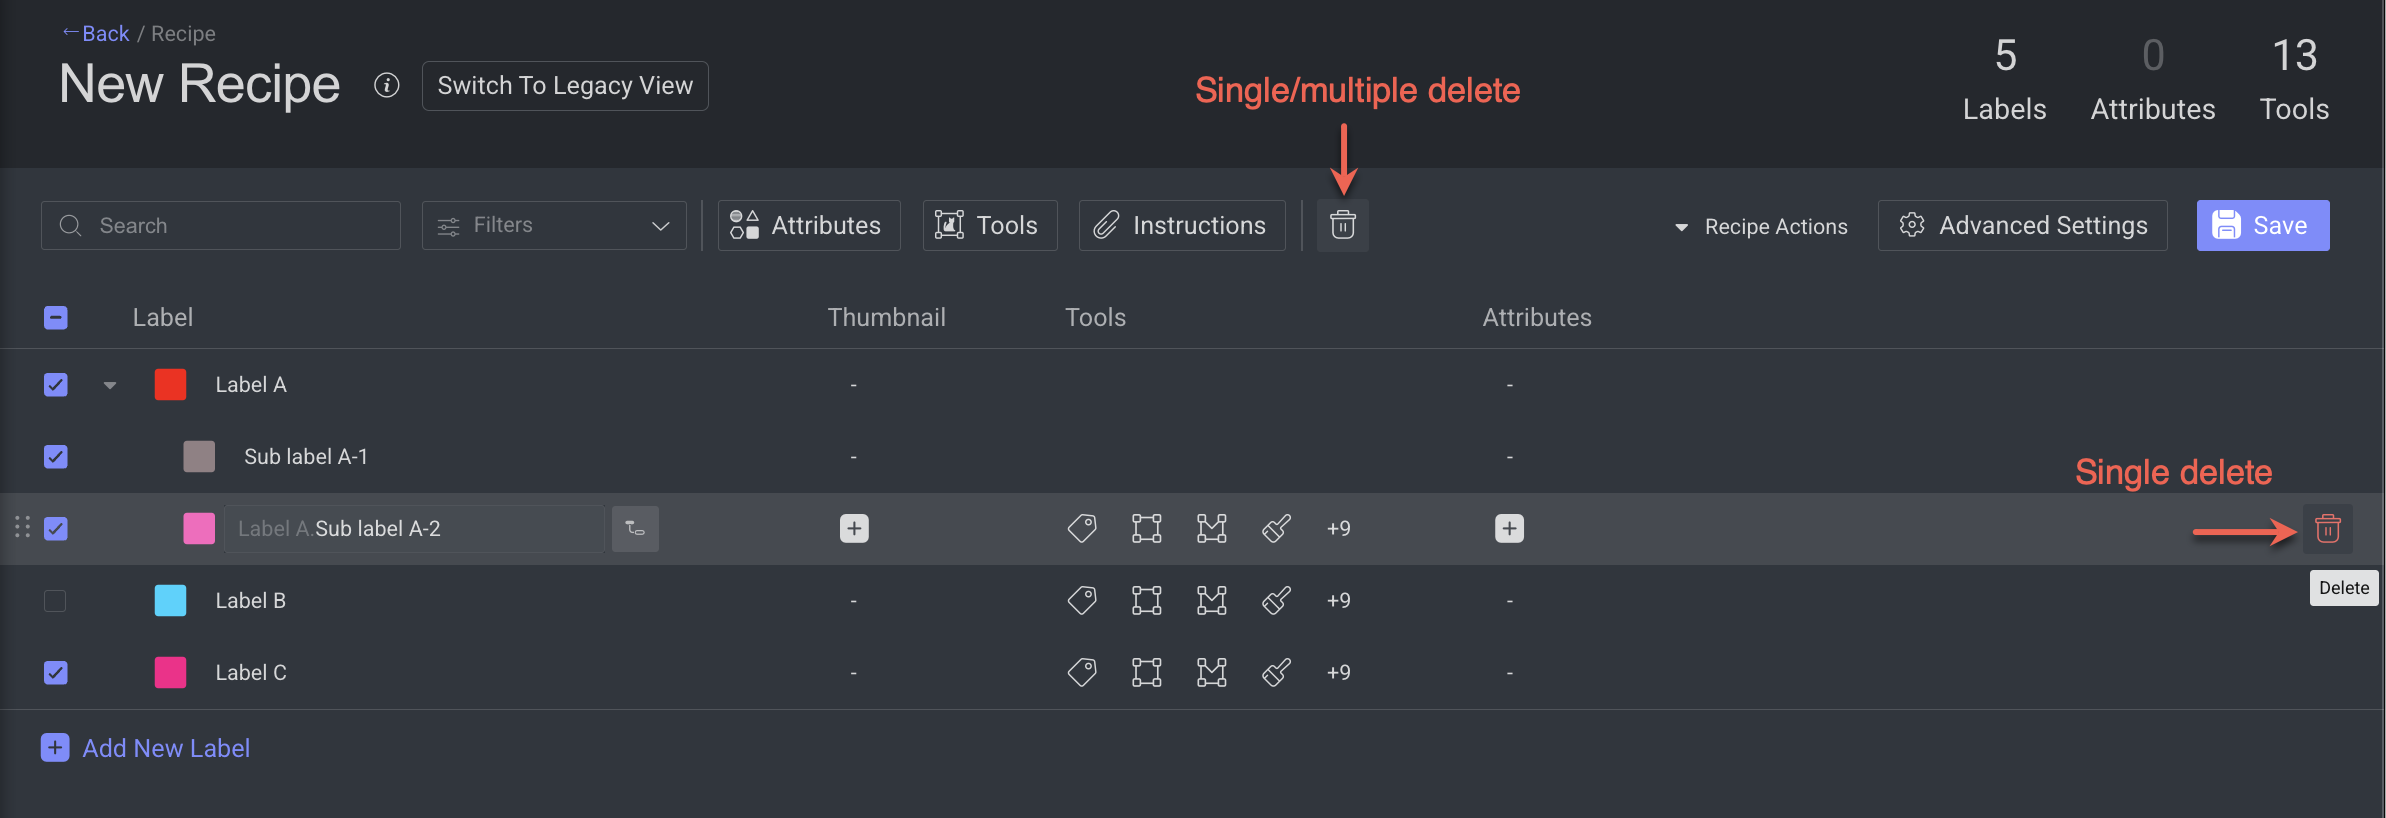
Open your recipe page.
Select one or more labels from the list to delete.
Click on the Trash icon from the top bar, or from the right-end of the row (for the single-label delete only). A confirmation message is displayed.
Click Delete to confirm the deletion. A successful message is displayed.
Label Colors
Each label created within a recipe is automatically assigned a default color. For most annotation tools—excluding Semantic Segmentation—this color is purely visual and affects only the platform's user interface, helping annotators distinguish between different labels across images, videos, and other data types.
However, for the Semantic Segmentation tool, the label color directly influences the output mask. If your model expects specific RGB values for segmentation masks, ensure that the corresponding label colors are set to match those values.
Changing Default Label Color
The default color assigned to a label can be changed. Click the colored square to select a color from the palette, or enter RGBA or HEX values.
.png)
Changing Color for Semantic Segmentation
Changing the color of the label used for semantic segmentation will impact only new annotations from that point onward. The color of existing annotations is saved on the mask in the item's JSON, and therefore won't affect all existing JSON files.
Learn more about the Semantic Segmentation tool.
Add Images as Label Thumbnails
Enhance your labeling workflow by adding image thumbnails to labels within your recipe. This allows annotators to select labels based on visual similarity between the item and its associated thumbnail — especially useful for retail and product classification tasks.
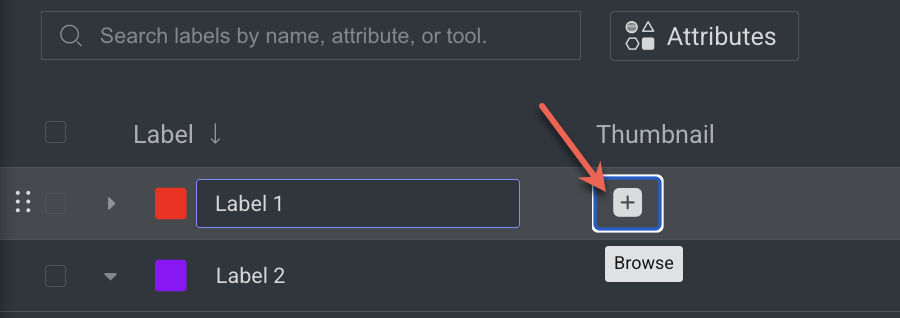
To add an image thumbnail to a label, click the “+” icon next to the label and choose an image from your local directory.
.png)
To remove a thumbnail:
Hover-over next to the thumbnail. A trash icon is displayed next to the Thumbnail.
Click on the Trash icon.
Click Remove to confirm.
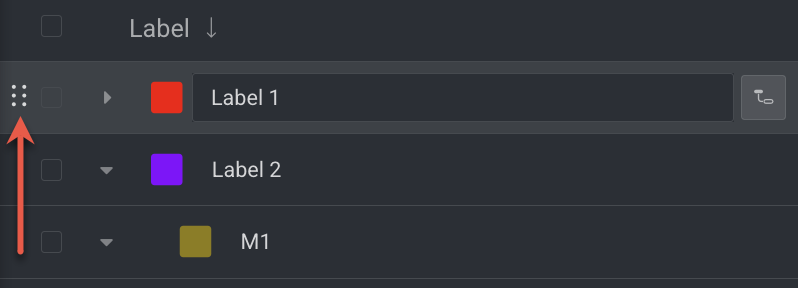
Reorder Labels
Labels can be reordered differently than creation order, to allow prioritizing and displaying at the top of the list during labeling tasks. To reorder labels, click on the Drag icon and drag & drop it to the desired position.
Attributes
An attribute of a label is a descriptive property or characteristic that provides additional information about an annotated object. Attributes help make annotations richer and more detailed, enabling more precise data for machine learning models.
Attributes are defined separately in the Recipe and can be linked (mapped) to:
A specific label (e.g., “Car” → attributes like Color, Make, Model), or
All labels, when they are relevant across multiple classes (e.g., Visibility, Quality Score).
For a vehicle label:
Color: Red, Blue, Black
Condition: New, Used, Damaged
Add Attributes
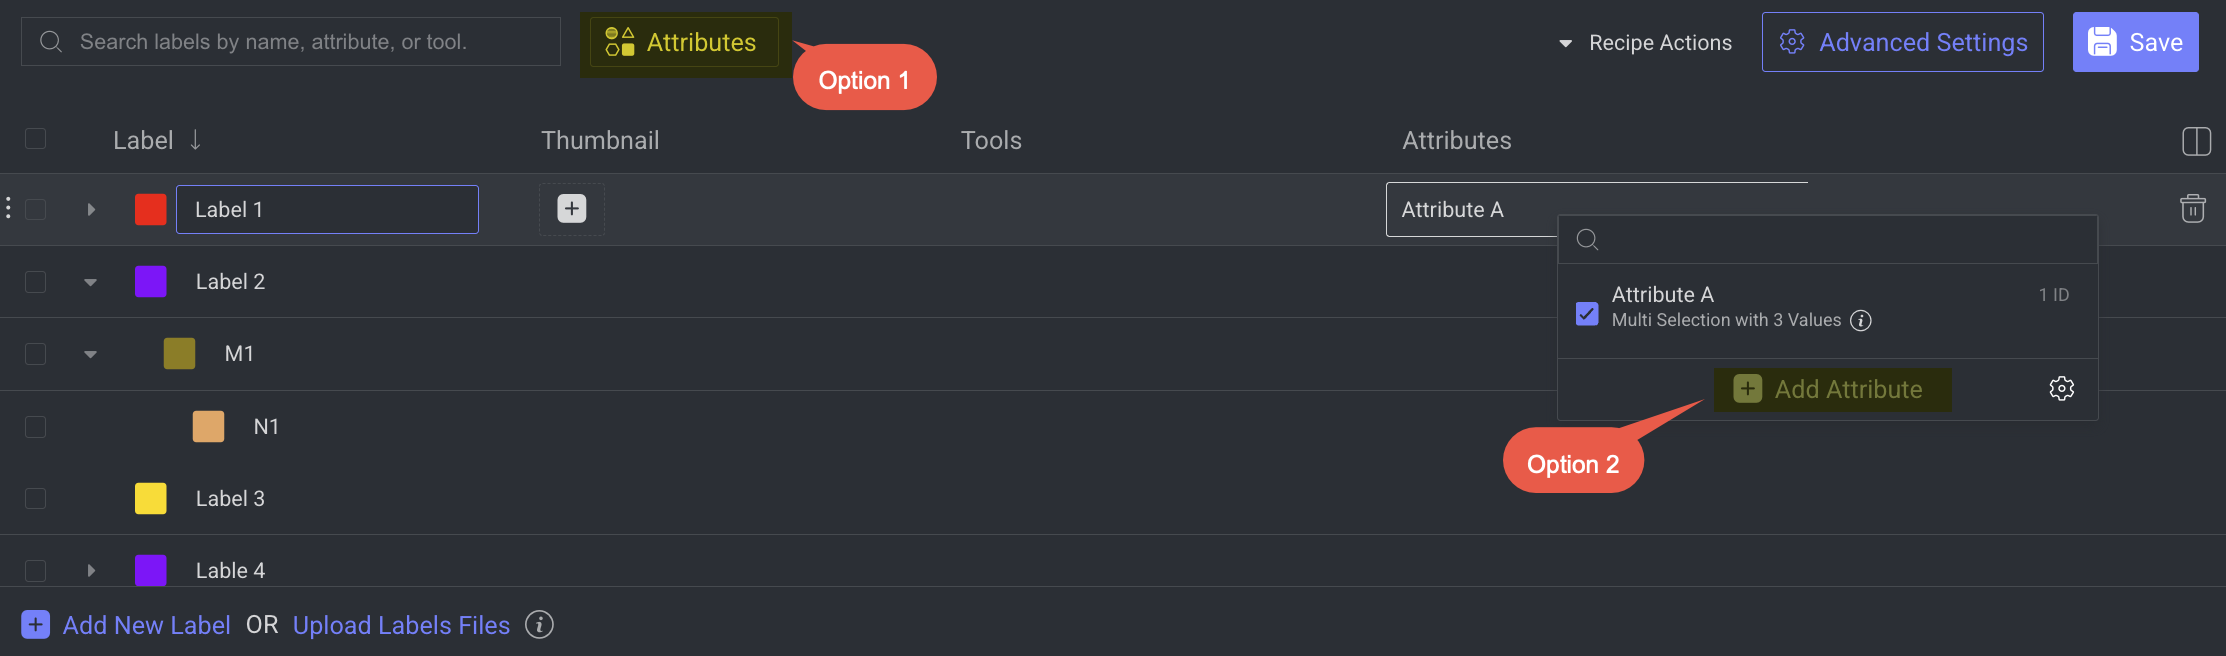
You can create attributes by using two ways. From the Labels main page (option 1) or single label level (option 2).
Go to the Recipes section.
Find and open the recipe from the list.
Click Attributes as shown above. A right-side panel will be displayed.
Labels: Select one or more labels from the list in which you need to add this attribute.
Mandatory: Enable to enforce annotators to answer attributes before moving to the next item. The feature is enabled from recipe instructions, and applies to any attribute set as ‘Mandatory’. While working in the Studio, mandatory attributes skipped will show with a red flag icon, requiring annotators’ attention. Mandatory attribute enforcement occurs only when working on a single item in the respective studio. Due to the nature of this work, mandatory attributes are not enforced when working in bulk from the Assignment Browser.
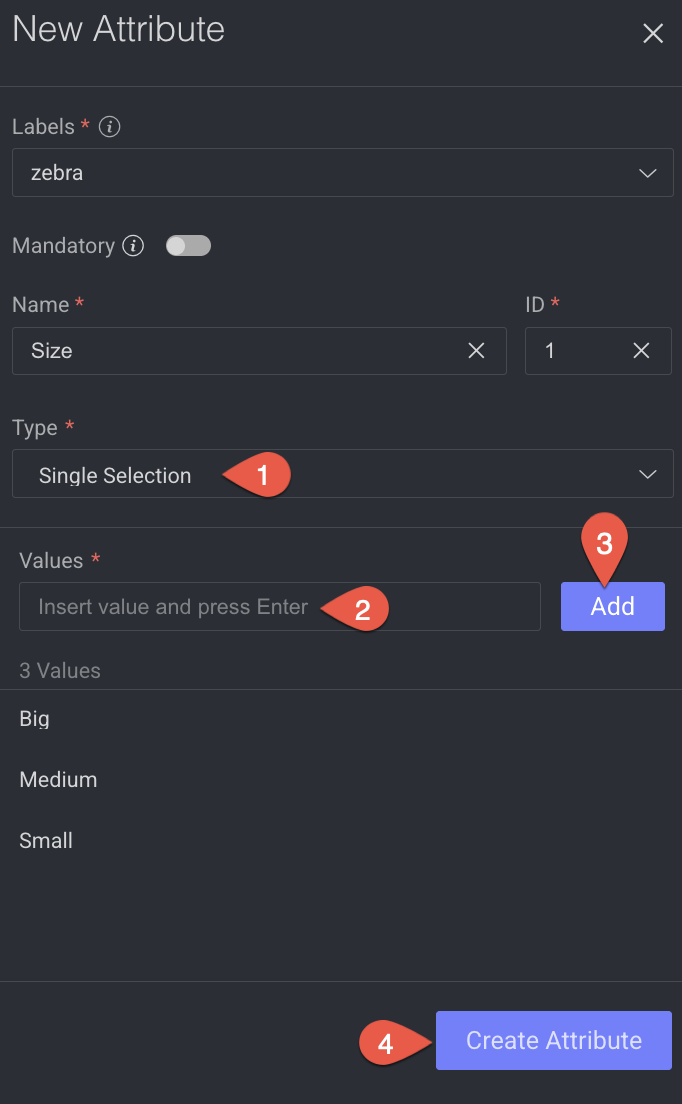
Name: Provide a name for the new attribute.
ID: A unique, auto-populated sequential value (editable). Used to reference this attribute in JSON exports and metadata. If edited, set it to an unused value.
Type: Where mapping to labels is done. The default applies any attribute to all labels, but individual selection can be done. By default, selecting a label applies the attribute automatically to all sub-labels.
Multiple Selection: It allows you to select multiple values while annotating. Add the multiple values in the Values field as shown below:
.png)
Single Selection: It allows you to select only a single value while annotating. Add the values in the Values field as shown below:
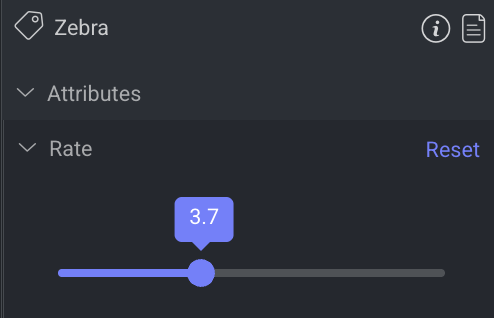
Slider: Selecting from a range of values, Minimum (, Maximum, and Step. (for example, between 1 and 10). Add the values in the Values field as shown below:
.png)
And the how you see as shown below:
Yes/No: It allows you to select Yes or No value (true or false).
Free text: A free text enter placeholder will be available for annotators to enter text to provide more information.
Click the Create Attribute to create the new attribute.
Search and Filter Attributes
Use the search field to find attributes by attribute type.
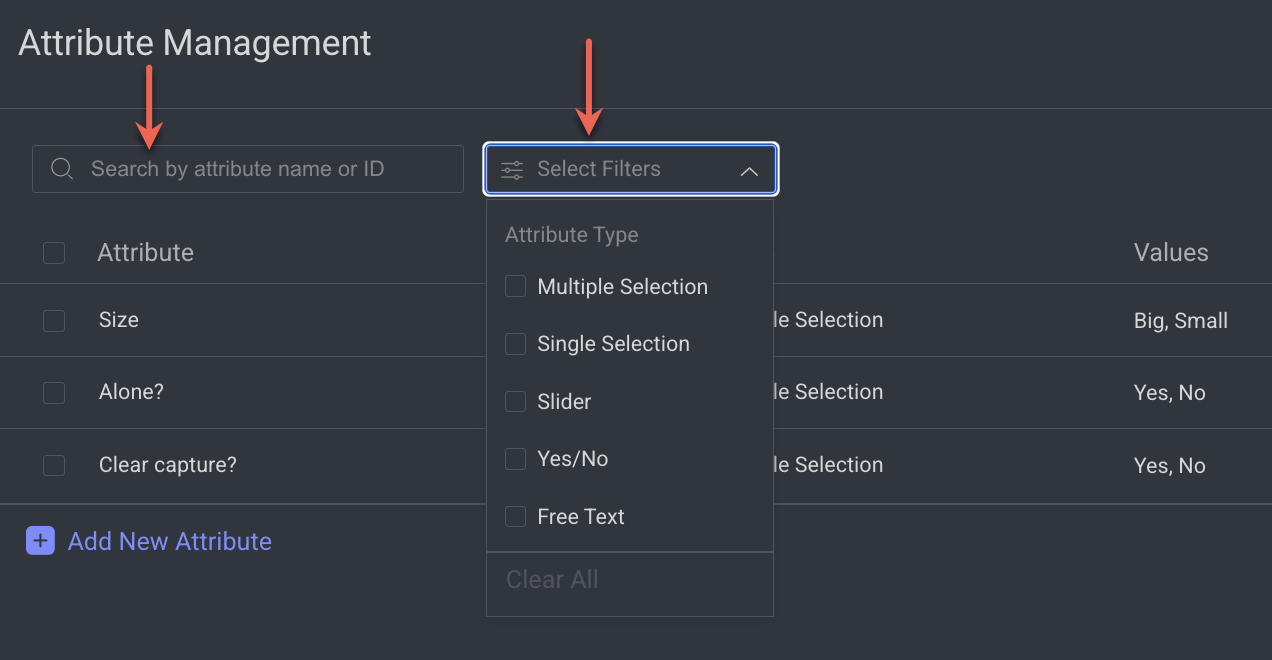
You can also filter labels using the following attribute type:
Multiple Selection: It allows you to filter attributes with multiple values
Single Selection: It allows you to filter attributes with a single value
Slider: It allows you to filter attributes with a numeric range (e.g., 1–10)
Yes/No: It allows you to filter attributes with binary (Yes/No) values
Free text: It allows you to filter attributes with free-text values.
Edit Attributes
Go to the Recipes section.
Find and open the recipe from the list.
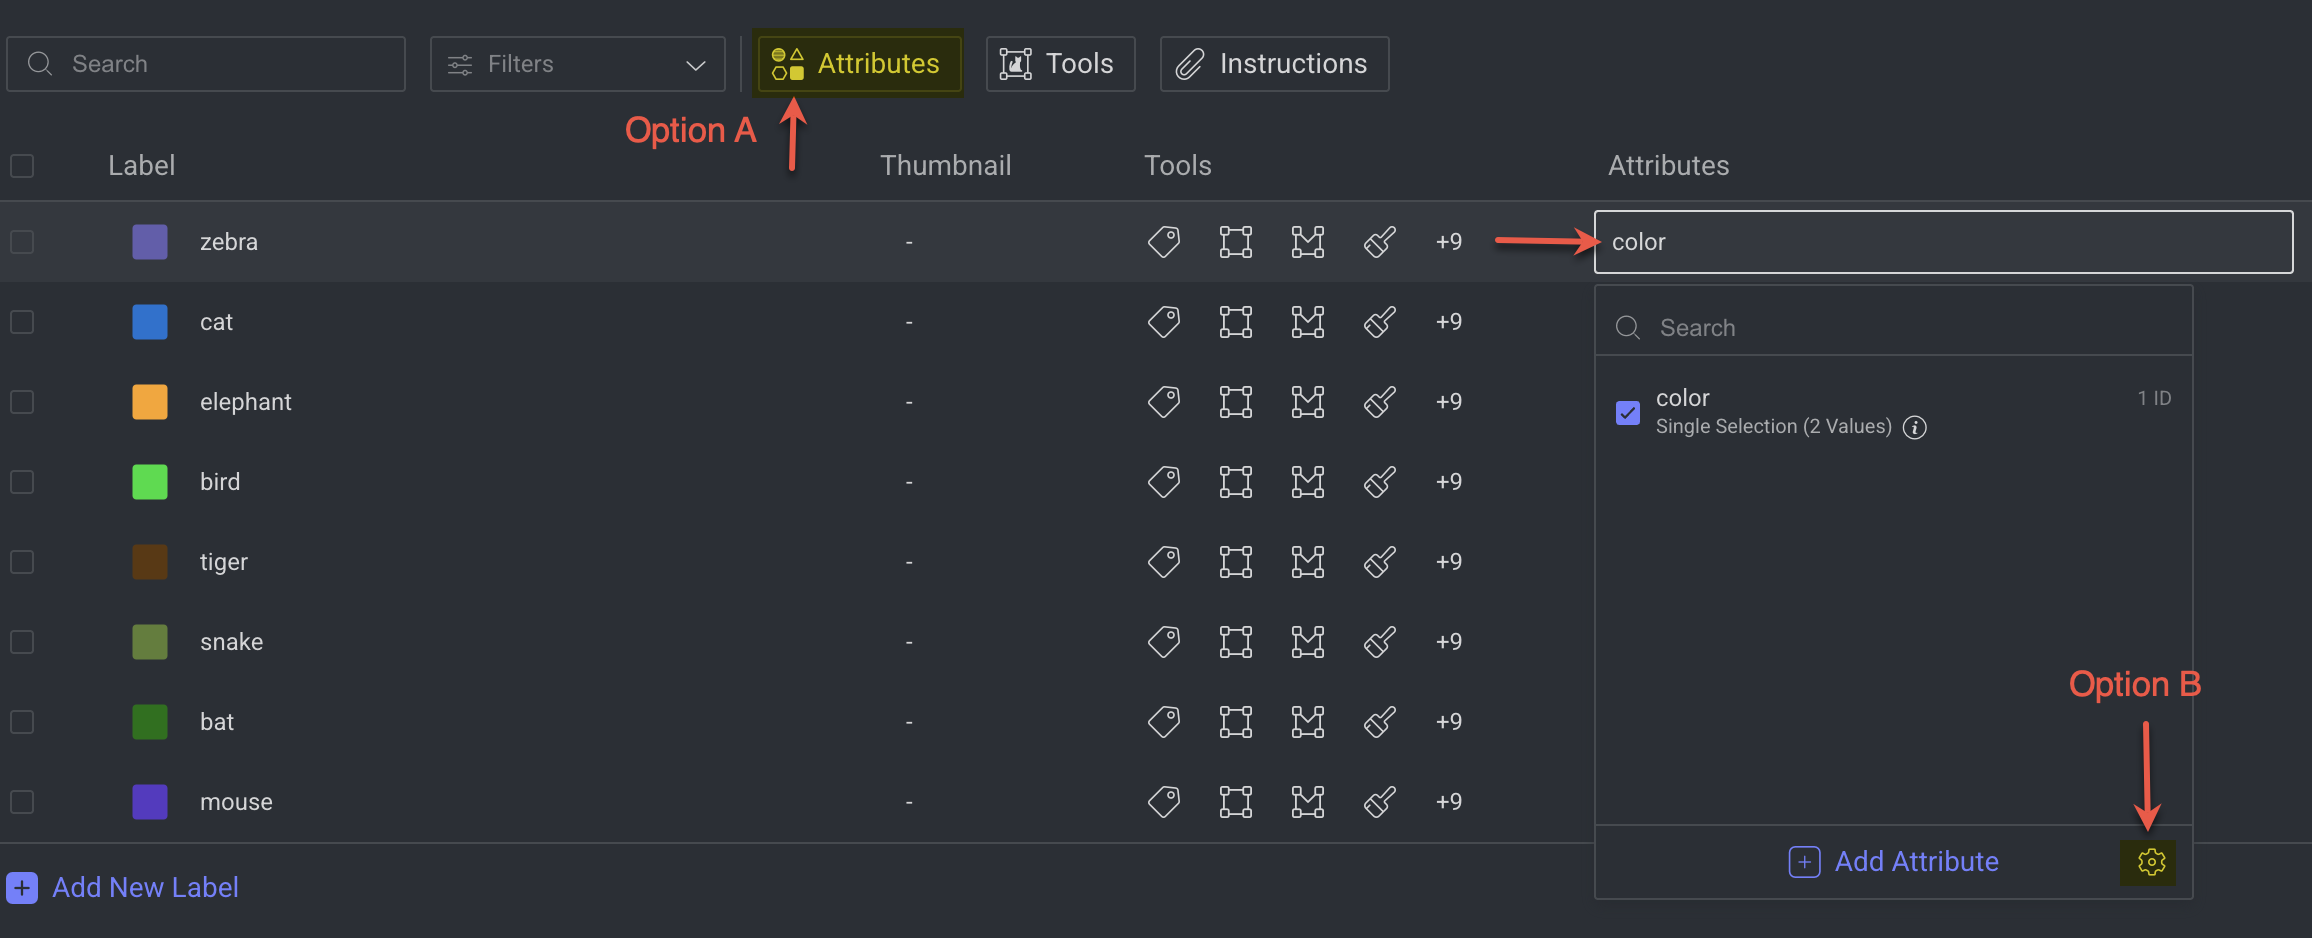
(Option A) To edit attributes regardless of label, click Attributes to open the Attribute Management page.
(Option B) To edit a specific label’s attribute, selec the label and click its attribute field. A dropdown panel is displayed.
Click on the Settings icon.
In the Attribute Management page, make changes to the following fields:
Attribute name
Add, update, or delete values
Update the Mandatory option
Modify the label list.
Delete Attributes
Go to the Recipes section.
Find and open the recipe.
Click Attributes. The attributes page is displayed.
To delete a single attribute: Find the attribute and hover over, and click on the Trash icon displayed.
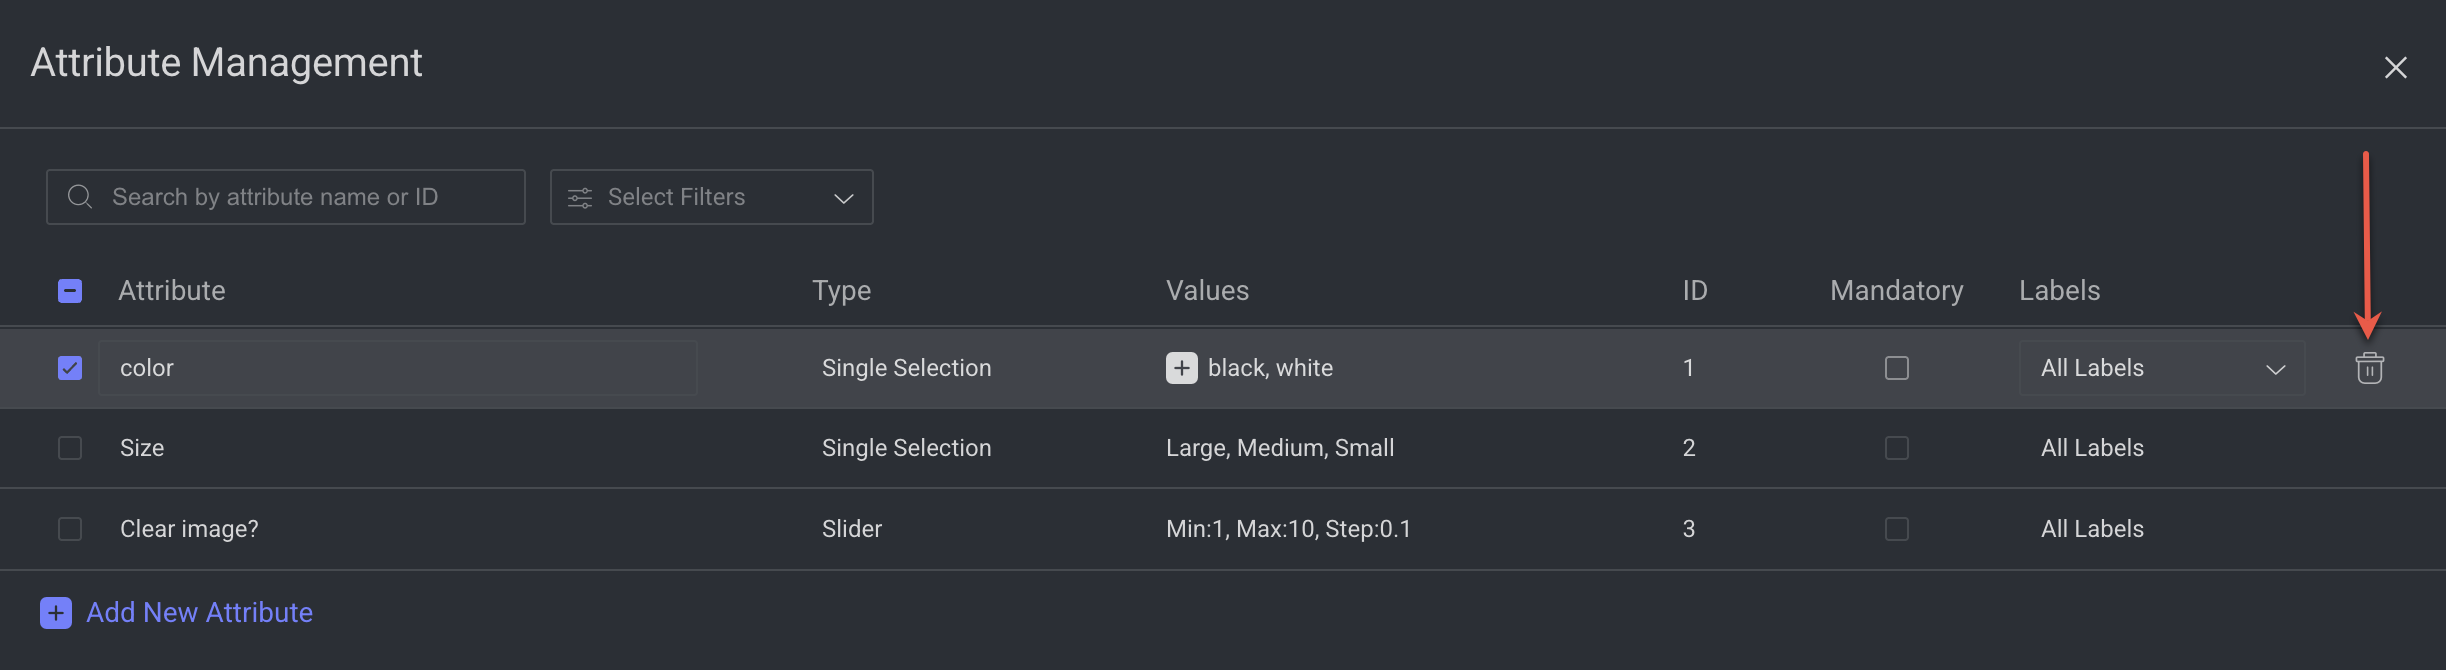
To delete multiple attributes: Select multiple attributes and click on the Trash icon displayed on the top-bar.
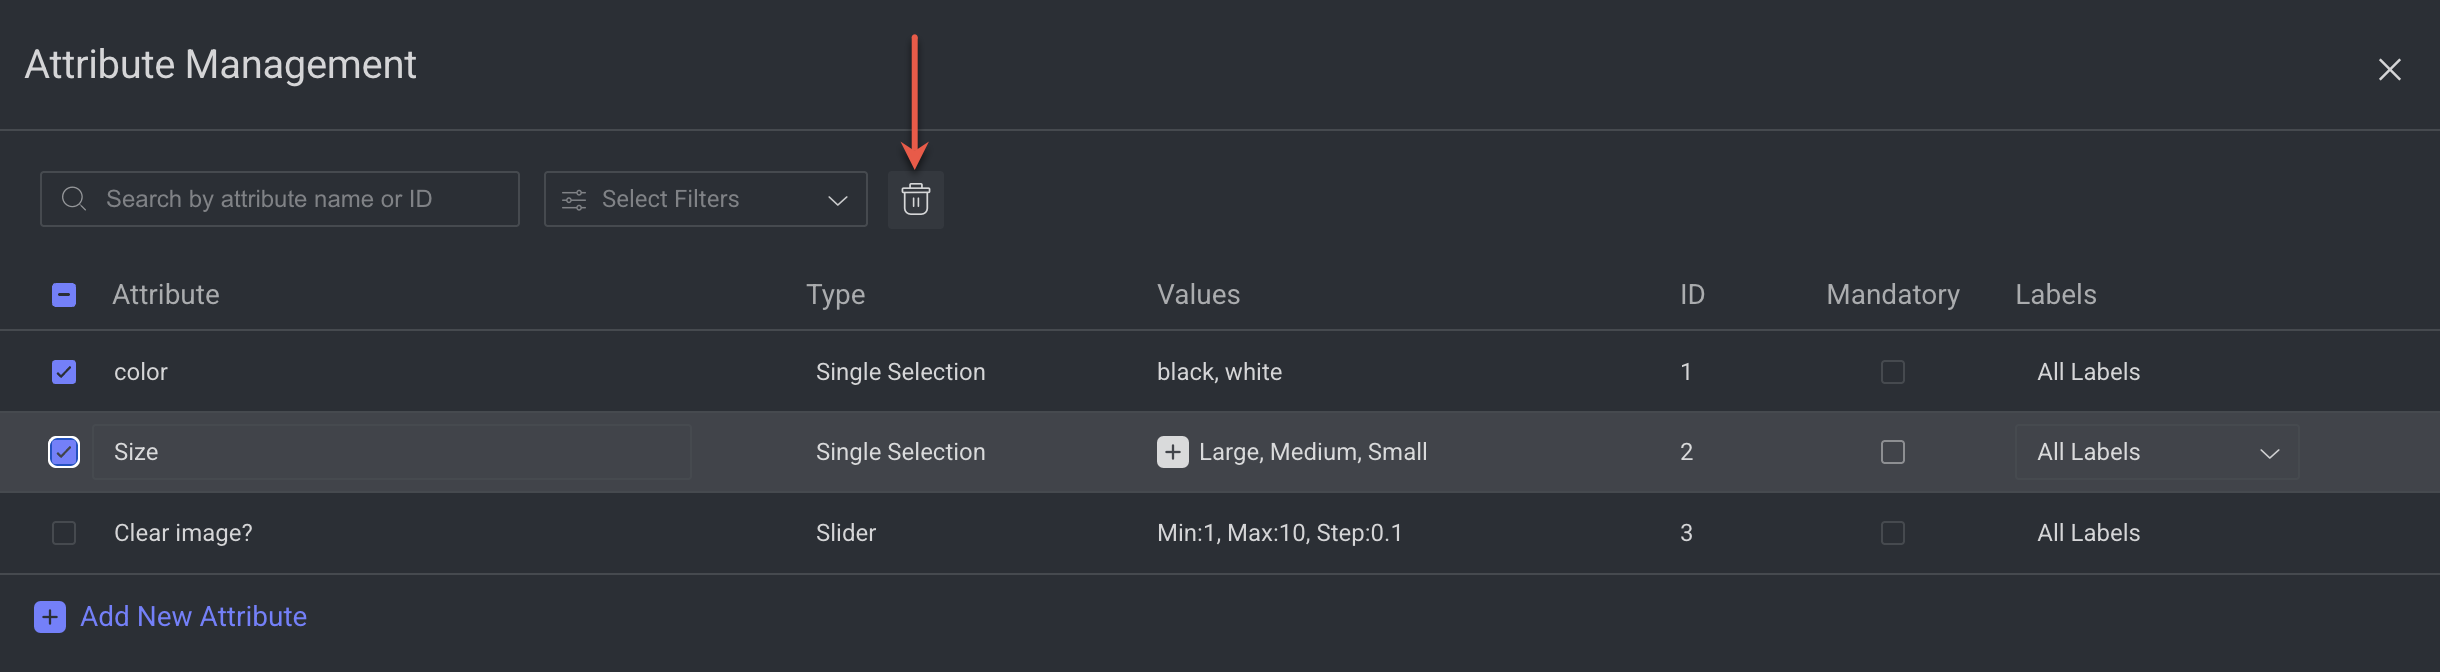
A confirmation message is displayed as
Deleting this attribute may effect active labeling or QA tasks.Click Delete.Click Done to close the window.
Click Save to save the changes.
Labeling Tools
Labeling tools help you annotate items according to your project’s requirements. Dataloop’s recipes provide a variety of tools tailored to different data types — such as images, audio, video, and text — allowing you to choose the most suitable option for your task.
When you create a label in your recipe, all tools are selected by default. You can customize this selection to match your needs. Once specific tools are chosen, they will be available in the Annotation Studio exactly as configured in the recipe.
Configure Tools for Your Recipe
By default, Tools are available for all the labels and enabled.
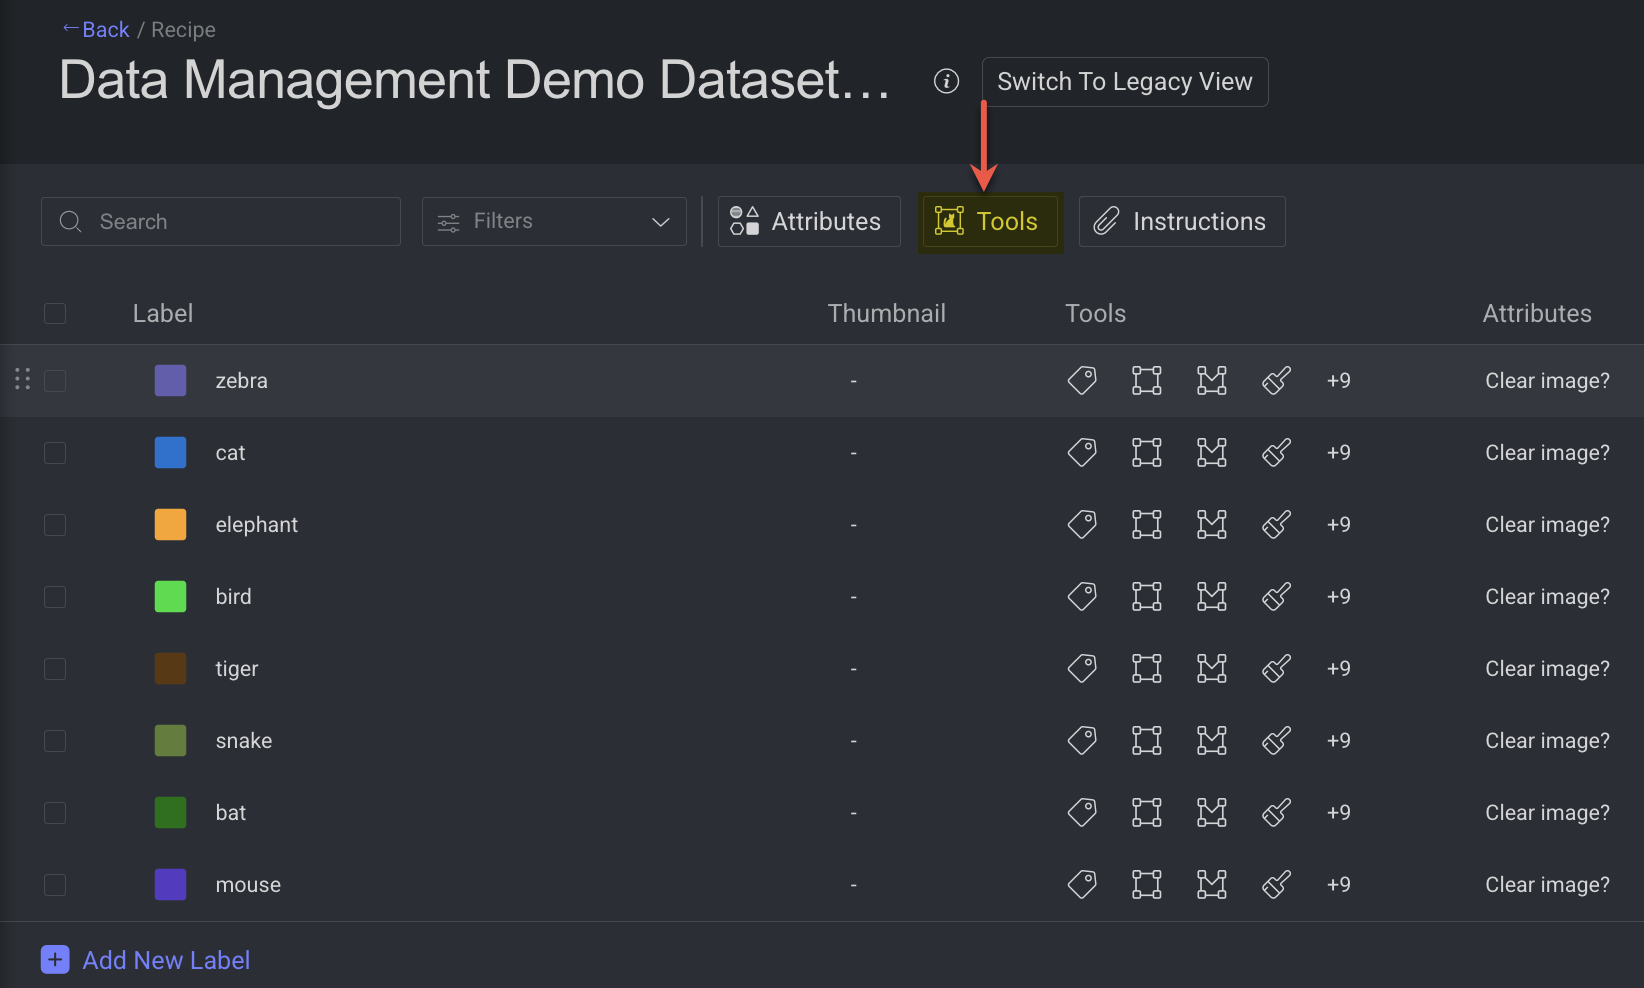
Go to the Recipes section.
Find and open the recipe.
Select the Tools button.
In the Tool Management, identify the tool from the list and make the following changes:
Labels: Choose list of labels from the list where this tool should be able to use.
Enable or disable: Enable if this tool must be available for the selected recipe.
Tool Settings: Only specific tools will have this option to set more advanced settings. For example, Bounding box, etc.
Click Done to close the window.
Click Save to save the changes.
Configure Tools for a Label
By default, Tools are available for all the labels and enabled.
Go to the Recipes section.
Find and open the recipe.
Find the label and click on tools column. A dropdown panel is displayed.
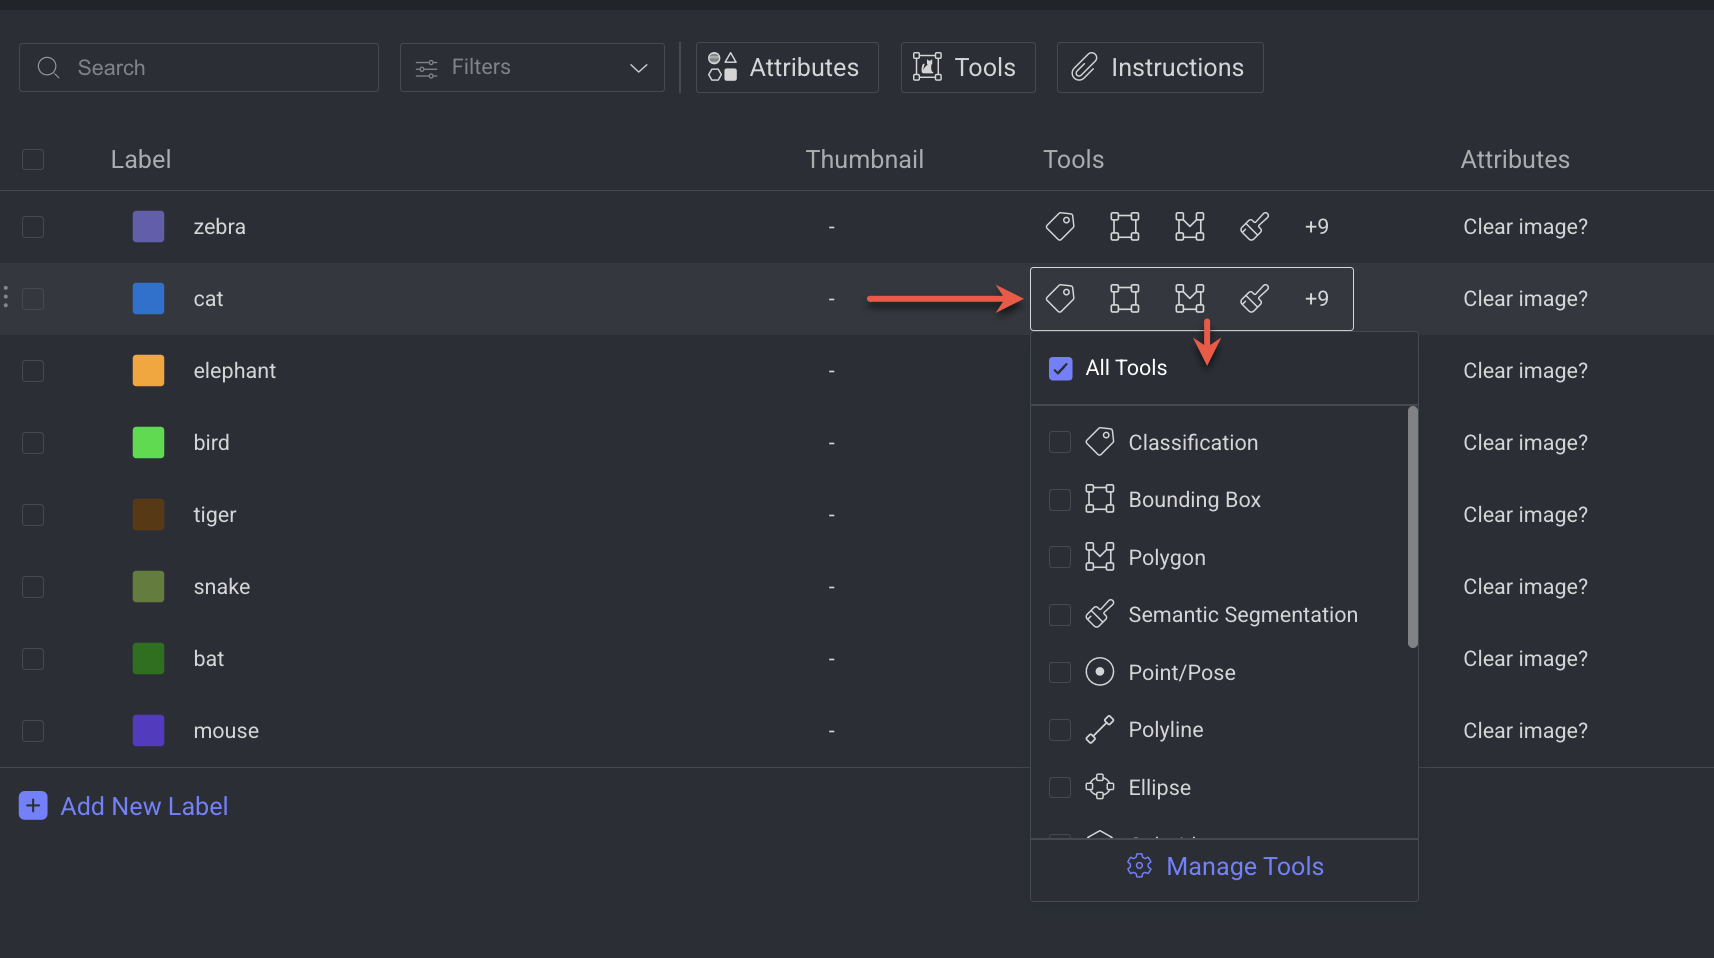
Select or deselect required tools from the list. If you need more options, click Manage Tools. The Tool Management page is displayed.
In the Tool Management, identify the tool from the list and make the following changes:
Labels: Choose list of labels from the list where this tool should be able to use.
Enable or disable: Enable if this tool must be available for the selected recipe.
Tool Settings: Only specific tools will have this option to set more advanced settings. For example, Bounding box, etc.
Click Done to close the window.
Click Save to save the changes.
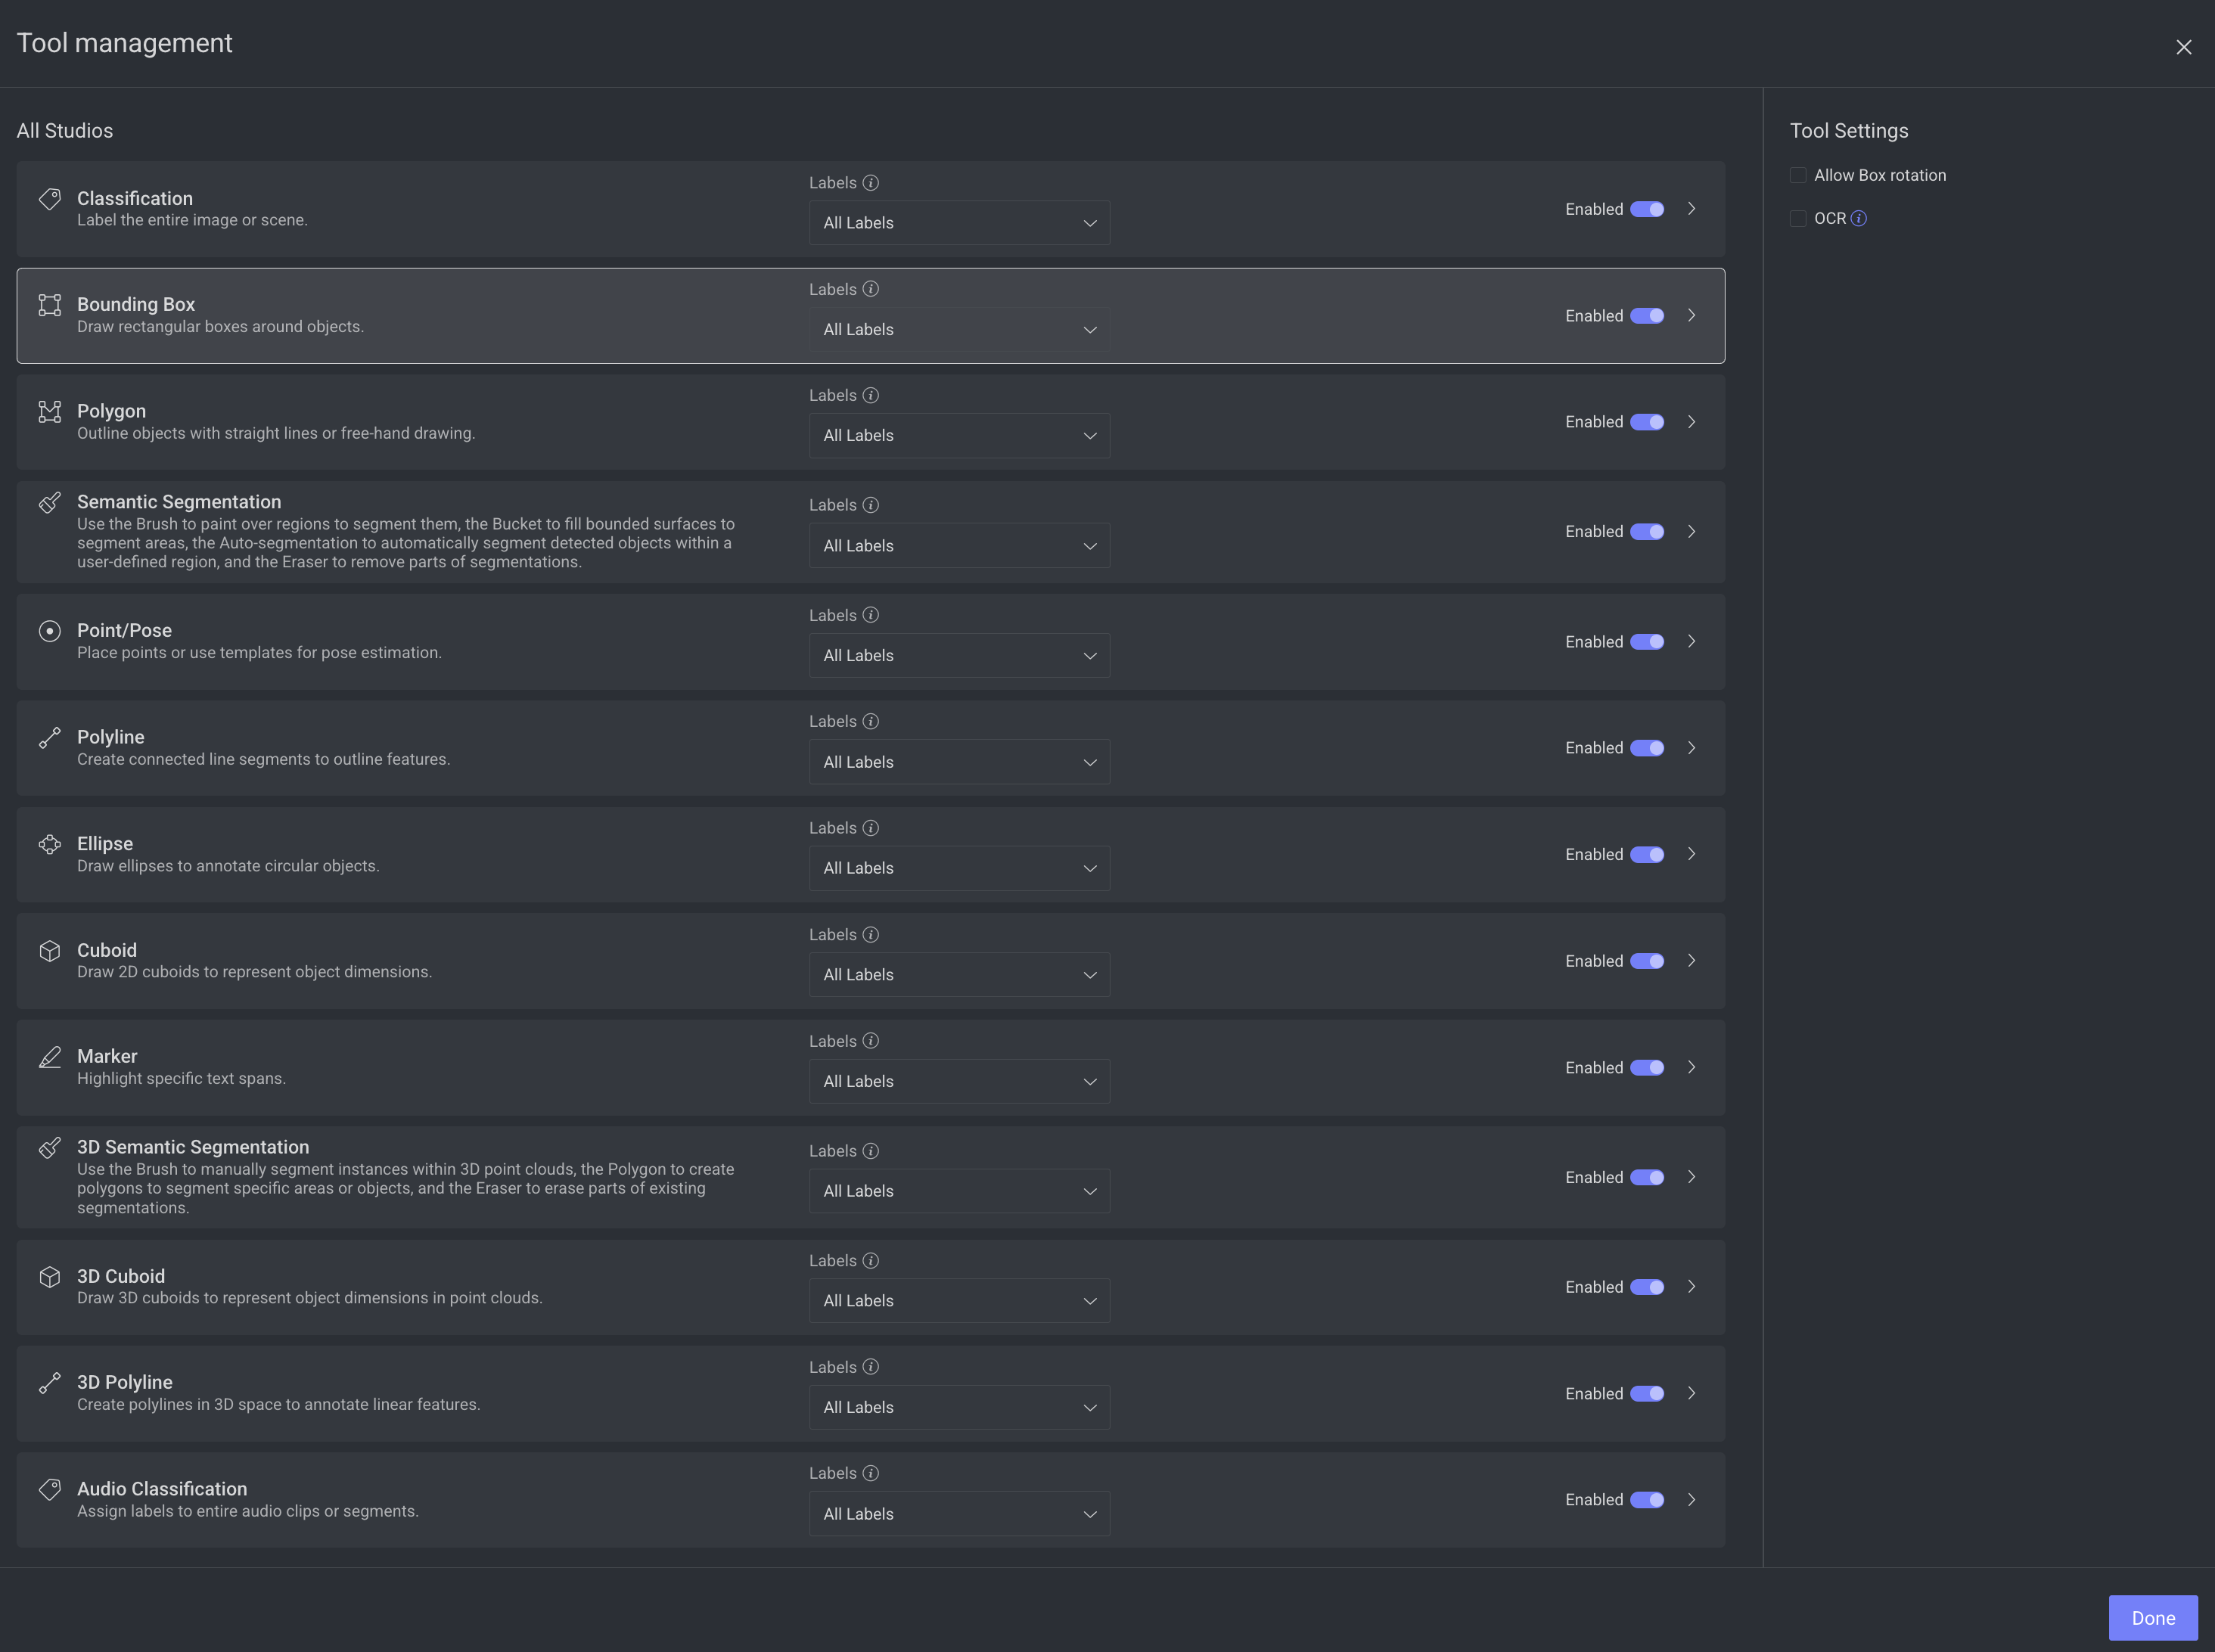
Tools List and Settings
Configure and customize annotation tools for different data types, enabling or disabling specific features to match your project’s labeling requirements.
By default, Tools are available for all the labels and enabled.
Tool Name | Tool Settings |
|---|---|
Classification | - |
Bounding Box |
|
Polygon |
|
Semantic Segmentation |
|
Point / Pose | Pose Templates: Standardize and expedite pose annotations in images or videos by providing predefined point structures, ensuring consistent labeling of complex forms like human bodies. Create New Templates. |
Polyline |
|
Ellipse | - |
Cuboid |
|
Marker | - |
3D Semantic Segmentation | - |
3D Cuboid | - |
3D Polyline | - |
Audio Classification | - |
Create Pose Templates
Standardize and expedite pose annotations in images or videos by providing predefined point structures, ensuring consistent labeling of complex forms like human bodies.
Open the Recipes from the left-side menu.
Click on the recipe to open it.
Select the Tools button.
Select the Point / Pose tool from the list.
Click Create New Template from the right-side panel. The Create Pose Template popup is displayed.
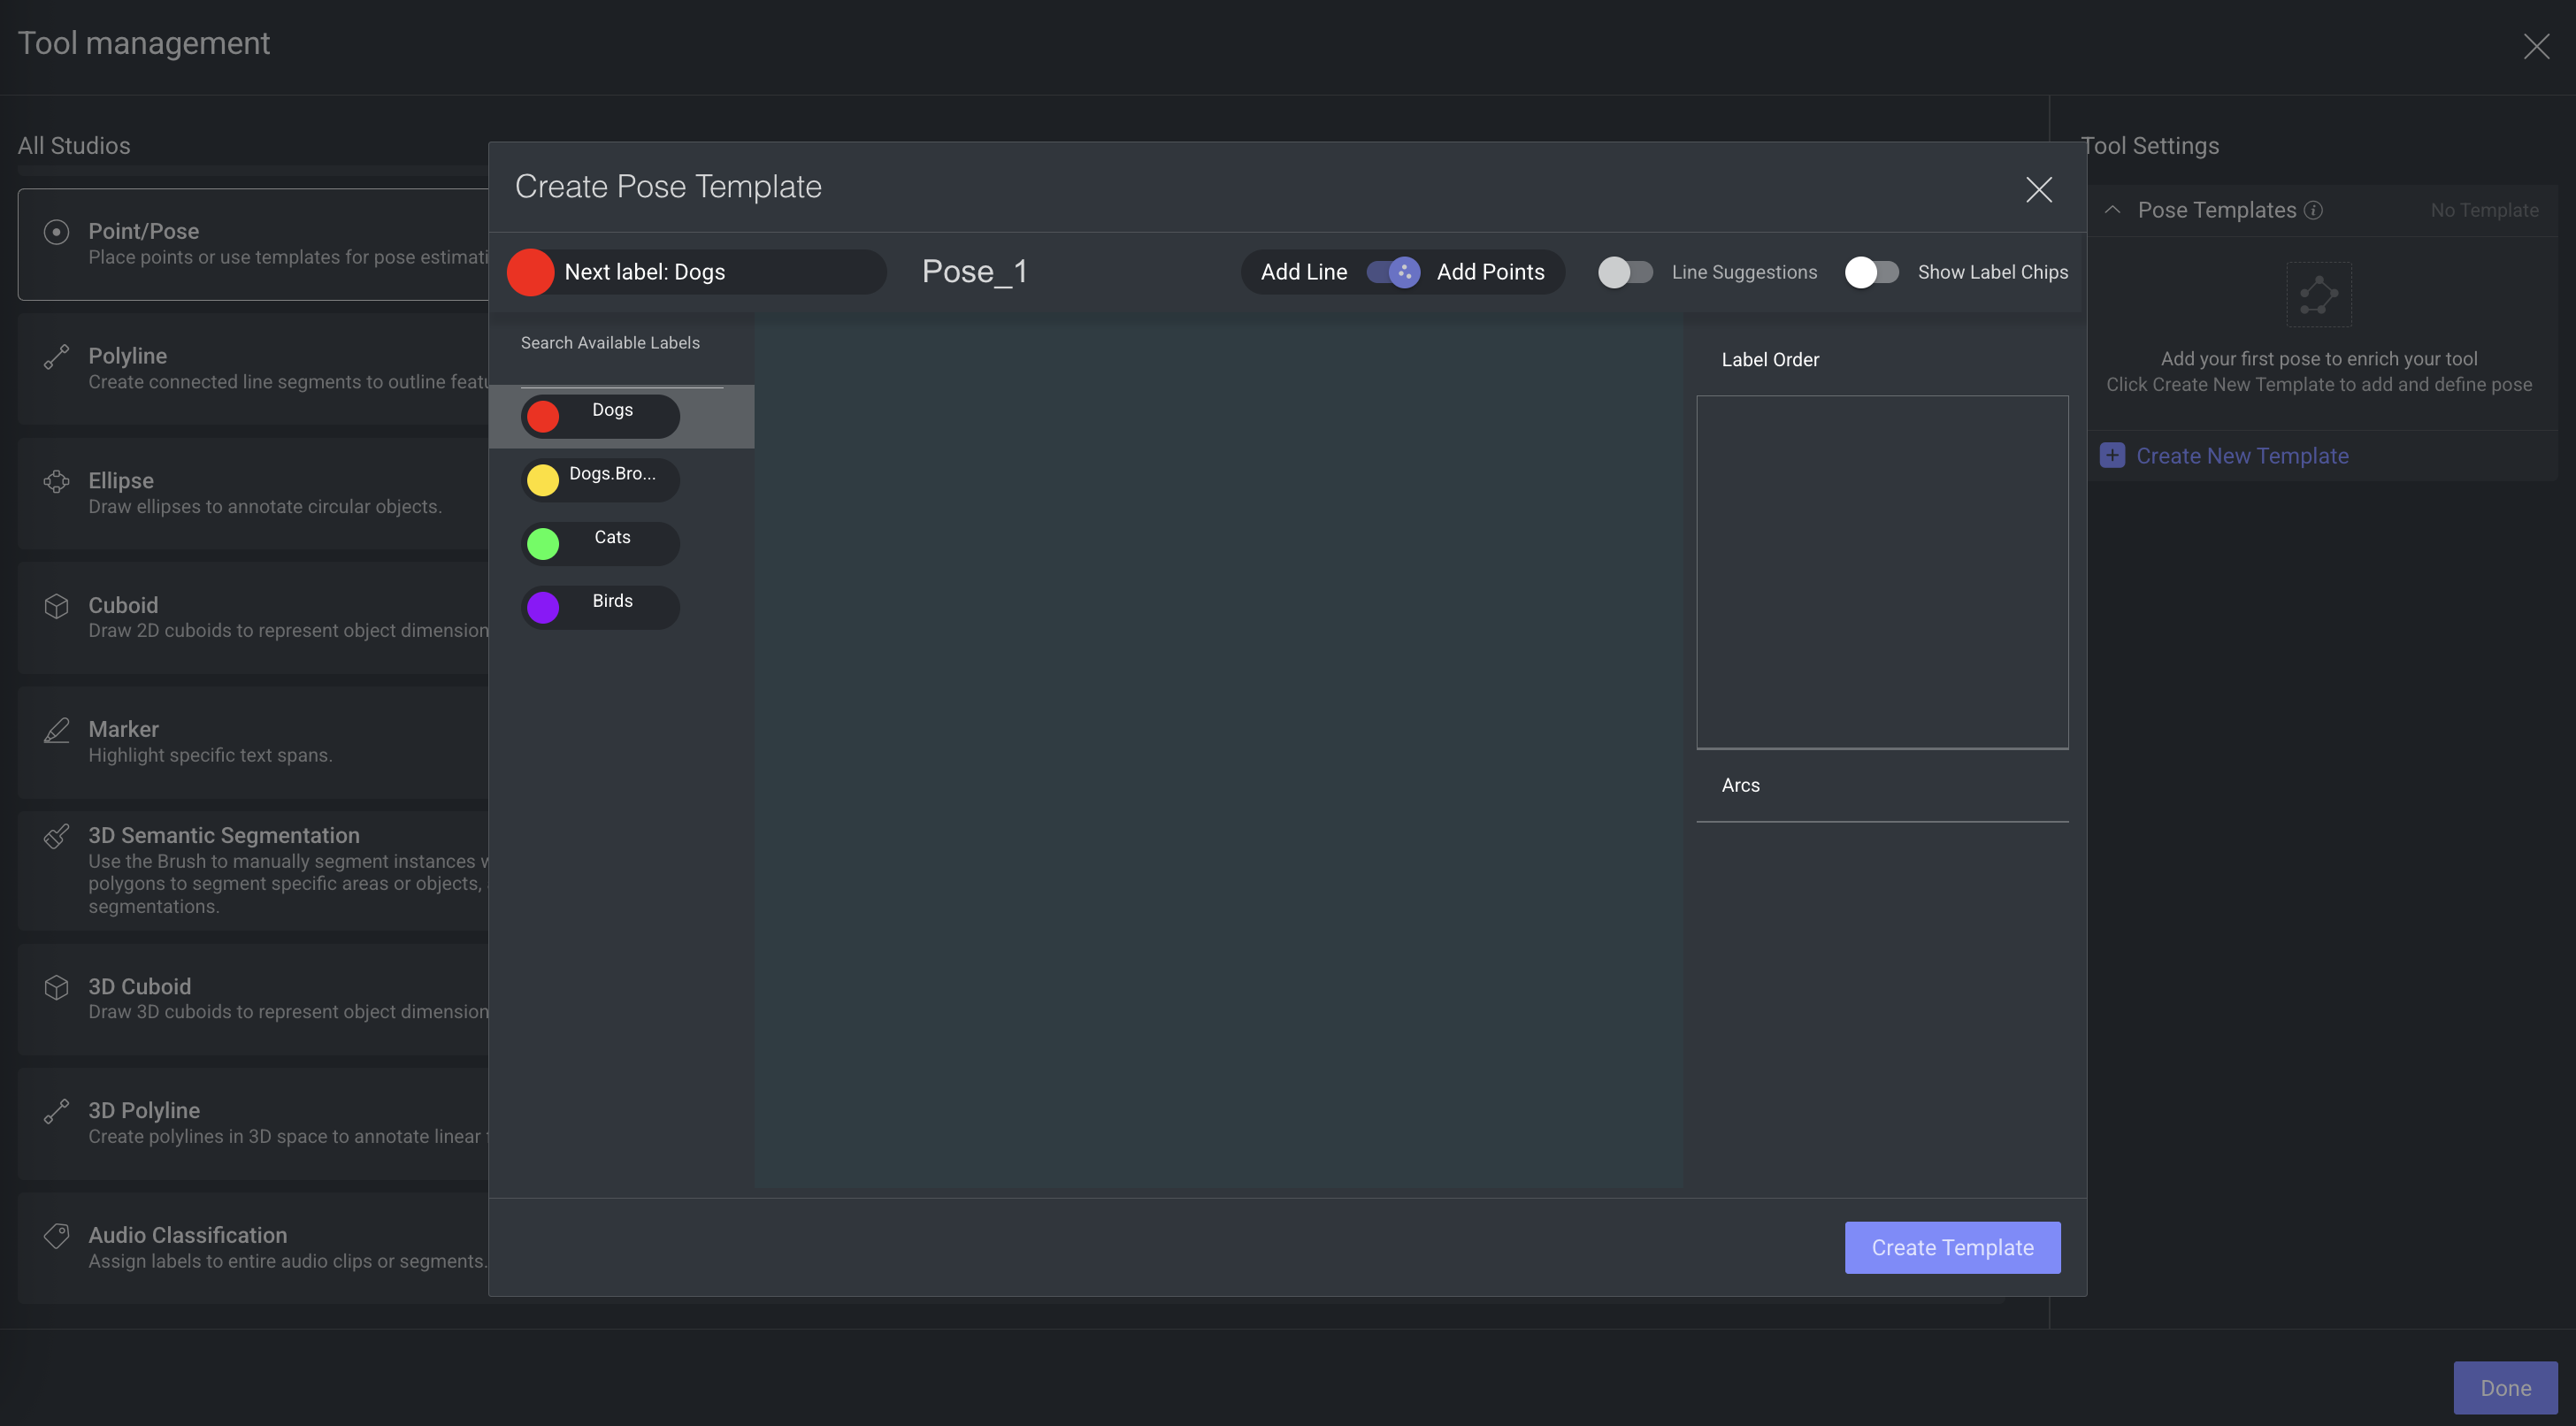
Search or select a label from the left-sde panel.
Click on the Canvas. The selected Label Point is displayed in the canvas and in the Label Order panel on the right-side.
Select the next label perform the above action.
To reorder, select the label from the Label Order panel, and drag and drop as required.
To Delete, double-click on the label in the canvas, or click on X icon next to the label in the label Order panel.
Show label Chips: Enable it to view the Label name as a chip in the canvas.
Add Points: Allows to add labels as points.
Add Line: Allows to add line between two points to show their relation.
Line Suggestions: Allows to provide line suggestion when hover-over between points.
Once complete, click Create Template to save the template.
Instructions
Annotation and QA instructions are PDF guides displayed in Annotation Studios. Annotation instructions tell annotators how to label; QA instructions define how reviewers validate results—both ensure consistency.
You can view instructions from the recipe’s Instructions panel or inside the relevant task by opening it in the appropriate studio (Annotation or QA).
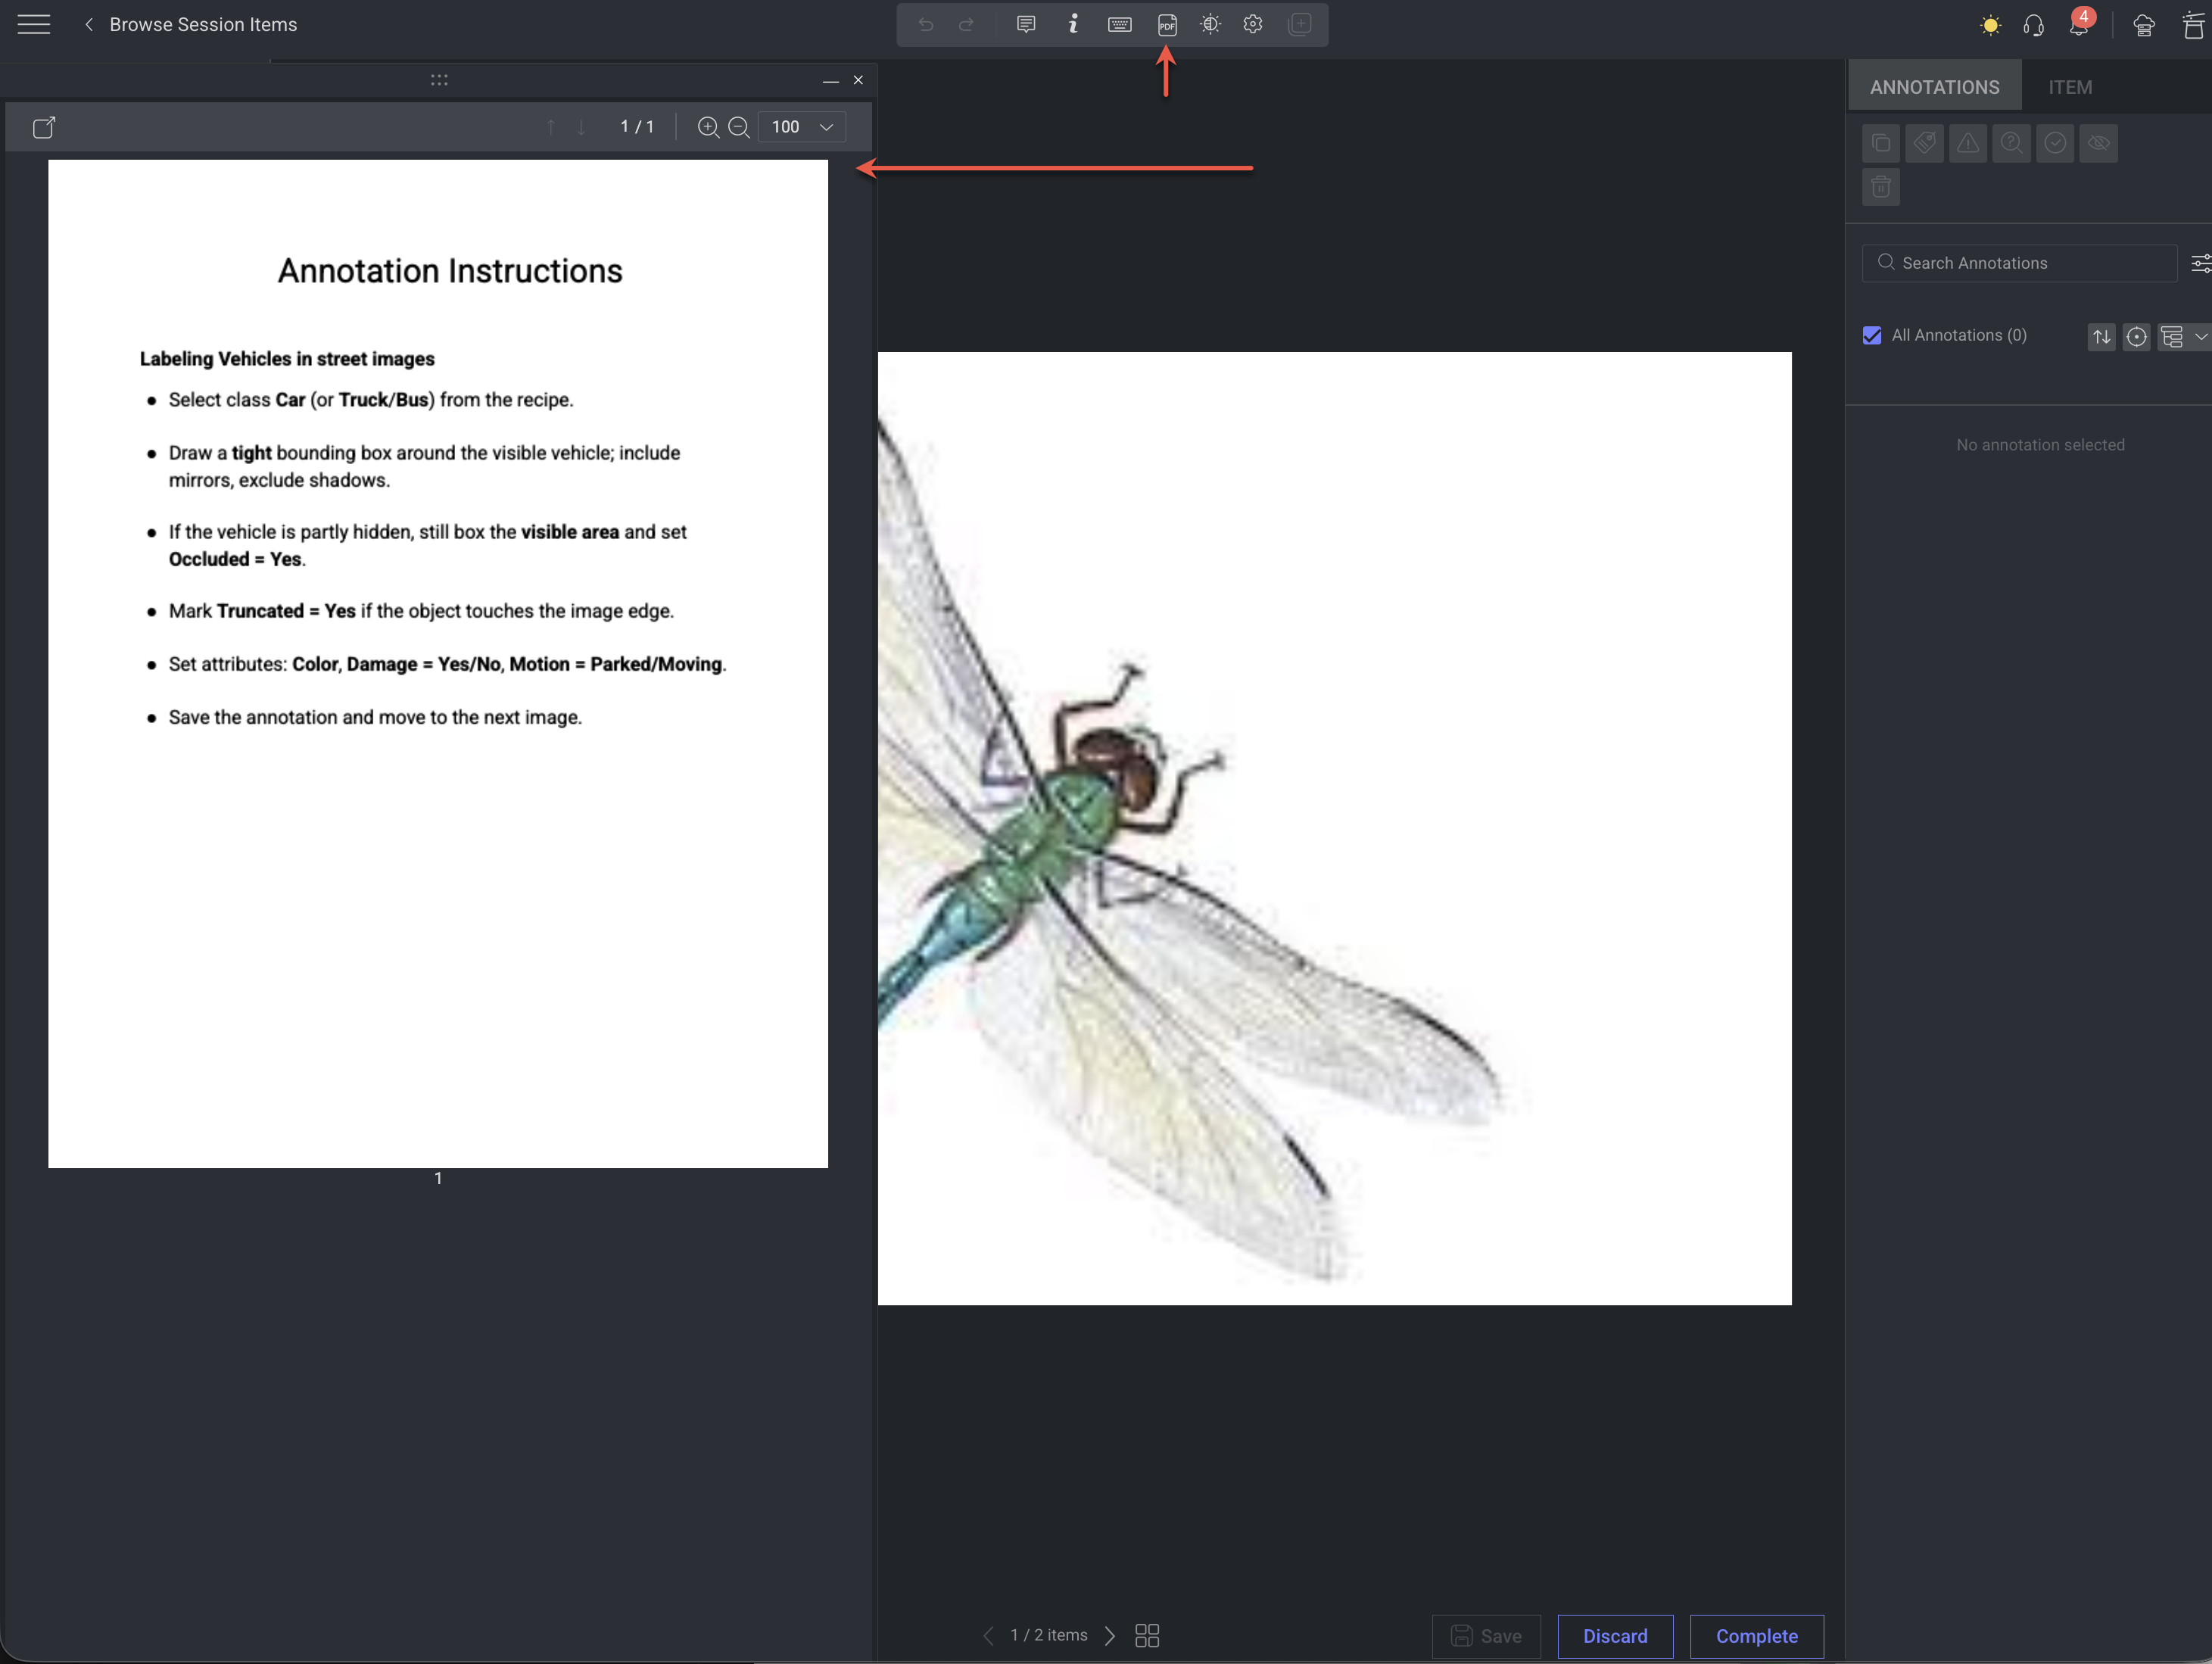
If you close the Instructions pane, it won’t stay open when you reopen the task, it’s hidden by default. To display, click on the PDF Viewer.
A preview of instruction is available in the Instructions.
You can reuse instruction PDFs from other recipes in the same project by selecting them from the list.
Editing in annotation studio isn’t supported—update your source document, export to PDF, then upload a replacement.
Annotation Instructions
Provide annotators with a clear PDF guide covering label definitions, tool usage, rules, and examples to ensure consistent, accurate labeling. You can upload and preview this PDF directly in recipe’s Instructions. When creating a Labeling Task, you can choose a specific page range from the PDF to display.
Upload Annotation Instructions
Go to the Recipes section.
Find and open the recipe from the list.
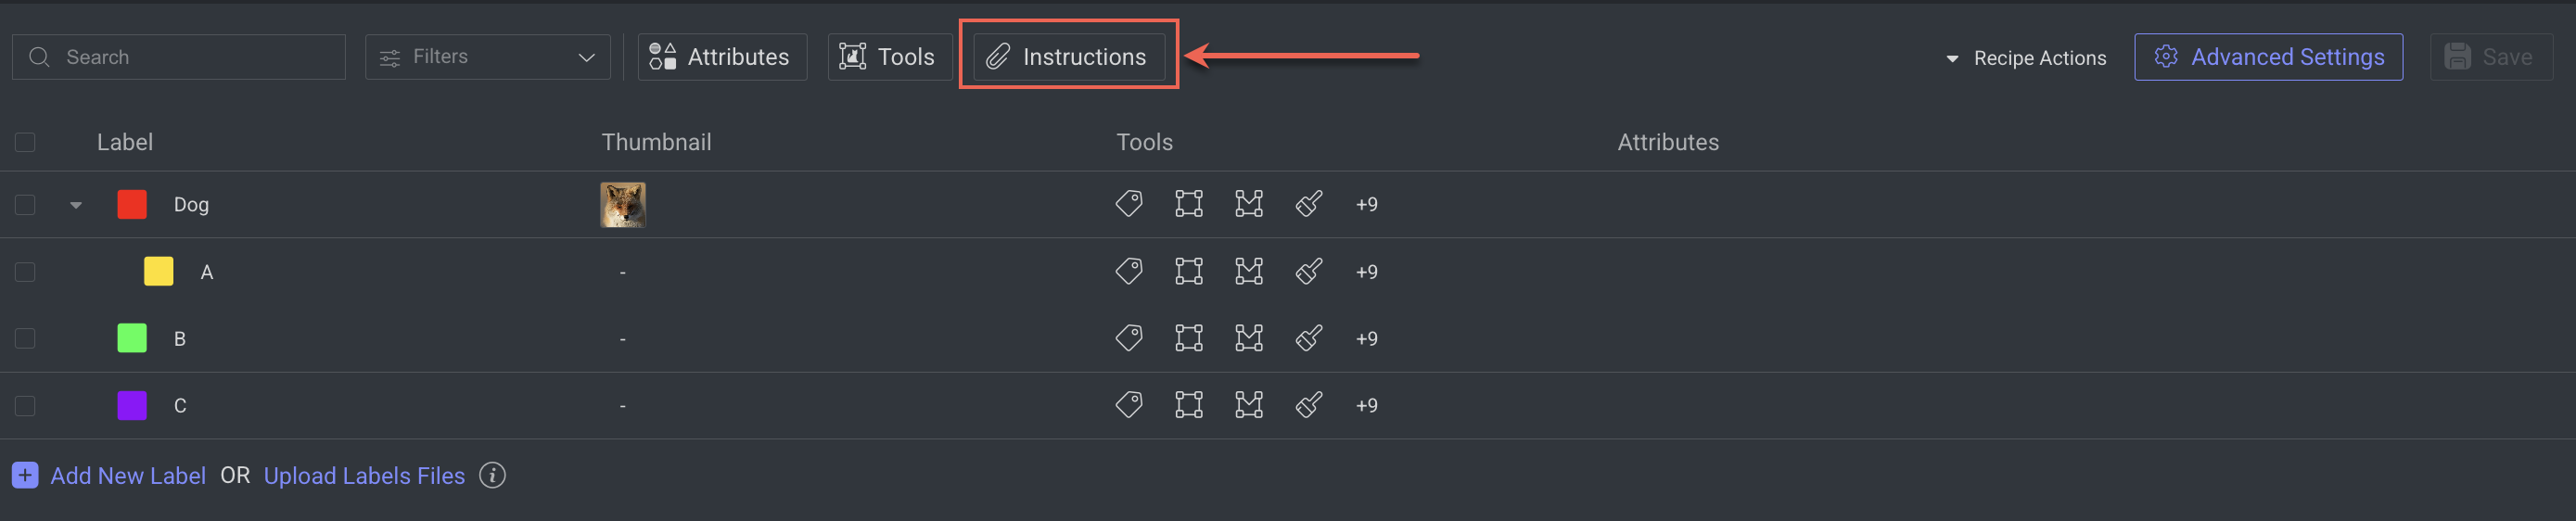
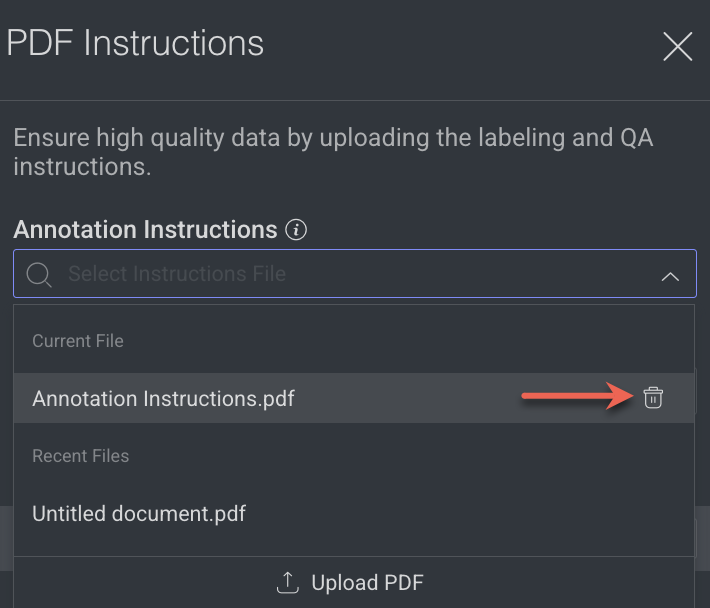
Click Instructions. The PDF Instructions popup panel is displayed.
Click on the Annotation Instructions field, and click Upload PDF.
Select the Instructions PDF and Upload it. The PDF file will be uploaded and a preview of it will be displayed in a tab format.
Delete Annotation Instructions
Go to the Recipes section.
Find and open the recipe from the list.
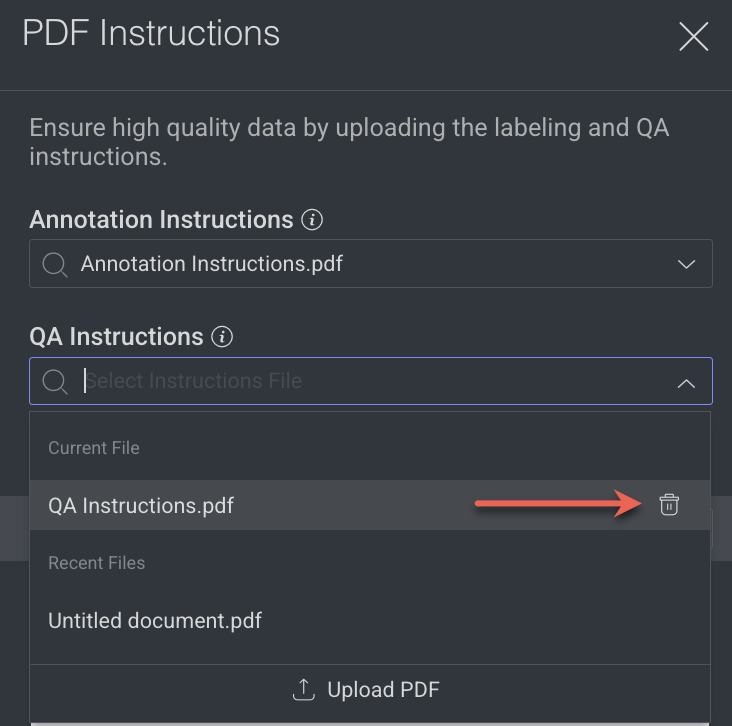
Click Instructions. The PDF Instructions popup panel is displayed.
Click on the QA Instructions field, and hover-over the instruction to be deleted. A Trash icon is displayed next to the file name.
Click on the Trash icon to delete the file.
QA Instructions
Offer QA reviewers specific criteria for evaluating annotations, identifying issues, and providing feedback to annotators. With Dataloop, you can upload and view your latest QA instructions PDF document directly in the annotation studio.
When you create a QA task, you can select a specific range of pages from the PDF. If there is no QA Instructions PDF document, the annotation instruction PDF document is displayed.
Upload QA Instructions
Go to the Recipes section.
Find and open the recipe from the list.
Click Instructions. The PDF Instructions popup panel is displayed.
Click on the QA Instructions field, and click Upload PDF.
Select the Instructions PDF and Upload it. The PDF file will be uploaded and a preview of it will be displayed in a tab format.
Delete QA Instructions
Go to the Recipes section.
Find and open the recipe from the list.
Click Instructions. The PDF Instructions popup panel is displayed.
Click on the QA Instructions field, and hover-over the instruction to be deleted. A Trash icon is displayed next to the file name.
Click on the Trash icon to delete the file.
Use Instructions on Labeling Tasks
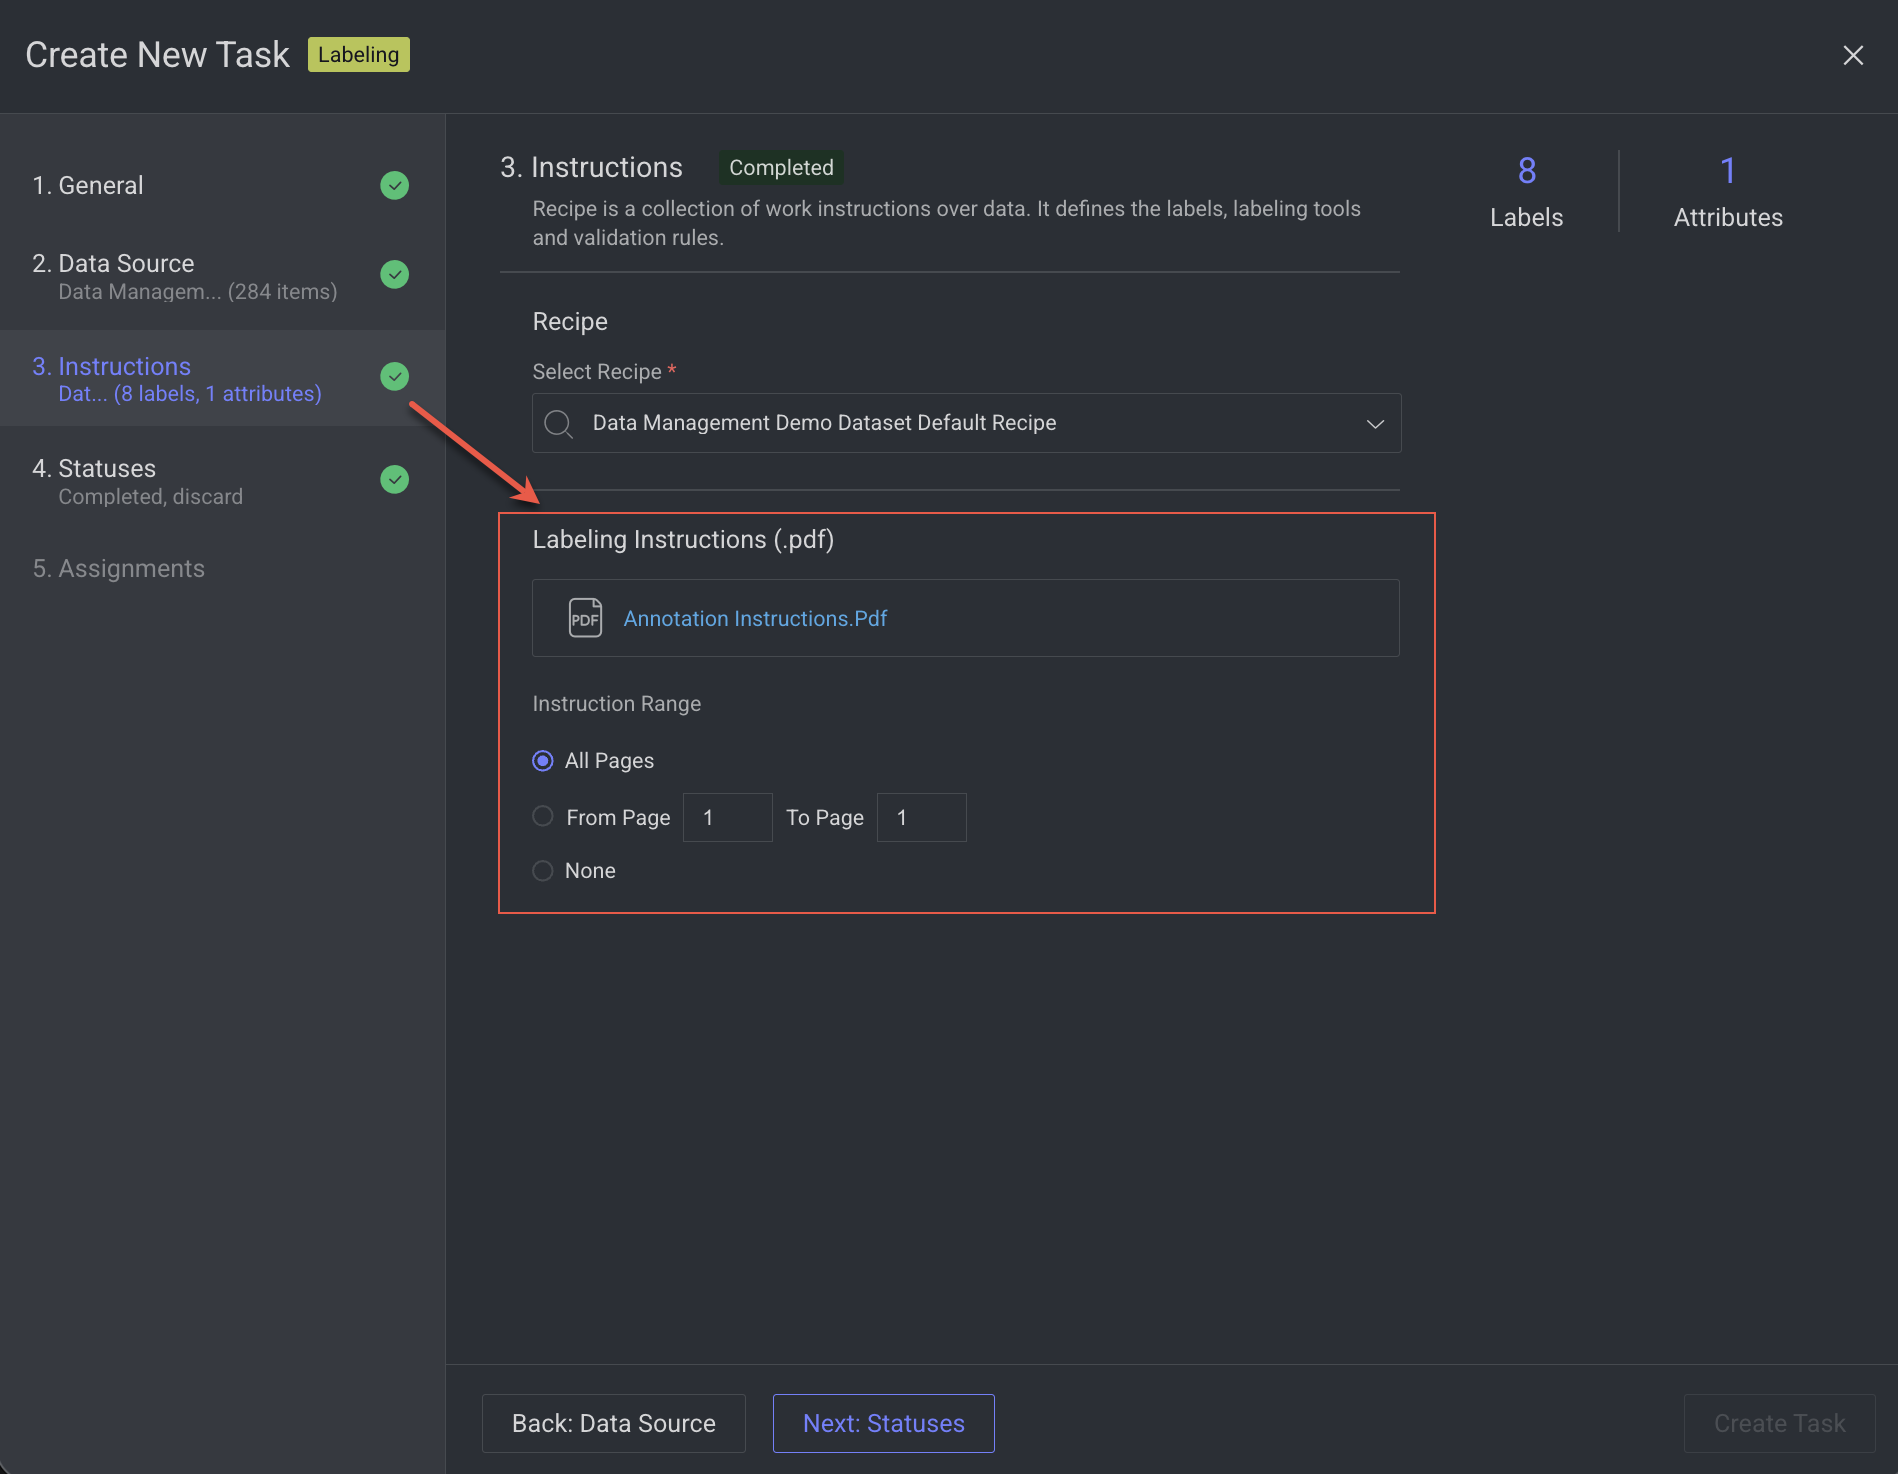
After uploading your Instructions PDF to a Recipe, you can use that recipe when creating labeling or QA tasks.
During task creation, select the recipe containing your uploaded instructions.
Once selected, the linked Annotation Instructions (for labeling tasks) or QA Instructions (for QA tasks) will appear, allowing you to choose a specific page range from the PDF to display in the studio if available.
View Instructions on Studios
You can view instructions from the recipe’s Instructions panel or inside the relevant task by opening it in the appropriate studio (Annotation or QA). If you close the Instructions pane, it won’t stay open when you reopen the task, it’s hidden by default. To display, click on the PDF Viewer.
Note: Annotator will only able to see Annotation Instructions, not QA instructions.
Recipe Actions
Recipe Actions let you perform key operations on your recipe, such as importing label files, importing ontology, exporting ontology and recipe, and cloning the recipe. These actions help you easily manage, reuse, and share your recipe configurations across projects.
.png)
Import Labels File
Click Recipes from the left-side menu.
Search and open the recipe from the list.
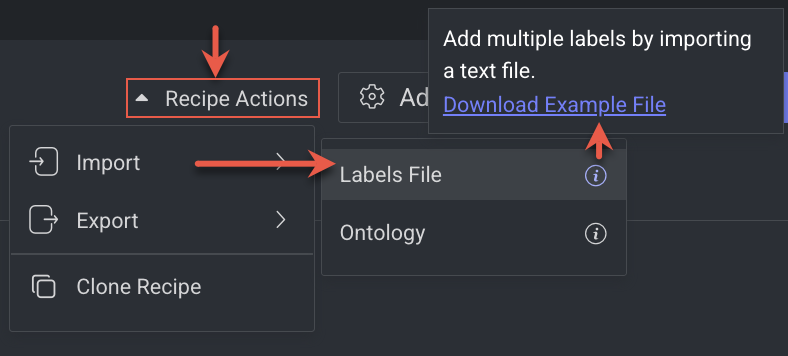
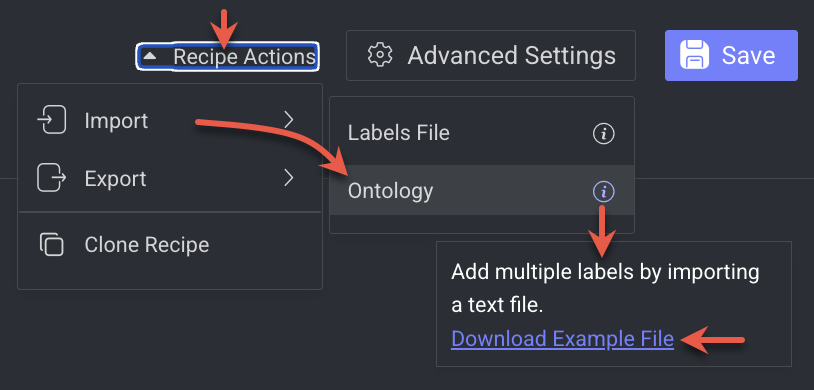
Download the Example File:
Click Recipe Actions → Import.
Hover over the Labels File’s Info icon.
Click on the Download Example File. A
.txtfile will be downloaded.Create your labels list according to this format.
Upload Labels File:
Click Recipe Actions → Import → Labels File.
Select the
.txtfile and click Open. The labels in the text file will be added to your recipe.
Import Ontology
An ontology in data labeling defines a structured framework for organizing and describing all entities, classes, and objects that annotators identify within a dataset. It establishes a hierarchical structure of labels (classes and subclasses), along with their attributes and permissible values, ensuring consistency and clarity throughout the annotation process.
For example, an ontology might include a main class “Fruit” with subclasses such as “Apple” and “Orange.” Similarly, for plant data, it could define an attribute like “Eatable” with values on a defined scale (e.g., Yes, No, Partially).
Click Recipes from the left-side menu.
Search and open the recipe from the list.
Download the Example File:
Click Recipe Actions → Import.
Hover over Ontology Info icon.
Click on the Download Example File. A
.jsonfile will be downloaded.Create your ontology list according to this format.
Upload Ontology File:
Click Recipe Actions → Import → Ontology.
Select the
.jsonfile and click Open. The ontology from the JSON file will be added to your recipe and will replace any existing labels.
Export Ontology
Click Recipes from the left-side menu.
Search and open the recipe from the list.
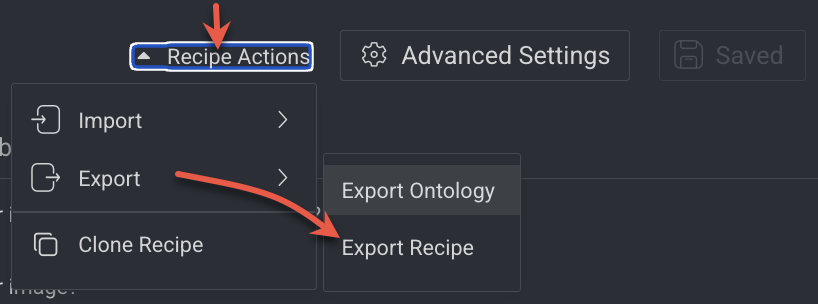
Click Recipe Actions → Export → Export Ontology.

Click Save and Export if there is any update to be saved. Otherwise, a
.jsonfile with the name format<your-recipe-name>-ontology.jsonwill be downloaded. An example format is shown below:
{
  "id": "677bd5ee386ce472f2bd615d",     // Unique ontology ID
  "creator": "youremail@dataloop.ai",     // Creator's email (who defined this ontology)
  "title": "Ontology name", // Ontology name/title
  "roots": [                            // Root-level labels (top-level classes in ontology)
    {
      "value": {
        "tag": "zebra",                 // Internal tag name
        "displayLabel": "zebra",        // Displayed label in UI
        "color": "#6e69b6",             // Color assigned to this class
        "attributes": [],               // List of attributes (empty means none defined)
        "displayData": {}               // Extra display configuration (empty here)
      },
      "children": [],                   // Sub-classes or nested labels (empty here)
      "identifier": "zebra"             // Unique identifier for the label
    },
...
    {
      "value": {
        "tag": "tiger",
        "displayLabel": "tiger",
        "color": "#693f0b",
        "attributes": [],
        "displayData": {}
      },
      "children": [],
      "identifier": "tiger"
    },
    {
      "value": {
        "tag": "mouse",
        "displayLabel": "mouse",
        "color": "#6343ca",
        "attributes": [],
        "displayData": {}
      },
      "children": [],
      "identifier": "mouse"
    }
  ],
  "metadata": {                          // Metadata section for ontology
    "system": {
      "projectIds": ["85899006-7814-467c-abab-655d21b553d4"], // Associated project IDs
      "system": false                   // Indicates whether this is a system ontology
    },
    "attributes": []                     // Global ontology-level attributes (none defined)
  }
}
Export Recipe
Click Recipes from the left-side menu.
Search and open the recipe from the list.
Click Recipe Actions → Export → Export Recipe.
Click Save and Export if there is any update to be saved. Otherwise, a
.jsonfile with the name format<your-recipe-name>.jsonwill be downloaded. An example format is shown below:
For example:
{
  "id": "677bd5ee386ce49e92bd615e",        // Unique Recipe ID
  "title": "Recipe Name",                  // Name of the recipe
  "projectIds": ["85899006-7814-467c-abab-655d21b553d4"], // Associated project(s) using this recipe
  "creator": "youremail@dataloop.ai",      // Creator's email (who made the recipe)
  "ontologyIds": ["677bd5ee386ce472f2bd615d"], // Linked ontology IDs (defines labels/classes)
  "uiSettings": {                          // User Interface configuration for labeling
    "fastClassificationBar": true,         // Show fast classification bar
    "requireObjectId": true,               // Force annotators to set object IDs
    "requireParenting": true,              // Require hierarchical (parent-child) labeling
    "ocrMode": false,                      // Enable OCR (Optical Character Recognition) mode
    "showText": false,                     // Display text annotations
    "freeText": true,                      // Allow free-text input
    ...
    "allowDisplayTextBlocksHorizontally": false, // Restrict text blocks to vertical display
    "disableQaTaskAnnotationTools": false, // If true, disables annotation tools for QA tasks
    "enableBulkClassificationMode": false, // Enable/disable bulk classification
    "audioSpeakerNameByAnnotation": false  // Require speaker name per audio annotation
  },
  "metadata": {                            // System metadata
    "system": {
      "collectionTemplates": [],           // Predefined collection templates (if any)
      "script": {
        "entryPoints": {                   // Script entry points (custom logic)
          "main": { "_instructions": [] }
        }
      }
    }
  },
  "createdAt": "2025-01-06T13:09:02.000Z", // Recipe creation date (ISO 8601)
  "updatedAt": "2025-09-12T08:41:12.658Z", // Last update timestamp
  "instructions": []                       // Instruction set (empty in this case)
}
Clone Recipes
Option A: From inside a Recipe:
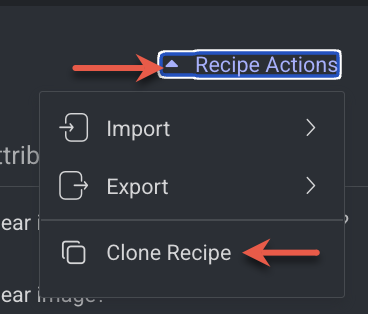
Click Recipes from the left-side menu.
Search and open the recipe from the list.
Click Recipe Actions → Clone Recipe. A successful message is displayed. To view it, click on the Show Recipe.
Option B: From the Recipes list:
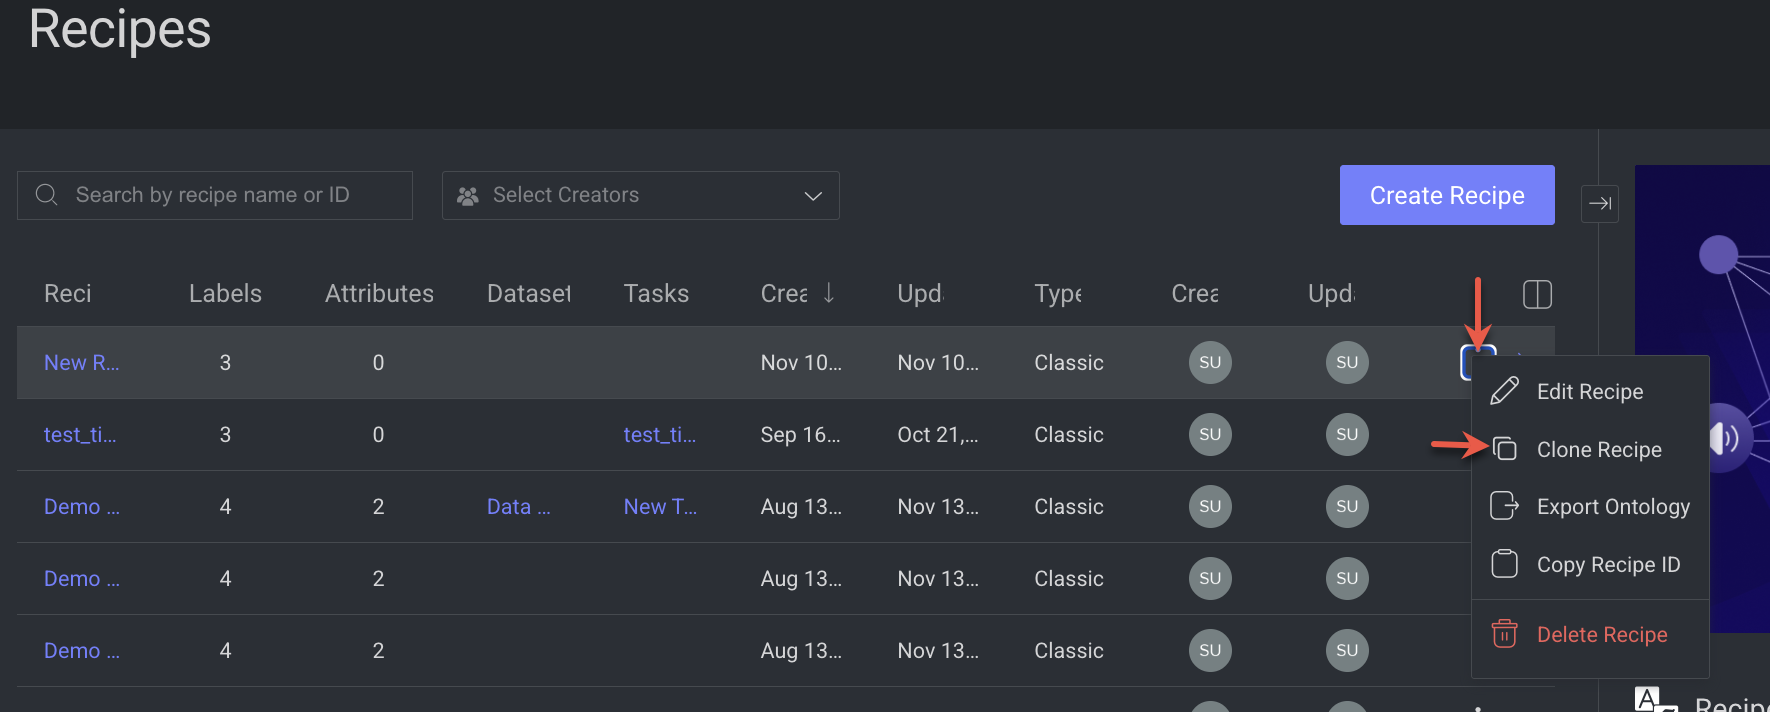
Click on the Recipes from the lift-side menu.
Locate or search for the desired recipe in the list.
Click on the ⋮ Three Dots and select Clone Recipe from the list.
Click Clone Recipe. The cloned recipe will be created and listed. A
[Clone]prefix will be added to the cloned recipe’s name.
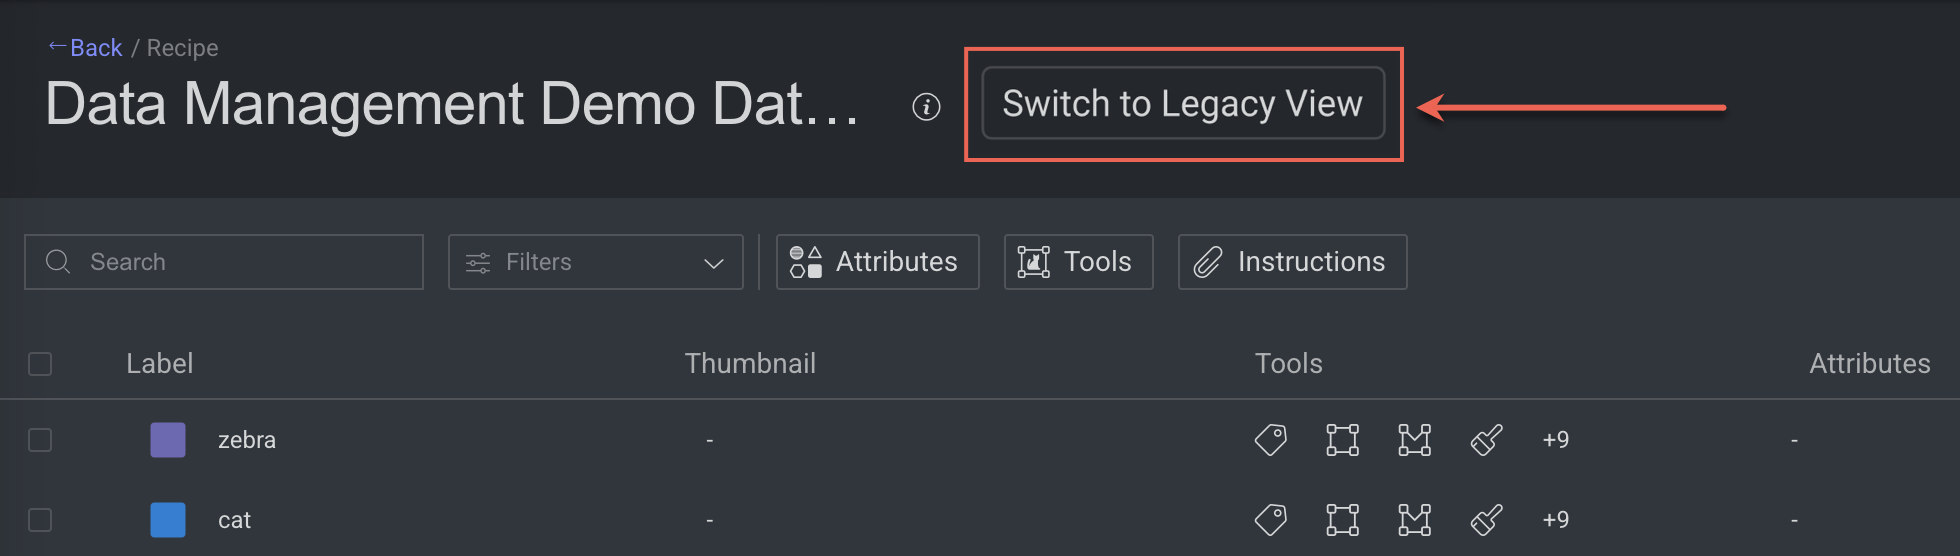
Switch to Legacy View
Users working with the new recipe can access the previous version (Legacy View) by selecting Switch to Legacy View.