DDOE offers an Instance Segmentation Studio, a sophisticated form of image segmentation in computer vision that identifies and outlines each unique instance of objects within an image, differentiating between multiple occurrences of the same type of object. With the instance segmentation, each element has its own annotation.
Unique Annotations for Each Instance: Ensures that every object instance has its own annotation, providing detailed and accurate segmentation.
Enhanced Accuracy for Complex Scenes: Ideal for scenarios with overlapping or multiple objects of the same type.
.png)
Segment Anything Model (SAM2)
The Segment Anything Model (SAM2) in the Instance Segmentation Studio is a powerful tool designed to make the process of annotating images for instance segmentation both efficient and precise. SAM2 uses advanced machine learning algorithms to automate and assist with the segmentation process. For more information, refer to the Segment Anything.
The Segment Anything Model (SAM2) in the Instance Segmentation Studio includes two tools: SAM Hover & Click and SAM Box. These features enhance the process of instance segmentation, making it more intuitive and efficient.
Supported Data Types
The Instance Segmentation Studio supports images.
Open Instance Segmentation Studio
Recipe: Set Instance Segmentation Studio as Default
You can now select either Image Segmentation Studio or Instance Segmentation Studio as the default for the Image type in the Recipe. If no custom studio is specified, the system will automatically apply the default option. Learn more.
In the Dataset Browser, double-click on the image.
Start annotating using various segmentation tools.
Label Picker
A Label Picker is a feature within the annotation studio that allows you to pick or select labels to assign to specific objects or elements in the data being annotated. You can perform the following activities on the Label Picker section. The available labels are determined in the Recipe.
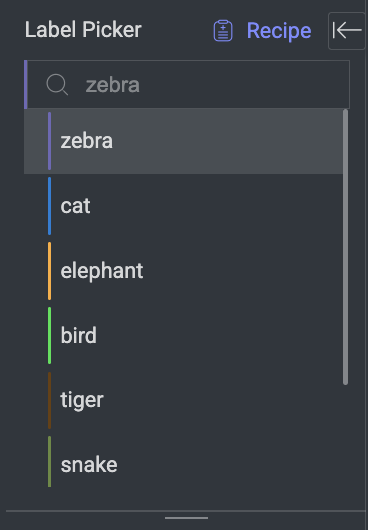
Scroll and click a label to activate it.
Use the search bar to easily find labels.
Resize the label list to better fit your number of labels by clicking and dragging the separator line.
Use the Shortcut keys to navigate between labels.
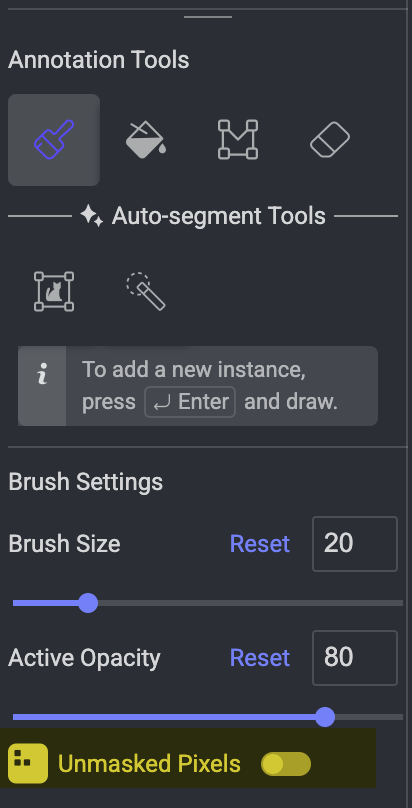
Annotation Tools
The Instance Segmentation Studio on the DDOE platform offers a suite of intuitive annotation tools designed to streamline the creation of high-quality segmentation masks. These tools empower users to add structured metadata to images, enabling machine learning models to understand and learn from visual data.
The tool set is divided into two main categories:
Classic Annotation Tools – Manual tools for detailed and custom annotations.
Auto-Segment Tools – AI-assisted tools powered by the Segment Anything Model (SAM2) for fast, accurate segmentation.
Each tool is configurable with parameters such as Active Opacity, and other contextual settings to provide flexibility and control.
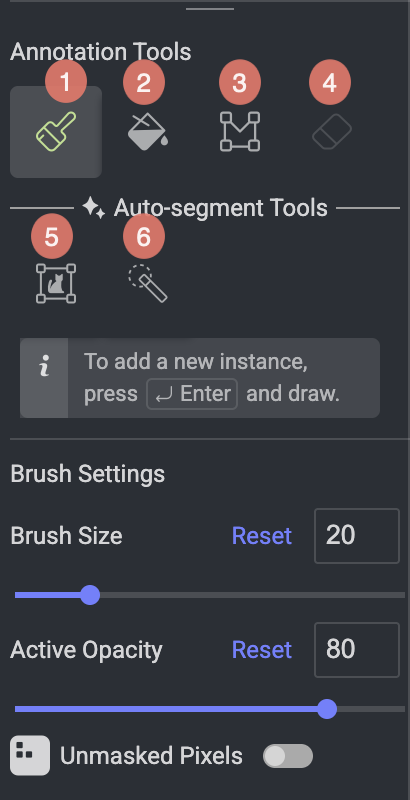
🎨 Classic Annotation Tools
Brush: Freehand drawing tool that allows users to paint segmentation masks directly on the image. Brush size can be adjusted for precision.
Bucket: Click to fill an entire enclosed region with a segmentation mask. Ideal for annotating large, contiguous areas with minimal effort.
Polygon: Enables users to draw precise shapes by placing individual points (vertices) around the object. Best suited for detailed and accurate outlines.
Eraser: Use this tool to selectively remove unwanted parts of existing annotations. Adjustable size ensures control over fine or broad edits.
⚡ Auto-Segment Tools
SAM Box: Draw a bounding box around the object, and the Segment Anything Model (SAM2) will generate the corresponding segmentation mask. Perfect for quickly segmenting objects with minimal interaction.
SAM Hover and Click: Simply hover over the object and click to create a high-accuracy segmentation mask using SAM. This intuitive method is ideal for precise, single-object segmentation with minimal manual input.
📊 Classic vs. Auto Segmentation Tools
Feature | Brush Tool | Polygon Tool | Bucket Tool | SAM Box | SAM Hover & Click |
|---|---|---|---|---|---|
Interaction Type | Freehand drawing | Point-by-point or freehand | Click to fill | Draw bounding box | Hover and single-click |
Best For | Irregular, detailed shapes | Angular or structured shapes | Uniform, enclosed areas | Fast object-level segmentation | Rapid single-object detection |
Precision Control | Very High | High | Medium | Medium–High (depends on box) | High (auto-detected) |
Speed | Slower (manual) | Moderate | Fast | Fast | Fastest |
AI Assistance | ❌ | ❌ | ❌ | ✅ (SAM2) | ✅ (SAM2) |
Refinement Needed? | Often | Sometimes | Occasionally | Occasionally | Occasionally |
Adjustments
The adjustments setting allows you to configure the following features according to your requirement.
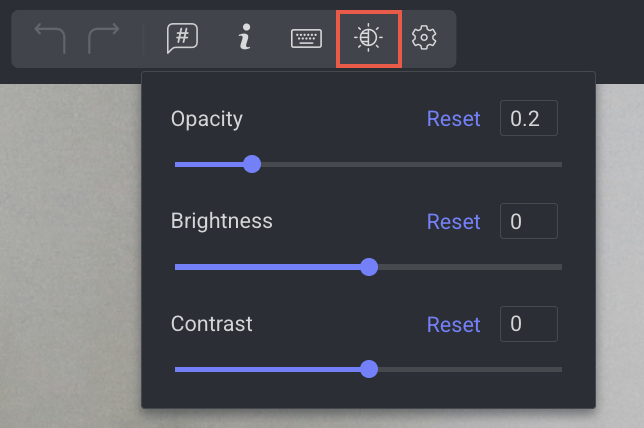
Opacity
It controls the transparency level of an annotation or element within the image.
1. Open the Instance Segmentation Studio.
2. In the top control panel, click on the Adjustments icon next to the Keyboard Shortcut icon.
3. Adjust the Opacity progress bar as required.
Brightness
It controls how light or dark the image appears.
1. Open the Instance Segmentation Studio.
2. In the top control panel, click on the Adjustments icon next to the Keyboard Shortcut icon.
3. Adjust the Brightness progress bar or enter a value as required.
Contrast
It adjusts the difference between the light and dark areas of an image. It enhances the distinction between light and dark areas, making annotations more pronounced.
1. Go to Open the Instance Segmentation Studio.
2. In the top-side control, click on the Adjustments icon next to the Keyboard Shortcut icon.
3. Adjust the Contrast progress bar or enter a value as required.
Use the Brush Tool
The Brush tool enables manual annotation by allowing you to draw directly over regions of interest within an image. It lets you select specific pixels for annotation, making it ideal for detailed and precise tasks where objects have complex shapes that require careful outlining.
.gif)
Select a Label: Use the Label Picker to choose the appropriate label for the object you want to annotate.
Ensure Brush Tool is Active: The Brush Applicator is selected by default when using the Brush Tool. By default, the Brush Applicator is selected.
Configure Brush Settings:
Brush Size: Adjust the diameter of the brush to suit your task:
Smaller sizes offer greater precision for fine details.
Larger sizes speed up coverage of broad areas.
Active Opacity: Set the transparency level of the brush overlay to better visualize how annotations blend with the image.
Paint the Object: Click and drag to manually draw over the object. Carefully trace along the boundaries to ensure complete and accurate coverage. The painted region will be highlighted in real time to show the developing segment.
Annotation Instance Creation: As soon as you apply the fill, an annotation instance is automatically created and added to the Annotations tab in the right-hand panel, where it can be viewed, modified, or managed.
You can continue annotating within the same instance, using either the same tool or switching to a different annotation tool, as needed. Each additional annotation will be part of the active instance until it is approved. To start a new instance:
Start a New Instance if required: Press Enter ⏎ to deselect the current instance and begin annotating a new object immediately.
Refine with the Eraser (if needed): Use the Eraser Tool to clean up any overdrawn areas or mistakes before finalizing the mask.
Save Your Work: Click Save to apply and store your annotation changes.
Use the Bucket Tool
The Bucket Tool offers a fast and efficient way to fill unsegmented areas within an image. Designed to streamline the annotation of large, contiguous regions, it detects and fills areas based on pixel similarity—stopping at segmentation boundaries. This tool is especially effective for annotating backgrounds or uniformly textured regions with clearly defined edges.
Select a Label: Choose the appropriate label from the Label Picker to assign to the region you’re about to annotate.
Activate the Bucket Tool: From the Semantic Instance Tools panel, select the Bucket Tool.
Adjust Bucket Settings: Active Opacity: Set the desired opacity level to control how transparently the filled region appears during annotation. Higher opacity gives clearer visual feedback.
Fill the Region: Click on the area of the image you wish to segment. The Bucket Tool will automatically detect boundaries and fill the region with the selected label. It analyzes pixel colors and textures to determine the extent of the fill area.
Annotation Instance Creation: As soon as you apply the fill, an annotation instance is automatically created and added to the Annotations tab in the right-hand panel, where it can be viewed, modified, or managed.
You can continue annotating within the same instance, using either the same tool or switching to a different annotation tool, as needed. Each additional annotation will be part of the active instance until it is approved. To start a new instance:
Start a New Instance if required: Press Enter ⏎ to deselect the current instance and begin annotating a new object immediately.
Another way is to simply create a new box. It saves the current one and starts a new instance.
Refine if necessary: If the fill overshoots or captures unintended areas, use the Eraser Tool to correct the annotation.
Save Your Work: Click Save to apply and store all changes.
Use the Polygon Tool
The Polygon Tool is designed for precise, shape-based segmentation by allowing you to place vertices around an object to define its boundaries. It is especially effective for annotating straight-edged or geometrically simple objects, or any case where a clean, angular outline is required.
In addition to point-and-click vertex placement, the tool also supports freehand drawing, offering flexibility when outlining curved or irregular shapes.
Select a Label: Use the Label Picker to choose the appropriate label for your annotation.
Activate the Polygon Tool: From the Annotation Tools panel, select the Polygon Tool.
Adjust Polygon Settings: Active Opacity - Set the transparency level of the filled region. A higher opacity makes it easier to see the annotated area while editing.
Place Vertices:
Click on the image to place the first vertex at the starting point of the object’s boundary.
Continue clicking to place additional vertices along the object's edge. Each vertex creates a connected line segment, building the polygon’s outline.
Close the Shape:
To complete the polygon, either:
Click the starting vertex (highlighted in green), or
Press Enter ⏎.
The polygon will automatically close, and the enclosed area will be filled to form the annotation mask.
Freehand Drawing (Optional): For curved or irregular shapes, hold down the left mouse button and drag to draw the outline freely. This mode allows for fluid annotation without placing individual points.
Annotation Instance Creation: Once the shape is completed, an annotation instance is automatically generated and added to the Annotations tab on the right-hand panel, where it can be viewed, edited, or managed.
You can continue annotating within the same instance, using either the same tool or switching to a different annotation tool, as needed. Each additional annotation will be part of the active instance until it is approved. To start a new instance:
Start a New Instance if needed: Press Enter ⏎ to deselect the current instance and begin annotating a new object.
Refine if Needed: Use the Eraser Tool to modify or remove any inaccurate parts of the
polygon.
Save Your Work: Click Save to apply and store your polygon annotation.
Use the Eraser Tool
The Eraser Tool is used to remove pixels from existing annotations, allowing you to correct mistakes or fine-tune segmentation masks. It is ideal for cleaning up over-segmented areas, removing misapplied labels, or performing precise pixel-level adjustments.
Identify the Annotation to Edit: Select the annotation instance from the image or via the Annotations tab to make it active for editing.
Activate the Eraser Tool: From the Annotation Tools panel, select the Eraser Tool.
Adjust Eraser Settings:
Eraser Size: Set the appropriate size based on the correction required:
Smaller sizes are ideal for detailed touch-ups and tight areas.
Larger sizes are better suited for clearing broader regions quickly.
Erase the Unwanted Area: Click and drag the cursor over the portions of the annotation you wish to remove. The affected pixels will be immediately cleared from the segmentation mask in real time.
Save Your Work: Once you're satisfied with the correction, click Save to apply and store the updated annotation.
Use the SAM Box
The SAM Box Tool leverages the Segment Anything Model (SAM2) to enable fast, AI-assisted segmentation. By drawing a simple bounding box around an object, the model automatically generates a high-precision segmentation mask, making this tool ideal for quickly capturing object boundaries before applying any manual refinements.
Select a Label: Choose the appropriate label from the Label Picker to assign to the segmented object.
Activate the SAM Box Tool: In the Auto-segment Tools, select SAM Box.
Adjust SAM Box Settings: Active Opacity: Configure the opacity level for the segmentation mask. Higher opacity improves visibility while drawing and reviewing the annotation.
Draw the Bounding Box:
Click and drag to draw a rectangular box around the object you wish to segment.
Make sure the box tightly encloses the object for optimal results.
Once the box is released, the Segment Anything Model (SAM2) will automatically process the selected area and generate a segmentation mask based on the object’s boundaries.
If there are unsegmented areas, click on the unsegmented areas to get segmented. If click again on the segmented area, causes getting unsegmented.
Approve or Cancel the instance:
You can approve the instance by clicking on the Tick icon, Enter ⏎, or click outside the box segmentation.
You can cancel the instance by clicking on the Cross (x) icon.

Annotation Instance Creation: Once the segmentation is completed, an annotation instance is automatically generated and added to the Annotations tab on the right-hand panel, where it can be viewed, edited, or managed.
You can continue annotating within the same instance, using either the same tool or switching to a different annotation tool, as needed. Each additional annotation will be part of the active instance until it is approved. To start a new instance:
Start a New Instance if required: Press Enter ⏎ to deselect the current instance and begin annotating a new object.
Refine if Necessary: Use the Eraser Tool to clean up any portions of the segmentation that may require adjustment.
Save Your Work: Click Save to apply and store the annotation.
Use the SAM Hover & Click Tool
The SAM Hover & Click Tool offers an intuitive, AI-powered approach to instance segmentation. As you move your cursor across the image, the Segment Anything Model (SAM2) dynamically identifies objects and previews segmentation masks. With a single click, you can apply these suggested masks—making this tool ideal for fast, precise, and minimal-effort annotations.
Select a Label: Choose a label from the Label Picker to apply to the segmented object.
Activate the SAM Hover & Click Tool: From the Auto-segment Tools panel, select SAM Hover & Click.
Adjust Tool Settings: Active Opacity - Set the desired transparency level of the segmentation mask to help visualize your annotations over the image.
Hover Over the Object: Move your cursor over the target object. SAM will continuously detect and highlight regions it recognizes as part of the object under the cursor.
Click to Segment:
Click on the highlighted region to generate a segmentation mask.
Each click will add or refine the segmented region.
For objects with complex shapes, multiple clicks may be used to capture all relevant areas.
Annotation Instance Creation: Once the segmentation is completed, an annotation instance is automatically generated and added to the Annotations tab on the right-hand panel, where it can be viewed, edited, or managed.
You can continue annotating within the same instance, using either the same tool or switching to a different annotation tool, as needed. Each additional annotation will be part of the active instance until it is approved. To start a new instance:
Start a New Instances, if required: Press Enter ⏎ to deselect the current instance and begin annotating a new object.
Refine if Necessary:Use the Eraser Tool to remove any inaccurate or excess segmentation areas.
Save Your Work: Click Save to apply and store your segmentation results.
Annotating Canvas
The Instance Segmentation Studio Canvas provides a versatile platform for segmentation using the available annotation applicators.
Displaying Images with Non-Instance Semantic Annotations
Semantic Segmentation: When annotations from the Classic Image Studio use Semantic Segmentation, they will be read as a single instance in the instance segmentation studio.
Other Annotations: Annotations created with tools like Bounding Box or Point will appear in the annotation list but won't be displayed on the canvas. In segmentation mode, the checkboxes for non-instance segmentation tools will be disabled in the annotation list.
Find the Unmasked Pixels
The Unmasked Pixels feature in the Instance Segmentation Studio helps ensure that every pixel in the image is fully segmented. It is designed to identify any unlabeled or unannotated areas, helping users achieve complete and accurate segmentation.
This tool is particularly useful in workflows that require 100% coverage, such as in model training or strict QA pipelines. The feature can detect up to 500 unmasked pixels within an image. If the number exceeds this threshold, a popup alert notifies the user to further refine their annotations.
![]()
Enforce 100% Segmentation Annotation
You can enable this option (Enforce 100% segmentation annotation) in the recipe to ensure that items are fully segmented, leaving no pixels unmasked.
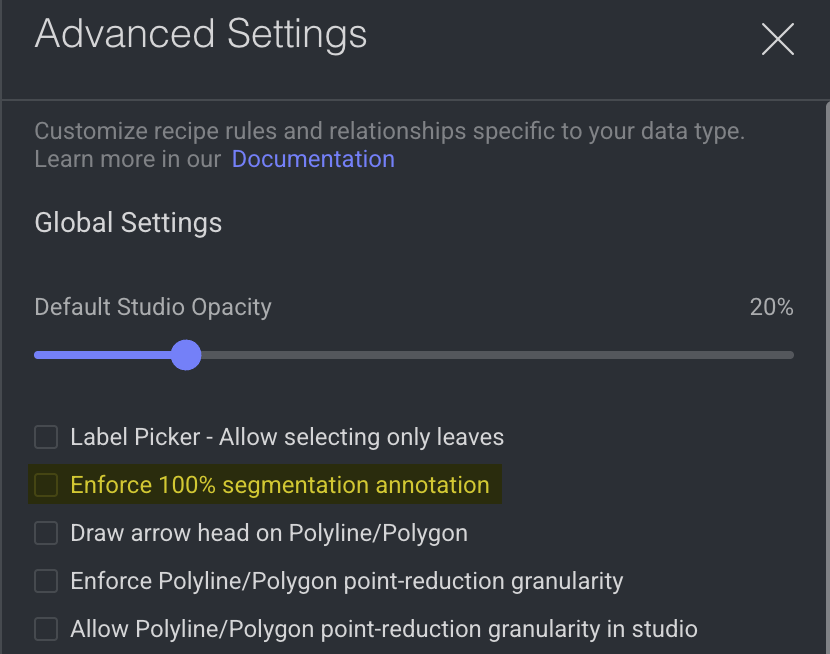
If the checkbox is unchecked, users can mark the task as complete even if there are unsegmented pixels.
If the checkbox is checked, the Complete button will be disabled if there are any unsegmented pixels, ensuring full segmentation before the task can be marked as complete or any other status can be set.
:::
To Find the Unmasked Pixels
Complete your segmentation annotations using tools such as Brush, Polygon, or SAM.
Click the Unmasked Pixels toggle in the top toolbar.
A popup message will appear indicating the number of pixels that remain unsegmented.
If ≤ 500 pixels: The user can manually locate and annotate them.
If > 500 pixels: A warning will prompt the user to continue annotating to reduce unmasked areas.
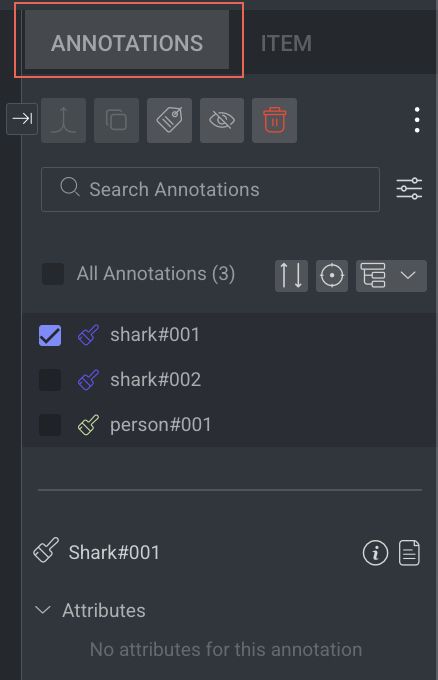
Annotations Tab
The Annotations tab in the right panel allows you to control and manage annotations using the annotations list and attribute controls, especially when attributes are defined in the Recipe. Learn more
Selecting annotations allow:
To perform various actions, hide, change labels & attributes, delete annotation, etc.
To view the selected annotation (supports multiple selections) will be highlighted in the Canvas.
To Merge annotation instances (more than one annotation) of the same label and attributes.
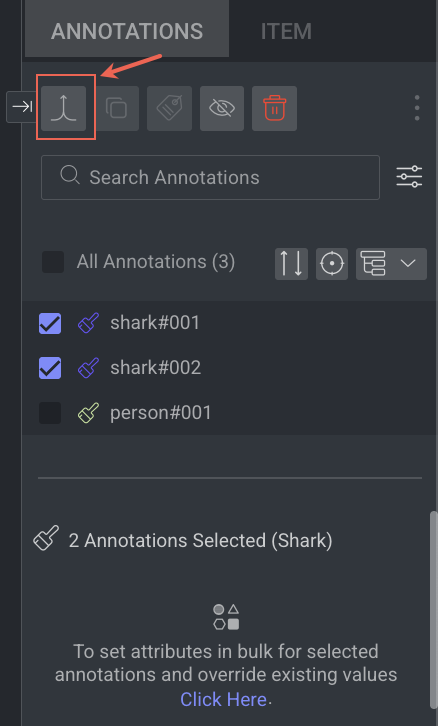
Merge Annotation Instances
The Merge Annotation Instances functionality in Instance Segmentation Studio enables users to combine multiple segmentation annotations that share the same label and attributes into a single, unified instance.
This feature is essential when a single object or entity is annotated in fragments across multiple instances and needs to be treated as one cohesive object for training or analysis purposes.
For example, If an object was mistakenly annotated in parts (e.g., a person’s body and legs separately), merging allows you to consolidate them into one instance.
Use the Merge button to combine multiple annotation instances that share the same label and attribute values.
✅ When It’s Active
The button becomes active only when more than one annotation with the same label is selected.
How It Works
Select more than one annotation of the same label and attributes. Selecting multiple annotations will highlight them on the canvas.
Click the Merge button. It combines all selected annotation instances into a single instance.
Information
The merge targets the annotation with the lowest ID among the selected items.
After merging, the resulting annotation instance will be automatically selected.
🚫 Conflict Handling
If the selected annotations cannot be merged, a tooltip will appear when hovering over the Merge button, explaining the reason. Examples include:

Select more than 1 annotation to perform a merge.
Attribute values or Labels don’t match – can’t perform a merge.
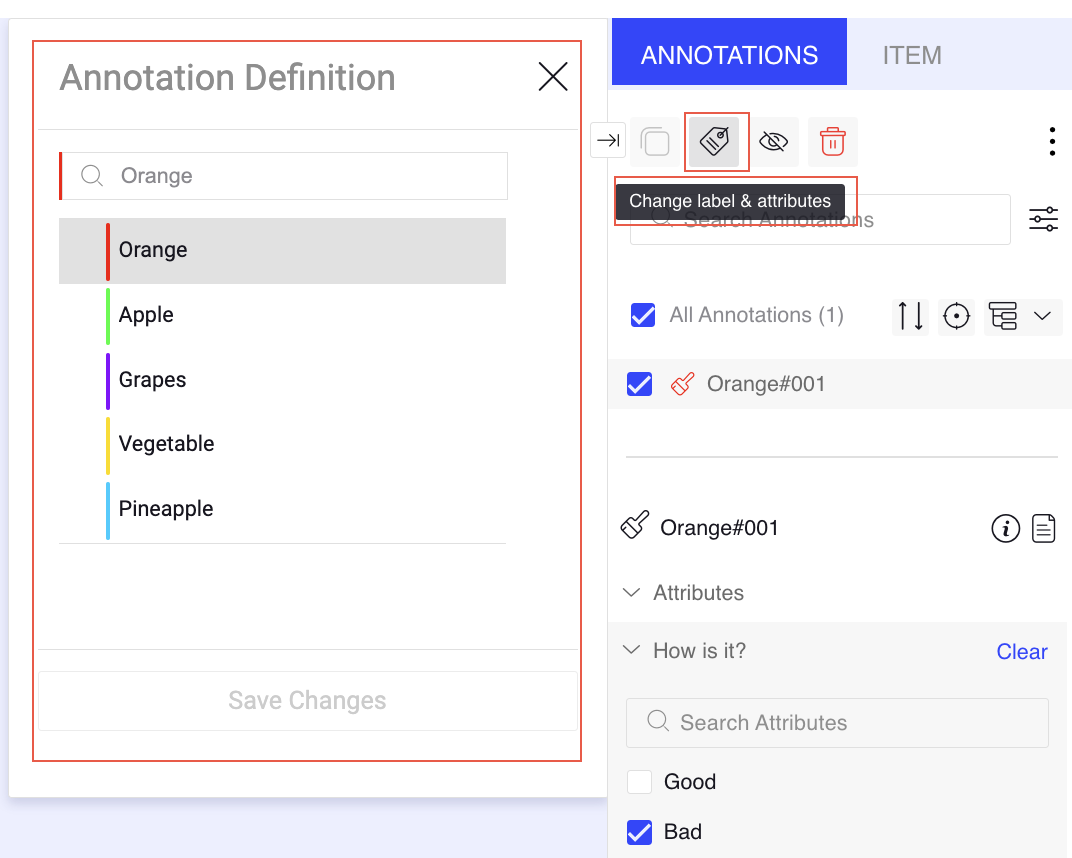
Change Labels
Recipe: Changing the label color
Changing a label color in the recipe will affect the whole annotations with same label.
In the Annotation list, select the annotation from the annotations list.
Click on either the Change label & attributes icon above the Search Annotations field. A pop-up window is displayed.
Make sure you are on the labels tab, and select the desired new label to switch to.
Click Save Changes.
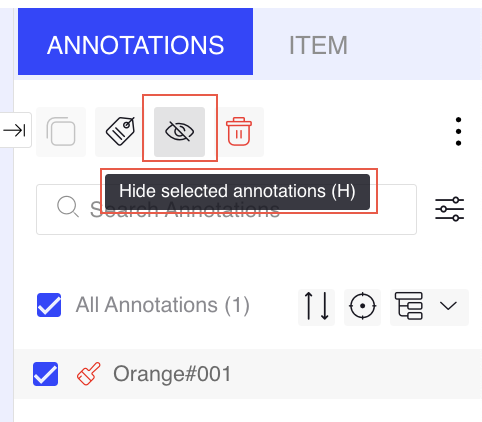
Hide/Reveal Annotations
In the Annotation list, select the annotation from the annotations list.
Click on the hide (eye) icon while hover over, or the eye icon above the Search Annotations field. An "Annotation is hidden. Show All" message is displayed.
Click Show All to reveal the annotation.
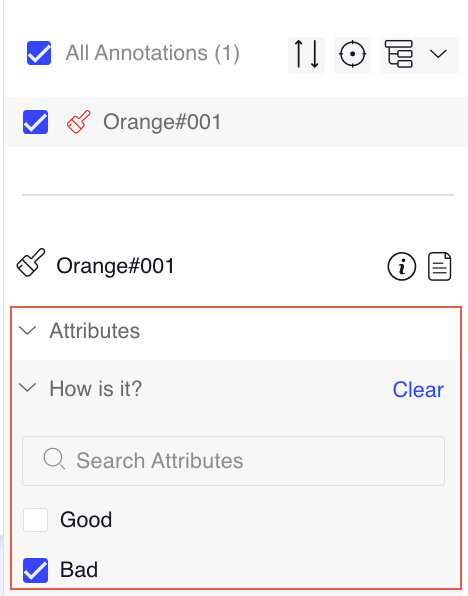
Set Attributes
In the Annotation list, select the annotation. The Attributes section is displayed below.
Set the attributes and click Save icon.
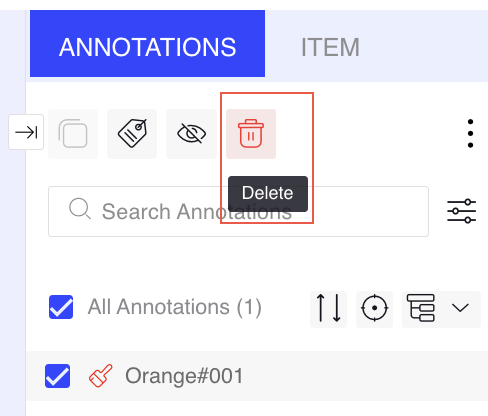
Delete Annotations
Select the relevant annotation(s) from the annotation list.
Click on the trash icon to delete the annotation.
Click Yes to confirm the deletion.
Item Tab
The Item tab displays information according to the type of the selected item.
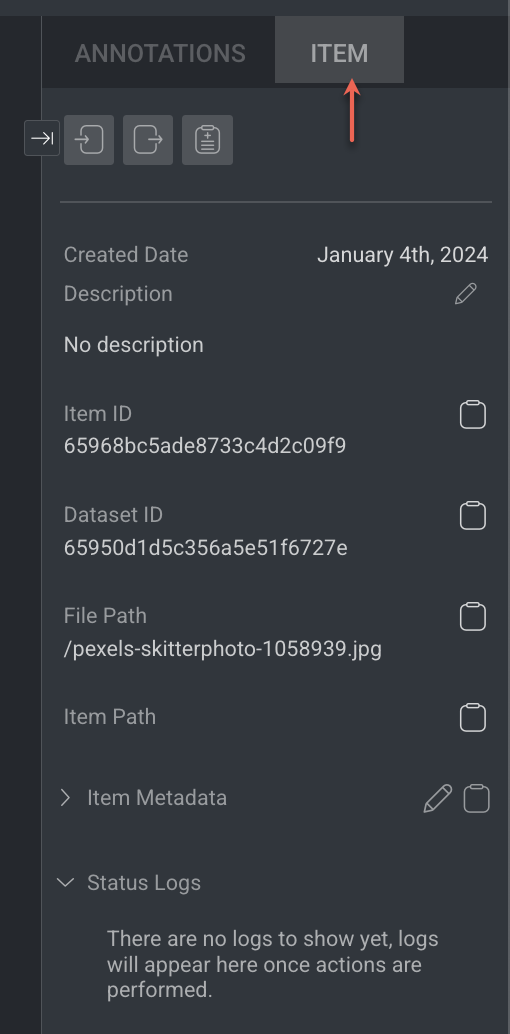
Learn more about the item and actions available.
Item Info & Controls (Top-Panel)
Item Info & Controls are available depends on the type of annotation studio. For the detailed information, refer to the following articles.

Keyboard Shortcuts
General Shortcuts
Action | Keyboard Shortcuts |
|---|---|
Save | S |
Delete | Delete |
Undo | Ctrl + Z |
Redo | Ctrl + Y |
Zoom In/Out | Scroll |
Pan | Ctrl + Drag |
Tool Selection | 1-6 |
Previous Item | < |
Next Item | > |
Add Item Description | T |
Mark Item as Done | Shift + F |
Mark Item as Discarded | Shift + G |
Hide/Show Selected Annotation | H |
Show Unmasked Pixels | Ctrl + M |
Go to annotation list | Shift + ; |
Navigate in annotation list | Up and Down arrows |
Select/deselect an annotation | Space |
Approve current mask, deselect annotation | Enter |
Annotation Tool Specific Shortcuts
Action | Keyboard Shortcuts |
|---|---|
Toggle Eraser | Shift + E |
Stroke Size | Alt + Scroll |
Tool Specific Shortcut Keys
Brush: Shortcut key is 1.
Bucket: Shortcut key is 2.
Polygon: Shortcut key is 3.
Eraser: Shortcut key is 4.
SAM Hover and click: Shortcut key is 5
SAM box: Shortcut key is 6.
Item's View Controls (Bottom-Panel)
The controls on the bottom-side panel display based on the annotation contexts and work controls.

Workflow Context
Assignment controls, including moving between items, displaying the item gallery, and the status buttons (Complete / Discard). It displays only while working on an annotation or QA task.
Browse between the assignment items using the Left and Right arrows
Open the Thumbnails' gallery viewer, and click a thumbnail to open that item
Save button - Clicking the button when it is enabled triggers saving changes to the DDOE platform, before the auto-saving feature takes care of that.
Status buttons - Complete and Discard.
View Controls
From left to right, work controls at the bottom panel deliver the following functionalities:
Zoom control - Small steps using (+) and (-) buttons.
Fit to screen.